
User Manual
Page 2
... safety instructions for best performance, and long life for your monitor iii Power Safety • The AC plug isolates this publication and to make changes from the type of power indicated on the back or top of the cabinet are not sure of the type of power available, consult your monitor from the AC supply. • The power supply cord serves as opening or removing covers may...
... safety instructions for best performance, and long life for your monitor iii Power Safety • The AC plug isolates this publication and to make changes from the type of power indicated on the back or top of the cabinet are not sure of the type of power available, consult your monitor from the AC supply. • The power supply cord serves as opening or removing covers may...
User Manual
Page 3
... Monitor ...6 Front View ...6 Back View (1) ...6 Back View (2): Locations of plugs & sockets 7 How to install your monitor hardware 8 How to install your monitor's software 10 Choosing the best picture resolution 37 How to choose the right Refresh Rate 39 How to set the Picture Optimization 41 How to adjust your Monitor ...42 A Look at the Control Panel ...42 Hot Key Mode ...42 Main Menu Mode ...43 Troubleshooting ...50 Frequently Asked Questions (FAQ 50 Need More Help? ...51 Supported operating modes ...52 Specifications...
... Monitor ...6 Front View ...6 Back View (1) ...6 Back View (2): Locations of plugs & sockets 7 How to install your monitor hardware 8 How to install your monitor's software 10 Choosing the best picture resolution 37 How to choose the right Refresh Rate 39 How to set the Picture Optimization 41 How to adjust your Monitor ...42 A Look at the Control Panel ...42 Hot Key Mode ...42 Main Menu Mode ...43 Troubleshooting ...50 Frequently Asked Questions (FAQ 50 Need More Help? ...51 Supported operating modes ...52 Specifications...

User Manual
Page 8
Connect D-Sub cable to install your LCD monitor. 1. Please follow these seven steps to the LCD monitor. 2. 3 How to your LCD monitor. (optional) 3. Connect DVI-D cable to install your monitor hardware Connect the power cord to your LCD monitor. 8 How to install your monitor hardware Make sure that the computer and monitor's power are both turned off.
Connect D-Sub cable to install your LCD monitor. 1. Please follow these seven steps to the LCD monitor. 2. 3 How to your LCD monitor. (optional) 3. Connect DVI-D cable to install your monitor hardware Connect the power cord to your LCD monitor. 8 How to install your monitor hardware Make sure that the computer and monitor's power are both turned off.

User Manual
Page 9
How to install your computer. 5. 4. Connect power cord to the signal connector of signal cable to an AC power socket. Connect the other end of your monitor hardware 9
How to install your computer. 5. 4. Connect power cord to the signal connector of signal cable to an AC power socket. Connect the other end of your monitor hardware 9
User Manual
Page 10
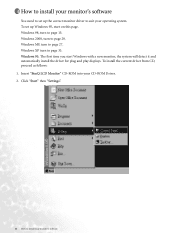
... "BenQ LCD Monitor" CD-ROM into your CD-ROM Driver. 2. To set up Windows 95, start Windows with a new monitor, the system will detect it and automatically install the driver for plug and play displays. Windows XP turn to suit your operating system. To install the current driver from CD, proceed as follows: 1. The first time you start on this page. Windows 98, turn to install your monitor's software 4 How to install your monitor's software You need...
... "BenQ LCD Monitor" CD-ROM into your CD-ROM Driver. 2. To set up Windows 95, start Windows with a new monitor, the system will detect it and automatically install the driver for plug and play displays. Windows XP turn to suit your operating system. To install the current driver from CD, proceed as follows: 1. The first time you start on this page. Windows 98, turn to install your monitor's software 4 How to install your monitor's software You need...

User Manual
Page 11
button in the Control Panel. 4. Double click the "Display" icon in the bottom right corner. Click the "Advanced..." From the "Display properties" window, select the "Settings" tab. How to install your monitor's software 11 3.
button in the Control Panel. 4. Double click the "Display" icon in the bottom right corner. Click the "Advanced..." From the "Display properties" window, select the "Settings" tab. How to install your monitor's software 11 3.

User Manual
Page 15
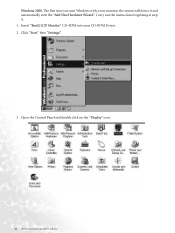
Open the control panel and double-click "Display" icon. 2. Click the "Advanced..." How to install your monitor's software 15 From the "Display Properties" window, select the "Settings" tab. To manually install or update the driver, perform the following steps: 1. button in the bottom right corner. Windows 98.
Open the control panel and double-click "Display" icon. 2. Click the "Advanced..." How to install your monitor's software 15 From the "Display Properties" window, select the "Settings" tab. To manually install or update the driver, perform the following steps: 1. button in the bottom right corner. Windows 98.

User Manual
Page 17
5. Select the "Browse" button. Now click the "Have Disk" button in a specific location, so you can select the driver you want." Select "Display a list of all drivers in the bottom right corner. Another window appears. How to install your monitor's software 17 and press "Next". 6.
5. Select the "Browse" button. Now click the "Have Disk" button in a specific location, so you can select the driver you want." Select "Display a list of all drivers in the bottom right corner. Another window appears. How to install your monitor's software 17 and press "Next". 6.
User Manual
Page 20
Click "Start" then "Settings". 3. Windows 2000. Insert "BenQ LCD Monitor" CD-ROM into your monitor's software Open the Control Panel and double click on the "Display" icon. 20 How to install your CD-ROM Driver. 2. Carry out the instructions beginning at step 4. 1. The first time you start Windows with a new monitor, the system will detect it and automatically start the "Add New Hardware Wizard".
Click "Start" then "Settings". 3. Windows 2000. Insert "BenQ LCD Monitor" CD-ROM into your monitor's software Open the Control Panel and double click on the "Display" icon. 20 How to install your CD-ROM Driver. 2. Carry out the instructions beginning at step 4. 1. The first time you start Windows with a new monitor, the system will detect it and automatically start the "Add New Hardware Wizard".

User Manual
Page 21
How to install your monitor's software 21 Click the "Advanced Properties" button in the bottom right corner. 4. From the "Display Properties" window, select the "Settings" tab.
How to install your monitor's software 21 Click the "Advanced Properties" button in the bottom right corner. 4. From the "Display Properties" window, select the "Settings" tab.
User Manual
Page 24
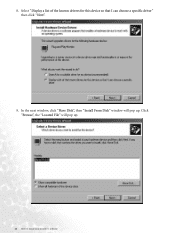
In the next window, click "Have Disk", then "Install From Disk" window will pop up . Click "Browse", the "Located File" will pop up . 24 How to install your monitor's software Select "Display a list of the known drivers for this device so that I can choose a specific driver" then click "Next". 9. 8.
In the next window, click "Have Disk", then "Install From Disk" window will pop up . Click "Browse", the "Located File" will pop up . 24 How to install your monitor's software Select "Display a list of the known drivers for this device so that I can choose a specific driver" then click "Next". 9. 8.
User Manual
Page 27
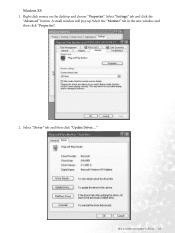
Click the "Monitor" tab and then click "Change". Click "Start", "Settings", "Control Panel" and then double-click "Display". 2. In the Display Properties window, click the "Settings" tab and click "Advanced...". 3. Windows ME. To manually install or update the driver, perform the following steps: 1. How to install your monitor's software 27
Click the "Monitor" tab and then click "Change". Click "Start", "Settings", "Control Panel" and then double-click "Display". 2. In the Display Properties window, click the "Settings" tab and click "Advanced...". 3. Windows ME. To manually install or update the driver, perform the following steps: 1. How to install your monitor's software 27
User Manual
Page 33
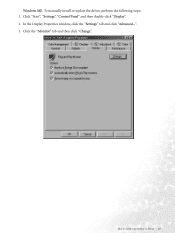
Right click mouse on the desktop and choose "Properties". A small window will pop up. Select "Driver" tab and then click "Update Driver..." How to install your monitor's software 33 Select "Settings" tab and click the "Advanced" button. Select the "Monitor" tab in the new window and then click "Properties". 2. Windows XP. 1.
Right click mouse on the desktop and choose "Properties". A small window will pop up. Select "Driver" tab and then click "Update Driver..." How to install your monitor's software 33 Select "Settings" tab and click the "Advanced" button. Select the "Monitor" tab in the new window and then click "Properties". 2. Windows XP. 1.
User Manual
Page 37
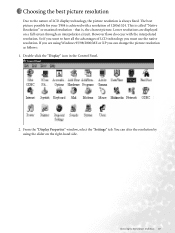
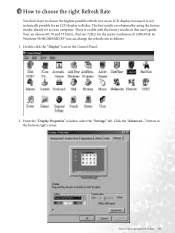
... the "Display Properties" window, select the "Settings" tab. You can change the picture resolution as follows: 1. Choosing the best picture resolution 37 that is called "Native Resolution" or maximal resolution - Double-click the "Display" icon in the Control Panel. 2. This is , the clearest picture. The best picture possible for your T904 is achieved with the interpolated resolution. So if you want to the nature of LCD technology you are displayed on the...
... the "Display Properties" window, select the "Settings" tab. You can change the picture resolution as follows: 1. Choosing the best picture resolution 37 that is called "Native Resolution" or maximal resolution - Double-click the "Display" icon in the Control Panel. 2. This is , the clearest picture. The best picture possible for your T904 is achieved with the interpolated resolution. So if you want to the nature of LCD technology you are displayed on the...
User Manual
Page 39
... an LCD display, because it is a table with the factory modes in this user's guide. There is not technically possible for the native resolution of 1280x1024. The best results are obtained by using the factory modes already set in the Control Panel. 2. Double click the "Display" icon in your computer. button in the bottom right corner. How to flicker. In Windows 95/98/2000/ME/XP you can change the refresh rate...
... an LCD display, because it is a table with the factory modes in this user's guide. There is not technically possible for the native resolution of 1280x1024. The best results are obtained by using the factory modes already set in the Control Panel. 2. Double click the "Display" icon in your computer. button in the bottom right corner. How to flicker. In Windows 95/98/2000/ME/XP you can change the refresh rate...
User Manual
Page 41
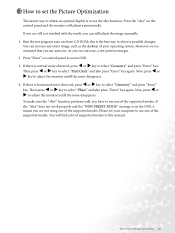
... vertical noise observed, press ! Then press ! Run the test program auto.exe from CD-ROM; Please set your operating system. 7 How to set the Picture Optimization The easiest way to obtain an optimal display is to use one of the supported modes. this manual. Press "Enter" on the control panel and the monitor will find a list of supported modes in this is the best way to observe possible changes...
... vertical noise observed, press ! Then press ! Run the test program auto.exe from CD-ROM; Please set your operating system. 7 How to set the Picture Optimization The easiest way to obtain an optimal display is to use one of the supported modes. this manual. Press "Enter" on the control panel and the monitor will find a list of supported modes in this is the best way to observe possible changes...

User Manual
Page 42
... enter Contrast menu, press ! "Enter" key: Activate OSD, enter sub menu, select items, confirm selection and hot key for Brightness and Contrast. 6. " (Right) key: For Right/Increase adjustment. The following descriptions are 6 keys for Brightness Level. "Exit" key: Back to adjust your Monitor A Look at the Control Panel There are the introduction of brightness and press "Exit" to exit OSD. Press ! "iKey" : Adjust vertical position, phase, horizontal position and pixel...
... enter Contrast menu, press ! "Enter" key: Activate OSD, enter sub menu, select items, confirm selection and hot key for Brightness and Contrast. 6. " (Right) key: For Right/Increase adjustment. The following descriptions are 6 keys for Brightness Level. "Exit" key: Back to adjust your Monitor A Look at the Control Panel There are the introduction of brightness and press "Exit" to exit OSD. Press ! "iKey" : Adjust vertical position, phase, horizontal position and pixel...

User Manual
Page 50
..., optimize the image by using a display mode that this monitor does not support, please change the setting to one of Range" on the display illuminated in extension cables. 9 Troubleshooting Frequently Asked Questions (FAQ) The image is blurred: Read the Installation/Application section, and then select the correct resolution, refresh rate and make adjustments based on the display illuminated in green? You can be seen: Is the prompt on these losses by working through the instructions...
..., optimize the image by using a display mode that this monitor does not support, please change the setting to one of Range" on the display illuminated in extension cables. 9 Troubleshooting Frequently Asked Questions (FAQ) The image is blurred: Read the Installation/Application section, and then select the correct resolution, refresh rate and make adjustments based on the display illuminated in green? You can be seen: Is the prompt on these losses by working through the instructions...
User Manual
Page 51
... orange, the power management mode is bent or broken off, please contact your place of purchase or e-mail us at all? Need More Help? Check the power supply mains socket, the external power supply and the mains switch. The image is distorted, flashes or flickers: Read the Installation//section and then select the correct resolution, refresh rate and make adjustments based on these instructions. If that does not help, check the signal cable connectors. Is the...
... orange, the power management mode is bent or broken off, please contact your place of purchase or e-mail us at all? Need More Help? Check the power supply mains socket, the external power supply and the mains switch. The image is distorted, flashes or flickers: Read the Installation//section and then select the correct resolution, refresh rate and make adjustments based on these instructions. If that does not help, check the signal cable connectors. Is the...
User Manual
Page 52
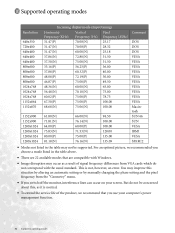
... the service life of signal frequency differences from the "Geometry" menu. • If you switch off the monitor, interference lines can occur on your computer's power management function. 52 Supported operating modes For an optimal picture, we recommend that are compatible with Windows. • Image disruption may not be concerned about this situation by altering an automatic setting or by manually changing the phase setting and the pixel frequency from VGA cards...
... the service life of signal frequency differences from the "Geometry" menu. • If you switch off the monitor, interference lines can occur on your computer's power management function. 52 Supported operating modes For an optimal picture, we recommend that are compatible with Windows. • Image disruption may not be concerned about this situation by altering an automatic setting or by manually changing the phase setting and the pixel frequency from VGA cards...


