
User Manual
Page 2
... monitor from time to make changes from the wall outlet before cleaning. If you to the contents hereof and specifically disclaims any of this product yourself, as a power disconnect device for any form or by BenQ Corporation. i Copyright Copyright © 2005 by any means, electronic, mechanical, magnetic, optical, chemical, manual or otherwise, without obligation of such revision or changes. Clean the LCD monitor...
... monitor from time to make changes from the wall outlet before cleaning. If you to the contents hereof and specifically disclaims any of this product yourself, as a power disconnect device for any form or by BenQ Corporation. i Copyright Copyright © 2005 by any means, electronic, mechanical, magnetic, optical, chemical, manual or otherwise, without obligation of such revision or changes. Clean the LCD monitor...

User Manual
Page 3
... to install on Windows 2000, ME, & 98 systems 14 How to complete the Windows Upgrade Device Driver Wizard 15 How to adjust the screen resolution 17 How to adjust the screen refresh rate 18 How to set the picture optimization 19 How to adjust your monitor 20 A Look at the Control Panel 20 Hot Key Mode ...20 Main Menu Mode ...21 Troubleshooting ...28 Frequently Asked Questions (FAQ 28 Need More Help? ...29 Supported operating modes 30 Specifications ...31...
... to install on Windows 2000, ME, & 98 systems 14 How to complete the Windows Upgrade Device Driver Wizard 15 How to adjust the screen resolution 17 How to adjust the screen refresh rate 18 How to set the picture optimization 19 How to adjust your monitor 20 A Look at the Control Panel 20 Hot Key Mode ...20 Main Menu Mode ...21 Troubleshooting ...28 Frequently Asked Questions (FAQ 28 Need More Help? ...29 Supported operating modes 30 Specifications ...31...
User Manual
Page 6
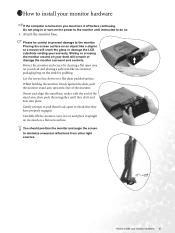
... scraping the monitor around on a flat clean padded surface. You should position the monitor and angle the screen to minimize unwanted reflections from other light sources. -5 ~+20 How to do so. 1. Do not plug-in or turn-on the power to the monitor until they have properly engaged. Orient and align the stand base socket with the end of the monitor. Placing the screen surface on...
... scraping the monitor around on a flat clean padded surface. You should position the monitor and angle the screen to minimize unwanted reflections from other light sources. -5 ~+20 How to do so. 1. Do not plug-in or turn-on the power to the monitor until they have properly engaged. Orient and align the stand base socket with the end of the monitor. Placing the screen surface on...

User Manual
Page 8
Plug the other end of the power cord into a power point and turn -on the front of the monitor. Turn on . How to install your BenQ monitor to and turn it on the computer too, and follow the instructions in Section 4: Getting the most from your monitor hardware 8 Connect-to install the monitor software. Turn on the monitor by pressing the power button on the power. 5.
Plug the other end of the power cord into a power point and turn -on the front of the monitor. Turn on . How to install your BenQ monitor to and turn it on the computer too, and follow the instructions in Section 4: Getting the most from your monitor hardware 8 Connect-to install the monitor software. Turn on the monitor by pressing the power button on the power. 5.
User Manual
Page 9
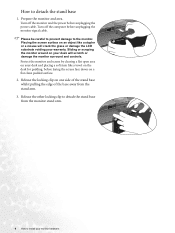
... other locking clip to install your warranty. How to the monitor. Sliding or scraping the monitor around on one side of the stand base whilst pulling the edge of the base away from the monitor stand arm. 9 How to detach the stand base from the stand arm. 3. Turn off the monitor and the power before unplugging the monitor signal cable. Protect the monitor and screen by clearing a flat open area on a flat clean padded...
... other locking clip to install your warranty. How to the monitor. Sliding or scraping the monitor around on one side of the stand base whilst pulling the edge of the base away from the monitor stand arm. 9 How to detach the stand base from the stand arm. 3. Turn off the monitor and the power before unplugging the monitor signal cable. Protect the monitor and screen by clearing a flat open area on a flat clean padded...

User Manual
Page 10
... to select a monitor model. Follow the wizard instructions until it asks you are upgrading an existing installation (which already has existing monitor driver software) with a newer monitor. In either case however, the very next time you turn on your computer (after connecting the monitor to your Windows computer, you must be logged on as an Administrator or as provided on your BenQ LCD Monitor will launch...
... to select a monitor model. Follow the wizard instructions until it asks you are upgrading an existing installation (which already has existing monitor driver software) with a newer monitor. In either case however, the very next time you turn on your computer (after connecting the monitor to your Windows computer, you must be logged on as an Administrator or as provided on your BenQ LCD Monitor will launch...

User Manual
Page 11
...) starts, it displays the option to Install Hardware Device drivers. 2. Check Search for a suitable driver for CD-ROM drives (uncheck all others) and click Next. 5. How to install the monitor on a new computer This instruction details the procedure for selecting and installing the BenQ LCD Monitor driver software on a new computer which has never had another monitor connected to it (and has monitor driver software installed), you are adding the BenQ LCD Monitor to...
...) starts, it displays the option to Install Hardware Device drivers. 2. Check Search for a suitable driver for CD-ROM drives (uncheck all others) and click Next. 5. How to install the monitor on a new computer This instruction details the procedure for selecting and installing the BenQ LCD Monitor driver software on a new computer which has never had another monitor connected to it (and has monitor driver software installed), you are adding the BenQ LCD Monitor to...

User Manual
Page 12
... Windows 98, Windows ME, Windows 2000, and Windows XP Operating System (OS). It is currently tested as at the time of writing, BenQ has done no testing of this driver on other versions of Windows, however, as compatible (and recommended only) for manually updating the existing monitor driver software on your Microsoft Windows computer. How to automate the task and guide you have connected, and letting Windows install...
... Windows 98, Windows ME, Windows 2000, and Windows XP Operating System (OS). It is currently tested as at the time of writing, BenQ has done no testing of this driver on other versions of Windows, however, as compatible (and recommended only) for manually updating the existing monitor driver software on your Microsoft Windows computer. How to automate the task and guide you have connected, and letting Windows install...

User Manual
Page 13
... install on the CD, and click the Next button. Please wait while the wizard searches for your CD drive may be selected for the best driver in step 6. The drive letter for your system. • Under the Classic view, click Start | Control Panel | Display. • Under the Category view, click Start | Control Panel | Appearance and Themes | Change the screen resolution. Select (single-click) the file named 'BenQ T705...
... install on the CD, and click the Next button. Please wait while the wizard searches for your CD drive may be selected for the best driver in step 6. The drive letter for your system. • Under the Classic view, click Start | Control Panel | Display. • Under the Category view, click Start | Control Panel | Appearance and Themes | Change the screen resolution. Select (single-click) the file named 'BenQ T705...

User Manual
Page 14
... Upgrade Device Driver Wizard will display. This will jump you are installing onto a computer which has a Windows XP (or later) version system. Open Display Properties. In Windows 2000, ME, & 98 versions, Control Panel is through the Windows desktop. Click Start | Settings | Control Panel | Display. See How to install on Windows ME or 98, click the Monitor tab and the Change button. In that case, see the instructions at How to complete the Windows Upgrade...
... Upgrade Device Driver Wizard will display. This will jump you are installing onto a computer which has a Windows XP (or later) version system. Open Display Properties. In Windows 2000, ME, & 98 versions, Control Panel is through the Windows desktop. Click Start | Settings | Control Panel | Display. See How to install on Windows ME or 98, click the Monitor tab and the Change button. In that case, see the instructions at How to complete the Windows Upgrade...

User Manual
Page 15
... BenQ LCD Monitor CD-ROM. Select (single-click) the file named BenQ T705, and click the Next button. 10. See How to adjust the screen refresh rate for the Windows Upgrade Device Driver Wizard. 2. This will contain something like D: or E: or F:). For instructions, see How to install on the computer you to . and click Next. 4. Click the Have Disk button. This will close the Advanced Display Properties window...
... BenQ LCD Monitor CD-ROM. Select (single-click) the file named BenQ T705, and click the Next button. 10. See How to adjust the screen refresh rate for the Windows Upgrade Device Driver Wizard. 2. This will contain something like D: or E: or F:). For instructions, see How to install on the computer you to . and click Next. 4. Click the Have Disk button. This will close the Advanced Display Properties window...

User Manual
Page 17
... can open Display Properties by right-clicking on a full screen through an interpolation circuit. This is achieved with the interpolated resolution. The best possible picture for your T705 is called "Native Resolution" or maximal resolution - that this other resolution, be aware that is always fixed. Use the slider in the 'Screen area' section to adjust the screen resolution Select the recommended resolution of 1280x1024. 1. Close the Display Properties window. 17...
... can open Display Properties by right-clicking on a full screen through an interpolation circuit. This is achieved with the interpolated resolution. The best possible picture for your T705 is called "Native Resolution" or maximal resolution - that this other resolution, be aware that is always fixed. Use the slider in the 'Screen area' section to adjust the screen resolution Select the recommended resolution of 1280x1024. 1. Close the Display Properties window. 17...

User Manual
Page 18
... native resolution of this User's Manual. Double click the Display icon in your computer. How to flicker. You can choose 60, 70 and 75 Hertz, (but not 72Hz) for an LCD display to adjust the screen refresh rate 18 From the Display Properties window, select the Settings tab and click the Advanced button. 3. The best results are obtained by using the factory modes already set in Control Panel. 2. Close the Display Properties window. 1611How to adjust...
... native resolution of this User's Manual. Double click the Display icon in your computer. How to flicker. You can choose 60, 70 and 75 Hertz, (but not 72Hz) for an LCD display to adjust the screen refresh rate 18 From the Display Properties window, select the Settings tab and click the Advanced button. 3. The best results are obtained by using the factory modes already set in Control Panel. 2. Close the Display Properties window. 1611How to adjust...

User Manual
Page 19
... set the picture optimization The easiest way to obtain an optimal display is on the monitor panel. If you wish to, you use to check for screen color, grayscale and line gradient display. 1. If the i key does not work properly and the NON PRESET MODE message is to use any other image, such as listed at the end of the supported modes. To assist you can always adjust the screen settings manually using...
... set the picture optimization The easiest way to obtain an optimal display is on the monitor panel. If you wish to, you use to check for screen color, grayscale and line gradient display. 1. If the i key does not work properly and the NON PRESET MODE message is to use any other image, such as listed at the end of the supported modes. To assist you can always adjust the screen settings manually using...
User Manual
Page 20
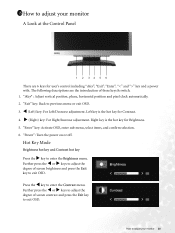
... W or X keys to adjust the degree of screen brightness and press the Exit key to exit OSD. "Exit" key: Back to enter the Brightness menu. "iKey" : Adjust vertical position, phase, horizontal position and pixel clock automatically. 2. Left key is the hot key for Contrast. 4. 1811How to adjust your monitor 20 "Enter" key: Activate OSD, enter sub menu, select items, and confirm selection. 6. "Power": Turn the power on or off. Further...
... W or X keys to adjust the degree of screen brightness and press the Exit key to exit OSD. "Exit" key: Back to enter the Brightness menu. "iKey" : Adjust vertical position, phase, horizontal position and pixel clock automatically. 2. Left key is the hot key for Contrast. 4. 1811How to adjust your monitor 20 "Enter" key: Activate OSD, enter sub menu, select items, and confirm selection. 6. "Power": Turn the power on or off. Further...
User Manual
Page 23
... Red, Green and Blue primary colors can tailor the image color tint to adjust your liking. The default start setting is the factory default color. If you reduce the Blue level the image will gradually take on the color tint of the image. e.g. allows video and still photographs to be altered to change the color tint of the image. To reset the defaults, see Recall sub menu for details. 23 How to suit your monitor...
... Red, Green and Blue primary colors can tailor the image color tint to adjust your liking. The default start setting is the factory default color. If you reduce the Blue level the image will gradually take on the color tint of the image. e.g. allows video and still photographs to be altered to change the color tint of the image. To reset the defaults, see Recall sub menu for details. 23 How to suit your monitor...

User Manual
Page 27
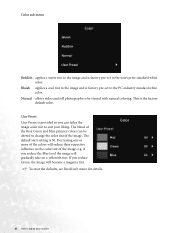
Display Information: Select Display Information to previous menu. Press the Exit key to return to display the current monitor property settings. Press the Exit key to return to previous menu. 27 How to adjust the degree of Sharpness. Miscellaneous sub menu Sharpness: Press the W or X keys to adjust your monitor
Display Information: Select Display Information to previous menu. Press the Exit key to return to display the current monitor property settings. Press the Exit key to return to previous menu. 27 How to adjust the degree of Sharpness. Miscellaneous sub menu Sharpness: Press the W or X keys to adjust your monitor

User Manual
Page 28
... green? Remove the extension cable for blurring to occur due to get necessary support. No image can minimize these instructions. On the monitor, press "Enter" key and press W or X key to move the mouse. Press W or X key to factory settings. Now check the signal cable connectors. If the LED is active. Press any button on the display not illuminated at resolutions lower than the native (maximum) resolution? Check the power supply mains...
... green? Remove the extension cable for blurring to occur due to get necessary support. No image can minimize these instructions. On the monitor, press "Enter" key and press W or X key to move the mouse. Press W or X key to factory settings. Now check the signal cable connectors. If the LED is active. Press any button on the display not illuminated at resolutions lower than the native (maximum) resolution? Check the power supply mains...

User Manual
Page 29
Need More Help? The image is displaced in one direction: Read the How to adjust the screen resolution section and then select the correct resolution, refresh rate and make adjustments based on these instructions. If your problems remain after checking this manual, please contact your place of purchase or e-mail us at: Support@BenQ.com 29 Troubleshooting The image is distorted, flashes or flickers: Read the How to adjust the screen resolution section and then select the correct resolution, refresh rate and make adjustments based on these instructions.
Need More Help? The image is displaced in one direction: Read the How to adjust the screen resolution section and then select the correct resolution, refresh rate and make adjustments based on these instructions. If your problems remain after checking this manual, please contact your place of purchase or e-mail us at: Support@BenQ.com 29 Troubleshooting The image is distorted, flashes or flickers: Read the How to adjust the screen resolution section and then select the correct resolution, refresh rate and make adjustments based on these instructions.

User Manual
Page 30
.... • To extend the service life of signal frequency differences from VGA cards which do not be supported. For an optimal picture, we recommend that you use your screen. 11011Supported operating modes Resolution 640x350 720x400 640x480 640x480 640x480 640x480 800x600 800x600 800x600 800x600 832x624 1024x768 1024x768 1024x768 1152x864 1152x870 1152x900 1152x900 1280x1024 1280x1024 1280x1024 1280x1024 Incoming display mode (Input timing) Horizontal Vertical Pixel Frequency (KHz) Frequency (Hz) Frequency (MHz) 31.47...
.... • To extend the service life of signal frequency differences from VGA cards which do not be supported. For an optimal picture, we recommend that you use your screen. 11011Supported operating modes Resolution 640x350 720x400 640x480 640x480 640x480 640x480 800x600 800x600 800x600 800x600 832x624 1024x768 1024x768 1024x768 1152x864 1152x870 1152x900 1152x900 1280x1024 1280x1024 1280x1024 1280x1024 Incoming display mode (Input timing) Horizontal Vertical Pixel Frequency (KHz) Frequency (Hz) Frequency (MHz) 31.47...


