
User Manual
Page 1
... your guide through the control menus and operation. Do not operate lamps beyond rated life could cause damage to comply with a home theater viewing experience. BenQ PE8700 User's Manual BenQ PE8700 Video Projector User's Manual Thank you with the limits for replacement. It has been designed to constitute a risk of electric shock. This symbol is intended to alert the user to provide reasonable protection against harmful interference in a residential installation. 1. This...
... your guide through the control menus and operation. Do not operate lamps beyond rated life could cause damage to comply with a home theater viewing experience. BenQ PE8700 User's Manual BenQ PE8700 Video Projector User's Manual Thank you with the limits for replacement. It has been designed to constitute a risk of electric shock. This symbol is intended to alert the user to provide reasonable protection against harmful interference in a residential installation. 1. This...

User Manual
Page 2
... RGB 13 Connecting a Computer 14 4.Basic Operation 15 Turning the Power on 15 Zoom/Focusing 15 Selecting an Input Source 16 Selecting an ASPECT Ratio 16 Selecting the Video Memory 17 Setting Menu 17 PIP (Picture-In-Picture)/POP (Picture-On-Picture) functions 18 Turning the Projector Off 18 5.Menus 19 Using the Menus 19 PICTURE Menu 19 DISPLAY Menu 20 ENVIRONMENT Menu 22 INSTALLATION Menu 22 6.Additional Information 24 Warning Message 24 Replace the Lamp 24 Troubleshooting 25 Specifications 26...
... RGB 13 Connecting a Computer 14 4.Basic Operation 15 Turning the Power on 15 Zoom/Focusing 15 Selecting an Input Source 16 Selecting an ASPECT Ratio 16 Selecting the Video Memory 17 Setting Menu 17 PIP (Picture-In-Picture)/POP (Picture-On-Picture) functions 18 Turning the Projector Off 18 5.Menus 19 Using the Menus 19 PICTURE Menu 19 DISPLAY Menu 20 ENVIRONMENT Menu 22 INSTALLATION Menu 22 6.Additional Information 24 Warning Message 24 Replace the Lamp 24 Troubleshooting 25 Specifications 26...
User Manual
Page 3
... of signal degradation from entering the engine, which could cause annoying 'spots' in the video memories. 1. Overview BenQ PE8700 User's Manual Features ■ Superior Picture Quality This single-DMD DLP™ projector provides reliable picture quality with a High-Quality Lens Design The optical engine uses a high-quality lens for the most artifact-free images possible. ■ PIP/POP function Picture-in-picture and picture-on-picture functions allow you to display two inputs on the screen...
... of signal degradation from entering the engine, which could cause annoying 'spots' in the video memories. 1. Overview BenQ PE8700 User's Manual Features ■ Superior Picture Quality This single-DMD DLP™ projector provides reliable picture quality with a High-Quality Lens Design The optical engine uses a high-quality lens for the most artifact-free images possible. ■ PIP/POP function Picture-in-picture and picture-on-picture functions allow you to display two inputs on the screen...

User Manual
Page 4
... a ceiling mount rack. 4 1. Front Lamp Cover Remove this cover when replacing the lamp. 2. Connector Panel For more details, see "Connector Panel" on or off. Ventilation Holes (intake) 6. Focus Ring and Zoom Ring Adjusts the focus and zoom of force. 1. Front Adjusters Adjusts the height or projection angle. 8. Ventilation Holes (exhaust) 5. Control Panel Show lamp status and whether the projector is on page 6. 2. Projection Lens 3. Rear Adjusters Adjusts the height or projection angle. 7. Front IR Sensor 4. Overview BenQ PE8700 User's Manual Location ❚...
... a ceiling mount rack. 4 1. Front Lamp Cover Remove this cover when replacing the lamp. 2. Connector Panel For more details, see "Connector Panel" on or off. Ventilation Holes (intake) 6. Focus Ring and Zoom Ring Adjusts the focus and zoom of force. 1. Front Adjusters Adjusts the height or projection angle. 8. Ventilation Holes (exhaust) 5. Control Panel Show lamp status and whether the projector is on page 6. 2. Projection Lens 3. Rear Adjusters Adjusts the height or projection angle. 7. Front IR Sensor 4. Overview BenQ PE8700 User's Manual Location ❚...

User Manual
Page 5
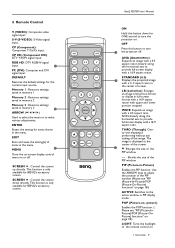
... the menu. Once in the menu. 7. EXIT Exits and saves the setting(s) of lamp. ■ Lit red when the lamp has developed a problem. Zoom Ring Adjusts the size of the projected images. 1. ENTER 9. Overview 5 Please contact your BenQ dealer for ONE second to make the image smaller. 11. Controls and Functions ❚ Control Panel BenQ PE8700 User's Manual 1. Indicates whether the unit is on or off . Indicates the status of items in the standby mode, you...
... the menu. Once in the menu. 7. EXIT Exits and saves the setting(s) of lamp. ■ Lit red when the lamp has developed a problem. Zoom Ring Adjusts the size of the projected images. 1. ENTER 9. Overview 5 Please contact your BenQ dealer for ONE second to make the image smaller. 11. Controls and Functions ❚ Control Panel BenQ PE8700 User's Manual 1. Indicates whether the unit is on or off . Indicates the status of items in the standby mode, you...
User Manual
Page 7
... full screen display with a 16:9 aspect ration. The image is only available for items shown in PIP display mode. picture) Enables the POP function. ( Please see "PIP (Picture-In-Picture)/POP (Picture-On-Picture) functions" on page 18.) ACTIVE: Switches to turn the projector on - ENTER Enters the setting for BENQ's accessory screen. SCREEN c : Control the screen up directly. BenQ PE8700 User's Manual ON Hold this button to the active window in the menu. CP HD (Component HD...
... full screen display with a 16:9 aspect ration. The image is only available for items shown in PIP display mode. picture) Enables the POP function. ( Please see "PIP (Picture-In-Picture)/POP (Picture-On-Picture) functions" on page 18.) ACTIVE: Switches to turn the projector on - ENTER Enters the setting for BENQ's accessory screen. SCREEN c : Control the screen up directly. BenQ PE8700 User's Manual ON Hold this button to the active window in the menu. CP HD (Component HD...
User Manual
Page 8
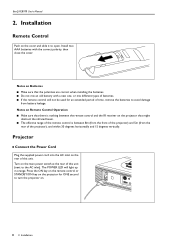
...; If the remote control will light up in orange. Projector ❚ Connect the Power Cord Plug the supplied power cord into the AC inlet on . 8 2. Press the ON key on the remote control or STANDBY/ON key on the projector that the polarities are correct when installing the batteries. ■ Do not mix an old battery with the correct polarity, then close the cover. Installation Notes on Remote Control Operation ■...
...; If the remote control will light up in orange. Projector ❚ Connect the Power Cord Plug the supplied power cord into the AC inlet on . 8 2. Press the ON key on the remote control or STANDBY/ON key on the projector that the polarities are correct when installing the batteries. ■ Do not mix an old battery with the correct polarity, then close the cover. Installation Notes on Remote Control Operation ■...
User Manual
Page 9
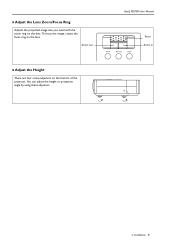
BenQ PE8700 User's Manual Focus Zoom in 2. You can adjust the height or projection angle by using these adjusters. ❚ Adjust the Lens Zoom/Focus Ring Adjusts the projected image size you need with the zoom ring on the lens. Installation 9 To focus the image, rotate the focus ring on the lens. Zoom out ❚ Adjust the Height There are four screw adjusters on the bottom of the projector.
BenQ PE8700 User's Manual Focus Zoom in 2. You can adjust the height or projection angle by using these adjusters. ❚ Adjust the Lens Zoom/Focus Ring Adjusts the projected image size you need with the zoom ring on the lens. Installation 9 To focus the image, rotate the focus ring on the lens. Zoom out ❚ Adjust the Height There are four screw adjusters on the bottom of the projector.

User Manual
Page 10
... and Maximum Distance. (Minimum Distance = 1.36 x Screen Width, Maximum Distance = 1.66 x Screen Width) 2. Fine tune the projected image size using ceiling mounting rack with a suitable length (Roof - Height 1 - Installation BenQ PE8700 User's Manual Ceiling Installation Distance Roof - Offst -Height 2 Offet Upper edge of the screen Ceiling Height 2 Height 1 Center of the screen's Height. 4. Mount this unit using the zoom and focus rings on the exact height you desired from the chart below, installing the projector at a distance from the...
... and Maximum Distance. (Minimum Distance = 1.36 x Screen Width, Maximum Distance = 1.66 x Screen Width) 2. Fine tune the projected image size using ceiling mounting rack with a suitable length (Roof - Height 1 - Installation BenQ PE8700 User's Manual Ceiling Installation Distance Roof - Offst -Height 2 Offet Upper edge of the screen Ceiling Height 2 Height 1 Center of the screen's Height. 4. Mount this unit using the zoom and focus rings on the exact height you desired from the chart below, installing the projector at a distance from the...

User Manual
Page 11
...-tune the projection image size with the zoom and focus rings on a table with a suitable height (Height - Decide on the exact height you desire from the screen between the projection lens and the screen. ) Height : The vertical height of the screen's Height. 4. Offet Floor Distance : Projection distance (the distance between the Minimum and Maximum Distance. (Minimum Distance = 1.36 x Screen Width, Maximum Distance = 1.66 x Screen Width) 2. Floor Installation Wall BenQ PE8700 User's Manual Offet Height...
...-tune the projection image size with the zoom and focus rings on a table with a suitable height (Height - Decide on the exact height you desire from the screen between the projection lens and the screen. ) Height : The vertical height of the screen's Height. 4. Offet Floor Distance : Projection distance (the distance between the Minimum and Maximum Distance. (Minimum Distance = 1.36 x Screen Width, Maximum Distance = 1.66 x Screen Width) 2. Floor Installation Wall BenQ PE8700 User's Manual Offet Height...

User Manual
Page 12
Connect all equipment before making any connections. 2. BenQ PE8700 User's Manual 3. Connecting Video Inputs ❚ Video/ S-Video/ Component (Interlaced Video) DVD Player Speaker x 2 12 3. This projector is not equipped with speakers. Connecting Ensure the cables are firmly inserted. 4. Use the correct signal cables for each source. 3. Turn off all audio signals to : 1. Connecting When connecting, make sure to external speakers.
Connect all equipment before making any connections. 2. BenQ PE8700 User's Manual 3. Connecting Video Inputs ❚ Video/ S-Video/ Component (Interlaced Video) DVD Player Speaker x 2 12 3. This projector is not equipped with speakers. Connecting Ensure the cables are firmly inserted. 4. Use the correct signal cables for each source. 3. Turn off all audio signals to : 1. Connecting When connecting, make sure to external speakers.

User Manual
Page 14
BenQ PE8700 User's Manual Connecting a Computer PC or Notebook The projector only supports resolutions up to XGA. If the input signal is greater than XGA, the projector will display a warning message. 14 3. Connecting
BenQ PE8700 User's Manual Connecting a Computer PC or Notebook The projector only supports resolutions up to XGA. If the input signal is greater than XGA, the projector will display a warning message. 14 3. Connecting

User Manual
Page 15
... input signal. Zoom/Focusing ■ Adjust the projected image size you change the input signal. 4. Basic Operation Turning the Power on -screen until a valid signal is in 4. To focus the image, rotate the focus ring on the lens. The POWER LED will be displayed on the screen. This message will remain on ■ The Power LED shines orange when power is applied and the power switch is detected. ■ If the horizontal frequency of the input signal exceeds the range of the projector (XGA), a message reading " Not supportive timing...
... input signal. Zoom/Focusing ■ Adjust the projected image size you change the input signal. 4. Basic Operation Turning the Power on -screen until a valid signal is in 4. To focus the image, rotate the focus ring on the lens. The POWER LED will be displayed on the screen. This message will remain on ■ The Power LED shines orange when power is applied and the power switch is detected. ■ If the horizontal frequency of the input signal exceeds the range of the projector (XGA), a message reading " Not supportive timing...
User Manual
Page 17
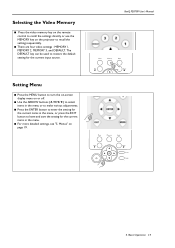
... the remote control to recall the settings directly or use the MEMORY key on page 19. The DEFAULT key can be used to restore the default setting for the current items in the menu. ■ For more detailed settings, see "5. BenQ PE8700 User's Manual 4. Menus" on the projector to leave and save the setting for the current input source. Basic Operation 17 Setting Menu ■ Press the MENU button to turn the on-screen display menu on...
... the remote control to recall the settings directly or use the MEMORY key on page 19. The DEFAULT key can be used to restore the default setting for the current items in the menu. ■ For more detailed settings, see "5. BenQ PE8700 User's Manual 4. Menus" on the projector to leave and save the setting for the current input source. Basic Operation 17 Setting Menu ■ Press the MENU button to turn the on-screen display menu on...

User Manual
Page 18
... projector to turn the projector off. ■ After turning the projector off, the POWER LED will flash green and the fans will run for one input from Video Group within one minute to cool the lamp. The projector will be lit a steady orange once the cooling process has finished. 18 4. The POWER LED will not respond to any commands until cooling process is complete. BenQ PE8700 User's Manual PIP (Picture-In-Picture)/POP (Picture-On-Picture...
... projector to turn the projector off. ■ After turning the projector off, the POWER LED will flash green and the fans will run for one input from Video Group within one minute to cool the lamp. The projector will be lit a steady orange once the cooling process has finished. 18 4. The POWER LED will not respond to any commands until cooling process is complete. BenQ PE8700 User's Manual PIP (Picture-In-Picture)/POP (Picture-On-Picture...
User Manual
Page 19
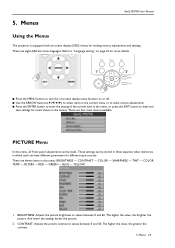
PICTURE Menu In this menu: BRIGHTNESS - TINT - YELLOW. 1. BRIGHTNESS: Adjusts the picture brightness to values between 0 and 30. These settings can be stored in three separate video memories, in this menu, all 'front panel' adjustments can have different parameters for making various adjustments and settings. COLOR - COLOR TEMP. - There are four main menus available. FILTERS - There are eight different menu languages. SHARPNESS - Menus BenQ PE8700 User's Manual Using the Menus The projector is equipped with...
PICTURE Menu In this menu: BRIGHTNESS - TINT - YELLOW. 1. BRIGHTNESS: Adjusts the picture brightness to values between 0 and 30. These settings can be stored in three separate video memories, in this menu, all 'front panel' adjustments can have different parameters for making various adjustments and settings. COLOR - COLOR TEMP. - There are four main menus available. FILTERS - There are eight different menu languages. SHARPNESS - Menus BenQ PE8700 User's Manual Using the Menus The projector is equipped with...
User Manual
Page 20
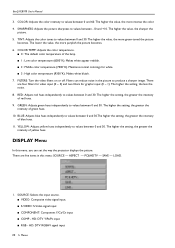
... value, the more green-toned the picture becomes. COLOR TEMP.: Adjusts the color temperature. ■ 0 : The default color temperature of red hues. 9. The higher the setting, the greater the intensity of the lamp. ■ 1 : Low color temperature (6500°K). The higher the setting, the greater the intensity of yellow hues. SOURCE: Selects the input source. ■ VIDEO: Composite video signal input. ■ S-VIDEO: S-Video signal input ■ COMPONENT: Component Y/CB/CR input ■ COMP - SHARPNESS: Adjusts the picture sharpness to values...
... value, the more green-toned the picture becomes. COLOR TEMP.: Adjusts the color temperature. ■ 0 : The default color temperature of red hues. 9. The higher the setting, the greater the intensity of the lamp. ■ 1 : Low color temperature (6500°K). The higher the setting, the greater the intensity of yellow hues. SOURCE: Selects the input source. ■ VIDEO: Composite video signal input. ■ S-VIDEO: S-Video signal input ■ COMPONENT: Component Y/CB/CR input ■ COMP - SHARPNESS: Adjusts the picture sharpness to values...

User Manual
Page 22
... installation. 22 5. AUTO OFF - This should only be displayed on-screen; LAMP HOURS: This displays the number of hours the lamp has been used. (The lifetime of the lamp is displayed at the center of three video memories. POS.: Adjusts the horizontal position of the current input source. 2. LAMP TIMER - There are three video memories in the Picture menu. 5. LAMP HOURS. 1. LAMP TIMER: Resets the lamp timer. INSTALLATION Menu This menu contains items necessary for a new lamp. The timer can be set to -one of the screen. BenQ PE8700 User's Manual...
... installation. 22 5. AUTO OFF - This should only be displayed on-screen; LAMP HOURS: This displays the number of hours the lamp has been used. (The lifetime of the lamp is displayed at the center of three video memories. POS.: Adjusts the horizontal position of the current input source. 2. LAMP TIMER - There are three video memories in the Picture menu. 5. LAMP HOURS. 1. LAMP TIMER: Resets the lamp timer. INSTALLATION Menu This menu contains items necessary for a new lamp. The timer can be set to -one of the screen. BenQ PE8700 User's Manual...

User Manual
Page 24
... the POWER LED will flash orange and green sequentially if the lamp has been in use for 30 seconds each time the projector is expired ! Pull out the lamp module horizontally. 9. The number of time. ■ The message "Lamplife is turned on the lamp shield. 4. " will be updated. ■ The message " Please change the lamp ! Lamp will be displayed on the screen for more than 2,000 hours. ■ The projector will turn off the lamp shield. 7. Remove...
... the POWER LED will flash orange and green sequentially if the lamp has been in use for 30 seconds each time the projector is expired ! Pull out the lamp module horizontally. 9. The number of time. ■ The message "Lamplife is turned on the lamp shield. 4. " will be updated. ■ The message " Please change the lamp ! Lamp will be displayed on the screen for more than 2,000 hours. ■ The projector will turn off the lamp shield. 7. Remove...
User Manual
Page 25
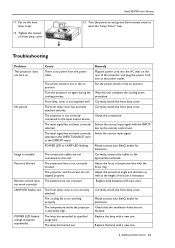
.... POWER LED flashed orange and green sequentially. Check the connection. Please contact your BenQ dealer for assistance. Adjust the projection angle and direction as well as the height of the projector, and plug the power cord into Environment menu to the power outlet. Put on and go into to reset the "Lamp Timer" item. BenQ PE8700 User's Manual 13. Turn the power on the front lamp cover. 12. Troubleshooting Problem This projector does not turn on position. No picture. Front lamp cover is...
.... POWER LED flashed orange and green sequentially. Check the connection. Please contact your BenQ dealer for assistance. Adjust the projection angle and direction as well as the height of the projector, and plug the power cord into Environment menu to the power outlet. Put on and go into to reset the "Lamp Timer" item. BenQ PE8700 User's Manual 13. Turn the power on the front lamp cover. 12. Troubleshooting Problem This projector does not turn on position. No picture. Front lamp cover is...


