
User Manual
Page 3
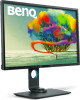
... place the monitor face down on the panel surface may occur. 3 Power Safety Please follow these safety instructions for best performance, and long life for pluggable equipment. Replace the unit if it is provided) RISK OF EXPLOSION IF BATTERY IS REPLACED BY AN INCORRECT TYPE. If you are no service parts inside a carrying case. • Connect the power adapter to a proper power source. •...
... place the monitor face down on the panel surface may occur. 3 Power Safety Please follow these safety instructions for best performance, and long life for pluggable equipment. Replace the unit if it is provided) RISK OF EXPLOSION IF BATTERY IS REPLACED BY AN INCORRECT TYPE. If you are no service parts inside a carrying case. • Connect the power adapter to a proper power source. •...
User Manual
Page 4
.... • (For models that support wall or ceiling mounting) • Install your monitor and monitor mounting kit on a wall with a lint-free, non-abrasive cloth. Avoid using any of product use. • Reduce your eye strain by focusing on objects far way. • Frequent blinking and eye exercise help keep your eyes from your eyes. • Looking at the screen for ventilation. Your monitor should be 50...
.... • (For models that support wall or ceiling mounting) • Install your monitor and monitor mounting kit on a wall with a lint-free, non-abrasive cloth. Avoid using any of product use. • Reduce your eye strain by focusing on objects far way. • Frequent blinking and eye exercise help keep your eyes from your eyes. • Looking at the screen for ventilation. Your monitor should be 50...
User Manual
Page 5
... Copyright ...2 Getting started ...7 Getting to know your monitor 9 Front view ...9 Back view ...9 Connection ...11 How to assemble your monitor hardware 13 How to detach the stand and the base 19 Adjusting the monitor height ...21 Rotating the monitor ...22 Viewing angle adjustment ...23 Using the monitor wall mounting kit 24 Getting the most from your BenQ monitor 25 How to install the monitor on a new computer 26 How to upgrade the monitor on an existing...
... Copyright ...2 Getting started ...7 Getting to know your monitor 9 Front view ...9 Back view ...9 Connection ...11 How to assemble your monitor hardware 13 How to detach the stand and the base 19 Adjusting the monitor height ...21 Rotating the monitor ...22 Viewing angle adjustment ...23 Using the monitor wall mounting kit 24 Getting the most from your BenQ monitor 25 How to install the monitor on a new computer 26 How to upgrade the monitor on an existing...

User Manual
Page 9
Light sensor / Eco sensor 2. Power button 1 Back view 45 7 9 68 10 11 23 12 4. USB 3.0 ports (downstream; USB 3.0 port (upstream 2; Audio Line In 9. connecting to the PC) 8. connecting to USB devices) 6. Cable management hole 10. USB 3.0 port (upstream 1; Kensington lock slot Getting to know your monitor 9 Control buttons 3. connecting to the PC) 7. Getting to know your monitor Front view 1. Hotkey Puck socket 5. AC power input jack 11. AC power switch 12.
Light sensor / Eco sensor 2. Power button 1 Back view 45 7 9 68 10 11 23 12 4. USB 3.0 ports (downstream; USB 3.0 port (upstream 2; Audio Line In 9. connecting to the PC) 8. connecting to USB devices) 6. Cable management hole 10. USB 3.0 port (upstream 1; Kensington lock slot Getting to know your monitor 9 Control buttons 3. connecting to the PC) 7. Getting to know your monitor Front view 1. Hotkey Puck socket 5. AC power input jack 11. AC power switch 12.

User Manual
Page 13
... display modes" section on the purchased model. • The supported timing may vary depending on the link "Adjusting the Screen Resolution" for more information. 1. Please be careful to prevent damage to the monitor base as illustrated. How to assemble your monitor hardware • If the computer is turned on the power to the monitor until you must turn -on you cannot go further. Do not plug...
... display modes" section on the purchased model. • The supported timing may vary depending on the link "Adjusting the Screen Resolution" for more information. 1. Please be careful to prevent damage to the monitor base as illustrated. How to assemble your monitor hardware • If the computer is turned on the power to the monitor until you must turn -on you cannot go further. Do not plug...

User Manual
Page 22
... Software (downloaded from the popup menu. Alternatively, right-click the desktop and select Screen resolution from www.BenQ.com), and check Auto Pivot to set the display to rotate with a portrait viewing orientation, the display has to be vertically extended to allow to rotate from landscape to the maximum extended position. Before rotating the monitor with the monitor automatically. Fully extend the monitor and tilt it to portrait mode...
... Software (downloaded from the popup menu. Alternatively, right-click the desktop and select Screen resolution from www.BenQ.com), and check Auto Pivot to set the display to rotate with a portrait viewing orientation, the display has to be vertically extended to allow to rotate from landscape to the maximum extended position. Before rotating the monitor with the monitor automatically. Fully extend the monitor and tilt it to portrait mode...
User Manual
Page 24
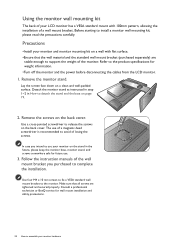
... or BenQ service for wall mount installation and safety precautions. 24 How to assemble your monitor and monitor mounting kit on the stand in How to detach the stand and the base on the back cover. Lay the screen face down on the back cover. Use a cross-pointed screwdriver to release the screws on a clean and well-padded surface. Using the monitor wall mounting kit The back of your LCD monitor has a VESA standard mount with flat...
... or BenQ service for wall mount installation and safety precautions. 24 How to assemble your monitor and monitor mounting kit on the stand in How to detach the stand and the base on the back cover. Lay the screen face down on the back cover. Use a cross-pointed screwdriver to release the screws on a clean and well-padded surface. Using the monitor wall mounting kit The back of your LCD monitor has a VESA standard mount with flat...
User Manual
Page 25
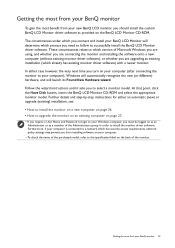
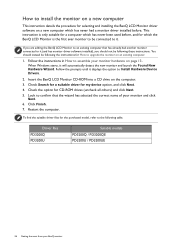
... install the BenQ LCD Monitor driver software. Furthermore, if your computer is connected to the specification label on the back of Microsoft Windows you are using, and whether you are upgrading an existing installation (which already has existing monitor driver software) with a newer monitor. At that point, click the Have Disk button, insert the BenQ LCD Monitor CD-ROM and select the appropriate monitor model. Getting the most benefit from your new BenQ LCD monitor...
... install the BenQ LCD Monitor driver software. Furthermore, if your computer is connected to the specification label on the back of Microsoft Windows you are using, and whether you are upgrading an existing installation (which already has existing monitor driver software) with a newer monitor. At that point, click the Have Disk button, insert the BenQ LCD Monitor CD-ROM and select the appropriate monitor model. Getting the most benefit from your new BenQ LCD monitor...
User Manual
Page 26
... monitor driver software installed), you are adding the BenQ LCD Monitor to an existing computer that the wizard has selected the correct name of your monitor and click Next. 6. If you should instead be connected to confirm that has already had a monitor driver installed before. Restart the computer. You should not be following these instructions. Follow the prompts until it displays the option to upgrade...
... monitor driver software installed), you are adding the BenQ LCD Monitor to an existing computer that the wizard has selected the correct name of your monitor and click Next. 6. If you should instead be connected to confirm that has already had a monitor driver installed before. Restart the computer. You should not be following these instructions. Follow the prompts until it displays the option to upgrade...
User Manual
Page 27
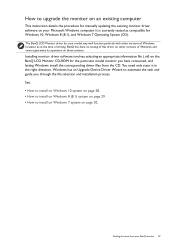
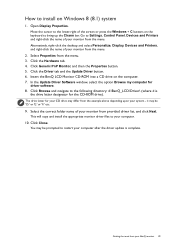
... the time of writing, BenQ has done no testing of this driver on other versions of Windows, however, as compatible for the particular model monitor you through the file selection and installation process. How to upgrade the monitor on an existing computer This instruction details the procedure for manually updating the existing monitor driver software on the BenQ LCD Monitor CD-ROM for Windows 10, Windows 8 (8.1), and Windows 7 Operating System (OS...
... the time of writing, BenQ has done no testing of this driver on other versions of Windows, however, as compatible for the particular model monitor you through the file selection and installation process. How to upgrade the monitor on an existing computer This instruction details the procedure for manually updating the existing monitor driver software on the BenQ LCD Monitor CD-ROM for Windows 10, Windows 8 (8.1), and Windows 7 Operating System (OS...
User Manual
Page 28
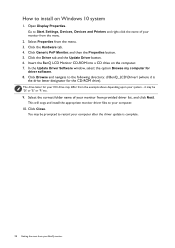
... Update Driver button. 6. it may be 'D:' or 'E:' or 'F:' etc. 9. How to your BenQ monitor Open Display Properties. Insert the BenQ LCD Monitor CD-ROM into a CD drive on Windows 10 system 1. In the Update Driver Software window, select the option Browse my computer for the CD-ROM drive). Go to restart your monitor from provided driver list, and click Next. Click Close. You may be prompted to Start, Settings...
... Update Driver button. 6. it may be 'D:' or 'E:' or 'F:' etc. 9. How to your BenQ monitor Open Display Properties. Insert the BenQ LCD Monitor CD-ROM into a CD drive on Windows 10 system 1. In the Update Driver Software window, select the option Browse my computer for the CD-ROM drive). Go to restart your monitor from provided driver list, and click Next. Click Close. You may be prompted to Start, Settings...
User Manual
Page 29
... Printers, and right-click the name of the screen or press the Windows + C buttons on the keyboard to the following directory: d:\BenQ_LCD\Driver\ (where d is complete. This will copy and install the appropriate monitor driver files to install on the computer. 7. Getting the most from your monitor from the menu. 2. Open Display Properties. In the Update Driver Software window, select the option Browse my computer for...
... Printers, and right-click the name of the screen or press the Windows + C buttons on the keyboard to the following directory: d:\BenQ_LCD\Driver\ (where d is complete. This will copy and install the appropriate monitor driver files to install on the computer. 7. Getting the most from your monitor from the menu. 2. Open Display Properties. In the Update Driver Software window, select the option Browse my computer for...
User Manual
Page 30
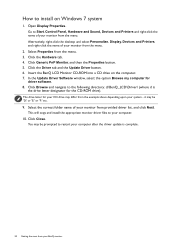
... the BenQ LCD Monitor CD-ROM into a CD drive on Windows 7 system 1. Click Close. Open Display Properties. This will copy and install the appropriate monitor driver files to Start, Control Panel, Hardware and Sound, Devices and Printers and right-click the name of your computer. 10. Click Generic PnP Monitor, and then the Properties button. 5. Click the Driver tab and the Update Driver button. 6. Go to your monitor from the menu...
... the BenQ LCD Monitor CD-ROM into a CD drive on Windows 7 system 1. Click Close. Open Display Properties. This will copy and install the appropriate monitor driver files to Start, Control Panel, Hardware and Sound, Devices and Printers and right-click the name of your computer. 10. Click Generic PnP Monitor, and then the Properties button. 5. Click the Driver tab and the Update Driver button. 6. Go to your monitor from the menu...

User Manual
Page 34
.... Basic menu operation All OSD (On Screen Display) menus can use the OSD menu to adjust your monitor. 1 2 4 3 1. You can be accessed by the control keys. The hot key menu is the hot key for Picture Mode. In the main menu, follow the icons next to the control keys to access the main menu. 4. Alternatively, press the key on your monitor Select (Menu) to make adjustments or selection. To change the default settings...
.... Basic menu operation All OSD (On Screen Display) menus can use the OSD menu to adjust your monitor. 1 2 4 3 1. You can be accessed by the control keys. The hot key menu is the hot key for Picture Mode. In the main menu, follow the icons next to the control keys to access the main menu. 4. Alternatively, press the key on your monitor Select (Menu) to make adjustments or selection. To change the default settings...
User Manual
Page 36
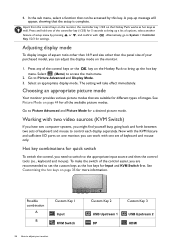
... 3 USB Upstream 1 DP USB Upstream 2 HDMI See Picture Mode on page 35 for all the available picture modes. Now with two video sources (KVM Switch) If you have two computer systems, you might find yourself busy going back and forth between two sets of keyboard and mouse to System > Controller Adjusting display mode To display images of aspect ratio other than 16:9 and size other than the panel size of...
... 3 USB Upstream 1 DP USB Upstream 2 HDMI See Picture Mode on page 35 for all the available picture modes. Now with two video sources (KVM Switch) If you have two computer systems, you might find yourself busy going back and forth between two sets of keyboard and mouse to System > Controller Adjusting display mode To display images of aspect ratio other than 16:9 and size other than the panel size of...

User Manual
Page 46
... • Auto matches the RGB range setting on the connected HDMI device. Ideal for 16:9 aspect images. Determines the range of Picture Mode, different Display Mode option is pre-set. Detect • RGB (0 ~ 255) • RGB (16 ~ 235) 46 Navigating the main menu Full Scales the input image to fill the screen. Slightly enlarges the input image. Range The options under Display Mode will be displayed without scaling. 19s" Displays the input image as if on a 19" monitor of...
... • Auto matches the RGB range setting on the connected HDMI device. Ideal for 16:9 aspect images. Determines the range of Picture Mode, different Display Mode option is pre-set. Detect • RGB (0 ~ 255) • RGB (16 ~ 235) 46 Navigating the main menu Full Scales the input image to fill the screen. Slightly enlarges the input image. Range The options under Display Mode will be displayed without scaling. 19s" Displays the input image as if on a 19" monitor of...

User Manual
Page 51
...; Volume • Mute DDC/CI Allows the monitor settings to be sent via the software for Display Data Channel/Command Interface, which was developed by Video Electronics Standards Association (VESA). DDC/CI capability allows monitor controls to be set through the software • ON on the PC. • OFF DP Auto Switch HDMI Auto Switch DDC/CI, short for remote diagnostics. When this function is activated, DP port...
...; Volume • Mute DDC/CI Allows the monitor settings to be sent via the software for Display Data Channel/Command Interface, which was developed by Video Electronics Standards Association (VESA). DDC/CI capability allows monitor controls to be set through the software • ON on the PC. • OFF DP Auto Switch HDMI Auto Switch DDC/CI, short for remote diagnostics. When this function is activated, DP port...

User Manual
Page 58
... does not help, check the signal cable connectors. Read the instructions on the link "Adjusting the Screen Resolution" on these instructions. If any button on the computer keyboard or move the mouse. The LED indicator is white or orange. • If the LED lights up in solid white, the monitor is powered on. • If the LED is illuminated in white and there is a message Out of Range on the screen, this...
... does not help, check the signal cable connectors. Read the instructions on the link "Adjusting the Screen Resolution" on these instructions. If any button on the computer keyboard or move the mouse. The LED indicator is white or orange. • If the LED lights up in solid white, the monitor is powered on. • If the LED is illuminated in white and there is a message Out of Range on the screen, this...

User Manual
Page 59
... built-in speakers: • Check whether Line In is properly connected. • Increase the volume (volume may be locked, press and hold any key for 10 seconds. No sound can use . • Use a screensaver to set a proper aspect ratio for the input sources. Read the instructions on the link "Adjusting the Screen Resolution" on the CD, and then select the correct resolution, refresh rate and make adjustments based on these instructions. The OSD controls are...
... built-in speakers: • Check whether Line In is properly connected. • Increase the volume (volume may be locked, press and hold any key for 10 seconds. No sound can use . • Use a screensaver to set a proper aspect ratio for the input sources. Read the instructions on the link "Adjusting the Screen Resolution" on the CD, and then select the correct resolution, refresh rate and make adjustments based on these instructions. The OSD controls are...
User Manual
Page 60
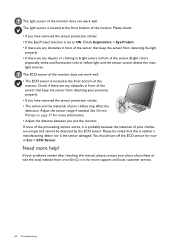
... any obstacles in Eco > ECO Sensor. You should turn off the ECO sensor for more support and local customer service. 60 Troubleshooting The ECO sensor of the monitor does not work well. Bright colors (especially white and fluorescent colors) reflect light and the sensor cannot detect the main light sources. The light sensor of the monitor does not work well. • The ECO sensor is located...
... any obstacles in Eco > ECO Sensor. You should turn off the ECO sensor for more support and local customer service. 60 Troubleshooting The ECO sensor of the monitor does not work well. Bright colors (especially white and fluorescent colors) reflect light and the sensor cannot detect the main light sources. The light sensor of the monitor does not work well. • The ECO sensor is located...


