User Manual
Page 4
PB9200-e.book Page iv Thursday, May 27, 2004 2:15 PM Correcting The Keystone Distortion 17 Adjusting The Volume 18 Muting The Sound 18 Temporarily Blanking The ... OPTION Menu 32 OPTION Menu (continued 33 NETWORK Menu 34 Network Setting Up 35 Lamp 36 Replacing The Lamp 37 Air Filter 38 Caring For The Air Filter 38 Other Care 39 Caring For The Inside Of The Projector 39 Caring For The Lens 39 Caring For The Cabinet And Remote Control 39...
PB9200-e.book Page iv Thursday, May 27, 2004 2:15 PM Correcting The Keystone Distortion 17 Adjusting The Volume 18 Muting The Sound 18 Temporarily Blanking The ... OPTION Menu 32 OPTION Menu (continued 33 NETWORK Menu 34 Network Setting Up 35 Lamp 36 Replacing The Lamp 37 Air Filter 38 Caring For The Air Filter 38 Other Care 39 Caring For The Inside Of The Projector 39 Caring For The Lens 39 Caring For The Cabinet And Remote Control 39...

User Manual
Page 5
PB9200-e.book Page v Thursday, May 27, 2004 2:15 PM Troubleshooting 40 Related Messages 40 Related Messages (continued 41 Regarding The Indicator Lamps 42 Regarding The Indicator Lamps (continued 43 Phenomena That May Easily Be Mistaken For Machine Defects 44 Phenomena That May Easily Be Mistaken For Machine Defects (continued 45 Warranty And After-Service 46 Specifications 47 Table of Contents v
PB9200-e.book Page v Thursday, May 27, 2004 2:15 PM Troubleshooting 40 Related Messages 40 Related Messages (continued 41 Regarding The Indicator Lamps 42 Regarding The Indicator Lamps (continued 43 Phenomena That May Easily Be Mistaken For Machine Defects 44 Phenomena That May Easily Be Mistaken For Machine Defects (continued 45 Warranty And After-Service 46 Specifications 47 Table of Contents v
User Manual
Page 7
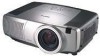
PB9200-e.book Page 1 Thursday, May 27, 2004 2:15 PM Projector Features This multimedia projector is available for reducing projector noise to achieve quieter operation. • User Memory Function This projector can memorize 4 settings by using a UHB (ultra high brightness) lamp and a highlyefficient optical system. • Whisper Mode Equipped Special mode is used to finely adjust the...can be magnified for closer viewing. • Keystone Distortion Correction Quick correction of distorted images electrically. • Optical Lens Shift The lens of this projector can be shifted vertically...
PB9200-e.book Page 1 Thursday, May 27, 2004 2:15 PM Projector Features This multimedia projector is available for reducing projector noise to achieve quieter operation. • User Memory Function This projector can memorize 4 settings by using a UHB (ultra high brightness) lamp and a highlyefficient optical system. • Whisper Mode Equipped Special mode is used to finely adjust the...can be magnified for closer viewing. • Keystone Distortion Correction Quick correction of distorted images electrically. • Optical Lens Shift The lens of this projector can be shifted vertically...

User Manual
Page 9
... The picture is projected from here. 6 Filter cover An air filter is inside. Part Names 3 PB9200-e.book Page 3 Thursday, May 27, 2004 2:15 PM Part Names Projector TEMP LAMP STANDBY/ON LENS SHIFT BNG COMPONENT S-VIDEO VIDEO MENU INTER RESET FOCUS ZOOM RGB M1-D INPUT KEYSTONE... SEARCH 3 5 4 6 1 2 Projector (Front/Right) 11 A D E B8 3 L F LENS SHIFT COMPONENTBNG S-VIDEO RGB M1-D INPUT INTER KEYSTONE SEARCH RESET VIDEO STANDBY/ON MENU TEMP LAMP G AUDIO IN1 REMOTE CONTROL CONTROL NETWORK AUDIO IN2 RGB RGB OUT R/CR/PR ...
... The picture is projected from here. 6 Filter cover An air filter is inside. Part Names 3 PB9200-e.book Page 3 Thursday, May 27, 2004 2:15 PM Part Names Projector TEMP LAMP STANDBY/ON LENS SHIFT BNG COMPONENT S-VIDEO VIDEO MENU INTER RESET FOCUS ZOOM RGB M1-D INPUT KEYSTONE... SEARCH 3 5 4 6 1 2 Projector (Front/Right) 11 A D E B8 3 L F LENS SHIFT COMPONENTBNG S-VIDEO RGB M1-D INPUT INTER KEYSTONE SEARCH RESET VIDEO STANDBY/ON MENU TEMP LAMP G AUDIO IN1 REMOTE CONTROL CONTROL NETWORK AUDIO IN2 RGB RGB OUT R/CR/PR ...

User Manual
Page 10
PB9200-e.book Page 4 Thursday, May 27, 2004 2:15 PM Control Buttons KEYSTONE 15 7 M1-D 8 RGB INPUT LENS SHIFT 9 BNC 4 COMPONENT ENTER 10 S-VIDEO 11 VIDEO SEARCH 6 5 RESET 17 18 MENU 16 19 12 STANDBY/ON 1 23 TEMP LAMP Control Panel on the Projector TEMP LAMP STANDBY/ON LENS SHIFT BNG COMPONENT S-VIDEO VIDEO MENU INTER...
PB9200-e.book Page 4 Thursday, May 27, 2004 2:15 PM Control Buttons KEYSTONE 15 7 M1-D 8 RGB INPUT LENS SHIFT 9 BNC 4 COMPONENT ENTER 10 S-VIDEO 11 VIDEO SEARCH 6 5 RESET 17 18 MENU 16 19 12 STANDBY/ON 1 23 TEMP LAMP Control Panel on the Projector TEMP LAMP STANDBY/ON LENS SHIFT BNG COMPONENT S-VIDEO VIDEO MENU INTER...

User Manual
Page 12
...When you release the elevator buttons, the elevator feet will lock into position. 3. TEMP LAMP STANDBY/ON LENS SHIFT BNG COMPONENT S-VIDEO VIDEO INTER RGB 1. Press and hold the projector whenever using the elevator buttons to the desired height and then release the elevator buttons. The... elevator feet. As necessary, you otherwise need to prevent a burn. BLANK ASPECT LASER Projector Remote control 6 Setting Up PB9200-e.book Page 6 Thursday, May 27, 2004 2:15 PM Adjusting The Projector's Elevator WARNING • Do not touch about the lens and ventilation openings during use ...
...When you release the elevator buttons, the elevator feet will lock into position. 3. TEMP LAMP STANDBY/ON LENS SHIFT BNG COMPONENT S-VIDEO VIDEO INTER RGB 1. Press and hold the projector whenever using the elevator buttons to the desired height and then release the elevator buttons. The... elevator feet. As necessary, you otherwise need to prevent a burn. BLANK ASPECT LASER Projector Remote control 6 Setting Up PB9200-e.book Page 6 Thursday, May 27, 2004 2:15 PM Adjusting The Projector's Elevator WARNING • Do not touch about the lens and ventilation openings during use ...

User Manual
Page 14
PB9200-e.book Page 8 Thursday, May 27, 2004 2:15 PM Please refer to mouse control) DVI port B M1-D USB port M1-D cable Audio out Stereo Mini cable ■ If using a M1-D input (to the following (for example) for connecting your devices. Examples of the projector.You can see the ports...G/Y B/CB/PB H V R/CR/PR G/Y B/CB/PB H V LENS SHIFT COMPONENTBNG S-VIDEO RGB M1-D INPUT INTER KEYSTONE SEARCH RESET VIDEO STANDBY/ON MENU TEMP LAMP FOCUS ZOOM AUDIO IN1 REMOTE CONTROL CONTROL NETWORK AUDIO IN2 RGB RGB OUT AUDIO OUT CR/PR Ca/Pa Y R/CR/PR G/Y B/CB/PB H V BNC R-AUDIO...
PB9200-e.book Page 8 Thursday, May 27, 2004 2:15 PM Please refer to mouse control) DVI port B M1-D USB port M1-D cable Audio out Stereo Mini cable ■ If using a M1-D input (to the following (for example) for connecting your devices. Examples of the projector.You can see the ports...G/Y B/CB/PB H V R/CR/PR G/Y B/CB/PB H V LENS SHIFT COMPONENTBNG S-VIDEO RGB M1-D INPUT INTER KEYSTONE SEARCH RESET VIDEO STANDBY/ON MENU TEMP LAMP FOCUS ZOOM AUDIO IN1 REMOTE CONTROL CONTROL NETWORK AUDIO IN2 RGB RGB OUT AUDIO OUT CR/PR Ca/Pa Y R/CR/PR G/Y B/CB/PB H V BNC R-AUDIO...

User Manual
Page 16
... damaged, contact your dealer to the "User's manual - LENS SHIFT COMPONENTBNG S-VIDEO RGB M1-D INPUT INTER KEYSTONE SEARCH RESET VIDEO STANDBY/ON MENU TEMP LAMP FOCUS ZOOM AUDIO IN1 REMOTE CONTROL CONTROL NETWORK AUDIO IN2 RGB RGB OUT R/CR/PR G/Y B/CB/PB H V AUDIO OUT CR/PR Ca/Pa Y...may result in fire and/or electrical shock. Safety Guide" and the following. • Only plug the power cord into the outlet. PB9200-e.book Page 10 Thursday, May 27, 2004 2:15 PM Connecting to a monitor Monitor Projector RGB in RGB cable L RGB OUT Connecting to a speaker (with the...
... damaged, contact your dealer to the "User's manual - LENS SHIFT COMPONENTBNG S-VIDEO RGB M1-D INPUT INTER KEYSTONE SEARCH RESET VIDEO STANDBY/ON MENU TEMP LAMP FOCUS ZOOM AUDIO IN1 REMOTE CONTROL CONTROL NETWORK AUDIO IN2 RGB RGB OUT R/CR/PR G/Y B/CB/PB H V AUDIO OUT CR/PR Ca/Pa Y...may result in fire and/or electrical shock. Safety Guide" and the following. • Only plug the power cord into the outlet. PB9200-e.book Page 10 Thursday, May 27, 2004 2:15 PM Connecting to a monitor Monitor Projector RGB in RGB cable L RGB OUT Connecting to a speaker (with the...

User Manual
Page 18
... right of the main unit and remote control via an audio cable (3.5 dia. Rear remote sensor is 3 meters with plugs). 12 Remote Control PB9200-e.book Page 12 Thursday, May 27, 2004 2:15 PM Operating The Remote Control CAUTION • Do not disassemble the remote control. •... please try. • Since the remote control uses infrared light to send signals to the projector (Class1 LED), be sure to use the remote control as from an inverter fluorescent lamp), hits the projector's remote sensor, the remote control may cease to function. NOTE • Replace the batteries ...
... right of the main unit and remote control via an audio cable (3.5 dia. Rear remote sensor is 3 meters with plugs). 12 Remote Control PB9200-e.book Page 12 Thursday, May 27, 2004 2:15 PM Operating The Remote Control CAUTION • Do not disassemble the remote control. •... please try. • Since the remote control uses infrared light to send signals to the projector (Class1 LED), be sure to use the remote control as from an inverter fluorescent lamp), hits the projector's remote sensor, the remote control may cease to function. NOTE • Replace the batteries ...

User Manual
Page 20
...power on the STANDBY/ON button / indicator screen for approximately 5 seconds. Turning On The Power 1. Set the power switch to [O] (OFF). The projector lamp will begin blinking green. LASER INDICATOR STANDBY/ON VIDEO RGB ++ LENS SHIFT FOCUS -- + ZOOM - Attach the lens cap. 2. Press the STANDBY/.../Pa Y BNC R-AUDIO IN-L VIDEO S-VIDEO LASER INDICATOR STANDBY/ON VIDEO RGB ++ LENS SHIFT FOCUS -- + ZOOM - the message is emitted. PB9200-e.book Page 14 Thursday, May 27, 2004 2:15 PM Power ON/OFF WARNING • When the power is ON, a strong light is visible....
...power on the STANDBY/ON button / indicator screen for approximately 5 seconds. Turning On The Power 1. Set the power switch to [O] (OFF). The projector lamp will begin blinking green. LASER INDICATOR STANDBY/ON VIDEO RGB ++ LENS SHIFT FOCUS -- + ZOOM - Attach the lens cap. 2. Press the STANDBY/.../Pa Y BNC R-AUDIO IN-L VIDEO S-VIDEO LASER INDICATOR STANDBY/ON VIDEO RGB ++ LENS SHIFT FOCUS -- + ZOOM - the message is emitted. PB9200-e.book Page 14 Thursday, May 27, 2004 2:15 PM Power ON/OFF WARNING • When the power is ON, a strong light is visible....

User Manual
Page 21
...LENS SHIFT COMPONENTBNG S-VIDEO RGB M1-D INPUT INTER KEYSTONE SEARCH RESET VIDEO STANDBY/ON MENU TEMP LAMP FOCUS ZOOM AUDIO IN1 REMOTE CONTROL CONTROL NETWORK AUDIO IN2 RGB RGB OUT AUDIO OUT CR/PR...button VIDEO S-VIDEO COMPONENT ■ Using RGB button Press the RGB button of the projector or the remote control. Use the FOCUS buttons to adjust the screen size. FOCUS buttons... button toggles between the RGB ports as shown below Select the signal you wish to project. PB9200-e.book Page 15 Thursday, May 27, 2004 2:15 PM Operating Selecting An Input Signal 1. ...
...LENS SHIFT COMPONENTBNG S-VIDEO RGB M1-D INPUT INTER KEYSTONE SEARCH RESET VIDEO STANDBY/ON MENU TEMP LAMP FOCUS ZOOM AUDIO IN1 REMOTE CONTROL CONTROL NETWORK AUDIO IN2 RGB RGB OUT AUDIO OUT CR/PR...button VIDEO S-VIDEO COMPONENT ■ Using RGB button Press the RGB button of the projector or the remote control. Use the FOCUS buttons to adjust the screen size. FOCUS buttons... button toggles between the RGB ports as shown below Select the signal you wish to project. PB9200-e.book Page 15 Thursday, May 27, 2004 2:15 PM Operating Selecting An Input Signal 1. ...
User Manual
Page 27
...same methods. ate the item. MENU MAIN PICTURE-1 PICTURE-2 INPUT AUTO SCREEN OPTION NETWORK : SELECT VOLUME SPEAKER IR REMOTE IR REMOTE ID LAMP TIME FILTER TIME SERVICE RESET 16 TURN ON ALL 1234 h 4321 h MENU MAIN PICTURE-1 PICTURE-2 INPUT AUTO SCREEN OPTION NETWORK : SELECT.... The opera- Note that the items whose functions are performed simultaneously with operating (ex. PB9200-e.book Page 21 Thursday, May 27, 2004 2:15 PM Multifunctional Settings Using The Menu Functions This projector has the following menus: MAIN, PICTURE-1, PICTURE-2, INPUT, AUTO, SCREEN, OPTION and NETWORK...
...same methods. ate the item. MENU MAIN PICTURE-1 PICTURE-2 INPUT AUTO SCREEN OPTION NETWORK : SELECT VOLUME SPEAKER IR REMOTE IR REMOTE ID LAMP TIME FILTER TIME SERVICE RESET 16 TURN ON ALL 1234 h 4321 h MENU MAIN PICTURE-1 PICTURE-2 INPUT AUTO SCREEN OPTION NETWORK : SELECT.... The opera- Note that the items whose functions are performed simultaneously with operating (ex. PB9200-e.book Page 21 Thursday, May 27, 2004 2:15 PM Multifunctional Settings Using The Menu Functions This projector has the following menus: MAIN, PICTURE-1, PICTURE-2, INPUT, AUTO, SCREEN, OPTION and NETWORK...

User Manual
Page 34
...automatically. Set the time using the 5 / 6 buttons.: TURN ON TURN OFF When the TURN ON is identified automatically independently of this feature. PB9200-e.book Page 28 Thursday, May 27, 2004 2:15 PM AUTO Menu With the AUTO menu, the items shown in the table below . memo Make... Settings When the time is set time. memo This operation requires approximately 10 seconds, and the message AUTO IN PROGRESS is continued to 99, the projector lamp will be automatically adjusted. Select the TURN ON or the TURN OFF using the 5 / 6 buttons. : Long (max. 99 minutes) Short (min. 0 ...
...automatically. Set the time using the 5 / 6 buttons.: TURN ON TURN OFF When the TURN ON is identified automatically independently of this feature. PB9200-e.book Page 28 Thursday, May 27, 2004 2:15 PM AUTO Menu With the AUTO menu, the items shown in the table below . memo Make... Settings When the time is set time. memo This operation requires approximately 10 seconds, and the message AUTO IN PROGRESS is continued to 99, the projector lamp will be automatically adjusted. Select the TURN ON or the TURN OFF using the 5 / 6 buttons. : Long (max. 99 minutes) Short (min. 0 ...
User Manual
Page 38
... time of the lamp timer to display the messages about 3 seconds displays the FILTER TIME menu. memo About caring for remote control using 5 button to 0. When the ALL is selected, the projector is on. Incorrect performing causes incorrect operation of the messages. PB9200-e.book Page 32 ... incorrect operation of the messages. Select the RESET using the 5 / 6 buttons. : ALL 1 2 3 The projector is controlled by a remote control irrespective of the position of the lamp timer to reset the timer. : RESET CANCEL Selecting the RESET resets the count of the ID CHANGE switch. memo ...
... time of the lamp timer to display the messages about 3 seconds displays the FILTER TIME menu. memo About caring for remote control using 5 button to 0. When the ALL is selected, the projector is on. Incorrect performing causes incorrect operation of the messages. PB9200-e.book Page 32 ... incorrect operation of the messages. Select the RESET using the 5 / 6 buttons. : ALL 1 2 3 The projector is controlled by a remote control irrespective of the position of the lamp timer to reset the timer. : RESET CANCEL Selecting the RESET resets the count of the ID CHANGE switch. memo ...

User Manual
Page 39
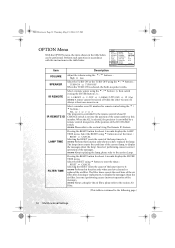
PB9200-e.book Page 33 Thursday, May 27, 2004 2:15 PM OPTION Menu (continued... a signal change to keep the current adjustment state, AUTO select the DISABLE. memo Note that the items "VOLUME", "LAMP TIME", "FILTER TIME" and "SERVICE" are collectively returned to reset the OPTION menu items. : EXECUTE CANCEL The items... the clock phase (H PHASE) and the horizontal size (H SIZE). Multifunctional Settings 33 Select the ENABLE or the DISABLE using a projector at highlands etc. Select the lens type currently used using the 5 / 6 buttons. : TURN ON TURN OFF Selecting the ...
PB9200-e.book Page 33 Thursday, May 27, 2004 2:15 PM OPTION Menu (continued... a signal change to keep the current adjustment state, AUTO select the DISABLE. memo Note that the items "VOLUME", "LAMP TIME", "FILTER TIME" and "SERVICE" are collectively returned to reset the OPTION menu items. : EXECUTE CANCEL The items... the clock phase (H PHASE) and the horizontal size (H SIZE). Multifunctional Settings 33 Select the ENABLE or the DISABLE using a projector at highlands etc. Select the lens type currently used using the 5 / 6 buttons. : TURN ON TURN OFF Selecting the ...
User Manual
Page 42
... local dealer. At the lamp replacing, make a loud bang when it to request a replacement lamp from the projector's vent holes. PB9200-e.book Page 36 Thursday, May 27, 2004 2:15 PM Lamp WARNING HIGH VOLTAGE HIGH TEMPERATURE HIGH PRESSURE The projector uses a high-pressure mercury glass lamp. For lamp recycling, go to cool sufficiently. The lamp can cause burns, as...
... local dealer. At the lamp replacing, make a loud bang when it to request a replacement lamp from the projector's vent holes. PB9200-e.book Page 36 Thursday, May 27, 2004 2:15 PM Lamp WARNING HIGH VOLTAGE HIGH TEMPERATURE HIGH PRESSURE The projector uses a high-pressure mercury glass lamp. For lamp recycling, go to cool sufficiently. The lamp can cause burns, as...
User Manual
Page 43
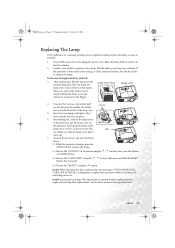
... ENTER button. (3) Choose the "LAMP TIME" using the 5 button. PC CO LAMP 7. is mounted on the projector, and reset the lamp timer. (1) While the projector running, press the MENU button to open the menu. memo Incorrectly resetting of the lamp timer (resetting without replacement, or neglect of replacement by the handle. PB9200-e.book Page 37 Thursday, May...
... ENTER button. (3) Choose the "LAMP TIME" using the 5 button. PC CO LAMP 7. is mounted on the projector, and reset the lamp timer. (1) While the projector running, press the MENU button to open the menu. memo Incorrectly resetting of the lamp timer (resetting without replacement, or neglect of replacement by the handle. PB9200-e.book Page 37 Thursday, May...
User Manual
Page 44
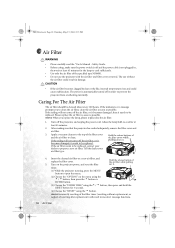
...the filter cover and the air filter to cool for at least 45 minutes for 3 seconds. (4) Choose the "RESET" using the 5 button. PB9200-e.book Page 38 Thursday, May 27, 2004 2:15 PM Air Filter WARNING • Please carefully read the "User's Manual - The power is ... the release buttons of the filter timer (resetting without the air filter could cause malfunction. Apply a vacuum cleaner to prevent the projector from overheating internally. TEMP LAMP STANDBY/ON timer. memo When you to prepare a new air filter. Safety Guide. • Before caring, make sure the...
...the filter cover and the air filter to cool for at least 45 minutes for 3 seconds. (4) Choose the "RESET" using the 5 button. PB9200-e.book Page 38 Thursday, May 27, 2004 2:15 PM Air Filter WARNING • Please carefully read the "User's Manual - The power is ... the release buttons of the filter timer (resetting without the air filter could cause malfunction. Apply a vacuum cleaner to prevent the projector from overheating internally. TEMP LAMP STANDBY/ON timer. memo When you to prepare a new air filter. Safety Guide. • Before caring, make sure the...
User Manual
Page 46
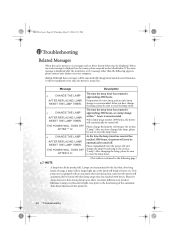
... be displayed. THE POWER WILL TURN OFF AFTER 0 hr. This projector is approaching 2000 hours. THE POWER WILL TURN OFF AFTER ** hr. After you have changed the lamp, please be sure to reset the lamp timer. When any such message is displayed on . The time the... reaches 2000 hours, the power will automatically be sure to the functioning of this projector. 40 Troubleshooting Please immediately turn the power off . Please change the lamp by referring to the section "Lamp". PB9200-e.book Page 40 Thursday, May 27, 2004 2:15 PM Troubleshooting Related Messages When the...
... be displayed. THE POWER WILL TURN OFF AFTER 0 hr. This projector is approaching 2000 hours. THE POWER WILL TURN OFF AFTER ** hr. After you have changed the lamp, please be sure to reset the lamp timer. When any such message is displayed on . The time the... reaches 2000 hours, the power will automatically be sure to the functioning of this projector. 40 Troubleshooting Please immediately turn the power off . Please change the lamp by referring to the section "Lamp". PB9200-e.book Page 40 Thursday, May 27, 2004 2:15 PM Troubleshooting Related Messages When the...

User Manual
Page 48
... proper response measure using the item descriptions below . After the projector has sufficiently cooled down at least 45 minutes. PB9200-e.book Page 42 Thursday, May 27, 2004 2:15 PM Regarding The Indicator Lamps Lighting and flashing of the STANDBY/ON indicator, the LAMP indicator, and the TEMP indicator have the meanings as described in...
... proper response measure using the item descriptions below . After the projector has sufficiently cooled down at least 45 minutes. PB9200-e.book Page 42 Thursday, May 27, 2004 2:15 PM Regarding The Indicator Lamps Lighting and flashing of the STANDBY/ON indicator, the LAMP indicator, and the TEMP indicator have the meanings as described in...

