

User Manual
Page 9
Part Names 3 A RGB port B M1-D port C BNC port D AUDIO IN 1 port E AUDIO IN 2 port F CONTROL port G NETWORK port H AUDIO IN R/L port I H J 9 FOCUS ZOOM 3 10 Projector (Rear/Left) 1 Elevator button 2 Elevator foot 3 Remote sensor 4 Lens cap 5 Lens The picture is projected from here. 6 Filter cover An air filter is inside. PB9200-e.book Page 3 Thursday, May 27, 2004 2:15 PM Part Names Projector TEMP LAMP STANDBY/ON LENS SHIFT BNG COMPONENT S-VIDEO VIDEO MENU INTER RESET FOCUS ZOOM RGB M1-D INPUT KEYSTONE SEARCH 3 5 4 6 1 2 Projector (Front/Right) 11 A D E B8 3 L F LENS...
Part Names 3 A RGB port B M1-D port C BNC port D AUDIO IN 1 port E AUDIO IN 2 port F CONTROL port G NETWORK port H AUDIO IN R/L port I H J 9 FOCUS ZOOM 3 10 Projector (Rear/Left) 1 Elevator button 2 Elevator foot 3 Remote sensor 4 Lens cap 5 Lens The picture is projected from here. 6 Filter cover An air filter is inside. PB9200-e.book Page 3 Thursday, May 27, 2004 2:15 PM Part Names Projector TEMP LAMP STANDBY/ON LENS SHIFT BNG COMPONENT S-VIDEO VIDEO MENU INTER RESET FOCUS ZOOM RGB M1-D INPUT KEYSTONE SEARCH 3 5 4 6 1 2 Projector (Front/Right) 11 A D E B8 3 L F LENS...
User Manual
Page 11
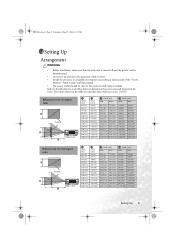
...Setting Up Arrangement WARNING • Before installation, make sure that the projector is turned off and the power code is disconnected. • Do not set up and move the projector, while it is hot. • Install the projector in the table are calculated for a full size screen. (±10%) Reference for the 16:9 aspect ratio B A Screen D B Side view...Safety Guide" and this manual. • The power outlet should be close to instructions of the "User's Manual - The values shown in a suitable environment according to the projector and...screen size and projection distance.
...Setting Up Arrangement WARNING • Before installation, make sure that the projector is turned off and the power code is disconnected. • Do not set up and move the projector, while it is hot. • Install the projector in the table are calculated for a full size screen. (±10%) Reference for the 16:9 aspect ratio B A Screen D B Side view...Safety Guide" and this manual. • The power outlet should be close to instructions of the "User's Manual - The values shown in a suitable environment according to the projector and...screen size and projection distance.

User Manual
Page 12
... WARNING • Do not touch about the lens and ventilation openings during use or immediately after use the LENS SHIFT buttons of the projector. As necessary, you want to finely adjust the picture position, use to adjust the elevator feet. Press and hold the projector whenever using the elevator buttons to prevent a burn. Raise or lower the projector to 9 degrees. LENS SHIFT LENS SHIFT buttons LASER INDICATOR STANDBY/ON VIDEO RGB ++ LENS SHIFT FOCUS -- + ZOOM - TEMP LAMP STANDBY...
... WARNING • Do not touch about the lens and ventilation openings during use or immediately after use the LENS SHIFT buttons of the projector. As necessary, you want to finely adjust the picture position, use to adjust the elevator feet. Press and hold the projector whenever using the elevator buttons to prevent a burn. Raise or lower the projector to 9 degrees. LENS SHIFT LENS SHIFT buttons LASER INDICATOR STANDBY/ON VIDEO RGB ++ LENS SHIFT FOCUS -- + ZOOM - TEMP LAMP STANDBY...

User Manual
Page 13
... correct port. Incorrect connecting could result in fire or electrical shock. For cables that you may not be compatible with this projector. • For some RGB input modes, the optional Mac adapter is necessary. • When the image resolution is changed on a computer, depending on how this manual and the manual of each device to be sure to activate the laptop's RGB external image output (set . Use...
... correct port. Incorrect connecting could result in fire or electrical shock. For cables that you may not be compatible with this projector. • For some RGB input modes, the optional Mac adapter is necessary. • When the image resolution is changed on a computer, depending on how this manual and the manual of each device to be sure to activate the laptop's RGB external image output (set . Use...

User Manual
Page 18
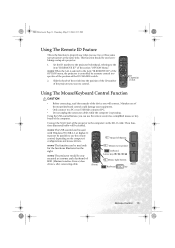
... the remote control and store them in the screen etc. Adjust the direction of the projector to keep light from obstacles that could block the remote control's output signal to the left and right of a remote sensor). Doing so may result in an area free from directly hitting the projector's remote sensor. • The remote control works TEMP LAMP STANDBY/ON LENS SHIFT BNG COMPONENT S-VIDEO VIDEO MENU INTER RESET FOCUS ZOOM with the projector's remote RGB M1-D INPUT KEYSTONE SEARCH...
... the remote control and store them in the screen etc. Adjust the direction of the projector to keep light from obstacles that could block the remote control's output signal to the left and right of a remote sensor). Doing so may result in an area free from directly hitting the projector's remote sensor. • The remote control works TEMP LAMP STANDBY/ON LENS SHIFT BNG COMPONENT S-VIDEO VIDEO MENU INTER RESET FOCUS ZOOM with the projector's remote RGB M1-D INPUT KEYSTONE SEARCH...
User Manual
Page 19
... right button Keyboard (Rear) key Remote Control 13 Connect the M1-D port of the device you use the remote control, depending on the right. memo When the ALL is selected to the item "IR REMOTE ID" of the OPTION menu, the projector is controlled by a remote control irrespective of the position of a projector. 1. This function should be used combining a setup of the ID CHANGE switch. 2. LASER INDICATOR STANDBY/ON VIDEO RGB ++ LENS SHIFT FOCUS -- + ZOOM...
... right button Keyboard (Rear) key Remote Control 13 Connect the M1-D port of the device you use the remote control, depending on the right. memo When the ALL is selected to the item "IR REMOTE ID" of the OPTION menu, the projector is controlled by a remote control irrespective of the position of a projector. 1. This function should be used combining a setup of the ID CHANGE switch. 2. LASER INDICATOR STANDBY/ON VIDEO RGB ++ LENS SHIFT FOCUS -- + ZOOM...

User Manual
Page 20
... COMPONENTBNG S-VIDEO RGB M1-D INPUT INTER KEYSTONE SEARCH RESET VIDEO STANDBY/ON MENU TEMP LAMP FOCUS ZOOM AUDIO IN1 REMOTE CONTROL CONTROL NETWORK AUDIO IN2 RGB RGB OUT R/CR/PR G/Y B/CB/PB H V AUDIO OUT CR/PR Ca/Pa Y BNC R-AUDIO IN-L VIDEO S-VIDEO Turning Off The Power 1. Remove the lens cap. 2. The projector lamp will stop STANDBY/ON STANDBY/ ON button blinking and light green. 4. When the power is completely on the STANDBY/ON button / indicator screen for approximately 5 seconds. Switch the power switch to solid orange when the lamp Power switch (OFF...
... COMPONENTBNG S-VIDEO RGB M1-D INPUT INTER KEYSTONE SEARCH RESET VIDEO STANDBY/ON MENU TEMP LAMP FOCUS ZOOM AUDIO IN1 REMOTE CONTROL CONTROL NETWORK AUDIO IN2 RGB RGB OUT R/CR/PR G/Y B/CB/PB H V AUDIO OUT CR/PR Ca/Pa Y BNC R-AUDIO IN-L VIDEO S-VIDEO Turning Off The Power 1. Remove the lens cap. 2. The projector lamp will stop STANDBY/ON STANDBY/ ON button blinking and light green. 4. When the power is completely on the STANDBY/ON button / indicator screen for approximately 5 seconds. Switch the power switch to solid orange when the lamp Power switch (OFF...

User Manual
Page 21
...the remote control. Turning the dial cycles through input ports and displays the picture of the projector. M1-D RGB BNC PREVIOUS NEXT MOUSE ESC MENU POSITION RESET AUTO MAGNFY PinP VOLUME ON FREEZE MUTE OFF KEYSTONE SEARCH 1 2 3 ID CHANGE SEARCH button ZOOM FOCUS ■ Using VIDEO button Press the VIDEO button of its ports, it will turn to the state it was in prior to project. FOCUS buttons ZOOM button LENS SHIFT COMPONENTBNG S-VIDEO RGB M1-D INPUT INTER KEYSTONE SEARCH RESET VIDEO STANDBY/ON MENU TEMP LAMP FOCUS ZOOM AUDIO IN1 REMOTE CONTROL CONTROL NETWORK...
...the remote control. Turning the dial cycles through input ports and displays the picture of the projector. M1-D RGB BNC PREVIOUS NEXT MOUSE ESC MENU POSITION RESET AUTO MAGNFY PinP VOLUME ON FREEZE MUTE OFF KEYSTONE SEARCH 1 2 3 ID CHANGE SEARCH button ZOOM FOCUS ■ Using VIDEO button Press the VIDEO button of its ports, it will turn to the state it was in prior to project. FOCUS buttons ZOOM button LENS SHIFT COMPONENTBNG S-VIDEO RGB M1-D INPUT INTER KEYSTONE SEARCH RESET VIDEO STANDBY/ON MENU TEMP LAMP FOCUS ZOOM AUDIO IN1 REMOTE CONTROL CONTROL NETWORK...
User Manual
Page 27
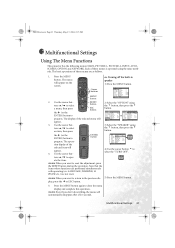
... MUTE OFF KEYSTONE SEARCH 1 2 3 ID CHANGE MENU button RESET button ESC button ENTER) button to oper- MENU MAIN PICTURE-1 PICTURE-2 INPUT AUTO SCREEN OPTION NETWORK : SELECT VOLUME SPEAKER IR REMOTE IR REMOTE ID LAMP TIME FILTER TIME SERVICE RESET 16 TURN ON ALL 1234 h 4321 h OPTION SPEAKER TURN ON TURN OFF 4) Use the cursor button 6 to close the menu display and complete this operation. LASER INDICATOR STANDBY/ON VIDEO RGB ++ LENS SHIFT FOCUS -- + ZOOM - Press the MENU button again to select the "TURN OFF". Press the MENU button. The opera- The display of these...
... MUTE OFF KEYSTONE SEARCH 1 2 3 ID CHANGE MENU button RESET button ESC button ENTER) button to oper- MENU MAIN PICTURE-1 PICTURE-2 INPUT AUTO SCREEN OPTION NETWORK : SELECT VOLUME SPEAKER IR REMOTE IR REMOTE ID LAMP TIME FILTER TIME SERVICE RESET 16 TURN ON ALL 1234 h 4321 h OPTION SPEAKER TURN ON TURN OFF 4) Use the cursor button 6 to close the menu display and complete this operation. LASER INDICATOR STANDBY/ON VIDEO RGB ++ LENS SHIFT FOCUS -- + ZOOM - Press the MENU button again to select the "TURN OFF". Press the MENU button. The opera- The display of these...

User Manual
Page 32
.... a irregular picture, a color lack), please select the mode depending on screen is selected to the section Connecting Your Devices. MENU MAIN PICTURE-1 PICTURE-2 INPUT AUTO SCREEN OPTION NETWORK : SELECT COLOR SPACE AUTO COMPONENT COMPONENT VIDEO AUTO 3D-YCS TURN OFF VIDEO NR LOW P. Please refer to the item 3DYSC of NTSC3.58, this INPUT menu. VIDEO 3D-YCS VIDEO NR Select a signal type mode using the 5 / 6 buttons. : HIGH MIDDLE LOW The noise on the input signal. memo The AUTO operation may...
.... a irregular picture, a color lack), please select the mode depending on screen is selected to the section Connecting Your Devices. MENU MAIN PICTURE-1 PICTURE-2 INPUT AUTO SCREEN OPTION NETWORK : SELECT COLOR SPACE AUTO COMPONENT COMPONENT VIDEO AUTO 3D-YCS TURN OFF VIDEO NR LOW P. Please refer to the item 3DYSC of NTSC3.58, this INPUT menu. VIDEO 3D-YCS VIDEO NR Select a signal type mode using the 5 / 6 buttons. : HIGH MIDDLE LOW The noise on the input signal. memo The AUTO operation may...

User Manual
Page 33
... setting. S2-ASPECT Select the TURN ON or the TURN OFF using the / buttons. : LAST INPUT M1-D RGB BNC COMPONENT S-VIDEO VIDEO Selecting the LAST INPUT selects the port that the item INFORMATION is used at a S-VIDEO signal. memo When the ASPECT button is not reset. Select the display position of the INPUT menu are collectively returned to this table. INFORMATION INPUT-INFORMATION RGB 1024x768 @60.0 FRAME LOCK INPUT-INFORMATION S-VIDEO SECAM AUTO INPUT...
... setting. S2-ASPECT Select the TURN ON or the TURN OFF using the / buttons. : LAST INPUT M1-D RGB BNC COMPONENT S-VIDEO VIDEO Selecting the LAST INPUT selects the port that the item INFORMATION is used at a S-VIDEO signal. memo When the ASPECT button is not reset. Select the display position of the INPUT menu are collectively returned to this table. INFORMATION INPUT-INFORMATION RGB 1024x768 @60.0 FRAME LOCK INPUT-INFORMATION S-VIDEO SECAM AUTO INPUT...

User Manual
Page 34
... picture, a color lack), please select the suitable mode to the following page.) 28 Multifunctional Settings Please refer to the section "Turning On The Power". (This table is set time. When the time is continued to the item VIDEO of this feature. Use a bright screen when adjusting. ■ At a video signal The signal type mode best suited for the respective input signal will be performed. MENU MAIN PICTURE-1 PICTURE-2 INPUT AUTO SCREEN OPTION NETWORK : SELECT ADJUST POWER OFF POWER ON...
... picture, a color lack), please select the suitable mode to the following page.) 28 Multifunctional Settings Please refer to the section "Turning On The Power". (This table is set time. When the time is continued to the item VIDEO of this feature. Use a bright screen when adjusting. ■ At a video signal The signal type mode best suited for the respective input signal will be performed. MENU MAIN PICTURE-1 PICTURE-2 INPUT AUTO SCREEN OPTION NETWORK : SELECT ADJUST POWER OFF POWER ON...

User Manual
Page 36
... SCREEN Menu With the SCREEN menu, the items shown in the table below . MENU MAIN PICTURE-1 PICTURE-2 INPUT AUTO SCREEN OPTION NETWORK : SELECT BLANK BLACK START UP ORIGINAL MyScreen MyScreen SIZE x1 MyScreen LOCK TURN OFF MENU POSITION MESSAGE TURN ON RESET Item Description Select a type of the START UP screen using the 5 / 6 buttons. : MyScreen ORIGINAL BLUE WHITE BLACK The BLANK screen is the screen, which is displayed by detecting no signal or an unsuitable signal. When the TURN OFF is START...
... SCREEN Menu With the SCREEN menu, the items shown in the table below . MENU MAIN PICTURE-1 PICTURE-2 INPUT AUTO SCREEN OPTION NETWORK : SELECT BLANK BLACK START UP ORIGINAL MyScreen MyScreen SIZE x1 MyScreen LOCK TURN OFF MENU POSITION MESSAGE TURN ON RESET Item Description Select a type of the START UP screen using the 5 / 6 buttons. : MyScreen ORIGINAL BLUE WHITE BLACK The BLANK screen is the screen, which is displayed by detecting no signal or an unsuitable signal. When the TURN OFF is START...
User Manual
Page 38
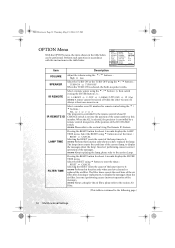
... table below . MENU MAIN PICTURE-1 PICTURE-2 INPUT AUTO SCREEN OPTION NETWORK : SELECT VOLUME SPEAKER IR REMOTE IR REMOTE ID LAMP TIME FILTER TIME SERVICE PIN LOCK 16 TURN ON 1: 2: 3: ALL 1234 h 4321 h TURN ON Item Description VOLUME SPEAKER IR REMOTE IR REMOTE ID Adjust the volume using the 5 / 6 buttons. : High Low Select the TURN ON or the TURN OFF using 5 button to reset the timer. : RESET CANCEL Selecting the RESET resets the count of the current lamp, to the section Using The Remote ID Feature...
... table below . MENU MAIN PICTURE-1 PICTURE-2 INPUT AUTO SCREEN OPTION NETWORK : SELECT VOLUME SPEAKER IR REMOTE IR REMOTE ID LAMP TIME FILTER TIME SERVICE PIN LOCK 16 TURN ON 1: 2: 3: ALL 1234 h 4321 h TURN ON Item Description VOLUME SPEAKER IR REMOTE IR REMOTE ID Adjust the volume using the 5 / 6 buttons. : High Low Select the TURN ON or the TURN OFF using 5 button to reset the timer. : RESET CANCEL Selecting the RESET resets the count of the current lamp, to the section Using The Remote ID Feature...

User Manual
Page 39
...", "LAMP TIME", "FILTER TIME" and "SERVICE" are collectively returned to the initial setting. AUTO: automatically selects optimum mode. memo About the optional lens, ask your dealer. Multifunctional Settings 33 LENS LOCK Select the TURN ON or the TURN OFF using the 5 / 6 buttons. : HIGH NORMAL FANSPEE The HIGH ups rotation speeds of the lens shift, the zoom and the focus. PB9200-e.book Page 33 Thursday, May 27, 2004 2:15 PM OPTION Menu (continued) Item SERVICE RESET Description...
...", "LAMP TIME", "FILTER TIME" and "SERVICE" are collectively returned to the initial setting. AUTO: automatically selects optimum mode. memo About the optional lens, ask your dealer. Multifunctional Settings 33 LENS LOCK Select the TURN ON or the TURN OFF using the 5 / 6 buttons. : HIGH NORMAL FANSPEE The HIGH ups rotation speeds of the lens shift, the zoom and the focus. PB9200-e.book Page 33 Thursday, May 27, 2004 2:15 PM OPTION Menu (continued) Item SERVICE RESET Description...
User Manual
Page 43
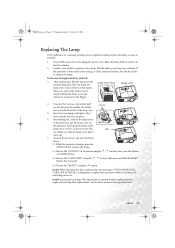
... 6. VIDEO STANDBY/ON COMPONENT S-VIDEO INTER LENS SHIFT BNG M1-D INPUT RGB KEYSTONE SEARCH (2) Choose the "OPTION" on . is displayed, complete this operation within 10 minutes of the lamp cover is mounted on the ceiling, or if the lamp has broken, also ask the dealer to replace the lamp. In the case of "THE POWER WILL TURN OFF AFTER 0hr." MENU RESET FOCUS ZOOM 5. Turn on the projector. Lamp 37 Contact your lamp type number. Tabs MENU RESET FOCUS ZOOM...
... 6. VIDEO STANDBY/ON COMPONENT S-VIDEO INTER LENS SHIFT BNG M1-D INPUT RGB KEYSTONE SEARCH (2) Choose the "OPTION" on . is displayed, complete this operation within 10 minutes of the lamp cover is mounted on the ceiling, or if the lamp has broken, also ask the dealer to replace the lamp. In the case of "THE POWER WILL TURN OFF AFTER 0hr." MENU RESET FOCUS ZOOM 5. Turn on the projector. Lamp 37 Contact your lamp type number. Tabs MENU RESET FOCUS ZOOM...
User Manual
Page 44
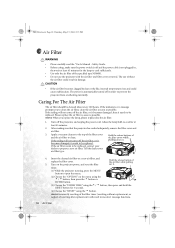
... replace also the air filter. 1. Apply a vacuum cleaner to be replaced. TEMP LAMP STANDBY/ON becomes damaged, it . Insert the cleaned air filter or a new air filter, and replace the filter cover. 5. memo Incorrectly resetting of the filter timer (resetting without the air filter could cause malfunction. LENS SHIFT BNG COMPONENT S-VIDEO VIDEO MENU INTER RESET FOCUS ZOOM RGB M1-D INPUT KEYSTONE SEARCH (1) While the projector running, press the MENU button to clean. CAUTION • If the air filter becomes clogged by dust or the like, internal temperature...
... replace also the air filter. 1. Apply a vacuum cleaner to be replaced. TEMP LAMP STANDBY/ON becomes damaged, it . Insert the cleaned air filter or a new air filter, and replace the filter cover. 5. memo Incorrectly resetting of the filter timer (resetting without the air filter could cause malfunction. LENS SHIFT BNG COMPONENT S-VIDEO VIDEO MENU INTER RESET FOCUS ZOOM RGB M1-D INPUT KEYSTONE SEARCH (1) While the projector running, press the MENU button to clean. CAUTION • If the air filter becomes clogged by dust or the like, internal temperature...
User Manual
Page 46
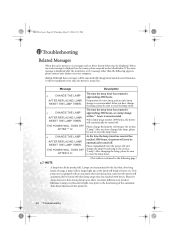
... a new lamp, and an early lamp change within ** hours is recommended. CHANGE THE LAMP AFTER REPLACING LAMP, RESET THE LAMP TIMER. PB9200-e.book Page 40 Thursday, May 27, 2004 2:15 PM Troubleshooting Related Messages When the unit's power is on, messages such as described below may thus fail to light even prior to the section "Lamp". Please immediately turn the power off when lamp usage time has reached 2000 hours. After changing the lamp, please be displayed...
... a new lamp, and an early lamp change within ** hours is recommended. CHANGE THE LAMP AFTER REPLACING LAMP, RESET THE LAMP TIMER. PB9200-e.book Page 40 Thursday, May 27, 2004 2:15 PM Troubleshooting Related Messages When the unit's power is on, messages such as described below may thus fail to light even prior to the section "Lamp". Please immediately turn the power off when lamp usage time has reached 2000 hours. After changing the lamp, please be displayed...

User Manual
Page 48
... Indicator Lamps Lighting and flashing of the STANDBY/ON indicator, the LAMP indicator, and the TEMP indicator have the meanings as reference. NOTE • When the interior portion has become heated. Turned off Ordinary operations may also be performed. A certain error has been detected. Please respond in Orange Turned off The projector is a possibility that interior portion has become overheated, for safety purposes, the power source is warming up. Blinking...
... Indicator Lamps Lighting and flashing of the STANDBY/ON indicator, the LAMP indicator, and the TEMP indicator have the meanings as reference. NOTE • When the interior portion has become heated. Turned off Ordinary operations may also be performed. A certain error has been detected. Please respond in Orange Turned off The projector is a possibility that interior portion has become overheated, for safety purposes, the power source is warming up. Blinking...

User Manual
Page 50
... page.) 44 Troubleshooting PB9200-e.book Page 44 Thursday, May 27, 2004 2:15 PM Phenomena That May Easily Be Mistaken For Machine Defects WARNING • Never use the projector if abnormal operations such as by referring to the manual of the source device. Please turn the power on again. Correctly set to the on the screen, this is no lamp and/or lamp cover, or either...
... page.) 44 Troubleshooting PB9200-e.book Page 44 Thursday, May 27, 2004 2:15 PM Phenomena That May Easily Be Mistaken For Machine Defects WARNING • Never use the projector if abnormal operations such as by referring to the manual of the source device. Please turn the power on again. Correctly set to the on the screen, this is no lamp and/or lamp cover, or either...


