
User Manual
Page 4
... (Picture In Picture) Menu 35 Maintenance 36 Cleaning the lens 36 Cleaning the projector case 36 Cleaning and replacing the air filters 36 Storing the projector 37 Transporting the projector 37 Lamp Information 38 Use and Replacement of the Lamp 38 Lamp Replacement 38 Temp Warning Light 40 Indicators ...40 Service Information 43 Accessories (included in...
... (Picture In Picture) Menu 35 Maintenance 36 Cleaning the lens 36 Cleaning the projector case 36 Cleaning and replacing the air filters 36 Storing the projector 37 Transporting the projector 37 Lamp Information 38 Use and Replacement of the Lamp 38 Lamp Replacement 38 Temp Warning Light 40 Indicators ...40 Service Information 43 Accessories (included in...

User Manual
Page 7
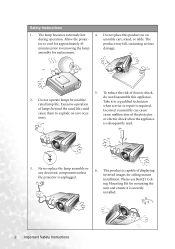
.... Caution • To prevent shock, do not open the lens shutter or • Please read this remove the lens cap when the projector lamp is on the product. user's manual for safety of ±10 volts occur. Important Safety Instructions 1 There are no user-serviceable parts ...inside. voltage of 100 to 240 volts, but could fail if power cuts or surges of information technology equipment. Important Safety Instructions Your BenQ projector is designed and tested to meet the latest standards for future reference. • In some countries, the line voltage is • Do...
.... Caution • To prevent shock, do not open the lens shutter or • Please read this remove the lens cap when the projector lamp is on the product. user's manual for safety of ±10 volts occur. Important Safety Instructions 1 There are no user-serviceable parts ...inside. voltage of 100 to 240 volts, but could fail if power cuts or surges of information technology equipment. Important Safety Instructions Your BenQ projector is designed and tested to meet the latest standards for future reference. • In some countries, the line voltage is • Do...
User Manual
Page 8
... is required. Do not operate lamps beyond the rated life could cause them to removing the lamp damage. Allow the projec- The tor to a qualified technician when service or repair is capable of electric shock, 2. Please use BenQ's Ceiling Mounting Kit for replacement.... 5. do not disassemble this product on rare occasions. assembly for mounting the unit and ensure it to cool for ceiling mount installation. Never replace the lamp assembly or any electronic components unless the projector is subsequently used...
... is required. Do not operate lamps beyond the rated life could cause them to removing the lamp damage. Allow the projec- The tor to a qualified technician when service or repair is capable of electric shock, 2. Please use BenQ's Ceiling Mounting Kit for replacement.... 5. do not disassemble this product on rare occasions. assembly for mounting the unit and ensure it to cool for ceiling mount installation. Never replace the lamp assembly or any electronic components unless the projector is subsequently used...
User Manual
Page 9
the following environments. - projector. - Do not block the ventilation holes. Space that is not fully horizontal may cause a malfunction of, or damage to, the lamp. - Always place the unit on end vertically. Do not use if tilted at an angle of more than 10 degrees left ...35°C / 95°F - Doing so may become excessively high, such as the inside the unit may contaminate optical components, shortening the projector's life span and darkening the image. Using the unit when it is poorly ventilated or confined. Do not place inflammables near fire alarms - ...
the following environments. - projector. - Do not block the ventilation holes. Space that is not fully horizontal may cause a malfunction of, or damage to, the lamp. - Always place the unit on end vertically. Do not use if tilted at an angle of more than 10 degrees left ...35°C / 95°F - Doing so may become excessively high, such as the inside the unit may contaminate optical components, shortening the projector's life span and darkening the image. Using the unit when it is poorly ventilated or confined. Do not place inflammables near fire alarms - ...

User Manual
Page 11
... Digital keystone correction to correct distorted images • Adjustable color balance control for data/video display • Ultra-high brightness projection lamp • Ability to display 16.7 million colors • On-screen menus in 10 languages: English, French, German, Italian, ...ease of the projected image will vary depending on the ambient lighting conditions and contrast/brightness settings. Introduction 5 Introduction Projector Features The projector integrates high-performance optical engine projection and a user-friendly design to provide high quality AV picture • HDTV ...
... Digital keystone correction to correct distorted images • Adjustable color balance control for data/video display • Ultra-high brightness projection lamp • Ability to display 16.7 million colors • On-screen menus in 10 languages: English, French, German, Italian, ...ease of the projected image will vary depending on the ambient lighting conditions and contrast/brightness settings. Introduction 5 Introduction Projector Features The projector integrates high-performance optical engine projection and a user-friendly design to provide high quality AV picture • HDTV ...
User Manual
Page 13
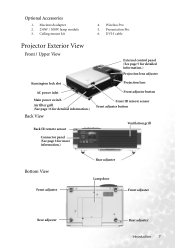
Presentation Pro 6. Macintosh adapter 2. 250W / 300W lamp module 3. Ceiling mount kit 4. DVI-I cable Projector Exterior View Front / Upper View External control panel (See page 9 for detailed information.) Projection lens adjuster Kensington lock slot Projection lens AC power inlet Main ... Front adjuster button Front IR remote sensor Front adjuster button Ventilation grill Connector panel (See page 8 for more information.) Bottom View Front adjuster Rear adjuster Lamp door Front adjuster Rear adjuster Rear adjuster Introduction 7 Optional Accessories 1. Wireless Pro 5.
Presentation Pro 6. Macintosh adapter 2. 250W / 300W lamp module 3. Ceiling mount kit 4. DVI-I cable Projector Exterior View Front / Upper View External control panel (See page 9 for detailed information.) Projection lens adjuster Kensington lock slot Projection lens AC power inlet Main ... Front adjuster button Front IR remote sensor Front adjuster button Ventilation grill Connector panel (See page 8 for more information.) Bottom View Front adjuster Rear adjuster Lamp door Front adjuster Rear adjuster Rear adjuster Introduction 7 Optional Accessories 1. Wireless Pro 5.

User Manual
Page 15
... the on -screen display control developed a problem. mation.) Automatically determines the best picture timings for more infor- 8. Introduction 9 Lamp indicator light (Refer to page 20 for more infor- You can 2. Controls and Functions External Control Panel 13 12 10 9 ... of the image. Sequentially selects the input signal 9. mation.) mation.) Turns the projector on . 12. Lights 6. 6Menu up or flashes when the projector is activated, Adjusts the size of the lamp. Refer to page 38 5. 5Exit for more information. 7. Power (Refer to ...
... the on -screen display control developed a problem. mation.) Automatically determines the best picture timings for more infor- 8. Introduction 9 Lamp indicator light (Refer to page 20 for more infor- You can 2. Controls and Functions External Control Panel 13 12 10 9 ... of the image. Sequentially selects the input signal 9. mation.) mation.) Turns the projector on . 12. Lights 6. 6Menu up or flashes when the projector is activated, Adjusts the size of the lamp. Refer to page 38 5. 5Exit for more information. 7. Power (Refer to ...

User Manual
Page 25
If the frequency/ resolution of Range" displayed on the projector or remote control to start the projector within hours, the fans will not respond to page 21. To protect the lamp, the projector will run for a few minutes to cool down . Disconnect the power cord from the wall socket. Shutdown 1.... refer to any commands during the 90-second cooling down process. To turn the projector off . 4. You can also press Source on a blank screen. The Power indicator light flashes orange and the lamp shuts down, the fans continue to run for approximately 90 seconds to cool down the...
If the frequency/ resolution of Range" displayed on the projector or remote control to start the projector within hours, the fans will not respond to page 21. To protect the lamp, the projector will run for a few minutes to cool down . Disconnect the power cord from the wall socket. Shutdown 1.... refer to any commands during the 90-second cooling down process. To turn the projector off . 4. You can also press Source on a blank screen. The Power indicator light flashes orange and the lamp shuts down, the fans continue to run for approximately 90 seconds to cool down the...

User Manual
Page 31
... input only) Presentation Mode, Vivid Mode, Video Mode, Economic Mode (YPbPr/ YCbCr/ S-Video/ Video signal input) Gaming Mode, Video Mode, Cinema Mode, Economic Mode Reset Lamp Hour Main Page: PIP Source PIP Size PIP Pos. OSD Pos., OSD Time Setup -- Menu Operation Menu System Please note that the OSD menus vary...
... input only) Presentation Mode, Vivid Mode, Video Mode, Economic Mode (YPbPr/ YCbCr/ S-Video/ Video signal input) Gaming Mode, Video Mode, Cinema Mode, Economic Mode Reset Lamp Hour Main Page: PIP Source PIP Size PIP Pos. OSD Pos., OSD Time Setup -- Menu Operation Menu System Please note that the OSD menus vary...

User Manual
Page 40
... system noise and reduce the power consumption by 20%. Lamp Hour Displays the number of hours the lamp has been used. 34 Operation YPbPr/ YCbCr/ S-Video/ Video Signal Input 1. Economic Mode: Use this mode to suit your projector image setup to reduce the system noise and reduce the... power consumption by 20%. Cinema Mode: With a lower color temperature, it is suitable for enjoying TV movies. 3. Vivid Mode: Is perfect for presentations. The lamp life is emphasized in this mode ...
... system noise and reduce the power consumption by 20%. Lamp Hour Displays the number of hours the lamp has been used. 34 Operation YPbPr/ YCbCr/ S-Video/ Video Signal Input 1. Economic Mode: Use this mode to suit your projector image setup to reduce the system noise and reduce the... power consumption by 20%. Cinema Mode: With a lower color temperature, it is suitable for enjoying TV movies. 3. Vivid Mode: Is perfect for presentations. The lamp life is emphasized in this mode ...
User Manual
Page 42
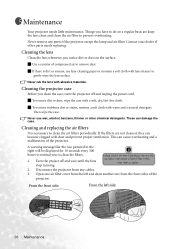
... benzene, thinner or other parts needs replacing. From the front side: From the left and draw another one from the front sides of the projector except the lamp and air filter. To remove stubborn dirt or stains, moisten a soft cloth with a soft, dry, lint-free cloth. This can damage ...the case. Disconnect the projector from the left side: 36 Maintenance Contact your dealer if other chemical detergents. Never rub the lens with dust and ...
... benzene, thinner or other parts needs replacing. From the front side: From the left and draw another one from the front sides of the projector except the lamp and air filter. To remove stubborn dirt or stains, moisten a soft cloth with a soft, dry, lint-free cloth. This can damage ...the case. Disconnect the projector from the left side: 36 Maintenance Contact your dealer if other chemical detergents. Never rub the lens with dust and ...
User Manual
Page 44
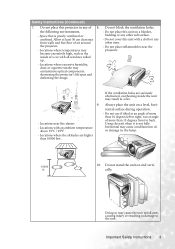
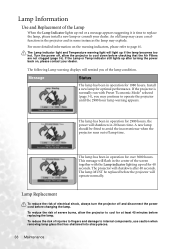
...indicators, please refer to avoid the inconvenience when the projector runs out of lamp time. Lamp Replacement To reduce the risk of electrical shock, always turn the projector off , allow the projector to internal components, use caution when removing lamp glass that the Air Filters are not clogged (page ... light will shutdown in operation for over 3000 hours. The lamp has been in 20 hours time. The projector will flash in operation for 1980 hours. Lamp Information Use and Replacement of the Lamp When the Lamp Indicator lights up red or a message appears suggesting it is...
...indicators, please refer to avoid the inconvenience when the projector runs out of lamp time. Lamp Replacement To reduce the risk of electrical shock, always turn the projector off , allow the projector to internal components, use caution when removing lamp glass that the Air Filters are not clogged (page ... light will shutdown in operation for over 3000 hours. The lamp has been in 20 hours time. The projector will flash in operation for 1980 hours. Lamp Information Use and Replacement of the Lamp When the Lamp Indicator lights up red or a message appears suggesting it is...

User Manual
Page 45
...screw that you use a magnetic-head screwdriver. If the screw is removed. Do not place the lamp in malfunction. Step 5. Consult your hands into the projector after the lamp is not loosened completely, you touch the optical components inside, it could injure your fingers. Then loosen...near flammable materials. Step 4. It is removed. If the lamp is hot, avoid burns by touching the lens, do not touch the empty lamp compartment when the lamp is strongly recommended that fixes the lamp to the projector. Do not insert your local hazardous waste regulations and dispose ...
...screw that you use a magnetic-head screwdriver. If the screw is removed. Do not place the lamp in malfunction. Step 5. Consult your hands into the projector after the lamp is not loosened completely, you touch the optical components inside, it could injure your fingers. Then loosen...near flammable materials. Step 4. It is removed. If the lamp is hot, avoid burns by touching the lens, do not touch the empty lamp compartment when the lamp is strongly recommended that fixes the lamp to the projector. Do not insert your local hazardous waste regulations and dispose ...

User Manual
Page 46
...: Light OFF 2. : Light flashing 3. : Light ON 4. ii. Air Filters are clean. Indicators Illustration - G : Green light 40 Maintenance Turn the projector off , check that the air filters are clogged. 3. R : Red light 6. Step 7. Temp Warning Light When the Temperature warning light is on, it... service personnel for 3 seconds to access the lamp hour timer. Reset the lamp counter i. Press and hold Exit on the remote control to display the total used lamp time. Press Menu on the projector or on the projector for further help. An adjustment message will appear...
...: Light OFF 2. : Light flashing 3. : Light ON 4. ii. Air Filters are clean. Indicators Illustration - G : Green light 40 Maintenance Turn the projector off , check that the air filters are clogged. 3. R : Red light 6. Step 7. Temp Warning Light When the Temperature warning light is on, it... service personnel for 3 seconds to access the lamp hour timer. Reset the lamp counter i. Press and hold Exit on the remote control to display the total used lamp time. Press Menu on the projector or on the projector for further help. An adjustment message will appear...

User Manual
Page 47
...- The Power indicator light is turned off. Replace the projection lamp with a new one immediately. - - R - - If you try to restart the projector, it will shutdown again. If you try to restart the projector, it will shutdown again. R- The projector has shutdown automatically. Or (2) The projector needs to cool down as it will shutdown again. G - - R The...
...- The Power indicator light is turned off. Replace the projection lamp with a new one immediately. - - R - - If you try to restart the projector, it will shutdown again. If you try to restart the projector, it will shutdown again. R- The projector has shutdown automatically. Or (2) The projector needs to cool down as it will shutdown again. G - - R The...

User Manual
Page 49
...43 Service Information Accessories (included in the standard package) Description of parts Part number Mac adapter (switchable 20.20118.A15 300W lamp module 60.J8106.001 250W lamp module 59.J9421.CG1 Ceiling mount kit 60.J7683.001 Wireless Pro (EU 59.J8201.001 Wireless Pro (US 59.J8201....501 Ordering Parts or Getting Information For product information, product assistance, service information, or to order accessories, please visit the BenQ Corporation website at http://www.BenQ.com. PC audio cable 50.L4302.501 Soft carry case 47.J8104.001 Component Video cable 50.J2401.001 USB mouse ...
...43 Service Information Accessories (included in the standard package) Description of parts Part number Mac adapter (switchable 20.20118.A15 300W lamp module 60.J8106.001 250W lamp module 59.J9421.CG1 Ceiling mount kit 60.J7683.001 Wireless Pro (EU 59.J8201.001 Wireless Pro (US 59.J8201....501 Ordering Parts or Getting Information For product information, product assistance, service information, or to order accessories, please visit the BenQ Corporation website at http://www.BenQ.com. PC audio cable 50.L4302.501 Soft carry case 47.J8104.001 Component Video cable 50.J2401.001 USB mouse ...

User Manual
Page 51
... signal input Audio signal input Audio 1 Output USB mouse connector Speaker RGB Audio L/R Digital Projector PB8240 1024 x 768 XGA PB8140 800 x 600 SVGA PB8250 1024 x 768 XGA 1-CHIP DMD F/2.4 PB8140 / PB8240 250W lamp PB8250 300W lamp AC100 ~ 240V, 4.5A, 50/60 Hz (Automatic) PB8140 / PB8240 330W (Max) PB8250 395W (Max) 320 mm (W) x 106 mm (H) x 236 mm (D) 7.7 lbs...
... signal input Audio signal input Audio 1 Output USB mouse connector Speaker RGB Audio L/R Digital Projector PB8240 1024 x 768 XGA PB8140 800 x 600 SVGA PB8250 1024 x 768 XGA 1-CHIP DMD F/2.4 PB8140 / PB8240 250W lamp PB8250 300W lamp AC100 ~ 240V, 4.5A, 50/60 Hz (Automatic) PB8140 / PB8240 330W (Max) PB8250 395W (Max) 320 mm (W) x 106 mm (H) x 236 mm (D) 7.7 lbs...

