User Manual
Page 3
... View 7 Front / Upper View 7 Back View ...7 Bottom View 7 Connector Panel 8 Controls and Functions 9 External Control Panel 9 Remote Control Description 10 Remote Control Effective Range 11 Installing or Replacing the Batteries 12 Setting Up Your Projector 13 Choosing a Location 13 Making Connections 13 Connecting to a Laptop or Desktop Computer 14 Connecting Equipment to the...
... View 7 Front / Upper View 7 Back View ...7 Bottom View 7 Connector Panel 8 Controls and Functions 9 External Control Panel 9 Remote Control Description 10 Remote Control Effective Range 11 Installing or Replacing the Batteries 12 Setting Up Your Projector 13 Choosing a Location 13 Making Connections 13 Connecting to a Laptop or Desktop Computer 14 Connecting Equipment to the...

User Manual
Page 11
...; Two PC input terminals and one PC output terminal • Replaceable air filter Note: The brightness of use. The projector offers the following features: • Full-function remote control with laser pointer/ remote mouse function • High quality manual zoom lens • One-key auto-adjustment to display the best picture quality •...
...; Two PC input terminals and one PC output terminal • Replaceable air filter Note: The brightness of use. The projector offers the following features: • Full-function remote control with laser pointer/ remote mouse function • High quality manual zoom lens • One-key auto-adjustment to display the best picture quality •...

User Manual
Page 12
... with the cables required for connection to a PC and to video equipment. PB8250 DiUnissgetiart'laslalMtPioraonujneScaetlroiers Projector Soft Carry Case User's Manual 1 .001 P/N:53.J940 Batteries 3-2 Power Converter User's Manual CD Quick Start Guide Warranty Booklet Remote Control S-Video Cable Video Cable VGA Cable Audio Cables US EU UK USB Cable D-Sub - Carefully...
... with the cables required for connection to a PC and to video equipment. PB8250 DiUnissgetiart'laslalMtPioraonujneScaetlroiers Projector Soft Carry Case User's Manual 1 .001 P/N:53.J940 Batteries 3-2 Power Converter User's Manual CD Quick Start Guide Warranty Booklet Remote Control S-Video Cable Video Cable VGA Cable Audio Cables US EU UK USB Cable D-Sub - Carefully...
User Manual
Page 13
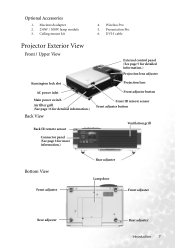
...DVI-I cable Projector Exterior View Front / Upper View External control panel (See page 9 for detailed information.) Projection lens adjuster Kensington lock slot Projection lens AC power inlet Main power switch Air filter grill (See page 36 for detailed information.) Back View Back IR remote sensor Front ...adjuster button Front IR remote sensor Front adjuster button Ventilation grill Connector panel (See page 8 for more information.) Bottom View Front adjuster ...
...DVI-I cable Projector Exterior View Front / Upper View External control panel (See page 9 for detailed information.) Projection lens adjuster Kensington lock slot Projection lens AC power inlet Main power switch Air filter grill (See page 36 for detailed information.) Back View Back IR remote sensor Front ...adjuster button Front IR remote sensor Front adjuster button Ventilation grill Connector panel (See page 8 for more information.) Bottom View Front adjuster ...

User Manual
Page 16
Remote Control Description Front View Power (18, 19) 6Down/ Menu (26) 3 Left/ Keystone 4 Right/ Keystone + (20) Auto (21) L-Click/ R-click (23) Zoom in +/ Zoom out - (23) Return (23, 24) PIP Position (23) PIP Source (23) Freeze (24) LED (22) Source (21) Laser Pointer (22) Exit (26) Blank (22) Mouse Pad (23) Drag (23) Volume +/- (23) Mute (23) PIP Size (23) Preset (34) Notes on Remote Control Operation Make sure that there are no obstacles between the remote control and the IR sensors on the projector that might obstruct the infra-red beam. 10 Introduction
Remote Control Description Front View Power (18, 19) 6Down/ Menu (26) 3 Left/ Keystone 4 Right/ Keystone + (20) Auto (21) L-Click/ R-click (23) Zoom in +/ Zoom out - (23) Return (23, 24) PIP Position (23) PIP Source (23) Freeze (24) LED (22) Source (21) Laser Pointer (22) Exit (26) Blank (22) Mouse Pad (23) Drag (23) Volume +/- (23) Mute (23) PIP Size (23) Preset (34) Notes on Remote Control Operation Make sure that there are no obstacles between the remote control and the IR sensors on the projector that might obstruct the infra-red beam. 10 Introduction

User Manual
Page 17
...of children. ATTENTION LASER DIODE ACHTUNG Introduction 11 It is visible. The remote control must be mindful of the dangers of laser energy and keep this remote control out of the reach of the projector's IR remote control sensors to depress the Laser button for continuous output. Parents should... 6 meters (19.5 feet). 6m Warning Messages on the front and the back of the projector. The laser pointer is not a toy. Remote Control Effective Range Infra Red (IR) remote control sensors are located on the Back of the Remote Control The laser beam is necessary to function correctly.
...of children. ATTENTION LASER DIODE ACHTUNG Introduction 11 It is visible. The remote control must be mindful of the dangers of laser energy and keep this remote control out of the reach of the projector's IR remote control sensors to depress the Laser button for continuous output. Parents should... 6 meters (19.5 feet). 6m Warning Messages on the front and the back of the projector. The laser pointer is not a toy. Remote Control Effective Range Infra Red (IR) remote control sensors are located on the Back of the Remote Control The laser beam is necessary to function correctly.

User Manual
Page 20
...• 576i • 720p (50/ 60 Hz) • 480p • 576p • 1080i (50/ 60 Hz) 14 Setting Up Your Projector The projector is capable of accepting HDTV data through a Component Video connector. Connecting Equipment to the Component Video Input Component Video cable RGB YPbPr AV equipment The...cable RGB To RGB input USB PC audio A Mac adapter (an optional accessory) may be necessary if you intend using mouse functions on the remote control. Some of these sources are: • Digital-VHS (D-VHS) player • Satellite Dish HDTV receiver • DVD player •...
...• 576i • 720p (50/ 60 Hz) • 480p • 576p • 1080i (50/ 60 Hz) 14 Setting Up Your Projector The projector is capable of accepting HDTV data through a Component Video connector. Connecting Equipment to the Component Video Input Component Video cable RGB YPbPr AV equipment The...cable RGB To RGB input USB PC audio A Mac adapter (an optional accessory) may be necessary if you intend using mouse functions on the remote control. Some of these sources are: • Digital-VHS (D-VHS) player • Satellite Dish HDTV receiver • DVD player •...

User Manual
Page 22
... will drop into position and be locked. 2. If the screen and the projector are not perpendicular to release the adjuster. Maximum zoom Minimum image size Focus ring Zoom ring 16 Setting Up Your Projector Screw the rear adjuster feet to the required picture size (see the table on... the remote control. Screen Size Place the projector at the required distance from the screen according to fine-tune the projection angle...
... will drop into position and be locked. 2. If the screen and the projector are not perpendicular to release the adjuster. Maximum zoom Minimum image size Focus ring Zoom ring 16 Setting Up Your Projector Screw the rear adjuster feet to the required picture size (see the table on... the remote control. Screen Size Place the projector at the required distance from the screen according to fine-tune the projection angle...

User Manual
Page 24
Turn on . 6. Next, the projector starts to start the unit. The Power indicator lights orange. 5. The Power indicator light flashes green when the power... seconds after pressing Power. Switch all of six messages will be displayed on the remote control or projector to search input signals. In the later stage of the screen. Plug the power cord into the projector and into a wall socket. 3. Turn the main power switch on . 2. ...1. Irrespective of selected input source, the screen shows "Acquiring Signal" at the bottom right corner of start up , a default BenQ logo appears. 7.
Turn on . 6. Next, the projector starts to start the unit. The Power indicator lights orange. 5. The Power indicator light flashes green when the power... seconds after pressing Power. Switch all of six messages will be displayed on the remote control or projector to search input signals. In the later stage of the screen. Plug the power cord into the projector and into a wall socket. 3. Turn the main power switch on . 2. ...1. Irrespective of selected input source, the screen shows "Acquiring Signal" at the bottom right corner of start up , a default BenQ logo appears. 7.

User Manual
Page 25
...". 8. Turn the main power switch off , press Power again. 2. Press Power and a warning message appears. If the frequency/ resolution of Range" displayed on the projector or remote control to select your desired input signal. The Power indicator light flashes orange and the lamp shuts down, the fans continue to run for approximately...
...". 8. Turn the main power switch off , press Power again. 2. Press Power and a warning message appears. If the frequency/ resolution of Range" displayed on the projector or remote control to select your desired input signal. The Power indicator light flashes orange and the lamp shuts down, the fans continue to run for approximately...

User Manual
Page 26
...4to correct keystoning at either the top or bottom. Press Menu key on the projector or 2. Press Right 4 on the projector or the remote control. Press 4 Right on the projector or Keystone4 on the remote control when you are in Picture --> Keystone menu. Digital Keystone Correction Keystoning refers...where the projected image is not perpendicular to Display --> Keystone and adjust the values by pressing 3 Left/ Right 4 on the projector or 3 Keystone/ Keystone 4 on the remote control. Press 3 Left/ Right 4 (hot key) on the control panel of these steps. 1. Press Keystone 4 to ...
...4to correct keystoning at either the top or bottom. Press Menu key on the projector or 2. Press Right 4 on the projector or the remote control. Press 4 Right on the projector or Keystone4 on the remote control when you are in Picture --> Keystone menu. Digital Keystone Correction Keystoning refers...where the projected image is not perpendicular to Display --> Keystone and adjust the values by pressing 3 Left/ Right 4 on the projector or 3 Keystone/ Keystone 4 on the remote control. Press 3 Left/ Right 4 (hot key) on the control panel of these steps. 1. Press Keystone 4 to ...

User Manual
Page 27
... panel of the screen for 3 seconds. The selected source will be displayed at the bottom right of the projector or on the remote control. To do this, press Auto on the projector control panel or the remote control. Analog RGB 1280 x 854 / 60Hz Presentation Mode The screen will be displayed at the bottom right...
... panel of the screen for 3 seconds. The selected source will be displayed at the bottom right of the projector or on the remote control. To do this, press Auto on the projector control panel or the remote control. Analog RGB 1280 x 854 / 60Hz Presentation Mode The screen will be displayed at the bottom right...

User Manual
Page 28
A word "BLANK" appear at the bottom right corner of the remote control and the attached "User Information" prior to using the lens' zoom ring. Focus ring Zoom ring Laser Pointer Operation The Laser Pointer is hidden. ...
A word "BLANK" appear at the bottom right corner of the remote control and the attached "User Information" prior to using the lens' zoom ring. Focus ring Zoom ring Laser Pointer Operation The Laser Pointer is hidden. ...

User Manual
Page 29
... In + / Zoom Out - Use the Mouse Pad to page 35 for the drag function of the picture will be magnified. Mouse Function Operation Connect the projector to your PC or notebook with a USB cable prior to mute the sound. The Mouse Pad can enable the PIP (Picture In Picture) function and... the Mouse Pad to the original size. When the - Operation 23 Or press Mute to using these functions. By pressing Zoom +, the center of the remote mouse.
... In + / Zoom Out - Use the Mouse Pad to page 35 for the drag function of the picture will be magnified. Mouse Function Operation Connect the projector to your PC or notebook with a USB cable prior to mute the sound. The Mouse Pad can enable the PIP (Picture In Picture) function and... the Mouse Pad to the original size. When the - Operation 23 Or press Mute to using these functions. By pressing Zoom +, the center of the remote mouse.

User Manual
Page 32
...various adjustments and settings. Adjust keystone values by pressing 3 Left/ Right 4on the projector or 3 Keystone/ Keystone 4 on . 4. Use 3 Left/ Right 4on the projector or 5. Press Menu on the projector or remote control to leave and save the settings. submenu and the second press closes the ... example describes the adjustment of the keystone. 1. Use 5Exit or 6Menu on the projector press Exit twice* on -screen menu. 26 Operation Press5Exit on the projector or 3 Keystone/ Keystone 4 on the remote *The first press leads you back to the control to select Display menu. 3....
...various adjustments and settings. Adjust keystone values by pressing 3 Left/ Right 4on the projector or 3 Keystone/ Keystone 4 on . 4. Use 3 Left/ Right 4on the projector or 5. Press Menu on the projector or remote control to leave and save the settings. submenu and the second press closes the ... example describes the adjustment of the keystone. 1. Use 5Exit or 6Menu on the projector press Exit twice* on -screen menu. 26 Operation Press5Exit on the projector or 3 Keystone/ Keystone 4 on the remote *The first press leads you back to the control to select Display menu. 3....

User Manual
Page 43
...humidity of purchase to gently sweep the dust away. 4. The projector will be reminded by a message displayed on the power again. When you need to store the projector for the projector. Remove the batteries from the remote control. Replace the filters then press the covers back until ...they click into place. Transporting the projector It is difficult to remove or the filters are broken, ...
...humidity of purchase to gently sweep the dust away. 4. The projector will be reminded by a message displayed on the power again. When you need to store the projector for the projector. Remove the batteries from the remote control. Replace the filters then press the covers back until ...they click into place. Transporting the projector It is difficult to remove or the filters are broken, ...

User Manual
Page 46
ii. Press Menu on the projector or on the remote control to display the total used lamp time. An adjustment message will appear. The internal temperature is warning you of the following section. Turn the projector off , check that the air filters are clogged. 3. O : Orange light... on , it is too high. 2. Reset the lamp counter i. iii. Temp Warning Light When the Temperature warning light is on the projector for further help. Step 7. For more detailed information, please refer to leave. Air Filters are clean. Indicators Illustration - The fans are not...
ii. Press Menu on the projector or on the remote control to display the total used lamp time. An adjustment message will appear. The internal temperature is warning you of the following section. Turn the projector off , check that the air filters are clogged. 3. O : Orange light... on , it is too high. 2. Reset the lamp counter i. iii. Temp Warning Light When the Temperature warning light is on the projector for further help. Step 7. For more detailed information, please refer to leave. Air Filters are clean. Indicators Illustration - The fans are not...

User Manual
Page 49
PC audio cable 50.L4302.501 Soft carry case 47.J8104.001 Component Video cable 50.J2401.001 USB mouse cable 50.73213.501 Remote control 56.26J95.001 3-2 power converter 22.91008.001 D-Sub - DVI cable 50.J2103.501 Optional Accessories (not included in the standard package) Description Part ....001 DVI-I cable 50.J2508.501 Ordering Parts or Getting Information For product information, product assistance, service information, or to order accessories, please visit the BenQ Corporation website at http://www...
PC audio cable 50.L4302.501 Soft carry case 47.J8104.001 Component Video cable 50.J2401.001 USB mouse cable 50.73213.501 Remote control 56.26J95.001 3-2 power converter 22.91008.001 D-Sub - DVI cable 50.J2103.501 Optional Accessories (not included in the standard package) Description Part ....001 DVI-I cable 50.J2508.501 Ordering Parts or Getting Information For product information, product assistance, service information, or to order accessories, please visit the BenQ Corporation website at http://www...

User Manual
Page 50
...not been correctly selected. Select the correct input signal with new ones. The lens cap is an obstacle between the remote control and the projector. Remove the obstacle. REMOTE CONTROL DOES NOT WORK Cause Remedy The batteries are not aligned properly. Replace both of the unit if necessary. ... well as the height of the batteries with the Source key on the projector, and plug the power cord into the AC inlet on the projector or remote control. There is still attached to turn the projector on . Plug the power cord into the power outlet. Wait until the...
...not been correctly selected. Select the correct input signal with new ones. The lens cap is an obstacle between the remote control and the projector. Remove the obstacle. REMOTE CONTROL DOES NOT WORK Cause Remedy The batteries are not aligned properly. Replace both of the unit if necessary. ... well as the height of the batteries with the Source key on the projector, and plug the power cord into the AC inlet on the projector or remote control. There is still attached to turn the projector on . Plug the power cord into the power outlet. Wait until the...

