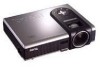
User Manual
Page 3
Table of Contents iii Picture Menu 24 Table of Contents Important Safety Instructions 1 Introduction 5 Projector Features 5 Shipping Contents 6 Optional Accessories 7 Projector Exterior View 7 Front / Upper Side 7 Rear Side ...7 Bottom Side ...7 Controls and Functions 8 External Control Panel 8 Remote Control Description 9 Remote Control Effective Range 10 Installing or Replacing the Battery 10 Connection 11 Connecting to a Laptop...
Table of Contents iii Picture Menu 24 Table of Contents Important Safety Instructions 1 Introduction 5 Projector Features 5 Shipping Contents 6 Optional Accessories 7 Projector Exterior View 7 Front / Upper Side 7 Rear Side ...7 Bottom Side ...7 Controls and Functions 8 External Control Panel 8 Remote Control Description 9 Remote Control Effective Range 10 Installing or Replacing the Battery 10 Connection 11 Connecting to a Laptop...
User Manual
Page 8
...place liquids near or on the projector or place any objects when the projector is under operation as this could cause the objects to become wet, disconnect it from the power supply's wall socket and call BenQ to fail. Liquids spilled into the projector may result in accidents and ...possible injury. 12. To temporarily turn off the lamp, press Blank on the projector or remote control. 4 Important Safety Instructions
...place liquids near or on the projector or place any objects when the projector is under operation as this could cause the objects to become wet, disconnect it from the power supply's wall socket and call BenQ to fail. Liquids spilled into the projector may result in accidents and ...possible injury. 12. To temporarily turn off the lamp, press Blank on the projector or remote control. 4 Important Safety Instructions
User Manual
Page 10
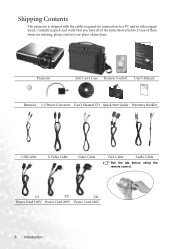
US EU UK Power Cord 110V Power Cord 220V Power Cord 240V 6 Introduction If any of these items are missing, please contact your place of the items shown below. Projector Soft Carry Case Remote Control User's Manual Batteries 3-2 Power Converter User's Manual CD Quick Start Guide Warranty Booklet USB Cable S-Video Cable Video Cable VGA Cable Audio Cable Pull the tab before using the remote control. Shipping Contents The projector is shipped with the cables required for connection to a PC and to video equipment. Carefully unpack and verify that you have all of purchase.
US EU UK Power Cord 110V Power Cord 220V Power Cord 240V 6 Introduction If any of these items are missing, please contact your place of the items shown below. Projector Soft Carry Case Remote Control User's Manual Batteries 3-2 Power Converter User's Manual CD Quick Start Guide Warranty Booklet USB Cable S-Video Cable Video Cable VGA Cable Audio Cable Pull the tab before using the remote control. Shipping Contents The projector is shipped with the cables required for connection to a PC and to video equipment. Carefully unpack and verify that you have all of purchase.
User Manual
Page 11
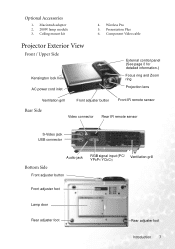
... Plus 6. Component Video cable Projector Exterior View Front / Upper Side Kensington lock hole AC power cord inlet External control panel (See page 8 for detailed information.) Focus ring and Zoom ring Projection lens Ventilation grill Front adjuster button Front IR remote sensor Rear Side Video connector Rear IR remote sensor S-Video jack USB connector...
... Plus 6. Component Video cable Projector Exterior View Front / Upper Side Kensington lock hole AC power cord inlet External control panel (See page 8 for detailed information.) Focus ring and Zoom ring Projection lens Ventilation grill Front adjuster button Front IR remote sensor Rear Side Video connector Rear IR remote sensor S-Video jack USB connector...
User Manual
Page 13
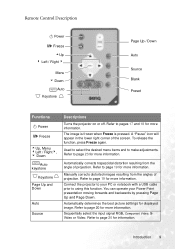
...SVideo or Video. Refer to page 23 for more information. Refer to pages 17 and 18 for displayed image. Connect the projector to your Power Point presentation moving forwards and backwards by pressing Page Up and Page Down. Automatically determines the best picture ...for more information. Automatically corrects trapezoidal distortion resulting from the angles of projection. Manually corrects distorted images resulting from the angle of projection. Remote Control Description II Power II/ Freeze 5Up 3 Left / Right 4 Menu 6 Down AUTO Auto Keystone Page Up / Down Auto ...
...SVideo or Video. Refer to page 23 for more information. Refer to pages 17 and 18 for displayed image. Connect the projector to your Power Point presentation moving forwards and backwards by pressing Page Up and Page Down. Automatically determines the best picture ...for more information. Automatically corrects trapezoidal distortion resulting from the angles of projection. Manually corrects distorted images resulting from the angle of projection. Remote Control Description II Power II/ Freeze 5Up 3 Left / Right 4 Menu 6 Down AUTO Auto Keystone Page Up / Down Auto ...
User Manual
Page 14
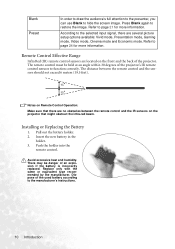
... to the presenter, you can use Blank to restore the image. The distance between the remote control and the IR sensors on the front and the back of the projector's IR remote control sensors to page 21 for more information. Pull out the battery holder. 2. Replace only... recommended by the manufacturer. Remote Control Effective Range Infra Red (IR) remote control sensors are no obstacles between the remote control and the sensors should not exceed 6 meters (19.5 feet). Notes on Remote Control Operation: Make sure that there are located on the projector that might obstruct the infra...
... to the presenter, you can use Blank to restore the image. The distance between the remote control and the IR sensors on the front and the back of the projector's IR remote control sensors to page 21 for more information. Pull out the battery holder. 2. Replace only... recommended by the manufacturer. Remote Control Effective Range Infra Red (IR) remote control sensors are no obstacles between the remote control and the sensors should not exceed 6 meters (19.5 feet). Notes on Remote Control Operation: Make sure that there are located on the projector that might obstruct the infra...
User Manual
Page 19
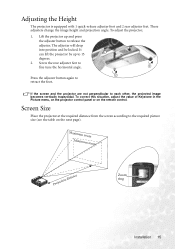
... projector up to 15 1 degrees. 2. ...projector are not perpendicular to retract the foot. To adjust the projector, 1. To correct this situation, adjust the value of Keystone in the Picture menu, on the projector... control panel or on the next page). Screen Size Place the projector at the required distance from the screen according to release the adjuster. Adjusting the Height The projector... is equipped with 1 quick-release adjuster foot and 2 rear adjuster feet. These adjusters change the image height and projection angle. It can lift the projector...
... projector up to 15 1 degrees. 2. ...projector are not perpendicular to retract the foot. To adjust the projector, 1. To correct this situation, adjust the value of Keystone in the Picture menu, on the projector... control panel or on the next page). Screen Size Place the projector at the required distance from the screen according to release the adjuster. Adjusting the Height The projector... is equipped with 1 quick-release adjuster foot and 2 rear adjuster feet. These adjusters change the image height and projection angle. It can lift the projector...

User Manual
Page 21
... input source, the screen shows "Acquiring Signal" at the bottom right corner of the input signal exceeds the projector's operating range, you will be displayed on the projector or remote control to select an input signal to display if there are 2 or more information, please refer to the... projector. Turn on the remote control or projector to search for input signals. The start up , a default BenQ logo appears. 6. If there is turned on. 5. You can also press Source on the screen ...
... input source, the screen shows "Acquiring Signal" at the bottom right corner of the input signal exceeds the projector's operating range, you will be displayed on the projector or remote control to select an input signal to display if there are 2 or more information, please refer to the... projector. Turn on the remote control or projector to search for input signals. The start up , a default BenQ logo appears. 6. If there is turned on. 5. You can also press Source on the screen ...
User Manual
Page 23
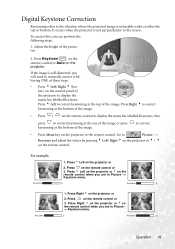
...is noticeably wider at the bottom of the projector to display the status bar labelled Keystone. Adjust the height of the image. For example, 1. Press on the remote control. Keystone 0 Keystone -6 1. Press Right 4 on the projector or 4 on the remote control when you are in Picture --> Keystone ... at the top of the image or press keystoning at either the top or bottom. Press 3 Left on the projector or the remote control. Press Right 4 on the remote control to display the status bar labelled Keystone, then press to correct • Press Menu key on the...
...is noticeably wider at the bottom of the projector to display the status bar labelled Keystone. Adjust the height of the image. For example, 1. Press on the remote control. Keystone 0 Keystone -6 1. Press Right 4 on the projector or 4 on the remote control when you are in Picture --> Keystone ... at the top of the image or press keystoning at either the top or bottom. Press 3 Left on the projector or the remote control. Press Right 4 on the remote control to display the status bar labelled Keystone, then press to correct • Press Menu key on the...
User Manual
Page 24
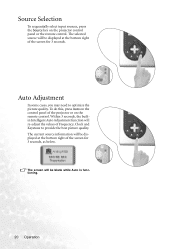
... the screen for 3 seconds, as below. The selected source will be displayed at the bottom right of the projector or on the remote control. To do this, press Auto on the projector control panel or the remote control. The screen will re-adjust the values of the screen for 3 seconds. Auto Adjustment In some...
... the screen for 3 seconds, as below. The selected source will be displayed at the bottom right of the projector or on the remote control. To do this, press Auto on the projector control panel or the remote control. The screen will re-adjust the values of the screen for 3 seconds. Auto Adjustment In some...
User Manual
Page 27
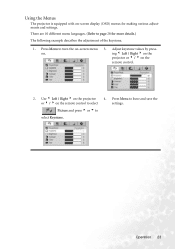
...display (OSD) menus for more details.) The following example describes the adjustment of the keystone. 1. Using the Menus The projector is equipped with on the projector 4. Picture and press 5 or 6 to page 28 for making various adjustments and settings. Adjust keystone values by press- ...Press Menu to select settings. ing 3 Left / Right 4 on the projector or 3 / 4 on the remote control to leave and save the or 3 / 4 on the remote control. 2. Operation 23 There are 10 different menu languages. (Refer to select Keystone.
...display (OSD) menus for more details.) The following example describes the adjustment of the keystone. 1. Using the Menus The projector is equipped with on the projector 4. Picture and press 5 or 6 to page 28 for making various adjustments and settings. Adjust keystone values by press- ...Press Menu to select settings. ing 3 Left / Right 4 on the projector or 3 / 4 on the remote control to leave and save the or 3 / 4 on the remote control. 2. Operation 23 There are 10 different menu languages. (Refer to select Keystone.
User Manual
Page 32
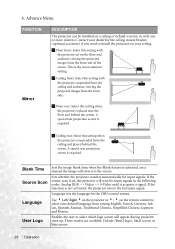
...time when the Blank feature is the most common setting. If the source scan is not activated, the projector selects the last input signal. Three modes are available: Default (BenQ logo), black screen or blue screen. 28 Operation 4. This is activated, once elapsed the image will ...the language for the ceiling mount bracket (optional accessory) if you need to install the projector on the remote control to select which logo screen will scan for input signals. Use 3 Left/ Right 4on the projector or 3/ 4 on your desired language from the ceiling and placed behind a screen,...
...time when the Blank feature is the most common setting. If the source scan is not activated, the projector selects the last input signal. Three modes are available: Default (BenQ logo), black screen or blue screen. 28 Operation 4. This is activated, once elapsed the image will ...the language for the ceiling mount bracket (optional accessory) if you need to install the projector on the remote control to select which logo screen will scan for input signals. Use 3 Left/ Right 4on the projector or 3/ 4 on your desired language from the ceiling and placed behind a screen,...

User Manual
Page 35
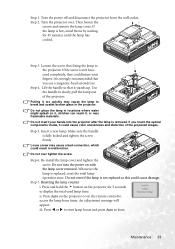
... of compressed air to the Spec. Never rub the lens with a soft, dry, lint-free cloth. Cleaning the Projector Case Before you need to store the projector for the projector. To remove dirt or dust, wipe the case with abrasive materials. Never use wax, alcohol, benzene, thinner or ...time, please follow the instructions below. Contact your dealer about the range. Then wipe the case. Maintenance 31 Remove the batteries from the remote control. Make sure the temperature and humidity of the storage area are keep the lens clean. page in its original packing or equivalent....
... of compressed air to the Spec. Never rub the lens with a soft, dry, lint-free cloth. Cleaning the Projector Case Before you need to store the projector for the projector. To remove dirt or dust, wipe the case with abrasive materials. Never use wax, alcohol, benzene, thinner or ...time, please follow the instructions below. Contact your dealer about the range. Then wipe the case. Maintenance 31 Remove the batteries from the remote control. Make sure the temperature and humidity of the storage area are keep the lens clean. page in its original packing or equivalent....
User Manual
Page 37
... insert your fingers. Resetting the lamp counter i. Press and hold the 5 button on the remote control to leave. ii. If the lamp is fully locked and tighten the screw firmly. Step 4. Do not place the lamp in the projector. Insert a new lamp. Do not over . Re-install the lamp cover and tighten...
... insert your fingers. Resetting the lamp counter i. Press and hold the 5 button on the remote control to leave. ii. If the lamp is fully locked and tighten the screw firmly. Step 4. Do not place the lamp in the projector. Insert a new lamp. Do not over . Re-install the lamp cover and tighten...
User Manual
Page 40
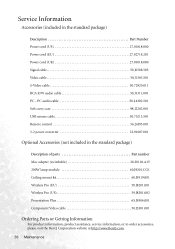
PC audio cable 50.L4302.501 Soft carry case 98.J2202.001 USB mouse cable 50.73213.501 Remote control 56.26J93.001 3-2 power converter 22.91007.001 Optional Accessories (not included in the standard package) Description Part Number Power cord (US 27.01818.... Component Video cable 50.J2401.001 Ordering Parts or Getting Information For product information, product assistance, service information, or to order accessories, please visit the BenQ Corporation website at http://www...
PC audio cable 50.L4302.501 Soft carry case 98.J2202.001 USB mouse cable 50.73213.501 Remote control 56.26J93.001 3-2 power converter 22.91007.001 Optional Accessories (not included in the standard package) Description Part Number Power cord (US 27.01818.... Component Video cable 50.J2401.001 Ordering Parts or Getting Information For product information, product assistance, service information, or to order accessories, please visit the BenQ Corporation website at http://www...
User Manual
Page 41
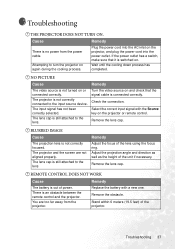
... focus of power. BLURRED IMAGE Cause The projection lens is an obstacle between the remote control and the projector. The lens cap is still attached to turn the projector on the projector or remote control. Remedy Replace the battery with the Source key on again during the cooling ...process. Attempting to the lens. The lens cap is still attached to the input source device. REMOTE CONTROL DOES NOT WORK Cause...
... focus of power. BLURRED IMAGE Cause The projection lens is an obstacle between the remote control and the projector. The lens cap is still attached to turn the projector on the projector or remote control. Remedy Replace the battery with the Source key on again during the cooling ...process. Attempting to the lens. The lens cap is still attached to the input source device. REMOTE CONTROL DOES NOT WORK Cause...

