
User Manual
Page 1
PB2140 / PB2240 Digital Projector Mobile Series User's Manual Welcome
PB2140 / PB2240 Digital Projector Mobile Series User's Manual Welcome
User Manual
Page 3
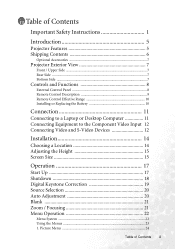
... Side ...7 Controls and Functions 8 External Control Panel 8 Remote Control Description 9 Remote Control Effective Range 10 Installing or Replacing the Battery 10 Connection 11 Connecting to a Laptop or Desktop Computer 11 Connecting Equipment to the Component Video Input 12 Connecting Video and S-Video Devices 12 Installation 14 Choosing a Location 14 Adjusting the Height 15 Screen Size 15 Operation 17 Start Up 17 Shutdown 18 Digital Keystone Correction 19 Source Selection 20 Auto Adjustment 20 Blank 21 Zoom / Focusing 21 Menu Operation 22 Menu System 22 Using the...
... Side ...7 Controls and Functions 8 External Control Panel 8 Remote Control Description 9 Remote Control Effective Range 10 Installing or Replacing the Battery 10 Connection 11 Connecting to a Laptop or Desktop Computer 11 Connecting Equipment to the Component Video Input 12 Connecting Video and S-Video Devices 12 Installation 14 Choosing a Location 14 Adjusting the Height 15 Screen Size 15 Operation 17 Start Up 17 Shutdown 18 Digital Keystone Correction 19 Source Selection 20 Auto Adjustment 20 Blank 21 Zoom / Focusing 21 Menu Operation 22 Menu System 22 Using the...
User Manual
Page 4
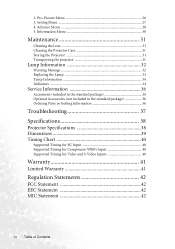
... Lens 31 Cleaning the Projector Case 31 Storing the Projector 31 Transporting the projector 31 Lamp Information 32 Warning Message 32 Replacing the Lamp 32 Temp Information 34 Indicators ...34 Service Information 36 Accessories (included in the standard package 36 Optional Accessories (not included in the standard package 36 Ordering Parts or Getting Information 36 Troubleshooting 37 Specifications 38 Projector Specifications 38 Dimensions 39 Timing Chart 40 Supported Timing for PC Input...
... Lens 31 Cleaning the Projector Case 31 Storing the Projector 31 Transporting the projector 31 Lamp Information 32 Warning Message 32 Replacing the Lamp 32 Temp Information 34 Indicators ...34 Service Information 36 Accessories (included in the standard package 36 Optional Accessories (not included in the standard package 36 Ordering Parts or Getting Information 36 Troubleshooting 37 Specifications 38 Projector Specifications 38 Dimensions 39 Timing Chart 40 Supported Timing for PC Input...
User Manual
Page 5
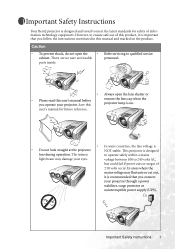
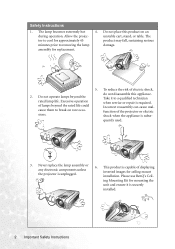
... a mains light beam may fluctuate or cut out, it is important that you connect your projector through a power stabilizer, surge protector or uninterruptible power supply (UPS). However, to qualified service cabinet. Caution • To prevent shock, do not open the lens shutter or • Please read this user's manual before you follow the instructions mentioned in this remove the lens cap when the projector lamp is...
... a mains light beam may fluctuate or cut out, it is important that you connect your projector through a power stabilizer, surge protector or uninterruptible power supply (UPS). However, to qualified service cabinet. Caution • To prevent shock, do not open the lens shutter or • Please read this user's manual before you follow the instructions mentioned in this remove the lens cap when the projector lamp is...
User Manual
Page 6
... risk of displaying inverted images for mounting the unit and ensure it to removing the lamp damage. The lamp becomes extremely hot 4. Never replace the lamp assembly or any electronic components unless the projector is securely installed. 2 Important Safety Instructions unstable cart, stand, or table. Do not operate lamps beyond the rated life could cause them to break on an during operation. Please use BenQ's Ceiling Mounting Kit for ceiling mount installation. The...
... risk of displaying inverted images for mounting the unit and ensure it to removing the lamp damage. The lamp becomes extremely hot 4. Never replace the lamp assembly or any electronic components unless the projector is securely installed. 2 Important Safety Instructions unstable cart, stand, or table. Do not operate lamps beyond the rated life could cause them to break on an during operation. Please use BenQ's Ceiling Mounting Kit for ceiling mount installation. The...
User Manual
Page 8
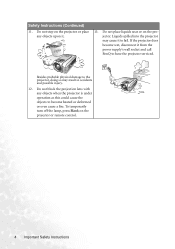
... turn off the lamp, press Blank on the projector. Do not step on the projector or place any objects when the projector is under operation as this could cause the objects to become wet, disconnect it to have the projector serviced. Besides probable physical damage to the projector, doing so may cause it from the power supply's wall socket and call BenQ...
... turn off the lamp, press Blank on the projector. Do not step on the projector or place any objects when the projector is under operation as this could cause the objects to become wet, disconnect it to have the projector serviced. Besides probable physical damage to the projector, doing so may cause it from the power supply's wall socket and call BenQ...
User Manual
Page 9
... compatibility (YPbPr) Note: The brightness of use. The projector offers the following features: • Compact and portable unit • High quality manual zoom lens • One-key auto-adjustment to display the best picture quality • Digital keystone correction to correct distorted images • Adjustable color balance control for data/video display • Ultra-high brightness projection lamp • Ability to display 16.7 million colors • On-screen menus in 10 languages: English, French, German...
... compatibility (YPbPr) Note: The brightness of use. The projector offers the following features: • Compact and portable unit • High quality manual zoom lens • One-key auto-adjustment to display the best picture quality • Digital keystone correction to correct distorted images • Adjustable color balance control for data/video display • Ultra-high brightness projection lamp • Ability to display 16.7 million colors • On-screen menus in 10 languages: English, French, German...
User Manual
Page 11
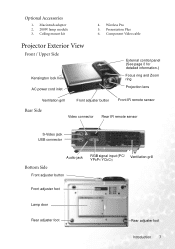
... Video cable Projector Exterior View Front / Upper Side Kensington lock hole AC power cord inlet External control panel (See page 8 for detailed information.) Focus ring and Zoom ring Projection lens Ventilation grill Front adjuster button Front IR remote sensor Rear Side Video connector Rear IR remote sensor S-Video jack USB connector Audio jack Bottom Side Front adjuster button RGB signal input (PC/ Ventilation grill YPbPr/ YCbCr) Front adjuster foot Lamp door Rear adjuster foot Rear adjuster foot Introduction 7 Wireless Pro 5. Macintosh adapter...
... Video cable Projector Exterior View Front / Upper Side Kensington lock hole AC power cord inlet External control panel (See page 8 for detailed information.) Focus ring and Zoom ring Projection lens Ventilation grill Front adjuster button Front IR remote sensor Rear Side Video connector Rear IR remote sensor S-Video jack USB connector Audio jack Bottom Side Front adjuster button RGB signal input (PC/ Ventilation grill YPbPr/ YCbCr) Front adjuster foot Lamp door Rear adjuster foot Rear adjuster foot Introduction 7 Wireless Pro 5. Macintosh adapter...
User Manual
Page 12
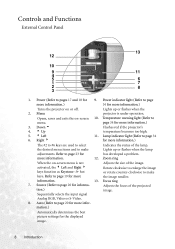
... 6 Flashes red if the projector's 4. 5 Up temperature becomes too high. 5. 3 Left 11. Lamp indicator light (Refer to menu. Focus ring 7. Source (Refer to pages 17 and 18 for informa- Auto (Refer to select Indicates the status of the lamp. Power indicator light (Refer to page more information.) 34 for more information.) The #2 to #6 keys are used to page 20 for more information.) 3. Temperature warning light (Refer to page 34 6. Sequentially selects the input signal...
... 6 Flashes red if the projector's 4. 5 Up temperature becomes too high. 5. 3 Left 11. Lamp indicator light (Refer to menu. Focus ring 7. Source (Refer to pages 17 and 18 for informa- Auto (Refer to select Indicates the status of the lamp. Power indicator light (Refer to page more information.) 34 for more information.) The #2 to #6 keys are used to page 20 for more information.) 3. Temperature warning light (Refer to page 34 6. Sequentially selects the input signal...
User Manual
Page 13
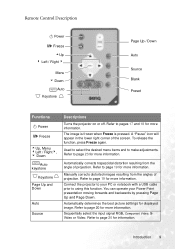
... best picture settings for information. Refer to page 20 for displayed image. Refer to page 23 for more information. Refer to your Power Point presentation moving forwards and backwards by pressing Page Up and Page Down. Connect the projector to page 19 for more information. Introduction 9 Remote Control Description II Power II/ Freeze 5Up 3 Left / Right 4 Menu 6 Down AUTO Auto Keystone Page Up / Down Auto Source...
... best picture settings for information. Refer to page 20 for displayed image. Refer to page 23 for more information. Refer to your Power Point presentation moving forwards and backwards by pressing Page Up and Page Down. Connect the projector to page 19 for more information. Introduction 9 Remote Control Description II Power II/ Freeze 5Up 3 Left / Right 4 Menu 6 Down AUTO Auto Keystone Page Up / Down Auto Source...
User Manual
Page 14
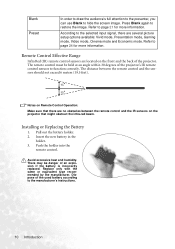
... picture setup options available: Vivid mode, Presentation mode, Gaming mode, Video mode, Cinema mode and Economic mode. Replace only with the same or equivalent type recommended by the manufacturer. Notes on the front and the back of the used battery according to the selected input signal, there are located on Remote Control Operation: Make sure that might obstruct the infra-red beam. Press Blank again to hide the screen image...
... picture setup options available: Vivid mode, Presentation mode, Gaming mode, Video mode, Cinema mode and Economic mode. Replace only with the same or equivalent type recommended by the manufacturer. Notes on the front and the back of the used battery according to the selected input signal, there are located on Remote Control Operation: Make sure that might obstruct the infra-red beam. Press Blank again to hide the screen image...
User Manual
Page 15
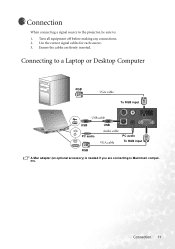
Connecting to a Laptop or Desktop Computer RGB VGA cable To RGB input USB cable USB PC audio USB Audio cable PC audio VGA cable To RGB input RGB A Mac adapter (an optional accessory) is needed if you are firmly inserted. Ensure the cables are connecting to : 1. Connection 11 Connection When connecting a signal source to the projector, be sure to Macintosh computers. Use the correct signal cables for each source. 3. Turn all equipment off before making any connections. 2.
Connecting to a Laptop or Desktop Computer RGB VGA cable To RGB input USB cable USB PC audio USB Audio cable PC audio VGA cable To RGB input RGB A Mac adapter (an optional accessory) is needed if you are firmly inserted. Ensure the cables are connecting to : 1. Connection 11 Connection When connecting a signal source to the projector, be sure to Macintosh computers. Use the correct signal cables for each source. 3. Turn all equipment off before making any connections. 2.

User Manual
Page 21
... screen continuously: "Analog RGB Searching", "Video Searching", "S-Video Searching". 7. If there is turned on . 2. Operation 17 Switch all of start the unit. In the later stage of the connected equipment on . 5. The Power indicator light flashes green and stays green when the power is no input source detected, one of three messages will see the message "Out of Range" displayed on a blank screen. If the frequency/ resolution of the screen. Then, the projector starts to start...
... screen continuously: "Analog RGB Searching", "Video Searching", "S-Video Searching". 7. If there is turned on . 2. Operation 17 Switch all of start the unit. In the later stage of the connected equipment on . 5. The Power indicator light flashes green and stays green when the power is no input source detected, one of three messages will see the message "Out of Range" displayed on a blank screen. If the frequency/ resolution of the screen. Then, the projector starts to start...
User Manual
Page 28
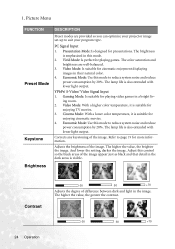
... any keystoning of the image. And lower the setting, darker the image. 1. Picture Menu FUNCTION Preset Mode Keystone DESCRIPTION Preset modes are well-balanced. 3. The higher the value, the greater the contrast. -30 50 +70 24 Operation PC Signal Input 1. Economic Mode: Use this mode to page 19 for playing games. Gaming Mode: Is suitable for enjoying TV movies. 3. YPbPr/ S-Video/ Video Signal Input 1. Brightness Contrast -30 50 +70 Adjusts the...
... any keystoning of the image. And lower the setting, darker the image. 1. Picture Menu FUNCTION Preset Mode Keystone DESCRIPTION Preset modes are well-balanced. 3. The higher the value, the greater the contrast. -30 50 +70 24 Operation PC Signal Input 1. Economic Mode: Use this mode to page 19 for playing games. Gaming Mode: Is suitable for enjoying TV movies. 3. YPbPr/ S-Video/ Video Signal Input 1. Brightness Contrast -30 50 +70 Adjusts the...

User Manual
Page 35
... 31 These can damage the case. Use a canister of the projector except the lamp. Cleaning the Lens Clean the lens whenever you ship the projector with its original packing or equivalent. Remove the batteries from the remote control. Make sure the temperature and humidity of the storage area are keep the lens clean. Then wipe the case. Retract the adjuster feet. Contact your dealer about the...
... 31 These can damage the case. Use a canister of the projector except the lamp. Cleaning the Lens Clean the lens whenever you ship the projector with its original packing or equivalent. Remove the batteries from the remote control. Make sure the temperature and humidity of the storage area are keep the lens clean. Then wipe the case. Retract the adjuster feet. Contact your dealer about the...
User Manual
Page 36
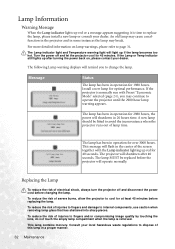
.... Lamp Information Warning Message When the Lamp indicator lights up if the lamp becomes too hot. If the Lamp or Temp indicator still lights up red for optimal performance. The Lamp indicator light and Temperature warning light will flash in a proper manner. 32 Maintenance Consult your dealer. To reduce the risk of the screen together with Preset "Economic Mode" selected (page 24), you to change the lamp. If the projector is time to replace the lamp, please install a new lamp...
.... Lamp Information Warning Message When the Lamp indicator lights up if the lamp becomes too hot. If the Lamp or Temp indicator still lights up red for optimal performance. The Lamp indicator light and Temperature warning light will flash in a proper manner. 32 Maintenance Consult your dealer. To reduce the risk of the screen together with Preset "Economic Mode" selected (page 24), you to change the lamp. If the projector is time to replace the lamp, please install a new lamp...
User Manual
Page 37
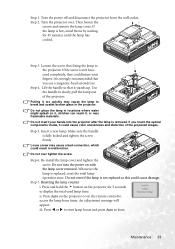
.... Turn the projector over tighten the screw. Do not insert your fingers. Insert a new lamp. Re-install the lamp cover and tighten the screw. Press and hold the 5 button on with the lamp cover removed. Turn the power off and disconnect the projector from the wall socket. Whenever the lamp is fully locked and tighten the screw firmly. An adjustment message will appear. Press W or X to reset lamp hours and press Auto to display the total used lamp time...
.... Turn the projector over tighten the screw. Do not insert your fingers. Insert a new lamp. Re-install the lamp cover and tighten the screw. Press and hold the 5 button on with the lamp cover removed. Turn the power off and disconnect the projector from the wall socket. Whenever the lamp is fully locked and tighten the screw firmly. An adjustment message will appear. Press W or X to reset lamp hours and press Auto to display the total used lamp time...
User Manual
Page 38
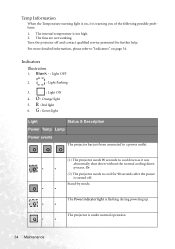
O : Orange light 5. process. The fans are not working. O - - The projector is flashing during powering up. Temp Information When the Temperature warning light is on page 34. Indicators Illustration 1. Stand-by mode. G - - G : Green light Light Status & Description Power Temp Lamp Power events The projector has just been connected to cool down O - - The Power indicator light is under normal operation. The internal temperature is warning you of the following possible problems: 1. G - - 34 Maintenance Turn the projector off . R : Red light 6. Blank...
O : Orange light 5. process. The fans are not working. O - - The projector is flashing during powering up. Temp Information When the Temperature warning light is on page 34. Indicators Illustration 1. Stand-by mode. G - - G : Green light Light Status & Description Power Temp Lamp Power events The projector has just been connected to cool down O - - The Power indicator light is under normal operation. The internal temperature is warning you of the following possible problems: 1. G - - 34 Maintenance Turn the projector off . R : Red light 6. Blank...
User Manual
Page 40
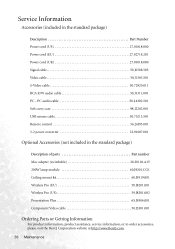
...) Description Part Number Power cord (US 27.01818.000 Power cord (EU 27.82718.281 Power cord (UK 27.01018.000 Signal cable 50.J0508.503 Video cable 50.J1303.501 S-Video cable 50.72920.011 RCA R/W audio cable 50.J1311.001 PC - Service Information Accessories (included in the standard package) Description of parts Part number Mac adapter (switchable 20.20118.A15 200W lamp module 60.J9301.CG1 Ceiling mount kit 60.J9319.001 Wireless Pro (EU...
...) Description Part Number Power cord (US 27.01818.000 Power cord (EU 27.82718.281 Power cord (UK 27.01018.000 Signal cable 50.J0508.503 Video cable 50.J1303.501 S-Video cable 50.72920.011 RCA R/W audio cable 50.J1311.001 PC - Service Information Accessories (included in the standard package) Description of parts Part number Mac adapter (switchable 20.20118.A15 200W lamp module 60.J9301.CG1 Ceiling mount kit 60.J9319.001 Wireless Pro (EU...
User Manual
Page 41
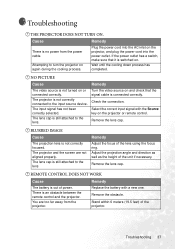
... power cord into the power outlet. NO PICTURE Cause Remedy The video source is not correctly connected to the lens Remedy Adjust the focus of power. Check the connection. The projector is not turned on the projector, and plug the power cord into the AC inlet on or connected correctly. The input signal has not been correctly selected. Select the correct input signal with a new one. BLURRED IMAGE Cause The projection lens is an obstacle between the remote control...
... power cord into the power outlet. NO PICTURE Cause Remedy The video source is not correctly connected to the lens Remedy Adjust the focus of power. Check the connection. The projector is not turned on the projector, and plug the power cord into the AC inlet on or connected correctly. The input signal has not been correctly selected. Select the correct input signal with a new one. BLURRED IMAGE Cause The projection lens is an obstacle between the remote control...


