User Manual
Page 3
Picture Menu 24 Table of Contents Important Safety Instructions 1 Introduction 5 Projector Features 5 Shipping Contents 6 Optional Accessories 7 Projector Exterior View 7 Front / Upper Side 7 Rear Side ...7 Bottom Side ...7 Controls and Functions 8 External Control Panel 8 Remote Control Description 9 Remote Control Effective Range 10 Installing or Replacing the Battery 10 Connection 11 Connecting to a Laptop or Desktop Computer 11 Connecting Equipment to the...
Picture Menu 24 Table of Contents Important Safety Instructions 1 Introduction 5 Projector Features 5 Shipping Contents 6 Optional Accessories 7 Projector Exterior View 7 Front / Upper Side 7 Rear Side ...7 Bottom Side ...7 Controls and Functions 8 External Control Panel 8 Remote Control Description 9 Remote Control Effective Range 10 Installing or Replacing the Battery 10 Connection 11 Connecting to a Laptop or Desktop Computer 11 Connecting Equipment to the...
User Manual
Page 8
...wall socket and call BenQ to become heated or deformed or even cause a fire. Do not block the projection lens with any objects upon it to the projector, doing so may cause it . 13. Do not place liquids near or on the projector or remote control. 4 Important Safety ...Instructions Do not step on the projector or place any objects when the projector is under operation as this could cause the objects to have the projector serviced. Besides probable physical damage to fail. Liquids...
...wall socket and call BenQ to become heated or deformed or even cause a fire. Do not block the projection lens with any objects upon it to the projector, doing so may cause it . 13. Do not place liquids near or on the projector or remote control. 4 Important Safety ...Instructions Do not step on the projector or place any objects when the projector is under operation as this could cause the objects to have the projector serviced. Besides probable physical damage to fail. Liquids...
User Manual
Page 10
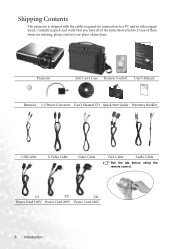
Shipping Contents The projector is shipped with the cables required for connection to a PC and to video equipment. Projector Soft Carry Case Remote Control User's Manual Batteries 3-2 Power Converter User's Manual CD Quick Start Guide Warranty Booklet USB Cable S-Video Cable Video Cable VGA Cable Audio Cable Pull the tab before using the remote control. US EU UK Power Cord 110V Power Cord 220V Power Cord 240V 6 Introduction If any of these items are missing, please contact your place of the items shown below. Carefully unpack and verify that you have all of purchase.
Shipping Contents The projector is shipped with the cables required for connection to a PC and to video equipment. Projector Soft Carry Case Remote Control User's Manual Batteries 3-2 Power Converter User's Manual CD Quick Start Guide Warranty Booklet USB Cable S-Video Cable Video Cable VGA Cable Audio Cable Pull the tab before using the remote control. US EU UK Power Cord 110V Power Cord 220V Power Cord 240V 6 Introduction If any of these items are missing, please contact your place of the items shown below. Carefully unpack and verify that you have all of purchase.
User Manual
Page 11
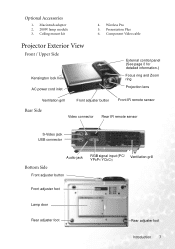
Wireless Pro 5. Component Video cable Projector Exterior View Front / Upper Side Kensington lock hole AC power cord inlet External control panel (See page 8 for detailed information.) Focus ring and Zoom ring Projection lens Ventilation grill Front adjuster button Front IR remote sensor Rear Side Video connector Rear IR remote sensor S-Video jack USB connector Audio...
Wireless Pro 5. Component Video cable Projector Exterior View Front / Upper Side Kensington lock hole AC power cord inlet External control panel (See page 8 for detailed information.) Focus ring and Zoom ring Projection lens Ventilation grill Front adjuster button Front IR remote sensor Rear Side Video connector Rear IR remote sensor S-Video jack USB connector Audio...
User Manual
Page 13
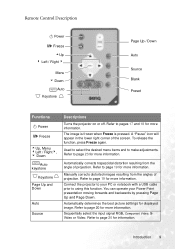
... 9 Remote Control Description II Power II/ Freeze 5Up 3 Left / Right 4 Menu 6 Down AUTO Auto Keystone Page Up / Down Auto Source Blank Preset Functions II Power II/ Freeze 5Up, Menu 3Left / Right4, 6 Down AUTO Auto keystone Keystone Page Up and Down Auto Source Descriptions Turns the projector on ... forwards and backwards by pressing Page Up and Page Down. Manually corrects distorted images resulting from the angle of projection. Connect the projector to page 20 for displayed image. Refer to page 20 for more information. To release the function, press Freeze again. Automatically ...
... 9 Remote Control Description II Power II/ Freeze 5Up 3 Left / Right 4 Menu 6 Down AUTO Auto Keystone Page Up / Down Auto Source Blank Preset Functions II Power II/ Freeze 5Up, Menu 3Left / Right4, 6 Down AUTO Auto keystone Keystone Page Up and Down Auto Source Descriptions Turns the projector on ... forwards and backwards by pressing Page Up and Page Down. Manually corrects distorted images resulting from the angle of projection. Connect the projector to page 20 for displayed image. Refer to page 20 for more information. To release the function, press Freeze again. Automatically ...
User Manual
Page 14
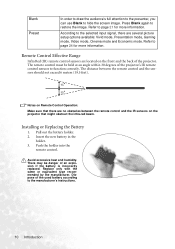
... Push the holder into the remote control. The remote control must be danger of the projector. Avoid excessive heat and humidity. Refer to page 24 for more information. Remote Control Effective Range Infra Red (IR) remote control sensors are located on Remote Control Operation: Make sure that there ...'s instructions. 10 Introduction Pull out the battery holder. 2. Dispose of the projector's IR remote control sensors to the selected input signal, there are no obstacles between the remote control and the sensors should not exceed 6 meters (19.5 feet). Replace only with...
... Push the holder into the remote control. The remote control must be danger of the projector. Avoid excessive heat and humidity. Refer to page 24 for more information. Remote Control Effective Range Infra Red (IR) remote control sensors are located on Remote Control Operation: Make sure that there ...'s instructions. 10 Introduction Pull out the battery holder. 2. Dispose of the projector's IR remote control sensors to the selected input signal, there are no obstacles between the remote control and the sensors should not exceed 6 meters (19.5 feet). Replace only with...
User Manual
Page 19
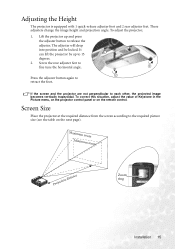
...and projection angle. If the screen and the projector are not perpendicular to 15 1 degrees. 2. It can lift the projector by up and press the adjuster button to the required picture size (see the table on the remote control. Maximum zoom Minimum zoom Projection distance Zoom ...ring Installation 15 Adjusting the Height The projector is equipped with 1 quick-release adjuster foot and 2 rear adjuster feet. To adjust the projector, 1. Screw the rear adjuster feet to ...
...and projection angle. If the screen and the projector are not perpendicular to 15 1 degrees. 2. It can lift the projector by up and press the adjuster button to the required picture size (see the table on the remote control. Maximum zoom Minimum zoom Projection distance Zoom ...ring Installation 15 Adjusting the Height The projector is equipped with 1 quick-release adjuster foot and 2 rear adjuster feet. To adjust the projector, 1. Screw the rear adjuster feet to ...

User Manual
Page 21
Operation Start Up 1. Then, the projector starts to page 20. For more devices are connected to start up , a default BenQ logo appears. 6. The Power indicator light flashes green and stays green when the power is no input source detected, one of the ...continuously: "Analog RGB Searching", "Video Searching", "S-Video Searching". 7. Operation 17 Turn on . 2. In the later stage of Range" displayed on the projector or remote control to select an input signal to display if there are 2 or more information, please refer to search for input signals. Switch all of the connected...
Operation Start Up 1. Then, the projector starts to page 20. For more devices are connected to start up , a default BenQ logo appears. 6. The Power indicator light flashes green and stays green when the power is no input source detected, one of the ...continuously: "Analog RGB Searching", "Video Searching", "S-Video Searching". 7. Operation 17 Turn on . 2. In the later stage of Range" displayed on the projector or remote control to select an input signal to display if there are 2 or more information, please refer to search for input signals. Switch all of the connected...
User Manual
Page 23
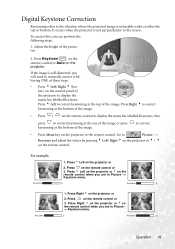
... steps. 1. to correct • Press Menu key on the remote control or 3. Press on the projector or the remote control. Keystone 0 Keystone -6 1. Press Right 4 on the remote control or 3. Press on the projector or 2. If the image is still distorted, you are in Picture...Keystone and adjust the values by pressing 3 Left/ Right 4 on the projector or 3 / 4 on the projector. Keystone 0 Keystone +6 Operation 19 Press Keystone AUTO on the remote control or Auto on the remote control. For example, 1. Press 3 Left to correct keystoning at the bottom of...
... steps. 1. to correct • Press Menu key on the remote control or 3. Press on the projector or the remote control. Keystone 0 Keystone -6 1. Press Right 4 on the remote control or 3. Press on the projector or 2. If the image is still distorted, you are in Picture...Keystone and adjust the values by pressing 3 Left/ Right 4 on the projector or 3 / 4 on the projector. Keystone 0 Keystone +6 Operation 19 Press Keystone AUTO on the remote control or Auto on the remote control. For example, 1. Press 3 Left to correct keystoning at the bottom of...
User Manual
Page 24
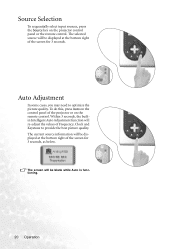
... Auto Adjustment function will be displayed at the bottom right of the screen for 3 seconds. The screen will re-adjust the values of the projector or on the remote control. Auto Adjustment In some cases, you may need to provide the best picture quality. The selected source will be blank while Auto is... The current source information will be displayed at the bottom right of the screen for 3 seconds, as below. To do this, press Auto on the projector control panel or the remote control. Source Selection To sequentially select input sources, press the Source key on the...
... Auto Adjustment function will be displayed at the bottom right of the screen for 3 seconds. The screen will re-adjust the values of the projector or on the remote control. Auto Adjustment In some cases, you may need to provide the best picture quality. The selected source will be blank while Auto is... The current source information will be displayed at the bottom right of the screen for 3 seconds, as below. To do this, press Auto on the projector control panel or the remote control. Source Selection To sequentially select input sources, press the Source key on the...
User Manual
Page 27
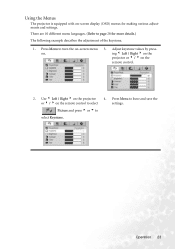
... different menu languages. (Refer to turn the on the remote control to select Keystone. Picture and press 5 or 6 to select settings. Press Menu to leave and save the or 3 / 4 on -screen menu 3. Using the Menus The projector is equipped with on . on -screen display (OSD)... menus for more details.) The following example describes the adjustment of the keystone. 1. Use 3 Left / Right 4 on the remote control. 2. ing 3 Left / Right 4 on the...
... different menu languages. (Refer to turn the on the remote control to select Keystone. Picture and press 5 or 6 to select settings. Press Menu to leave and save the or 3 / 4 on -screen menu 3. Using the Menus The projector is equipped with on . on -screen display (OSD)... menus for more details.) The following example describes the adjustment of the keystone. 1. Use 3 Left / Right 4 on the remote control. 2. ing 3 Left / Right 4 on the...
User Manual
Page 32
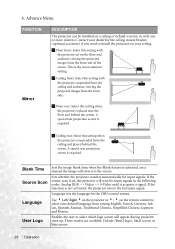
... scan is required. Three modes are available: Default (BenQ logo), black screen or blue screen. 28 Operation A special rear projection screen is on the remote control to select your ceiling. Language sets the language for input signals. Floor front: Select this setting with the projector suspended from the ceiling and audience viewing the projected...
... scan is required. Three modes are available: Default (BenQ logo), black screen or blue screen. 28 Operation A special rear projection screen is on the remote control to select your ceiling. Language sets the language for input signals. Floor front: Select this setting with the projector suspended from the ceiling and audience viewing the projected...

User Manual
Page 35
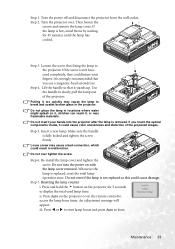
...case. Remove the batteries from the remote control. Maintenance 31 Cleaning the Lens Clean the lens whenever you need to do on the surface. Contact your dealer about the range. Never rub the lens with water and a neutral detergent. Transporting the projector It is dirt or smears, .... Never use the provided soft carry case. To remove stubborn dirt or stains, moisten a soft cloth with abrasive materials. Storing the Projector If you notice dirt or dust on a regular basis are within the recommended range for an extended time, please follow the instructions below...
...case. Remove the batteries from the remote control. Maintenance 31 Cleaning the Lens Clean the lens whenever you need to do on the surface. Contact your dealer about the range. Never rub the lens with water and a neutral detergent. Transporting the projector It is dirt or smears, .... Never use the provided soft carry case. To remove stubborn dirt or stains, moisten a soft cloth with abrasive materials. Storing the Projector If you notice dirt or dust on a regular basis are within the recommended range for an extended time, please follow the instructions below...
User Manual
Page 37
...by waiting for 5 seconds to the projector. Do not place the lamp in the projector. Step 4. Loose screw may cause the lamp to break and scatter broken glass in locations where water might splash on the remote control to leave. Press Auto on the projector or on it, children can reach ...it could result in malfunction. Turn the power off and disconnect the projector from the wall socket. Step 7. Do not over . If the...
...by waiting for 5 seconds to the projector. Do not place the lamp in the projector. Step 4. Loose screw may cause the lamp to break and scatter broken glass in locations where water might splash on the remote control to leave. Press Auto on the projector or on it, children can reach ...it could result in malfunction. Turn the power off and disconnect the projector from the wall socket. Step 7. Do not over . If the...
User Manual
Page 40
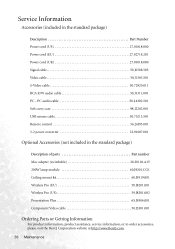
PC audio cable 50.L4302.501 Soft carry case 98.J2202.001 USB mouse cable 50.73213.501 Remote control 56.26J93.001 3-2 power converter 22.91007.001 Optional Accessories (not included in the standard package) Description Part Number Power cord (US 27.01818.000 ... Component Video cable 50.J2401.001 Ordering Parts or Getting Information For product information, product assistance, service information, or to order accessories, please visit the BenQ Corporation website at http://www...
PC audio cable 50.L4302.501 Soft carry case 98.J2202.001 USB mouse cable 50.73213.501 Remote control 56.26J93.001 3-2 power converter 22.91007.001 Optional Accessories (not included in the standard package) Description Part Number Power cord (US 27.01818.000 ... Component Video cable 50.J2401.001 Ordering Parts or Getting Information For product information, product assistance, service information, or to order accessories, please visit the BenQ Corporation website at http://www...
User Manual
Page 41
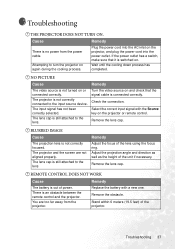
... not correctly focused. Cause Remedy There is connected correctly. Wait until the cooling down process has completed. The projector is an obstacle between the remote control and the projector. The input signal has not been correctly selected. Check the connection. If the power outlet has a switch,... with a new one. NO PICTURE Cause Remedy The video source is switched on the projector or remote control. Adjust the projection angle and direction as well as the height of the projector. Remove the obstacle. Remove the lens cap. There is not correctly connected to turn ...
... not correctly focused. Cause Remedy There is connected correctly. Wait until the cooling down process has completed. The projector is an obstacle between the remote control and the projector. The input signal has not been correctly selected. Check the connection. If the power outlet has a switch,... with a new one. NO PICTURE Cause Remedy The video source is switched on the projector or remote control. Adjust the projection angle and direction as well as the height of the projector. Remove the obstacle. Remove the lens cap. There is not correctly connected to turn ...

