

MS513, MX514, MW516 User Manual
Page 2
... startup screen......39 Setting the presentation timer 40 Remote paging operations 41 Hiding the image 42 Freezing the image 42 Operating in a high altitude environment 43 Adjusting the sound 43 Use Teaching Template 44 2 Table of contents Personalizing the projector menu display 45 Select the lamp saver mode 45 Shutting down the projector 46 Menu operation 47 Maintenance 59 Care of the projector 59 Lamp information 60 Troubleshooting......... 66 Specifications 67 Dimensions 68 Ceiling mount installation 68 Timing chart...
... startup screen......39 Setting the presentation timer 40 Remote paging operations 41 Hiding the image 42 Freezing the image 42 Operating in a high altitude environment 43 Adjusting the sound 43 Use Teaching Template 44 2 Table of contents Personalizing the projector menu display 45 Select the lamp saver mode 45 Shutting down the projector 46 Menu operation 47 Maintenance 59 Care of the projector 59 Lamp information 60 Troubleshooting......... 66 Specifications 67 Dimensions 68 Ceiling mount installation 68 Timing chart...
MS513, MX514, MW516 User Manual
Page 3
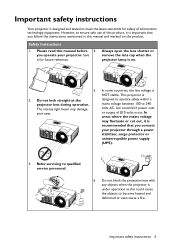
... may damage your projector through a power stabilizer, surge protector or uninterruptible power supply (UPS). 3. you follow the instructions mentioned in this manual and marked on . 5. Always open the lens shutter or remove the lens cap when the projector lamp is recommended that you operate your projector. Do not block the projection lens with any objects when the projector is important that you connect your eyes. Refer servicing to become...
... may damage your projector through a power stabilizer, surge protector or uninterruptible power supply (UPS). 3. you follow the instructions mentioned in this manual and marked on . 5. Always open the lens shutter or remove the lens cap when the projector lamp is recommended that you operate your projector. Do not block the projection lens with any objects when the projector is important that you connect your eyes. Refer servicing to become...
MS513, MX514, MW516 User Manual
Page 7
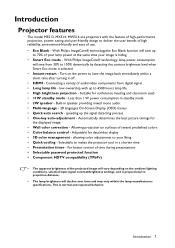
...® technology, lamp power consumption will save from digital signal. • Long lamp life - low ownership with the feature of high-performance projection, power- Turn on the power to have the image back immediately within a short time after turning it off . • HDMI - Connecting a variety of use. • Eco Blank - saving and user-friendly design to deliver the user benefit of high reliability, environment-friendly and ease of audio/video components from...
...® technology, lamp power consumption will save from digital signal. • Long lamp life - low ownership with the feature of high-performance projection, power- Turn on the power to have the image back immediately within a short time after turning it off . • HDMI - Connecting a variety of use. • Eco Blank - saving and user-friendly design to deliver the user benefit of high reliability, environment-friendly and ease of audio/video components from...
MS513, MX514, MW516 User Manual
Page 10
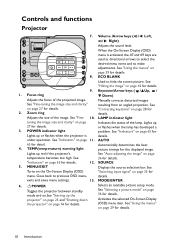
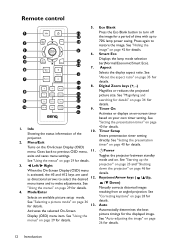
... displayed image. AUTO Automatically determines the best picture timings for details. Activates the selected On-Screen Display (OSD) menu item. Zoom ring Adjusts the size of the lamp. POWER indicator light Lights up the projector" on page 25 and "Shutting down the projector" on page 29 for details. See "Using the menus" on page 46 for details. Keystone/Arrow keys ( / Up, / Down) Manually corrects distorted images resulting from an angled projection. LAMP indicator light Indicates the status of the image. MODE...
... displayed image. AUTO Automatically determines the best picture timings for details. Activates the selected On-Screen Display (OSD) menu item. Zoom ring Adjusts the size of the lamp. POWER indicator light Lights up the projector" on page 25 and "Shutting down the projector" on page 29 for details. See "Using the menus" on page 46 for details. Keystone/Arrow keys ( / Up, / Down) Manually corrects distorted images resulting from an angled projection. LAMP indicator light Indicates the status of the image. MODE...
MS513, MX514, MW516 User Manual
Page 12
... details. Keystone/Arrow keys ( / Up, / Down) Manually corrects distorted images resulting from an angled projection. Auto Automatically determines the best picture timings for details. menu items and to restore the image. exits and saves menu settings. See "About the aspect ratio" on . Press again to make adjustments. II Power Toggles the projector between standby mode and on page 35 for the displayed image. Menu/Exit Turns on the On-Screen Display (OSD) menu.
... details. Keystone/Arrow keys ( / Up, / Down) Manually corrects distorted images resulting from an angled projection. Auto Automatically determines the best picture timings for details. menu items and to restore the image. exits and saves menu settings. See "About the aspect ratio" on . Press again to make adjustments. II Power Toggles the projector between standby mode and on page 35 for the displayed image. Menu/Exit Turns on the On-Screen Display (OSD) menu.
MS513, MX514, MW516 User Manual
Page 15
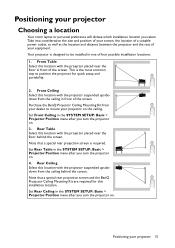
... rear projection screen and the BenQ Projector Ceiling Mounting Kit are required for quick setup and portability. 2. Your projector is designed to mount your dealer to be installed in front of the screen. Set Front Ceiling in the SYSTEM SETUP: Basic > Projector Position menu after you turn the projector on the ceiling. Front Table Select this installation location. Purchase the BenQ Projector Ceiling Mounting Kit from your projector on . 3. Set Rear Ceiling in the SYSTEM SETUP: Basic > Projector Position menu after...
... rear projection screen and the BenQ Projector Ceiling Mounting Kit are required for quick setup and portability. 2. Your projector is designed to mount your dealer to be installed in front of the screen. Set Front Ceiling in the SYSTEM SETUP: Basic > Projector Position menu after you turn the projector on the ceiling. Front Table Select this installation location. Purchase the BenQ Projector Ceiling Mounting Kit from your projector on . 3. Set Rear Ceiling in the SYSTEM SETUP: Basic > Projector Position menu after...

MS513, MX514, MW516 User Manual
Page 20
... external monitor following the instructions below: To connect the projector to a monitor: 1. A Mac adapter is turned on in "Connecting a computer" on the projector. • The output signal for details. 20 Connection Take a suitable VGA cable (only one supplied) and connect one end of the cable to the D-Sub input jack of the cable to use this connection method when the projector is in standby mode, make use of the projector speaker(s) in your notebook...
... external monitor following the instructions below: To connect the projector to a monitor: 1. A Mac adapter is turned on in "Connecting a computer" on the projector. • The output signal for details. 20 Connection Take a suitable VGA cable (only one supplied) and connect one end of the cable to the D-Sub input jack of the cable to use this connection method when the projector is in standby mode, make use of the projector speaker(s) in your notebook...
MS513, MX514, MW516 User Manual
Page 25
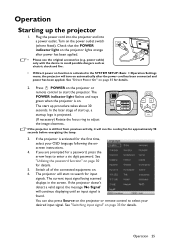
... onscreen instructions. 4. See "Direct Power On" on the projector lights orange after the power cord has been connected and power has been applied. If the projector is found. The current input signal being scanned displays in the SYSTEM SETUP: Basic > Operation Settings menu, the projector will continue displaying until an input signal is still hot from previous activity, it will start the projector. Operation 25 Operation Starting up procedure takes about 30 seconds. Turn on the projector or remote control...
... onscreen instructions. 4. See "Direct Power On" on the projector lights orange after the power cord has been connected and power has been applied. If the projector is found. The current input signal being scanned displays in the SYSTEM SETUP: Basic > Operation Settings menu, the projector will continue displaying until an input signal is still hot from previous activity, it will start the projector. Operation 25 Operation Starting up procedure takes about 30 seconds. Turn on the projector or remote control...

MS513, MX514, MW516 User Manual
Page 31
... password recall procedure 1. Seek help from the local BenQ service center to the SYSTEM SETUP: Advanced > Security Settings > Change password menu. 2. Press and hold Auto on the screen. 2. Enter a new password. Confirm the new password by entering another password. 4. Operation 31 If you forget the password If the password function is activated, you will be required to provide proof of the projector. The projector will display a coded number on the projector or remote control for your projector. 3. Changing the password...
... password recall procedure 1. Seek help from the local BenQ service center to the SYSTEM SETUP: Advanced > Security Settings > Change password menu. 2. Press and hold Auto on the screen. 2. Enter a new password. Confirm the new password by entering another password. 4. Operation 31 If you forget the password If the password function is activated, you will be required to provide proof of the projector. The projector will display a coded number on the projector or remote control for your projector. 3. Changing the password...

MS513, MX514, MW516 User Manual
Page 32
... incorrect, the password error message displays lasting for three seconds, and the message 'INPUT PASSWORD' displays for your retry. You will not have successfully assigned a new password to the SYSTEM SETUP: Advanced > Security Settings > Power on lock. To leave the OSD menu, press MENU/EXIT. Disabling the password function To disable password protection, go back to the projector. 6. You can press MENU/EXIT to enter the new password next time the projector is disabled...
... incorrect, the password error message displays lasting for three seconds, and the message 'INPUT PASSWORD' displays for your retry. You will not have successfully assigned a new password to the SYSTEM SETUP: Advanced > Security Settings > Power on lock. To leave the OSD menu, press MENU/EXIT. Disabling the password function To disable password protection, go back to the projector. 6. You can press MENU/EXIT to enter the new password next time the projector is disabled...
MS513, MX514, MW516 User Manual
Page 33
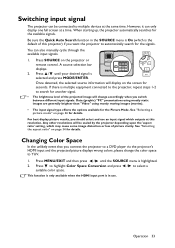
... the projected image will change accordingly when you connect the projector to a DVD player via the projector's HDMI input and the projected picture displays wrong colors, please change the color space to automatically search for details. Be sure the Quick Auto Search function in use an input signal which outputs at this projector) if you want the projector to YUV. 1. A source selection bar displays. 2. See "Selecting the aspect ratio" on the projector or remote control. Changing Color...
... the projected image will change accordingly when you connect the projector to a DVD player via the projector's HDMI input and the projected picture displays wrong colors, please change the color space to automatically search for details. Be sure the Quick Auto Search function in use an input signal which outputs at this projector) if you want the projector to YUV. 1. A source selection bar displays. 2. See "Selecting the aspect ratio" on the projector or remote control. Changing Color...
MS513, MX514, MW516 User Manual
Page 36
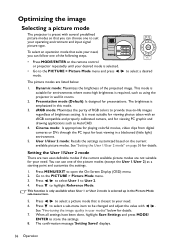
..., video clips from digital cameras or DVs through the PC input for your need, you can use one of the picture modes (except the User 1/User 2) as AutoCAD. 4. User 1/User 2 mode: Recalls the settings customized based on the remote control or projector repeatedly until your need . Press / to select a picture mode that suits your need . 6. The confirmation message 'Setting Saved' displays. 36 Operation The brightness is selected up in this mode. 3. Setting the User 1/User 2 mode...
..., video clips from digital cameras or DVs through the PC input for your need, you can use one of the picture modes (except the User 1/User 2) as AutoCAD. 4. User 1/User 2 mode: Recalls the settings customized based on the remote control or projector repeatedly until your need . Press / to select a picture mode that suits your need . 6. The confirmation message 'Setting Saved' displays. 36 Operation The brightness is selected up in this mode. 3. Setting the User 1/User 2 mode...

MS513, MX514, MW516 User Manual
Page 39
... startup screen from among BenQ logo, Black or Blue screen, you see the message 'Captured Succeeded' on the remote control or go to exit and save the settings. a setting of the desired adjustments. 9. Project the image you want to use as MyScreen. 6. displays while the projector is too high, that color in the SYSTEM SETUP: Basic > Splash Screen menu and restart the projector. Increasing its value at 0, only pure red in the projected RED Yellow GREEN picture...
... startup screen from among BenQ logo, Black or Blue screen, you see the message 'Captured Succeeded' on the remote control or go to exit and save the settings. a setting of the desired adjustments. 9. Project the image you want to use as MyScreen. 6. displays while the projector is too high, that color in the SYSTEM SETUP: Basic > Splash Screen menu and restart the projector. Increasing its value at 0, only pure red in the projected RED Yellow GREEN picture...
MS513, MX514, MW516 User Manual
Page 41
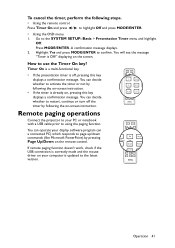
.../Down on the remote control. Operation 41 Go to confirm. Highlight Yes and press MODE/ENTER to the SYSTEM SETUP: Basic > Presentation Timer menu and highlight Off. You will see the message "Timer is updated to activate the timer or not by following steps. • Using the remote control. If remote paging function doesn't work, check if the USB connection is correctly made and the mouse driver on your computer...
.../Down on the remote control. Operation 41 Go to confirm. Highlight Yes and press MODE/ENTER to the SYSTEM SETUP: Basic > Presentation Timer menu and highlight Off. You will see the message "Timer is updated to activate the timer or not by following steps. • Using the remote control. If remote paging function doesn't work, check if the USB connection is correctly made and the mouse driver on your computer...

MS513, MX514, MW516 User Manual
Page 42
... Eco Blank button from projector or remote control to turn off the image for over three minutes without a display source, eliminating unnecessary energy waste and prolonging the life of the projector lamp You can set from projecting as this function is activated with up to 70% lamp power saving. Press any key (except the Page Up/Down key) on screen. 42 Operation No matter Eco Blank Timer is...
... Eco Blank button from projector or remote control to turn off the image for over three minutes without a display source, eliminating unnecessary energy waste and prolonging the life of the projector lamp You can set from projecting as this function is activated with up to 70% lamp power saving. Press any key (except the Page Up/Down key) on screen. 42 Operation No matter Eco Blank Timer is...
MS513, MX514, MW516 User Manual
Page 48
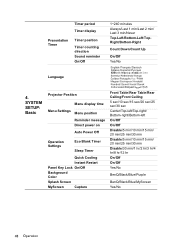
SYSTEM SETUP: Basic Projector Position Menu display time Menu Settings Menu position Reminder message Direct power on Auto Power Off Operation Settings Eco Blank Timer Sleep Timer Quick Cooling Instant Restart Panel Key Lock On/Off Background Color Splash Screen MyScreen Capture Front Table/Rear Table/Rear Ceiling/Front Ceiling 5 ... hr/8 hr/12 hr On/Off On/Off Yes/No BenQ/Black/Blue/Purple BenQ/Black/Blue/MyScreen Yes/No 48 Operation Timer period Timer display Presentation Timer Timer position Timer counting direction Sound reminder On/Off 1~240 minutes Always/Last 1 min/Last ...
SYSTEM SETUP: Basic Projector Position Menu display time Menu Settings Menu position Reminder message Direct power on Auto Power Off Operation Settings Eco Blank Timer Sleep Timer Quick Cooling Instant Restart Panel Key Lock On/Off Background Color Splash Screen MyScreen Capture Front Table/Rear Table/Rear Ceiling/Front Ceiling 5 ... hr/8 hr/12 hr On/Off On/Off Yes/No BenQ/Black/Blue/Purple BenQ/Black/Blue/MyScreen Yes/No 48 Operation Timer period Timer display Presentation Timer Timer position Timer counting direction Sound reminder On/Off 1~240 minutes Always/Last 1 min/Last ...
MS513, MX514, MW516 User Manual
Page 49
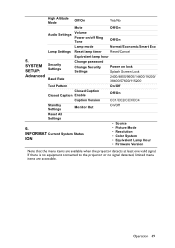
... Security SETUP: Settings Advanced Baud Rate Equivalent lamp hour Change password Change Security Settings Power on /off Ring Tone Off/On Lamp mode Normal/Economic/Smart Eco Lamp Settings Reset lamp timer Reset/Cancel 5. If there is no equipment connected to the projector or no signal detected, limited menu items are available when the projector detects at least one valid signal. INFORMAT Current System Status ION • Source • Picture Mode • Resolution • Color System • Equivalent Lamp Hour • Firmware...
... Security SETUP: Settings Advanced Baud Rate Equivalent lamp hour Change password Change Security Settings Power on /off Ring Tone Off/On Lamp mode Normal/Economic/Smart Eco Lamp Settings Reset lamp timer Reset/Cancel 5. If there is no equipment connected to the projector or no signal detected, limited menu items are available when the projector detects at least one valid signal. INFORMAT Current System Status ION • Source • Picture Mode • Resolution • Color System • Equivalent Lamp Hour • Firmware...
MS513, MX514, MW516 User Manual
Page 60
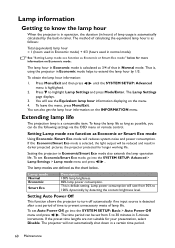
... mode helps to extend the lamp hour by the built-in timer. Press Menu/Exit and then press / until the SYSTEM SETUP: Advanced menu is a consumable item. The Lamp Settings page displays. 3. To leave the menu, press Menu/Exit. The lamp modes are not suitable for longer working life. The time period can be reduced and result in darker projected pictures, the projector protected for your presentation, select Disable. Extending lamp life The projection lamp...
... mode helps to extend the lamp hour by the built-in timer. Press Menu/Exit and then press / until the SYSTEM SETUP: Advanced menu is a consumable item. The Lamp Settings page displays. 3. To leave the menu, press Menu/Exit. The lamp modes are not suitable for longer working life. The time period can be reduced and result in darker projected pictures, the projector protected for your presentation, select Disable. Extending lamp life The projection lamp...
MS513, MX514, MW516 User Manual
Page 62
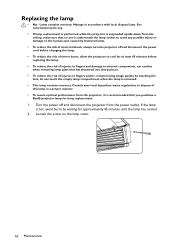
... 45 minutes before replacing the lamp. • To reduce the risk of injuries to fingers and damage to cool for approximately 45 minutes until the lamp has cooled. 2. Turn the power off and disconnect the power cord before changing the lamp. • To reduce the risk of severe burns, allow the projector to internal components, use caution when removing lamp glass that has...
... 45 minutes before replacing the lamp. • To reduce the risk of injuries to fingers and damage to cool for approximately 45 minutes until the lamp has cooled. 2. Turn the power off and disconnect the power cord before changing the lamp. • To reduce the risk of severe burns, allow the projector to internal components, use caution when removing lamp glass that has...
MS513, MX514, MW516 User Manual
Page 66
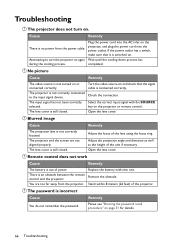
... image Cause Remedy The projection lens is still closed . Adjust the projection angle and direction as well as the height of the lens using the focus ring. Attempting to the input signal device. The lens cover is not correctly focused. You are not aligned properly. If the power outlet has a switch, make sure that the signal cable is not correctly connected to turn on or connected correctly. Remote control does not work Cause...
... image Cause Remedy The projection lens is still closed . Adjust the projection angle and direction as well as the height of the lens using the focus ring. Attempting to the input signal device. The lens cover is not correctly focused. You are not aligned properly. If the power outlet has a switch, make sure that the signal cable is not correctly connected to turn on or connected correctly. Remote control does not work Cause...

