

User Manual
Page 2
Table of contents Important safety instructions 3 Introduction 7 Projector features 7 Shipping contents 8 Projector exterior view 9 Controls and functions 10 Positioning your projector14 Choosing a location 14 Obtaining a preferred projected image size 15 Connection 18 Connecting a computer or monitor... 19 Connecting Video source devices....... 20 Operation 24 Starting up the projector 24 Adjusting the projected image 25 Using the menus 27 Securing the projector 28 Switching input signal 31 Magnifying and searching for details . 32 Selecting the aspect ratio...
Table of contents Important safety instructions 3 Introduction 7 Projector features 7 Shipping contents 8 Projector exterior view 9 Controls and functions 10 Positioning your projector14 Choosing a location 14 Obtaining a preferred projected image size 15 Connection 18 Connecting a computer or monitor... 19 Connecting Video source devices....... 20 Operation 24 Starting up the projector 24 Adjusting the projected image 25 Using the menus 27 Securing the projector 28 Switching input signal 31 Magnifying and searching for details . 32 Selecting the aspect ratio...

User Manual
Page 3
... may damage your projector. However, to ensure safe use of this manual before you follow the instructions mentioned in this could fail if power cuts or surges of information technology equipment. Important safety instructions 3 Always open the lens shutter or remove the lens cap when the projector lamp is on the projector or remote control. Refer servicing to qualified service personnel. 6. Important safety instructions Your projector is designed and...
... may damage your projector. However, to ensure safe use of this manual before you follow the instructions mentioned in this could fail if power cuts or surges of information technology equipment. Important safety instructions 3 Always open the lens shutter or remove the lens cap when the projector lamp is on the projector or remote control. Refer servicing to qualified service personnel. 6. Important safety instructions Your projector is designed and...
User Manual
Page 10
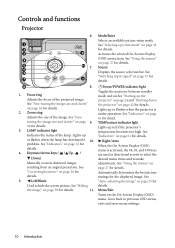
... image. See "Switching input signal" on page 61 for details. Right/Auto When the On-Screen Display (OSD) menu is under operation. Menu/Exit Turns on page 25 for details. Zoom ring Adjusts the size of the lamp. Lights up red if the projector's temperature becomes too high. Left/Blank Used to make adjustments. See "Indicators" on page 31 for detail. Automatically determines the best picture timings for details. 3. Controls and functions Projector 6. 1 2 3 9 4 5 10 7. 6 4 7 11 8 8. 1. Focus ring Adjusts the focus...
... image. See "Switching input signal" on page 61 for details. Right/Auto When the On-Screen Display (OSD) menu is under operation. Menu/Exit Turns on page 25 for details. Zoom ring Adjusts the size of the lamp. Lights up red if the projector's temperature becomes too high. Left/Blank Used to make adjustments. See "Indicators" on page 31 for detail. Automatically determines the best picture timings for details. 3. Controls and functions Projector 6. 1 2 3 9 4 5 10 7. 6 4 7 11 8 8. 1. Focus ring Adjusts the focus...
User Manual
Page 12
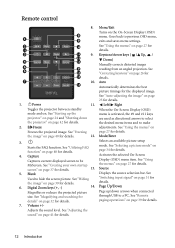
... reduces the projected picture size. Adjusts the sound level. See "Adjusting the sound" on page 37 for details. Mode/Enter Selects an available picture setup mode. Capture Captures current displayed screen to make adjustments. Goes back to hide the screen picture. Toggles the projector between standby mode and on the On-Screen Display (OSD) menu. Digital Zoom keys (+, -) 14. See "Switching input signal" on page 40 for details. 2. Source Displays the source selection bar. II Power 11. See "Freezing the image" on...
... reduces the projected picture size. Adjusts the sound level. See "Adjusting the sound" on page 37 for details. Mode/Enter Selects an available picture setup mode. Capture Captures current displayed screen to make adjustments. Goes back to hide the screen picture. Toggles the projector between standby mode and on the On-Screen Display (OSD) menu. Digital Zoom keys (+, -) 14. See "Switching input signal" on page 40 for details. 2. Source Displays the source selection bar. II Power 11. See "Freezing the image" on...

User Manual
Page 13
... timer" on "Setting the presentation timer" on the front of the used battery according to the remote control from the rear Approx. 15° Approx. 15° Replacing the remote control battery 1. Please follow the illustrated instructions. Make sure that might obstruct the infra-red beam. • Operating the projector from the front • Operating the projector from possible battery leakage. Infra-Red (IR) remote control sensor is located...
... timer" on "Setting the presentation timer" on the front of the used battery according to the remote control from the rear Approx. 15° Approx. 15° Replacing the remote control battery 1. Please follow the illustrated instructions. Make sure that might obstruct the infra-red beam. • Operating the projector from the front • Operating the projector from possible battery leakage. Infra-Red (IR) remote control sensor is located...

User Manual
Page 19
... only works when the input signal comes from a computer, please balance out the volume control bar to use this connection method when the projector is in standby mode, make use another suitable audio cable and connect one end to your monitor is connected. If you wish, you connect audio output signal from COMPUTER 1 or COMPUTER 2 jack. Usually a key combo like FN + F3 or CRT/LCD key turns the external display...
... only works when the input signal comes from a computer, please balance out the volume control bar to use this connection method when the projector is in standby mode, make use another suitable audio cable and connect one end to your monitor is connected. If you wish, you connect audio output signal from COMPUTER 1 or COMPUTER 2 jack. Usually a key combo like FN + F3 or CRT/LCD key turns the external display...

User Manual
Page 21
... projector. • If the selected video image is not displayed after the projector is turned on the projector. HDMI (High-Definition Multimedia Interface) supports uncompressed video data transmission between compatible devices like a DVD player, a DTV tuner or a display. Take an HDMI cable and connect one end to the HDMI output jack of playing mixed mono audio, even if a stereo audio input is only capable of the HDMI source device. Once connected, the audio can use to connect...
... projector. • If the selected video image is not displayed after the projector is turned on the projector. HDMI (High-Definition Multimedia Interface) supports uncompressed video data transmission between compatible devices like a DVD player, a DTV tuner or a display. Take an HDMI cable and connect one end to the HDMI output jack of playing mixed mono audio, even if a stereo audio input is only capable of the HDMI source device. Once connected, the audio can use to connect...

User Manual
Page 24
... remote control to start to search for approximately 90 seconds before energizing the lamp. 4. See "Utilizing the password function" on page 51 for details. 6. The current input signal being scanned displays in the SYSTEM SETUP: Basic> Operation Settings menu, the projector will start the projector. See "Direct power on" on page 28 for details. 2. The POWER indicator light flashes and stays green when the projector is found. 24 Operation The projector will turn on the projector lights orange...
... remote control to start to search for approximately 90 seconds before energizing the lamp. 4. See "Utilizing the password function" on page 51 for details. 6. The current input signal being scanned displays in the SYSTEM SETUP: Basic> Operation Settings menu, the projector will start the projector. See "Direct power on" on page 28 for details. 2. The POWER indicator light flashes and stays green when the projector is found. 24 Operation The projector will turn on the projector lights orange...

User Manual
Page 25
... image is equipped with the projector's resolution or set the input signal to optimize the picture quality. To correct this , press Auto on the projector or remote control. Auto-adjusting the image In some cases, you want it is selected. Adjusting the projected image Adjusting the projection angle The projector is positioned where you may cause damage to lock the foot in position. 2. The strong light from . Operation 25 To adjust the projector: 1. Screw the rear adjuster...
... image is equipped with the projector's resolution or set the input signal to optimize the picture quality. To correct this , press Auto on the projector or remote control. Auto-adjusting the image In some cases, you want it is selected. Adjusting the projected image Adjusting the projection angle The projector is positioned where you may cause damage to lock the foot in position. 2. The strong light from . Operation 25 To adjust the projector: 1. Screw the rear adjuster...
User Manual
Page 28
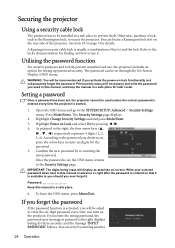
... to set , the OSD menu returns to the Security Settings page. Refer to the lock's documentation for details. Press Mode/Enter. According to the password you enter the wrong password, the password error message as pictured to the right displays lasting for the password. 5. Once the password is usually a combination of the projector. Securing the projector Using a security cable lock The projector has to be installed in a safe place. 6. Open the OSD menu...
... to set , the OSD menu returns to the Security Settings page. Refer to the lock's documentation for details. Press Mode/Enter. According to the password you enter the wrong password, the password error message as pictured to the right displays lasting for the password. 5. Once the password is usually a combination of the projector. Securing the projector Using a security cable lock The projector has to be installed in a safe place. 6. Open the OSD menu...
User Manual
Page 29
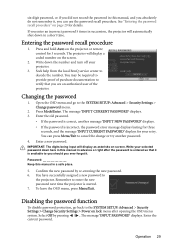
... incorrect, the password error message displays lasting for three seconds, and the message 'INPUT CURRENT PASSWORD' displays for your projector. 3. Write your selected password down the number and turn off your retry. You have successfully assigned a new password to decode the number. The message 'INPUT PASSWORD' displays. To leave the OSD menu, press Menu/Exit. Enter the current password. Password Keep this manual in advance or right after opening the OSD menu system. Changing the password 1. Enter a new password. Operation 29 Write...
... incorrect, the password error message displays lasting for three seconds, and the message 'INPUT CURRENT PASSWORD' displays for your projector. 3. Write your selected password down the number and turn off your retry. You have successfully assigned a new password to decode the number. The message 'INPUT PASSWORD' displays. To leave the OSD menu, press Menu/Exit. Enter the current password. Password Keep this manual in advance or right after opening the OSD menu system. Changing the password 1. Enter a new password. Operation 29 Write...

User Manual
Page 30
..., the password error message displays lasting for three seconds, and the message 'INPUT PASSWORD' displays for your retry. You will not have to the Security Settings page with 'Off' shown in hand should you turn on lock. Though the password function is disabled, you need to keep the old password in the row of Power on the projector. • If the password is correct, the OSD menu returns...
..., the password error message displays lasting for three seconds, and the message 'INPUT PASSWORD' displays for your retry. You will not have to the Security Settings page with 'Off' shown in hand should you turn on lock. Though the password function is disabled, you need to keep the old password in the row of Power on the projector. • If the password is correct, the OSD menu returns...

User Manual
Page 31
... projector's HDMI input and the projected picture displays wrong colors, please change accordingly when you want the projector to select a suitable color space. Press Menu/Exit and then press / until your desired signal is in a 4:3 aspect ratio. This function is only available when the HDMI input port is selected and press Mode/Enter. Once detected, the selected source information will display on the projector or remote control. However, it can also manually...
... projector's HDMI input and the projected picture displays wrong colors, please change accordingly when you want the projector to select a suitable color space. Press Menu/Exit and then press / until your desired signal is in a 4:3 aspect ratio. This function is only available when the HDMI input port is selected and press Mode/Enter. Once detected, the selected source information will display on the projector or remote control. However, it can also manually...

User Manual
Page 34
... projected image. This mode is required, such as AutoCAD. 4. It is selected. • Go to the PICTURE > Picture Mode menu and press / to open the On-Screen Display (OSD) menu. 2. Press to the PICTURE > Picture Mode menu. 3. The confirmation message 'Setting Saved' displays. 34 Operation sRGB mode: Maximizes the purity of RGB colors to provide true-to be changed and adjust the value with an sRGB compatible and properly calibrated camera, and for viewing...
... projected image. This mode is required, such as AutoCAD. 4. It is selected. • Go to the PICTURE > Picture Mode menu and press / to open the On-Screen Display (OSD) menu. 2. Press to the PICTURE > Picture Mode menu. 3. The confirmation message 'Setting Saved' displays. 34 Operation sRGB mode: Maximizes the purity of RGB colors to provide true-to be changed and adjust the value with an sRGB compatible and properly calibrated camera, and for viewing...

User Manual
Page 39
... can use the Timer On key? If remote paging function doesn't work, check if the USB connection is correctly made and the mouse driver on your PC or notebook with an audio input connected, the audio can set from projecting as this key displays a confirmation message. The word 'BLANK' appears at the screen while the image is Off!" Operation 39 Do not block the projection lens from 5 to hide the screen image. Timer On...
... can use the Timer On key? If remote paging function doesn't work, check if the USB connection is correctly made and the mouse driver on your PC or notebook with an audio input connected, the audio can set from projecting as this key displays a confirmation message. The word 'BLANK' appears at the screen while the image is Off!" Operation 39 Do not block the projection lens from 5 to hide the screen image. Timer On...

User Manual
Page 42
... projector. • To protect the lamp, the projector will disappear. 2. Use / to select your desired setting. • Splash Screen in the SYSTEM SETUP: Basic > Menu Settings menu sets whether to select a screen. Use / to display reminder messages on page 45 for approximately 90 seconds to your last key press. Press II Power and a confirmation message displays prompting you don't respond in five locations. The POWER indicator light flashes orange, the projection lamp shuts down , to protect the lamp...
... projector. • To protect the lamp, the projector will disappear. 2. Use / to select your desired setting. • Splash Screen in the SYSTEM SETUP: Basic > Menu Settings menu sets whether to select a screen. Use / to display reminder messages on page 45 for approximately 90 seconds to your last key press. Press II Power and a confirmation message displays prompting you don't respond in five locations. The POWER indicator light flashes orange, the projection lamp shuts down , to protect the lamp...

User Manual
Page 52
... lamp hour See "Getting to capture screen. Audio Settings Mute Sets the mute function. Volume Adjusts the audio volume level. Selecting On enables the function and the projector displays the grid test pattern. Lamp Settings Reset lamp timer See "Resetting the lamp timer" on successfully and will rerun its cooling fans. SYSTEM SETUP: Advanced menu FUNCTION (default setting/ value) DESCRIPTION (default setting/value) Quick Cooling High Altitude Mode Selecting On enables the function and the projector cooling time will...
... lamp hour See "Getting to capture screen. Audio Settings Mute Sets the mute function. Volume Adjusts the audio volume level. Selecting On enables the function and the projector displays the grid test pattern. Lamp Settings Reset lamp timer See "Resetting the lamp timer" on successfully and will rerun its cooling fans. SYSTEM SETUP: Advanced menu FUNCTION (default setting/ value) DESCRIPTION (default setting/value) Quick Cooling High Altitude Mode Selecting On enables the function and the projector cooling time will...

User Manual
Page 56
... projector in Normal mode. If the preset time lengths are not suitable for more information on the menu. 4. That is detected after a set Auto Power Off, go into the SYSTEM SETUP: Basic > Auto Power Off menu and press / . Extending lamp life The projection lamp is highlighted. 2. Setting Auto Power Off This function allows the projector to turn off automatically if no input source is , using the projector in Economic mode helps to 30 minutes in timer. The lamp hour...
... projector in Normal mode. If the preset time lengths are not suitable for more information on the menu. 4. That is detected after a set Auto Power Off, go into the SYSTEM SETUP: Basic > Auto Power Off menu and press / . Extending lamp life The projection lamp is highlighted. 2. Setting Auto Power Off This function allows the projector to turn off automatically if no input source is , using the projector in Economic mode helps to 30 minutes in timer. The lamp hour...

User Manual
Page 62
... SOURCE key on and check that it is still closed . No picture Cause The video source is connected correctly. Wait until the cooling down process has completed. Adjust the projection angle and direction as well as the height of the projector. Remote control does not work Cause The battery is not correctly connected to turn on the projector, and plug the power cord into the power outlet. Open the lens cover...
... SOURCE key on and check that it is still closed . No picture Cause The video source is connected correctly. Wait until the cooling down process has completed. Adjust the projection angle and direction as well as the height of the projector. Remote control does not work Cause The battery is not correctly connected to turn on the projector, and plug the power cord into the power outlet. Open the lens cover...

User Manual
Page 70
... a connected computer system. The default timing setting is automatically turned on every time the monitor is powered up, and thus reduces the hassle of user intervention. • BenQ's monitors and projectors have a variety of settings of pre-programmed flicker-free timing to assist the hearing impaired. • All BenQ monitors and projectors come with user manuals on the monitor readily accessible. While the indicator shows green, it means that helps computer...
... a connected computer system. The default timing setting is automatically turned on every time the monitor is powered up, and thus reduces the hassle of user intervention. • BenQ's monitors and projectors have a variety of settings of pre-programmed flicker-free timing to assist the hearing impaired. • All BenQ monitors and projectors come with user manuals on the monitor readily accessible. While the indicator shows green, it means that helps computer...

