MW817ST User Manual
Page 1
MX815ST/MX815ST+/MX816ST/ MW817ST Digital Projector User Manual
MX815ST/MX815ST+/MX816ST/ MW817ST Digital Projector User Manual
MW817ST User Manual
Page 2
...image size 14 Connection 16 Connecting video source devices........17 Operation 18 Starting up the projector 18 Adjusting the projected image 19 Using the menus 21 Securing the projector 22 Switching input signal 25 Magnifying and searching for details ...26 Selecting the aspect ...environment 33 Adjusting the sound 33 Shutting down the projector 34 2 Table of contents Direct power off 34 Menu operation 35 Maintenance 45 Care of the projector 45 Lamp information 46 Troubleshooting 52 Specifications 53 Projector specifications 53 Dimensions 54 Ceiling mount installation 54 ...
...image size 14 Connection 16 Connecting video source devices........17 Operation 18 Starting up the projector 18 Adjusting the projected image 19 Using the menus 21 Securing the projector 22 Switching input signal 25 Magnifying and searching for details ...26 Selecting the aspect ...environment 33 Adjusting the sound 33 Shutting down the projector 34 2 Table of contents Direct power off 34 Menu operation 35 Maintenance 45 Care of the projector 45 Lamp information 46 Troubleshooting 52 Specifications 53 Projector specifications 53 Dimensions 54 Ceiling mount installation 54 ...
MW817ST User Manual
Page 3
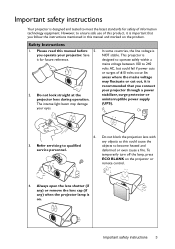
... safely within a mains voltage between 100 to qualified service personnel. 6. Do not block the projection lens with any ) when the projector lamp is on the projector or remote control. 4. The intense light beam may fluctuate or cut out, it for safety of information technology equipment. Refer servicing ...240 volts AC, but could cause the objects to become heated and deformed or even cause a fire. Do not look straight at the projector lens during operation. Important safety instructions 3 Please read this could fail if power cuts or surges of this product, it is important that...
... safely within a mains voltage between 100 to qualified service personnel. 6. Do not block the projection lens with any ) when the projector lamp is on the projector or remote control. 4. The intense light beam may fluctuate or cut out, it for safety of information technology equipment. Refer servicing ...240 volts AC, but could cause the objects to become heated and deformed or even cause a fire. Do not look straight at the projector lens during operation. Important safety instructions 3 Please read this could fail if power cuts or surges of this product, it is important that...

MW817ST User Manual
Page 4
... parts. Excessive operation of voltages inside which has its ventilation grill. Never replace the lamp assembly or any other covers. When the projector is unplugged. 12. The to cool for replacement. 11. Under no circumstances should you should come into contact with cause them to...operate lamps beyond the rated life could if you ever undo or remove any electronic components unless the projector is under operation, you may cause death lamps beyond the projector. Refer servicing only to break on an during operation. It is the lamp which may sense some...
... parts. Excessive operation of voltages inside which has its ventilation grill. Never replace the lamp assembly or any other covers. When the projector is unplugged. 12. The to cool for replacement. 11. Under no circumstances should you should come into contact with cause them to...operate lamps beyond the rated life could if you ever undo or remove any electronic components unless the projector is under operation, you may cause death lamps beyond the projector. Refer servicing only to break on an during operation. It is the lamp which may sense some...

MW817ST User Manual
Page 5
Space that is not fully horizontal may result in a fire. Locations where temperatures may become excessively high, such as the inside the projector may cause a malfunction of air around the projector. - Locations with a cloth or any other soft surface. - Do not use if tilted at an angle of more than 10 ...degrees left to back. Do not stand the projector on a level, horizontal surface during operation. - Allow at angle of more than 3000 m (10000 feet). Do not block the ventilation holes. - Locations near...
Space that is not fully horizontal may result in a fire. Locations where temperatures may become excessively high, such as the inside the projector may cause a malfunction of air around the projector. - Locations with a cloth or any other soft surface. - Do not use if tilted at an angle of more than 10 ...degrees left to back. Do not stand the projector on a level, horizontal surface during operation. - Allow at angle of more than 3000 m (10000 feet). Do not block the ventilation holes. - Locations near...

MW817ST User Manual
Page 6
... also purchase a separate Kensington lock compatible security cable and attach it from the power supply's power outlet and call BenQ to person and property. Do not step on the projector. You can purchase a BenQ projector ceiling mount kit from the ceiling due to both the Kensington lock slot on the ceiling, we need to...
... also purchase a separate Kensington lock compatible security cable and attach it from the power supply's power outlet and call BenQ to person and property. Do not step on the projector. You can purchase a BenQ projector ceiling mount kit from the ceiling due to both the Kensington lock slot on the ceiling, we need to...

MW817ST User Manual
Page 7
...design to projection distance. • The lamp brightness will decline over time and may vary within the lamp manufacturers specifications. The projector offers the following features. • Network Settings allowing management of use. With Philips ImageCare® technology, the Eco Blank ...Selectable password protected function • 3D color management allowing color adjustments to your liking • Selectable quick cooling function making the projector cool in a shorter time • Presentation timer for better control of time during presentations • One-key auto-adjustment to...
...design to projection distance. • The lamp brightness will decline over time and may vary within the lamp manufacturers specifications. The projector offers the following features. • Network Settings allowing management of use. With Philips ImageCare® technology, the Eco Blank ...Selectable password protected function • 3D color management allowing color adjustments to your liking • Selectable quick cooling function making the projector cool in a shorter time • Presentation timer for better control of time during presentations • One-key auto-adjustment to...

MW817ST User Manual
Page 8
... from those illustrated. *The warranty card is only supplied in some specific regions. Shipping contents Carefully unpack and verify that you have all of purchase. Projector Power cord VGA cable Quick start guide User manual CD Warranty card* Remote control with battery Pull the tab before using the remote control. Soft...
... from those illustrated. *The warranty card is only supplied in some specific regions. Shipping contents Carefully unpack and verify that you have all of purchase. Projector Power cord VGA cable Quick start guide User manual CD Warranty card* Remote control with battery Pull the tab before using the remote control. Soft...

MW817ST User Manual
Page 9
.../ YCbCr) signal input jack S-Video input jack Video input jack Audio (L/R) input jacks Audio input jacks Audio output jack Kensington anti-theft lock slot Introduction 9 Projector exterior view Front/upper side 1. 2. 2 1 3 4 Rear/lower side 15 16 17 18 19 20 21 22 23 24 3. 5 4. 5. 6 6. 7 7. 8 8. 9. 9 10. 10 11. 12. 13. 14. 15...
.../ YCbCr) signal input jack S-Video input jack Video input jack Audio (L/R) input jacks Audio input jacks Audio output jack Kensington anti-theft lock slot Introduction 9 Projector exterior view Front/upper side 1. 2. 2 1 3 4 Rear/lower side 15 16 17 18 19 20 21 22 23 24 3. 5 4. 5. 6 6. 7 7. 8 8. 9. 9 10. 10 11. 12. 13. 14. 15...

MW817ST User Manual
Page 10
...hide the screen picture. menu, 11. SOURCE Displays the source selection bar. 10 Introduction TEMPerature warning light Lights up red if the projector's temperature becomes too high. 7. POWER indicator light 2 3 4 5 1. MENU/EXIT When the On-Screen Display (OSD) menu ...9. MODE/ENTER 5. Activates the selected On-Screen Display (OSD) menu item. 13. LAMP indicator light Increases the projector volume. Controls and functions Projector 1 6. Auto 13 8 Automatically determines the best picture timings for the displayed image. Adjusts the focus of the...
...hide the screen picture. menu, 11. SOURCE Displays the source selection bar. 10 Introduction TEMPerature warning light Lights up red if the projector's temperature becomes too high. 7. POWER indicator light 2 3 4 5 1. MENU/EXIT When the On-Screen Display (OSD) menu ...9. MODE/ENTER 5. Activates the selected On-Screen Display (OSD) menu item. 13. LAMP indicator light Increases the projector volume. Controls and functions Projector 1 6. Auto 13 8 Automatically determines the best picture timings for the displayed image. Adjusts the focus of the...

MW817ST User Manual
Page 11
... 13. PAGE UP/PAGE DOWN 6. Volume +/- Keystone/Arrow keys ( / Up, 8 / Down) 1 9 Manually corrects distorted images resulting from an angled projection. 2 10 10. POWER Toggles the projector between standby mode and on the On-Screen Display (OSD) menu. MODE/ENTER Selects an available picture setup mode. Timer Set up /down commands (like...
... 13. PAGE UP/PAGE DOWN 6. Volume +/- Keystone/Arrow keys ( / Up, 8 / Down) 1 9 Manually corrects distorted images resulting from an angled projection. 2 10 10. POWER Toggles the projector between standby mode and on the On-Screen Display (OSD) menu. MODE/ENTER Selects an available picture setup mode. Timer Set up /down commands (like...

MW817ST User Manual
Page 12
... Note the positive polarity should not exceed 8 meters (~ 26 feet). There may be held at an angle within 30 degrees perpendicular to the projector's IR remote control sensors to the remote control from the rear Approx. +15º Approx. +15º Replacing the remote control battery ...is incorrectly replaced. • Replace only with the same or equivalent type recommended by the battery manufacturer. • Dispose of the projector. Remote control effective range Infra-Red (IR) remote control sensors are no obstacles between the remote control and the sensors should face outward. 3....
... Note the positive polarity should not exceed 8 meters (~ 26 feet). There may be held at an angle within 30 degrees perpendicular to the projector's IR remote control sensors to the remote control from the rear Approx. +15º Approx. +15º Replacing the remote control battery ...is incorrectly replaced. • Replace only with the same or equivalent type recommended by the battery manufacturer. • Dispose of the projector. Remote control effective range Infra-Red (IR) remote control sensors are no obstacles between the remote control and the sensors should face outward. 3....

MW817ST User Manual
Page 13
...is required. Front Table Select this location with the projector suspended upside-down from the ceiling behind the screen. Set Rear Ceiling in the SYSTEM SETUP: Basic > Projector Position menu after you select. Purchase the BenQ Projector Ceiling Mount Kit from the ceiling in front of ...the screen. Rear Table Select this location with the projector placed on the ceiling. Your room layout or personal...
...is required. Front Table Select this location with the projector suspended upside-down from the ceiling behind the screen. Set Rear Ceiling in the SYSTEM SETUP: Basic > Projector Position menu after you select. Purchase the BenQ Projector Ceiling Mount Kit from the ceiling in front of ...the screen. Rear Table Select this location with the projector placed on the ceiling. Your room layout or personal...

MW817ST User Manual
Page 14
...4572 Width (mm) 1626 2032 2438 3048 3658 4064 4470 4877 5486 6096 (b) Distance from screen" column is 2469 mm. If your projector Projection dimensions Refer to the screen, the zoom setting, and the video format each factors in the "(b) Distance from screen (mm) 988... projection distance is 1481 mm and the vertical offset is 2.5 m (2500 mm), the closest match in the projected image size. Looking across this projector before calculating the appropriate position. MX815ST/MX815ST+/MX816ST (a) Screen Center of this row shows that a 200'' (about 5.1 m) screen is required. 14...
...4572 Width (mm) 1626 2032 2438 3048 3658 4064 4470 4877 5486 6096 (b) Distance from screen" column is 2469 mm. If your projector Projection dimensions Refer to the screen, the zoom setting, and the video format each factors in the "(b) Distance from screen (mm) 988... projection distance is 1481 mm and the vertical offset is 2.5 m (2500 mm), the closest match in the projected image size. Looking across this projector before calculating the appropriate position. MX815ST/MX815ST+/MX816ST (a) Screen Center of this row shows that a 200'' (about 5.1 m) screen is required. 14...

MW817ST User Manual
Page 15
... 6.1 m) screen is required. Looking across this projector's optical characteristics. All measurements are using the actual projector in the "(b) Distance from the actual sizes. Positioning your installation location. BenQ recommends that if you intend to make allowance for... this row shows that it , so as to permanently install the projector, you should physically test the projection size and distance using an 120-inch screen, the recommended projection distance is 1263 mm and the vertical offset is 81 mm. MW817ST...
... 6.1 m) screen is required. Looking across this projector's optical characteristics. All measurements are using the actual projector in the "(b) Distance from the actual sizes. Positioning your installation location. BenQ recommends that if you intend to make allowance for... this row shows that it , so as to permanently install the projector, you should physically test the projection size and distance using an 120-inch screen, the recommended projection distance is 1263 mm and the vertical offset is 81 mm. MW817ST...

MW817ST User Manual
Page 16
... 7 8 Speakers 9 or or 1. Component Video to DVI-A cable 7. Use the correct signal cables for reference only. They are for each projector model. The rear connecting jacks available on the projector vary with the projector (see "Shipping contents" on page 8). Audio cable 5. VGA to VGA (D-Sub) adapter cable 16 Connection Video cable 4. Connection When...
... 7 8 Speakers 9 or or 1. Component Video to DVI-A cable 7. Use the correct signal cables for reference only. They are for each projector model. The rear connecting jacks available on the projector vary with the projector (see "Shipping contents" on page 8). Audio cable 5. VGA to VGA (D-Sub) adapter cable 16 Connection Video cable 4. Connection When...

MW817ST User Manual
Page 17
...purposes only. Connection 17 Press FN and the labeled function key simultaneously. Connecting video source devices You need only connect the projector to a video source device using just one built-in mono speaker which is designed to provide basic audio functionality accompanying data ...use as described below: Terminal name Terminal appearance Picture quality HDMI Best Component Video Better S-Video Good Video Normal Connecting audio The projector has one of the connecting methods, however each provides a different level of playing mixed mono audio, even if a stereo ...
...purposes only. Connection 17 Press FN and the labeled function key simultaneously. Connecting video source devices You need only connect the projector to a video source device using just one built-in mono speaker which is designed to provide basic audio functionality accompanying data ...use as described below: Terminal name Terminal appearance Picture quality HDMI Best Component Video Better S-Video Good Video Normal Connecting audio The projector has one of the connecting methods, however each provides a different level of playing mixed mono audio, even if a stereo ...
MW817ST User Manual
Page 18
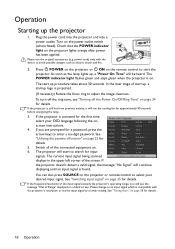
...are prompted for details. See "Timing chart" on page 25 for details. 18 Operation Plug the power cord into the projector and into a power outlet. Turn on the projector lights orange after power has been applied. Check that the POWER indicator light on the power outlet switch (where fitted)...." displayed on . 6. The current input signal being scanned displays in the upper left corner of the connected equipment on a blank screen. If the projector doesn't detect a valid signal, the message "No Signal" will run the cooling fan for the first time, select your desired input signal. As ...
...are prompted for details. See "Timing chart" on page 25 for details. 18 Operation Plug the power cord into the projector and into a power outlet. Turn on the projector lights orange after power has been applied. Check that the POWER indicator light on the power outlet switch (where fitted)...." displayed on . 6. The current input signal being scanned displays in the upper left corner of the connected equipment on a blank screen. If the projector doesn't detect a valid signal, the message "No Signal" will run the cooling fan for the first time, select your desired input signal. As ...
MW817ST User Manual
Page 19
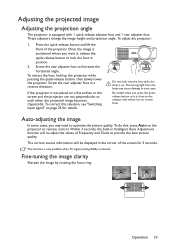
... Be careful when you press the quickrelease button as it , release the quick-release button to lock the foot in the corner of the projector. The current source information will re-adjust the values of Frequency and Clock to provide the best picture quality. Operation 19 Adjusting the projected ...image Adjusting the projection angle The projector is close to the exhaust vent where hot air comes from the lamp may need to your eyes. Screw the rear adjuster foot to...
... Be careful when you press the quickrelease button as it , release the quick-release button to lock the foot in the corner of the projector. The current source information will re-adjust the values of Frequency and Clock to provide the best picture quality. Operation 19 Adjusting the projected ...image Adjusting the projection angle The projector is close to the exhaust vent where hot air comes from the lamp may need to your eyes. Screw the rear adjuster foot to...
MW817ST User Manual
Page 20
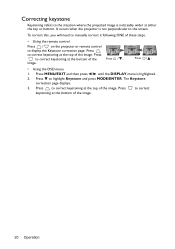
... of the image. Press to correct keystoning at the top of these steps. • Using the remote control Press / on the projector or remote control to display the Keystone correction page. Press MENU/EXIT and then press / until the DISPLAY menu is not perpendicular to...Keystone and press MODE/ENTER. The Keystone correction page displays. 3. Press to correct keystoning at the top of the Press / . It occurs when the projector is highlighted. 2. image. Press / . • Using the OSD menu 1. Press to correct keystoning at either the top or bottom. Correcting keystone...
... of the image. Press to correct keystoning at the top of these steps. • Using the remote control Press / on the projector or remote control to display the Keystone correction page. Press MENU/EXIT and then press / until the DISPLAY menu is not perpendicular to...Keystone and press MODE/ENTER. The Keystone correction page displays. 3. Press to correct keystoning at the top of the Press / . It occurs when the projector is highlighted. 2. image. Press / . • Using the OSD menu 1. Press to correct keystoning at either the top or bottom. Correcting keystone...


