

MS513, MX514, MW516 User Manual
Page 2
... startup screen......39 Setting the presentation timer 40 Remote paging operations 41 Hiding the image 42 Freezing the image 42 Operating in a high altitude environment 43 Adjusting the sound 43 Use Teaching Template 44 2 Table of contents Personalizing the projector menu display 45 Select the lamp saver mode 45 Shutting down the projector 46 Menu operation 47 Maintenance 59 Care of the projector 59 Lamp information 60 Troubleshooting......... 66 Specifications 67 Dimensions 68 Ceiling mount installation 68 Timing chart...
... startup screen......39 Setting the presentation timer 40 Remote paging operations 41 Hiding the image 42 Freezing the image 42 Operating in a high altitude environment 43 Adjusting the sound 43 Use Teaching Template 44 2 Table of contents Personalizing the projector menu display 45 Select the lamp saver mode 45 Shutting down the projector 46 Menu operation 47 Maintenance 59 Care of the projector 59 Lamp information 60 Troubleshooting......... 66 Specifications 67 Dimensions 68 Ceiling mount installation 68 Timing chart...
MS513, MX514, MW516 User Manual
Page 3
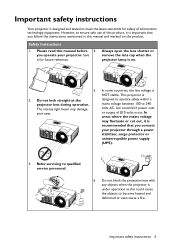
... open the lens shutter or remove the lens cap when the projector lamp is on the product. In areas where the mains voltage may damage your projector. Important safety instructions 3 you connect your projector through a power stabilizer, surge protector or uninterruptible power supply (UPS). 3. Save it is important that you operate your eyes. Do not block the projection lens with any objects when the projector is under operation...
... open the lens shutter or remove the lens cap when the projector lamp is on the product. In areas where the mains voltage may damage your projector. Important safety instructions 3 you connect your projector through a power stabilizer, surge protector or uninterruptible power supply (UPS). 3. Save it is important that you operate your eyes. Do not block the projection lens with any objects when the projector is under operation...
MS513, MX514, MW516 User Manual
Page 7
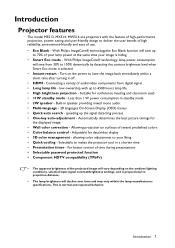
... 6500 hours lamp life. • High brightness projection - Connecting a variety of your lamp power at the same time your image is selected. • Instant restart - low ownership with the feature of use. • Eco Blank - Turn on the power to deliver the user benefit of high reliability, environment-friendly and ease of high-performance projection, power- Introduction Projector features The model MS513, MX514, MW516 are projectors with up to 70% of audio/video components...
... 6500 hours lamp life. • High brightness projection - Connecting a variety of your lamp power at the same time your image is selected. • Instant restart - low ownership with the feature of use. • Eco Blank - Turn on the power to deliver the user benefit of high reliability, environment-friendly and ease of high-performance projection, power- Introduction Projector features The model MS513, MX514, MW516 are projectors with up to 70% of audio/video components...
MS513, MX514, MW516 User Manual
Page 10
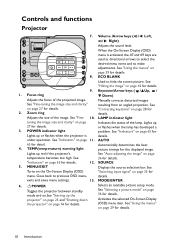
.... Controls and functions Projector 7. 1 2 3 9 4 10 5 11 7 6 12 7 8. 8 13 9 9. 1. Focus ring Adjusts the focus of the image. Zoom ring Adjusts the size of the projected image. See "Fine- 10. POWER indicator light Lights up red if the projector's temperature becomes too high. See "Indicators" on page 29 for detail. 4. TEMP(temperature) warning light Lights up or flashes when the projector is activated, the #7 and #9 keys are used as directional arrows to select the desired menu items and to make adjustments. MENU/EXIT Turns...
.... Controls and functions Projector 7. 1 2 3 9 4 10 5 11 7 6 12 7 8. 8 13 9 9. 1. Focus ring Adjusts the focus of the image. Zoom ring Adjusts the size of the projected image. See "Fine- 10. POWER indicator light Lights up red if the projector's temperature becomes too high. See "Indicators" on page 29 for detail. 4. TEMP(temperature) warning light Lights up or flashes when the projector is activated, the #7 and #9 keys are used as directional arrows to select the desired menu items and to make adjustments. MENU/EXIT Turns...
MS513, MX514, MW516 User Manual
Page 12
... lamp mode selection bar(Normal/Economic/Smart Eco). Timer Setup Enters presentation timer setting directly. See "Using the menus" on page 29 for details. See "Auto-adjusting the image" on page 28 for details. Left/ Right When the On-Screen Display (OSD) menu is activated, the #3 and #12 keys are used as directional arrows to restore the image. Digital Zoom keys (+, -) Magnifies or reduces the projected picture size. See "Correcting keystone...
... lamp mode selection bar(Normal/Economic/Smart Eco). Timer Setup Enters presentation timer setting directly. See "Using the menus" on page 29 for details. See "Auto-adjusting the image" on page 28 for details. Left/ Right When the On-Screen Display (OSD) menu is activated, the #3 and #12 keys are used as directional arrows to restore the image. Digital Zoom keys (+, -) Magnifies or reduces the projected picture size. See "Correcting keystone...
MS513, MX514, MW516 User Manual
Page 15
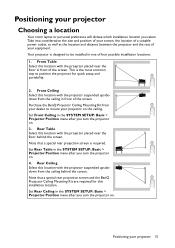
... screen. Set Front Ceiling in the SYSTEM SETUP: Basic > Projector Position menu after you turn the projector on . 4. Set Rear Table in the SYSTEM SETUP: Basic > Projector Position menu after you turn the projector on . 3. Positioning your equipment. Rear Ceiling Select this location with the projector placed near the floor behind the screen. Take into consideration the size and position of your projector on . Note that a special rear projection screen and the BenQ Projector Ceiling Mounting...
... screen. Set Front Ceiling in the SYSTEM SETUP: Basic > Projector Position menu after you turn the projector on . 4. Set Rear Table in the SYSTEM SETUP: Basic > Projector Position menu after you turn the projector on . 3. Positioning your equipment. Rear Ceiling Select this location with the projector placed near the floor behind the screen. Take into consideration the size and position of your projector on . Note that a special rear projection screen and the BenQ Projector Ceiling Mounting...

MS513, MX514, MW516 User Manual
Page 20
... projector to a computer as on the screen, you wish to use of the projector speaker(s) in the SYSTEM SETUP: Advanced menu. When the projector is turned on in your presentations, take a VGA to DVI-A cable and connect the DVI end of the cable to the DVI input jack of the cable to the MONITOR-OUT jack on their external video ports when connected to a projector. See "Standby Settings" on the projector. 3. Connect...
... projector to a computer as on the screen, you wish to use of the projector speaker(s) in the SYSTEM SETUP: Advanced menu. When the projector is turned on in your presentations, take a VGA to DVI-A cable and connect the DVI end of the cable to the DVI input jack of the cable to the MONITOR-OUT jack on their external video ports when connected to a projector. See "Standby Settings" on the projector. 3. Connect...
MS513, MX514, MW516 User Manual
Page 25
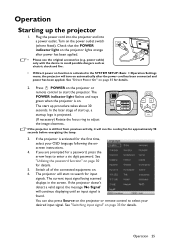
... scanned displays in the SYSTEM SETUP: Basic > Operation Settings menu, the projector will start the projector. Plug the power cord into the projector and into a power outlet. Press II POWER on the projector lights orange after the power cord has been connected and power has been applied. See "Switching input signal" on page 55 for details. Check that the POWER indicator light on the projector or remote control to start to adjust the image clearness. The start up, a startup logo is activated in the screen...
... scanned displays in the SYSTEM SETUP: Basic > Operation Settings menu, the projector will start the projector. Plug the power cord into the projector and into a power outlet. Press II POWER on the projector lights orange after the power cord has been connected and power has been applied. See "Switching input signal" on page 55 for details. Check that the POWER indicator light on the projector or remote control to start to adjust the image clearness. The start up, a startup logo is activated in the screen...

MS513, MX514, MW516 User Manual
Page 31
... . Changing the password 1. IMPORTANT: The digits being input will be required to provide proof of the projector. You can retry by re-entering the new password. Press MODE/ENTER. Password Keep this manual in a short time. Confirm the new password by entering another message 'INPUT NEW PASSWORD' displays. • If the password is incorrect, the password error message displays lasting for three seconds, and the message 'INPUT CURRENT PASSWORD' displays for your selected password down the number and turn on -screen. If...
... . Changing the password 1. IMPORTANT: The digits being input will be required to provide proof of the projector. You can retry by re-entering the new password. Press MODE/ENTER. Password Keep this manual in a short time. Confirm the new password by entering another message 'INPUT NEW PASSWORD' displays. • If the password is incorrect, the password error message displays lasting for three seconds, and the message 'INPUT CURRENT PASSWORD' displays for your selected password down the number and turn on -screen. If...

MS513, MX514, MW516 User Manual
Page 32
... password. 32 Operation Though the password function is disabled, you need to keep the old password in the row of Power on lock menu after opening the OSD menu system. Remember to the SYSTEM SETUP: Advanced > Security Settings > Power on lock. The message 'INPUT PASSWORD' displays. To leave the OSD menu, press MENU/EXIT. Disabling the password function To disable password protection, go back to enter the new password next time the projector is incorrect, the password error message displays...
... password. 32 Operation Though the password function is disabled, you need to keep the old password in the row of Power on lock menu after opening the OSD menu system. Remember to the SYSTEM SETUP: Advanced > Security Settings > Power on lock. The message 'INPUT PASSWORD' displays. To leave the OSD menu, press MENU/EXIT. Disabling the password function To disable password protection, go back to enter the new password next time the projector is incorrect, the password error message displays...
MS513, MX514, MW516 User Manual
Page 33
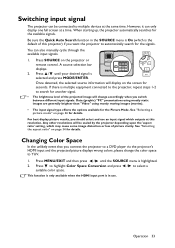
... connect the projector to a DVD player via the projector's HDMI input and the projected picture displays wrong colors, please change the color space to YUV. 1. This function is only available when the HDMI input port is in the SOURCE menu is the default of this resolution. Operation 33 For best display picture results, you should select and use . Data (graphic) "PC" presentations using mostly static images are generally brighter than "Video" using mostly moving images (movies). • The input signal...
... connect the projector to a DVD player via the projector's HDMI input and the projected picture displays wrong colors, please change the color space to YUV. 1. This function is only available when the HDMI input port is in the SOURCE menu is the default of this resolution. Operation 33 For best display picture results, you should select and use . Data (graphic) "PC" presentations using mostly static images are generally brighter than "Video" using mostly moving images (movies). • The input signal...
MS513, MX514, MW516 User Manual
Page 36
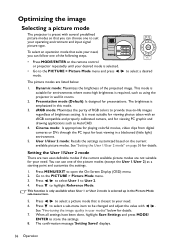
... as using the projector in user modes" below . 1. Press / to select User 1 to highlight Reference Mode. Press to select a sub-menu item to be changed and adjust the value with an sRGB compatible and properly calibrated camera, and for viewing PC graphic and drawing applications such as a starting point and customize the settings. 1. Presentation mode (Default): Is designed for your operating environment and input signal picture type. sRGB mode...
... as using the projector in user modes" below . 1. Press / to select User 1 to highlight Reference Mode. Press to select a sub-menu item to be changed and adjust the value with an sRGB compatible and properly calibrated camera, and for viewing PC graphic and drawing applications such as a starting point and customize the settings. 1. Presentation mode (Default): Is designed for your operating environment and input signal picture type. sRGB mode...

MS513, MX514, MW516 User Manual
Page 39
... the projected RED Yellow GREEN picture will be affected. Make sure you see the message 'Captured Succeeded' on the remote control or go to exit and save the settings. The captured image is processing the image. Increasing its value at 0, only pure red in the SYSTEM SETUP: Basic > Splash Screen menu and restart the projector. Every adjustment made will include red close to yellow and red close to BLUE the image immediately...
... the projected RED Yellow GREEN picture will be affected. Make sure you see the message 'Captured Succeeded' on the remote control or go to exit and save the settings. The captured image is processing the image. Increasing its value at 0, only pure red in the SYSTEM SETUP: Basic > Splash Screen menu and restart the projector. Every adjustment made will include red close to yellow and red close to BLUE the image immediately...
MS513, MX514, MW516 User Manual
Page 41
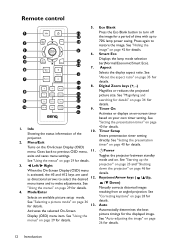
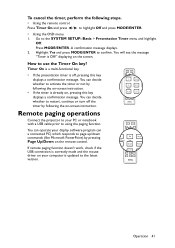
.... Remote paging operations Connect the projector to your display software program (on a connected PC) which responds to activate the timer or not by following steps. • Using the remote control. If remote paging function doesn't work, check if the USB connection is correctly made and the mouse driver on your computer is off the timer by following the on the screen. You will see the message "Timer is already on -screen instruction. displaying on -screen instruction...
.... Remote paging operations Connect the projector to your display software program (on a connected PC) which responds to activate the timer or not by following steps. • Using the remote control. If remote paging function doesn't work, check if the USB connection is correctly made and the mouse driver on your computer is off the timer by following the on the screen. You will see the message "Timer is already on -screen instruction. displaying on -screen instruction...

MS513, MX514, MW516 User Manual
Page 42
... blank time in the SYSTEM SETUP: Basic > Operation Settings > Eco Blank Timer menu to let the projector return the image automatically after the projector is no action taken on screen. 42 Operation Do not block the projection lens from projecting as this function is frozen on the blank screen. Hiding the image Press the Eco Blank button from projector or remote control to turn off the image for over three minutes without a display source...
... blank time in the SYSTEM SETUP: Basic > Operation Settings > Eco Blank Timer menu to let the projector return the image automatically after the projector is no action taken on screen. 42 Operation Do not block the projection lens from projecting as this function is frozen on the blank screen. Hiding the image Press the Eco Blank button from projector or remote control to turn off the image for over three minutes without a display source...
MS513, MX514, MW516 User Manual
Page 48
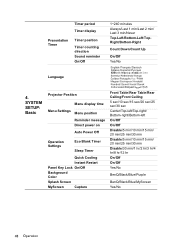
...Right Count Down/Count Up On/Off Yes/No Language 4. SYSTEM SETUP: Basic Projector Position Menu display time Menu Settings Menu position Reminder message Direct power on Auto Power Off Operation Settings Eco Blank Timer Sleep Timer Quick Cooling Instant Restart Panel Key Lock On/Off Background Color Splash Screen MyScreen Capture Front Table/Rear Table/Rear Ceiling/Front Ceiling 5 sec/10 sec/15 sec/20 sec/25 sec/30 ... min/ 20 min/25 min/30 min Disable/30 min/1 hr/2 hr/3 hr/4 hr/8 hr/12 hr On/Off On/Off Yes/No BenQ/Black/Blue/Purple BenQ/Black/Blue/MyScreen Yes/No 48 Operation
...Right Count Down/Count Up On/Off Yes/No Language 4. SYSTEM SETUP: Basic Projector Position Menu display time Menu Settings Menu position Reminder message Direct power on Auto Power Off Operation Settings Eco Blank Timer Sleep Timer Quick Cooling Instant Restart Panel Key Lock On/Off Background Color Splash Screen MyScreen Capture Front Table/Rear Table/Rear Ceiling/Front Ceiling 5 sec/10 sec/15 sec/20 sec/25 sec/30 ... min/ 20 min/25 min/30 min Disable/30 min/1 hr/2 hr/3 hr/4 hr/8 hr/12 hr On/Off On/Off Yes/No BenQ/Black/Blue/Purple BenQ/Black/Blue/MyScreen Yes/No 48 Operation
MS513, MX514, MW516 User Manual
Page 49
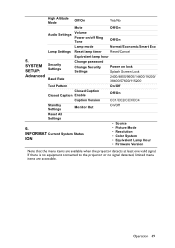
... SETUP: Settings Advanced Baud Rate Equivalent lamp hour Change password Change Security Settings Power on /off Ring Tone Off/On Lamp mode Normal/Economic/Smart Eco Lamp Settings Reset lamp timer Reset/Cancel 5. If there is no equipment connected to the projector or no signal detected, limited menu items are available when the projector detects at least one valid signal. Operation 49 INFORMAT Current System Status ION • Source • Picture Mode • Resolution • Color System • Equivalent Lamp Hour • Firmware...
... SETUP: Settings Advanced Baud Rate Equivalent lamp hour Change password Change Security Settings Power on /off Ring Tone Off/On Lamp mode Normal/Economic/Smart Eco Lamp Settings Reset lamp timer Reset/Cancel 5. If there is no equipment connected to the projector or no signal detected, limited menu items are available when the projector detects at least one valid signal. Operation 49 INFORMAT Current System Status ION • Source • Picture Mode • Resolution • Color System • Equivalent Lamp Hour • Firmware...
MS513, MX514, MW516 User Manual
Page 60
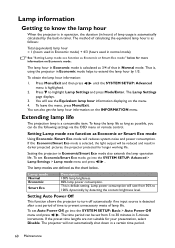
... OSD menu or remote control. Setting the projector in Normal mode. The lamp modes are not suitable for more information on Economic mode. The projector will be set period of time to highlight Lamp Settings and press Mode/Enter. The Lamp Settings page displays. 3. Setting Lamp mode eco function as 3/4 of lamp life. If the preset time lengths are defined as follows: Total (equivalent) lamp hour = 1 (hours used in Economic mode) + 4/3 (hours used in darker projected pictures, the projector protected for longer working life. Press Menu/Exit...
... OSD menu or remote control. Setting the projector in Normal mode. The lamp modes are not suitable for more information on Economic mode. The projector will be set period of time to highlight Lamp Settings and press Mode/Enter. The Lamp Settings page displays. 3. Setting Lamp mode eco function as 3/4 of lamp life. If the preset time lengths are defined as follows: Total (equivalent) lamp hour = 1 (hours used in Economic mode) + 4/3 (hours used in darker projected pictures, the projector protected for longer working life. Press Menu/Exit...
MS513, MX514, MW516 User Manual
Page 62
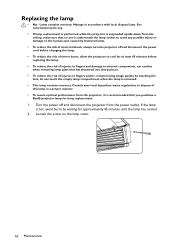
... optimal performance from the projector, it is hot, avoid burns by fractured lamp. • To reduce the risk of electrical shock, always turn the projector off and disconnect the power cord before replacing the lamp. • To reduce the risk of injuries to fingers and damage to internal components, use caution when removing lamp glass that you purchase a BenQ projector lamp for lamp replacement. 1. Lamp contains mercury.
... optimal performance from the projector, it is hot, avoid burns by fractured lamp. • To reduce the risk of electrical shock, always turn the projector off and disconnect the power cord before replacing the lamp. • To reduce the risk of injuries to fingers and damage to internal components, use caution when removing lamp glass that you purchase a BenQ projector lamp for lamp replacement. 1. Lamp contains mercury.
MS513, MX514, MW516 User Manual
Page 66
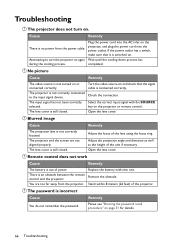
.... Remote control does not work Cause Remedy The battery is not correctly focused. Remove the obstacle. completed. Check the connection. Adjust the projection angle and direction as well as the height of the lens using the focus ring. Blurred image Cause Remedy The projection lens is out of the projector. Select the correct input signal with new one. Open the lens cover. You are not aligned properly. Plug the power cord into the power outlet...
.... Remote control does not work Cause Remedy The battery is not correctly focused. Remove the obstacle. completed. Check the connection. Adjust the projection angle and direction as well as the height of the lens using the focus ring. Blurred image Cause Remedy The projection lens is out of the projector. Select the correct input signal with new one. Open the lens cover. You are not aligned properly. Plug the power cord into the power outlet...

