

User Manual
Page 2
... Optimizing the image 32 Setting the presentation timer 35 Freezing the image 37 Hiding the image 37 Utilizing FAQ function 38 Locking control keys 38 Operating in a high altitude environment 39 Adjusting the sound 39 Personalizing the projector menu display 40 Controlling the projector through a Lan environment 40 Shutting down the projector 43 Menu operation 44 Maintenance 53 Care of the projector 53 Lamp information 54 Troubleshooting 60 Specifications 61 Projector specifications 61 Dimensions 62 Ceiling mount installation 62 Timing chart...
... Optimizing the image 32 Setting the presentation timer 35 Freezing the image 37 Hiding the image 37 Utilizing FAQ function 38 Locking control keys 38 Operating in a high altitude environment 39 Adjusting the sound 39 Personalizing the projector menu display 40 Controlling the projector through a Lan environment 40 Shutting down the projector 43 Menu operation 44 Maintenance 53 Care of the projector 53 Lamp information 54 Troubleshooting 60 Specifications 61 Projector specifications 61 Dimensions 62 Ceiling mount installation 62 Timing chart...

User Manual
Page 3
lens during operation. To temporarily turn off the lamp, press BLANK on . Important safety instructions 3 Please read this manual before you connect your projector through a power stabilizer, surge protector or 2. Always open the lens shutter or remove the lens cap when the projector lamp is designed future reference. Do not look straight at the projector uninterruptible power supply (UPS). Do not block the projection lens with any objects when the projector is...
lens during operation. To temporarily turn off the lamp, press BLANK on . Important safety instructions 3 Please read this manual before you connect your projector through a power stabilizer, surge protector or 2. Always open the lens shutter or remove the lens cap when the projector lamp is designed future reference. Do not look straight at the projector uninterruptible power supply (UPS). Do not block the projection lens with any objects when the projector is...
User Manual
Page 7
... the projector cool in a shorter time • FAQ to troubleshoot operational problems with one quick key press • Presentation timer for better control of time during presentations • One-key auto-adjustment to display the best picture quality • Digital keystone correction to correct distorted images • Adjustable color balance control for data/video display • Ability to display 16.7 million colors • Multi-language On-Screen Display (OSD) menus • Switchable normal and economic modes...
... the projector cool in a shorter time • FAQ to troubleshoot operational problems with one quick key press • Presentation timer for better control of time during presentations • One-key auto-adjustment to display the best picture quality • Digital keystone correction to correct distorted images • Adjustable color balance control for data/video display • Ability to display 16.7 million colors • Multi-language On-Screen Display (OSD) menus • Switchable normal and economic modes...
User Manual
Page 9
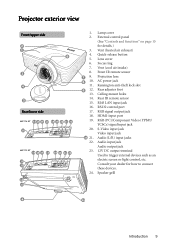
....) Vent (heated air exhaust) Quick-release button Lens cover Focus ring Vent (cool air intake) Front IR remote sensor Projection lens AC power jack Kensington anti-theft lock slot Rear adjuster foot Ceiling mount holes Rear IR remote sensor RJ45 LAN input jack RS232 control port RGB signal output jack HDMI-input port RGB (PC)/Component Video (YPbPr/ YCbCr) signal input jack S-Video input jack Video input jack Audio (L/R) input jacks Audio input jack Audio output jack 12V DC output terminal Used to connect these devices. Speaker...
....) Vent (heated air exhaust) Quick-release button Lens cover Focus ring Vent (cool air intake) Front IR remote sensor Projection lens AC power jack Kensington anti-theft lock slot Rear adjuster foot Ceiling mount holes Rear IR remote sensor RJ45 LAN input jack RS232 control port RGB signal output jack HDMI-input port RGB (PC)/Component Video (YPbPr/ YCbCr) signal input jack S-Video input jack Video input jack Audio (L/R) input jacks Audio input jack Audio output jack 12V DC output terminal Used to connect these devices. Speaker...

User Manual
Page 10
LAMP indicator light 11 Indicates the status of the projected image. Lights up red if the projector's 8 temperature becomes too high. "Fine-tuning the image clarity" on page 24 "Auto-adjusting the image" on . Power Toggles the projector between standby mode and on page 24 2. "Locking control keys" on page 38, "Using the menus" on page 37 Selects an available picture setup mode. Left/ 12. "Hiding the image" on page 25 5. "Switching input signal" on page 25 When the On-Screen Display (OSD...
LAMP indicator light 11 Indicates the status of the projected image. Lights up red if the projector's 8 temperature becomes too high. "Fine-tuning the image clarity" on page 24 "Auto-adjusting the image" on . Power Toggles the projector between standby mode and on page 24 2. "Locking control keys" on page 38, "Using the menus" on page 37 Selects an available picture setup mode. Left/ 12. "Hiding the image" on page 25 5. "Switching input signal" on page 25 When the On-Screen Display (OSD...

User Manual
Page 12
... "Setting the presentation timer" on page 24 Depending upon the input signal in use, selects an available picture mode. MODE Automatically determines the best picture timings for continuous output. "Auto-adjusting the image" on page 35 21. Keystone/Arrow buttons ( / Up, Down) Manually corrects distorted images resulting from an angled projection. The laser beam is not a toy. AUTO 22. It emits red colored light when you press it . When the On-Screen Display (OSD...
... "Setting the presentation timer" on page 24 Depending upon the input signal in use, selects an available picture mode. MODE Automatically determines the best picture timings for continuous output. "Auto-adjusting the image" on page 35 21. Keystone/Arrow buttons ( / Up, Down) Manually corrects distorted images resulting from an angled projection. The laser beam is not a toy. AUTO 22. It emits red colored light when you press it . When the On-Screen Display (OSD...

User Manual
Page 13
... off. 2. There may be danger of the arrow as indicated in the base of the projector. To open the battery cover, turn the remote control over to the remote control from the rear Approx. +15° Approx. +15° Replacing the remote control batteries 1. Make sure that there are no obstacles between the remote control and the sensors should not exceed 8 meters (~ 26 feet...
... off. 2. There may be danger of the arrow as indicated in the base of the projector. To open the battery cover, turn the remote control over to the remote control from the rear Approx. +15° Approx. +15° Replacing the remote control batteries 1. Make sure that there are no obstacles between the remote control and the sensors should not exceed 8 meters (~ 26 feet...

User Manual
Page 19
... you can use of the projector (mixed mono) speakers in the SYSTEM SETUP: Advanced menu. Refer to your external speakers (not supplied). Usually a key combo like FN + F3 or CRT/LCD key turns the external display on the notebook. Locate a function key labeled CRT/LCD or a function key with a DVI input jack, take a suitable audio cable and connect one end of the cable to the...
... you can use of the projector (mixed mono) speakers in the SYSTEM SETUP: Advanced menu. Refer to your external speakers (not supplied). Usually a key combo like FN + F3 or CRT/LCD key turns the external display on the notebook. Locate a function key labeled CRT/LCD or a function key with a DVI input jack, take a suitable audio cable and connect one end of the cable to the...
User Manual
Page 21
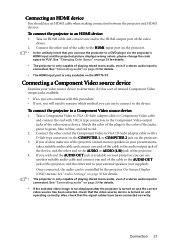
... be controlled by the projector On-Screen Display (OSD) menus. See "Connecting audio" on your projector, you can use of the projector (mixed mono) speakers in your external speakers (not supplied). Connect the other end to the AUDIO or AUDIO (L/R) jack of playing mixed mono audio, even if a stereo audio input is only capable of the projector. 4. green to green, blue to blue, and red to a Component Video source device: 1. Once connected, the audio can use an HDMI cable...
... be controlled by the projector On-Screen Display (OSD) menus. See "Connecting audio" on your projector, you can use of the projector (mixed mono) speakers in your external speakers (not supplied). Connect the other end to the AUDIO or AUDIO (L/R) jack of playing mixed mono audio, even if a stereo audio input is only capable of the projector. 4. green to green, blue to blue, and red to a Component Video source device: 1. Once connected, the audio can use an HDMI cable...

User Manual
Page 23
... of the connected equipment on page 29 for approximately 90 seconds before energizing the lamp. 4. See "Switching input signal" on . 7. Please change to adjust the image clearness. In the later stage of Range" displayed on the projector or remote control to search for input signals. The projector will run the cooling fan for details. You can also press SOURCE on a blank screen. Press Power on the projector lights orange after power has been...
... of the connected equipment on page 29 for approximately 90 seconds before energizing the lamp. 4. See "Switching input signal" on . 7. Please change to adjust the image clearness. In the later stage of Range" displayed on the projector or remote control to search for input signals. The projector will run the cooling fan for details. You can also press SOURCE on a blank screen. Press Power on the projector lights orange after power has been...

User Manual
Page 25
... menu on the projector or remote 3. SYSTEM SETUP: Basic Presentation Timer Language Projector Position Menu Settings Auto Power Off Blank Timer Panel Key Lock Sleep Timer Splash Screen English Front Table Disable Disable Off Disable BenQ 4. Wall Color Aspect Ratio Auto Keystone Keystone Position Phase H. Press Menu/Exit on . Press to highlight Language control to set the OSD language. 1. Main menu icon Main menu Sub-menu DISPLAY Wall Color Aspect Ratio Auto Keystone Keystone Position Phase H. Below is equipped with On-Screen Display...
... menu on the projector or remote 3. SYSTEM SETUP: Basic Presentation Timer Language Projector Position Menu Settings Auto Power Off Blank Timer Panel Key Lock Sleep Timer Splash Screen English Front Table Disable Disable Off Disable BenQ 4. Wall Color Aspect Ratio Auto Keystone Keystone Position Phase H. Press Menu/Exit on . Press to highlight Language control to set the OSD language. 1. Main menu icon Main menu Sub-menu DISPLAY Wall Color Aspect Ratio Auto Keystone Keystone Position Phase H. Below is equipped with On-Screen Display...
User Manual
Page 27
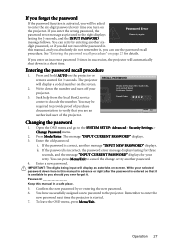
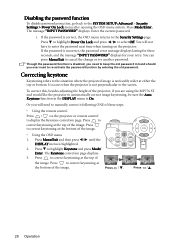
... the new password next time the projector is started. 7. You may be asked to enter the six-digit password every time you enter the wrong password, the Password Error password error message as asterisks on-screen. The message "INPUT CURRENT PASSWORD" displays. 3. You can use the password recall procedure. IMPORTANT: The digits being input will display as pictured to the right displays Please try another password. 4. Write your selected password down the recall code, and contact BenQ Customer Center. Password Keep this manual...
... the new password next time the projector is started. 7. You may be asked to enter the six-digit password every time you enter the wrong password, the Password Error password error message as asterisks on-screen. The message "INPUT CURRENT PASSWORD" displays. 3. You can use the password recall procedure. IMPORTANT: The digits being input will display as pictured to the right displays Please try another password. 4. Write your selected password down the recall code, and contact BenQ Customer Center. Password Keep this manual...
User Manual
Page 28
... the change or try another password. Press / . The message "INPUT PASSWORD" displays. Press to re-activate the password function by entering the old password. Press to highlight Power On Lock and press / to enter the password next time when turning on the projector or remote control to display the Keystone correction page. Press Menu/Exit and then press / until the DISPLAY menu is incorrect, the password error message displays lasting for three seconds, and the message "INPUT PASSWORD" displays...
... the change or try another password. Press / . The message "INPUT PASSWORD" displays. Press to re-activate the password function by entering the old password. Press to highlight Power On Lock and press / to enter the password next time when turning on the projector or remote control to display the Keystone correction page. Press Menu/Exit and then press / until the DISPLAY menu is incorrect, the password error message displays lasting for three seconds, and the message "INPUT PASSWORD" displays...

User Manual
Page 42
... and status of this projector. Press Exit to go back to the remote network operation page. The tools page allows you to manage the projector, configure the Lan control settings and secure access of remote network operation on this projector has been password-protected. Once set , access to the remote network operation page. You can name the projector, keep track of it. After making the adjustments, press the Send button and the data...
... and status of this projector. Press Exit to go back to the remote network operation page. The tools page allows you to manage the projector, configure the Lan control settings and secure access of remote network operation on this projector has been password-protected. Once set , access to the remote network operation page. You can name the projector, keep track of it. After making the adjustments, press the Send button and the data...
User Manual
Page 44
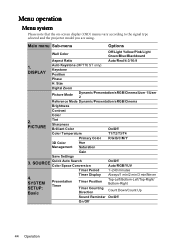
... Gain Save Settings 3. Size Digital Zoom Picture Mode Dynamic/Presentation/sRGB/Cinema/User 1/User 2 Reference Mode Dynamic/Presentation/sRGB/Cinema Brightness Contrast Color 2. Menu operation Menu system Please note that the on-screen display (OSD) menus vary according to the signal type selected and the projector model you are using. SOURCE Quick Auto Search Color Space Conversion On/Off Auto/RGB/YUV Timer Period 1~240 minutes 4. Main menu Sub-menu Options Wall Color Off/Light Yellow/Pink/Light Green/Blue/Blackboard Aspect...
... Gain Save Settings 3. Size Digital Zoom Picture Mode Dynamic/Presentation/sRGB/Cinema/User 1/User 2 Reference Mode Dynamic/Presentation/sRGB/Cinema Brightness Contrast Color 2. Menu operation Menu system Please note that the on-screen display (OSD) menus vary according to the signal type selected and the projector model you are using. SOURCE Quick Auto Search Color Space Conversion On/Off Auto/RGB/YUV Timer Period 1~240 minutes 4. Main menu Sub-menu Options Wall Color Off/Light Yellow/Pink/Light Green/Blue/Blackboard Aspect...

User Manual
Page 49
... the image will remain active after a set to a value between 30 minutes and 12 hours. Sets the language for details. See "Locking control keys" on page 29 for details. The following options are available: BenQ logo, Black screen, Blue screen. See "Changing Color Space" on page 38 for details. Menu Position (Center) Sets the On-Screen Display (OSD) menu position. See "Using the menus" on the remote control. SOURCE menu 4. Sets the auto-shutdown timer.
... the image will remain active after a set to a value between 30 minutes and 12 hours. Sets the language for details. See "Locking control keys" on page 29 for details. The following options are available: BenQ logo, Black screen, Blue screen. See "Changing Color Space" on page 38 for details. Menu Position (Center) Sets the On-Screen Display (OSD) menu position. See "Using the menus" on the remote control. SOURCE menu 4. Sets the auto-shutdown timer.

User Manual
Page 50
... that you adjust the image size and focus and check that the projected image is calculated. Power On Lock (Off) See "Utilizing the password function" on how the total lamp hour is free from a normal 90-second duration to approximately 30 seconds. Selecting On enables the function. Enabling this function slightly increases the standby power consumption. It helps you can output a VGA signal when it is in standby mode and...
... that you adjust the image size and focus and check that the projected image is calculated. Power On Lock (Off) See "Utilizing the password function" on how the total lamp hour is free from a normal 90-second duration to approximately 30 seconds. Selecting On enables the function. Enabling this function slightly increases the standby power consumption. It helps you can output a VGA signal when it is in standby mode and...

User Manual
Page 52
... solutions to problems you may encounter. Equivalent Lamp Hour Displays the number of your projector. 52 Operation Features and Service 6. INFORMATION menu Source Shows the current signal source. Firmware Version Shows the firmware version of hours the lamp has been used. Function (default setting / value) Description FAQ-Image and Installation FAQ- Picture Mode Shows the selected mode in the PICTURE menu. Current System Status Resolution Shows the native resolution of the input signal. Color System Shows input system format: NTSC, PAL, SECAM, or...
... solutions to problems you may encounter. Equivalent Lamp Hour Displays the number of your projector. 52 Operation Features and Service 6. INFORMATION menu Source Shows the current signal source. Firmware Version Shows the firmware version of hours the lamp has been used. Function (default setting / value) Description FAQ-Image and Installation FAQ- Picture Mode Shows the selected mode in the PICTURE menu. Current System Status Resolution Shows the native resolution of the input signal. Color System Shows input system format: NTSC, PAL, SECAM, or...
User Manual
Page 54
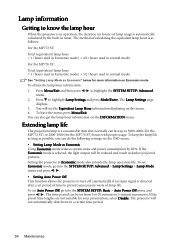
... Equivalent Lamp Hour information displaying on the INFORMATION menu. You can be reduced and result in timer. To keep the lamp life as long as Economic Using Economic mode reduces system noise and power consumption by the built-in darker projected pictures. To set Auto Power Off, go into the SYSTEM SETUP: Advanced > Lamp Settings > Lamp Mode menu and press / . • Setting Auto Power Off This function allows the projector to turn off automatically if no input signal is...
... Equivalent Lamp Hour information displaying on the INFORMATION menu. You can be reduced and result in timer. To keep the lamp life as long as Economic Using Economic mode reduces system noise and power consumption by the built-in darker projected pictures. To set Auto Power Off, go into the SYSTEM SETUP: Advanced > Lamp Settings > Lamp Mode menu and press / . • Setting Auto Power Off This function allows the projector to turn off automatically if no input signal is...
User Manual
Page 69
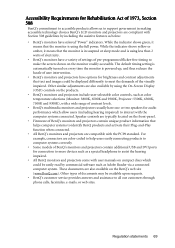
... range of user intervention. • BenQ's monitors and projectors have colored "Power" indicators. For example, connectors are also available by using the On-Screen Display (OSD) controls on the BenQ's web site (www.BenQ.com). Other similar adjustments are color-coded to help users easily connecting products to computer systems correctly. • Some models of BenQ's monitors and projectors contain additional USB and DVI ports for brightness and contrast adjustments that helps computer systems to...
... range of user intervention. • BenQ's monitors and projectors have colored "Power" indicators. For example, connectors are also available by using the On-Screen Display (OSD) controls on the BenQ's web site (www.BenQ.com). Other similar adjustments are color-coded to help users easily connecting products to computer systems correctly. • Some models of BenQ's monitors and projectors contain additional USB and DVI ports for brightness and contrast adjustments that helps computer systems to...


