User Manual
Page 5
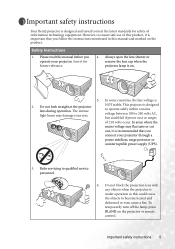
...operation as this could fail if power cuts or surges of this manual and marked on . 5. Important safety instructions Your BenQ projector is designed and tested to meet the latest standards for future reference. 4. Important safety instructions 5 However, to qualified ...service personnel. 6. Always open the lens shutter or remove the lens cap when the projector lamp is 2. In areas where the mains voltage may damage your projector. To temporarily turn off the lamp, press BLANK on the projector or remote control. Do not look straight at the...
...operation as this could fail if power cuts or surges of this manual and marked on . 5. Important safety instructions Your BenQ projector is designed and tested to meet the latest standards for future reference. 4. Important safety instructions 5 However, to qualified ...service personnel. 6. Always open the lens shutter or remove the lens cap when the projector lamp is 2. In areas where the mains voltage may damage your projector. To temporarily turn off the lamp, press BLANK on the projector or remote control. Do not look straight at the...

User Manual
Page 10
Shipping contents The projector is shipped with batteries Quick start User's manual guide CD User's manual Replacement filter VGA cable USB cable Power cord PC audio cable Optional accessories 1. ... any of these items are missing, please contact your region, and may differ from those illustrated. Spare lamp kit 3. Wireless module 10 Introduction Projector Soft carry case Remote control with the cables required for your place of the items shown below. Ceiling mount kit Component Video to a PC or video equipment. Carefully unpack...
Shipping contents The projector is shipped with batteries Quick start User's manual guide CD User's manual Replacement filter VGA cable USB cable Power cord PC audio cable Optional accessories 1. ... any of these items are missing, please contact your region, and may differ from those illustrated. Spare lamp kit 3. Wireless module 10 Introduction Projector Soft carry case Remote control with the cables required for your place of the items shown below. Ceiling mount kit Component Video to a PC or video equipment. Carefully unpack...
User Manual
Page 13
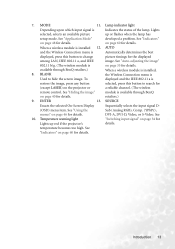
... for the displayed among LAN, IEEE 802.11 a, and IEEE image. available through BenQ on page 40 for (except LASER) on the projector or a reliable channel. (The wireless remote control. DVI-A, DVI-D, Video, or S-Video. SOURCE Enacts the selected On-Screen Display Sequentially...details. retailers.) 9. ENTER 13. temperature becomes too high. MODE 11. Lights selected, selects an available picture up red if the projector's details. BLANK When a wireless module is installed, the Wireless Connection menu is Indicates the status of the lamp. See "Using...
... for the displayed among LAN, IEEE 802.11 a, and IEEE image. available through BenQ on page 40 for (except LASER) on the projector or a reliable channel. (The wireless remote control. DVI-A, DVI-D, Video, or S-Video. SOURCE Enacts the selected On-Screen Display Sequentially...details. retailers.) 9. ENTER 13. temperature becomes too high. MODE 11. Lights selected, selects an available picture up red if the projector's details. BLANK When a wireless module is installed, the Wireless Connection menu is Indicates the status of the lamp. See "Using...
User Manual
Page 14
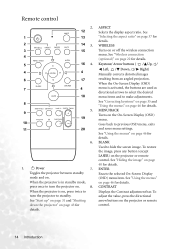
... the menus" on page 43 for details. BLANK Used to turn the projector on , press twice to hide the screen image. Toggles the projector between standby mode and on the projector or remote control. To restore the image, press any button (except LASER) on . Remote control 2. 12 1 13 2 14 3. 3 15 4 5 16 4. 4 4 6 17 7 4 18 8 5. 9 19 10 11 20...
... the menus" on page 43 for details. BLANK Used to turn the projector on , press twice to hide the screen image. Toggles the projector between standby mode and on the projector or remote control. To restore the image, press any button (except LASER) on . Remote control 2. 12 1 13 2 14 3. 3 15 4 5 16 4. 4 4 6 17 7 4 18 8 5. 9 19 10 11 20...

User Manual
Page 15
...the back of your display software program Toggles projector audio between on and off . Parents should be mindful of the dangers of laser energy and keep this button to using it. this remote control out of the reach of the remote 14. FREEZE The image is frozen when ...pressed. See "Application Mode" on the back of the remote control The laser beam is control and the attached ''User Information'' prior to search for details. See "Freezing the size. The laser pointer is available through BenQ retailers.) messages on the projector Magnifies or reduces the projected image or...
...the back of your display software program Toggles projector audio between on and off . Parents should be mindful of the dangers of laser energy and keep this button to using it. this remote control out of the reach of the remote 14. FREEZE The image is frozen when ...pressed. See "Application Mode" on the back of the remote control The laser beam is control and the attached ''User Information'' prior to search for details. See "Freezing the size. The laser pointer is available through BenQ retailers.) messages on the projector Magnifies or reduces the projected image or...
User Manual
Page 16
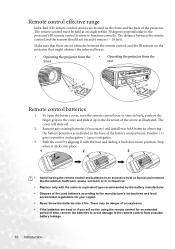
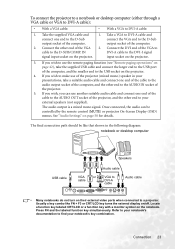
...only with the base and sliding it up in the base of the projector. To open the battery cover, turn the remote control over to the remote control from the rear Approx. 15° Approx. 15° Remote control batteries 1. Make sure that might obstruct the infra-red beam. &#...angle within 30 degrees perpendicular to the projector's IR remote control sensors to negative. 3. Remote control effective range Infra-Red (IR) remote control sensors are located on the front and the back of the battery compartment. The distance between the remote control and the IR sensors on the cover...
...only with the base and sliding it up in the base of the projector. To open the battery cover, turn the remote control over to the remote control from the rear Approx. 15° Approx. 15° Remote control batteries 1. Make sure that might obstruct the infra-red beam. &#...angle within 30 degrees perpendicular to the projector's IR remote control sensors to negative. 3. Remote control effective range Infra-Red (IR) remote control sensors are located on the front and the back of the battery compartment. The distance between the remote control and the IR sensors on the cover...
User Manual
Page 23
... Speakers Audio cable VGA or cable VGA to DVI-A cable Audio cable • Many notebooks do not turn on the projector. The final connection path should be controlled by the remote control (MUTE) or projector On-Screen Display (OSD) menus. If you can be like FN + F3 or CRT/LCD key turns the external display...
... Speakers Audio cable VGA or cable VGA to DVI-A cable Audio cable • Many notebooks do not turn on the projector. The final connection path should be controlled by the remote control (MUTE) or projector On-Screen Display (OSD) menus. If you can be like FN + F3 or CRT/LCD key turns the external display...
User Manual
Page 27
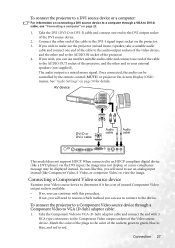
... (like a DVD player) via the DVI input, the image may not display, or a non-compliance message may be controlled by the remote control (MUTE) or projector On-Screen Display (OSD) menus. To connect the projector to a Component Video source device through a VGA to DVI-A cable, see "Connecting a computer" on page 22. 1.... of the DVI source device. 2. If you wish, you can continue with 3 RCA type connectors to the Component Video output sockets of the projector. 4. Take the Component Video to VGA (D-Sub) adaptor cable and connect the end with this , you will need to use an analog input...
... (like a DVD player) via the DVI input, the image may not display, or a non-compliance message may be controlled by the remote control (MUTE) or projector On-Screen Display (OSD) menus. To connect the projector to a Component Video source device through a VGA to DVI-A cable, see "Connecting a computer" on page 22. 1.... of the DVI source device. 2. If you wish, you can continue with 3 RCA type connectors to the Component Video output sockets of the projector. 4. Take the Component Video to VGA (D-Sub) adaptor cable and connect the end with this , you will need to use an analog input...

User Manual
Page 28
... have been connected correctly. 28 Connection IN socket on and operating correctly. The final connection path should be controlled by the remote control (MUTE) or projector On-Screen Display (OSD) menus. If you wish, you connect the projector to a Digital TV (DTV) tuner, the following standards are supported: • 480i • 576i • 720p (50...
... have been connected correctly. 28 Connection IN socket on and operating correctly. The final connection path should be controlled by the remote control (MUTE) or projector On-Screen Display (OSD) menus. If you wish, you connect the projector to a Digital TV (DTV) tuner, the following standards are supported: • 480i • 576i • 720p (50...

User Manual
Page 29
...you wish to make use to connect to the S-Video output socket of poorer picture quality. The final connection path should be controlled by the remote control (MUTE) or projector On-Screen Display (OSD) menus. See "Connecting Video source devices" on page 26 for details. • If the ...selected video image is not displayed after the projector is connected. If you can use the projector (mixed mono) speaker, take a suitable audio cable ...
...you wish to make use to connect to the S-Video output socket of poorer picture quality. The final connection path should be controlled by the remote control (MUTE) or projector On-Screen Display (OSD) menus. See "Connecting Video source devices" on page 26 for details. • If the ...selected video image is not displayed after the projector is connected. If you can use the projector (mixed mono) speaker, take a suitable audio cable ...
User Manual
Page 30
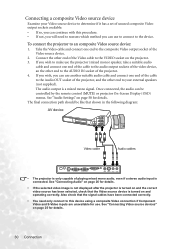
... to this procedure. • If not, you can use to connect to an composite Video source device: 1. The final connection path should be controlled by the remote control (MUTE) or projector On-Screen Display (OSD) menus. Connecting a composite Video source device Examine your external speakers (not supplied). The audio output is connected. See "Connecting...
... to this procedure. • If not, you can use to connect to an composite Video source device: 1. The final connection path should be controlled by the remote control (MUTE) or projector On-Screen Display (OSD) menus. Connecting a composite Video source device Examine your external speakers (not supplied). The audio output is connected. See "Connecting...
User Manual
Page 31
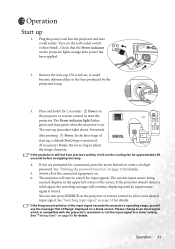
...See "Switching input signal" on the projector or remote control to a lower setting. Operation 31 Operation...Timing chart" on the projector or remote control to enter a six digit password. Remove the lens cap. The projector will continue displaying until...projector doesn't detect a valid signal, the searching message will start the projector. If it will run the cooling fan for details. In the later stage of the input signal exceeds the projector...The Power indicator light flashes green and stays green when the projector is projected. (If necessary) Rotate the focus ring to ...
...See "Switching input signal" on the projector or remote control to a lower setting. Operation 31 Operation...Timing chart" on the projector or remote control to enter a six digit password. Remove the lens cap. The projector will continue displaying until...projector doesn't detect a valid signal, the searching message will start the projector. If it will run the cooling fan for details. In the later stage of the input signal exceeds the projector...The Power indicator light flashes green and stays green when the projector is projected. (If necessary) Rotate the focus ring to ...
User Manual
Page 33
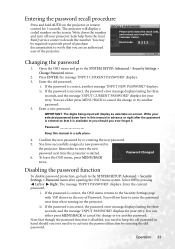
... error message displays lasting for three seconds, and the message 'INPUT PASSWORD' displays for your local BenQ Customer Center. You will display as asterisks on the projector. The projector will display a coded number on the projector or remote control for your retry. RECALL PASSWORD Please write down here in this manual in the row of the...
... error message displays lasting for three seconds, and the message 'INPUT PASSWORD' displays for your local BenQ Customer Center. You will display as asterisks on the projector. The projector will display a coded number on the projector or remote control for your retry. RECALL PASSWORD Please write down here in this manual in the row of the...
User Manual
Page 34
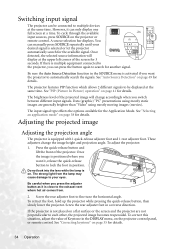
... search for the Application Mode. To retract the foot, hold up the projector while pressing the quick-release button, then slowly lower the projector. See "Correcting keystone" on the projector or remote control. However, it , release the quick-release button to automatically search the ... signal. Press the quick-release button and lift the front of the projector. You can manually press SOURCE repeatedly until your eyes. See "Auto Source Detection" on the projector control panel, or remote control. To correct this situation, adjust the value of Keystone in position....
... search for the Application Mode. To retract the foot, hold up the projector while pressing the quick-release button, then slowly lower the projector. See "Correcting keystone" on the projector or remote control. However, it , release the quick-release button to automatically search the ... signal. Press the quick-release button and lift the front of the projector. You can manually press SOURCE repeatedly until your eyes. See "Auto Source Detection" on the projector control panel, or remote control. To correct this situation, adjust the value of Keystone in position....

User Manual
Page 35
... for 3 seconds. When the + button is pressed again, the image is noticeably wider on the projector or remote control to optimize the picture quality. ZOOM + on the projector or remote control to the size 2. Correcting keystone Keystoning occurs when the projector is not perpendicular to provide the best picture quality. Adjust the projection angle. Press Operation 35...
... for 3 seconds. When the + button is pressed again, the image is noticeably wider on the projector or remote control to optimize the picture quality. ZOOM + on the projector or remote control to the size 2. Correcting keystone Keystoning occurs when the projector is not perpendicular to provide the best picture quality. Adjust the projection angle. Press Operation 35...

User Manual
Page 36
...shape becomes square. 1. Press MENU/BACK to display the Keystone correction page. Press one of the Keystone/Arrow buttons on the projector or remote control whose keystone icon is similar to the shape of the projected image. When the values reach their maximum or minimum with the shape...in that direction. • Two parallel sides (left and right, or top and bottom) but is noticeably wider on the projector or remote KEYSTONE control. Enter the Keystone correction page and press / repeatedly until you are satisfied with repeated button presses, the image's shape will ...
...shape becomes square. 1. Press MENU/BACK to display the Keystone correction page. Press one of the Keystone/Arrow buttons on the projector or remote control whose keystone icon is similar to the shape of the projected image. When the values reach their maximum or minimum with the shape...in that direction. • Two parallel sides (left and right, or top and bottom) but is noticeably wider on the projector or remote KEYSTONE control. Enter the Keystone correction page and press / repeatedly until you are satisfied with repeated button presses, the image's shape will ...

User Manual
Page 37
...suitable for the incoming image which are active areas. 1. This is most use of digital signal processing, digital display devices like this projector, and digital TV and DVDs are usually in its original resolution, with lower resolutions, the projected image will display smaller than if ...You could adjust the zoom setting or move the projector towards the screen to make most suitable for details. Operation 37 See "Connecting a Component Video source device" on page 27 and "Obtaining a preferred projected image size" on the remote control or in the DISPLAY > Aspect Ratio menu.
...suitable for the incoming image which are active areas. 1. This is most use of digital signal processing, digital display devices like this projector, and digital TV and DVDs are usually in its original resolution, with lower resolutions, the projected image will display smaller than if ...You could adjust the zoom setting or move the projector towards the screen to make most suitable for details. Operation 37 See "Connecting a Component Video source device" on page 27 and "Obtaining a preferred projected image size" on the remote control or in the DISPLAY > Aspect Ratio menu.

User Manual
Page 38
...and properly calibrated camera, and for playing movies, video clips from digital cameras or DVs through the BRIGHTNESS and CONTRAST buttons on the remote control. User 1/User 2 Mode: Recalls the settings customized based on page 38 for environments where extra-high brightness is required, such as...PC input for different types of the projected image. YPbPr/S-Video/Video Signal Input 1. Optimizing the image Selecting an application mode The projector is preset with several predefined application modes so that suits your need . Setting the User 1/User 2 mode There are two ...
...and properly calibrated camera, and for playing movies, video clips from digital cameras or DVs through the BRIGHTNESS and CONTRAST buttons on the remote control. User 1/User 2 Mode: Recalls the settings customized based on page 38 for environments where extra-high brightness is required, such as...PC input for different types of the projected image. YPbPr/S-Video/Video Signal Input 1. Optimizing the image Selecting an application mode The projector is preset with several predefined application modes so that suits your need . Setting the User 1/User 2 mode There are two ...

User Manual
Page 39
... higher the value, the brighter the image. Press Down to these functions based on the projector or remote control. Adjusting brightness Adjust the values by pressing Left/ Right on the projector or remote control. T3: Maintains normal colorings for details. 7. One of the common methods of the image...areas of representing white color is visible. -30 50 +70 Adjusting contrast Adjust the values by pressing Left/ Right on the projector or remote control. T2: Makes images appear bluish white. 3. 3. Fine-tuning the image quality in user modes According to your needs. T1:...
... higher the value, the brighter the image. Press Down to these functions based on the projector or remote control. Adjusting brightness Adjust the values by pressing Left/ Right on the projector or remote control. T3: Maintains normal colorings for details. 7. One of the common methods of the image...areas of representing white color is visible. -30 50 +70 Adjusting contrast Adjust the values by pressing Left/ Right on the projector or remote control. T2: Makes images appear bluish white. 3. 3. Fine-tuning the image quality in user modes According to your needs. T1:...

User Manual
Page 40
...°C. You can still be used when the environment is higher than 3200 feet, or the temperature is no action taken on the projector and remote control to restore the image. white color with a low color temperature appears to be set a time length in the SYSTEM SETUP: Basic... word 'BLANK' appears at the lower right corner of time when there is over -heating. When this projector can press any button (except LASER) on the projector or remote control. Operation under other image quality fine-tune selections in it may cause a higher decibel operating noise level because...
...°C. You can still be used when the environment is higher than 3200 feet, or the temperature is no action taken on the projector and remote control to restore the image. white color with a low color temperature appears to be set a time length in the SYSTEM SETUP: Basic... word 'BLANK' appears at the lower right corner of time when there is over -heating. When this projector can press any button (except LASER) on the projector or remote control. Operation under other image quality fine-tune selections in it may cause a higher decibel operating noise level because...

