User Manual
Page 5
... intense light beam may fluctuate or cut out, it is recommended that you connect your projector. Important safety instructions 5 Safety Instructions 1. Always open the lens shutter or remove the lens cap when the projector lamp is 2. In areas where the mains voltage may damage your eyes. Refer servicing to ensure safe use of this manual before you operate your projector through a power stabilizer, surge protector or uninterruptible power supply...
... intense light beam may fluctuate or cut out, it is recommended that you connect your projector. Important safety instructions 5 Safety Instructions 1. Always open the lens shutter or remove the lens cap when the projector lamp is 2. In areas where the mains voltage may damage your eyes. Refer servicing to ensure safe use of this manual before you operate your projector through a power stabilizer, surge protector or uninterruptible power supply...

User Manual
Page 9
... cable or wireless connection • High quality manual zoom lens • One-key auto-adjustment to display the best picture quality • Two-way digital keystone correction to correct distorted images • Adjustable color balance control for data/video display • Ultra-high brightness projection lamp • Ability to display 16.7 million colors • Multi-language On-Screen Display (OSD) menus • Switchable normal and Economic modes to reduce the power consumption • Built-in speaker provides mixed mono audio...
... cable or wireless connection • High quality manual zoom lens • One-key auto-adjustment to display the best picture quality • Two-way digital keystone correction to correct distorted images • Adjustable color balance control for data/video display • Ultra-high brightness projection lamp • Ability to display 16.7 million colors • Multi-language On-Screen Display (OSD) menus • Switchable normal and Economic modes to reduce the power consumption • Built-in speaker provides mixed mono audio...
User Manual
Page 13
...wireless remote control. ENTER 13. temperature becomes too high. MODE 11. See "Application Mode" developed a problem. See "Indicators" on page 34 for details. SOURCE Enacts the selected On-Screen Display Sequentially selects the input signal D- (OSD) menu item. See 10. Introduction 13 7. BLANK When a wireless module is installed, the Wireless Connection menu is installed 12. Temperature warning light "Switching input signal" on page 48 for details. When a wireless module is Used to change picture timings for details. AUTO and the Wireless Connection menu...
...wireless remote control. ENTER 13. temperature becomes too high. MODE 11. See "Application Mode" developed a problem. See "Indicators" on page 34 for details. SOURCE Enacts the selected On-Screen Display Sequentially selects the input signal D- (OSD) menu item. See 10. Introduction 13 7. BLANK When a wireless module is installed, the Wireless Connection menu is installed 12. Temperature warning light "Switching input signal" on page 48 for details. When a wireless module is Used to change picture timings for details. AUTO and the Wireless Connection menu...

User Manual
Page 15
... Turns the Picture In Picture (PIP) window BenQ retailers.) on or off . (on the remote DVI-D, Video, or S-Video. To release the function, press any button on a connected PC) which input signal is a presentation aid for for safe operation on the back of children. LED indicator light (Analog RGB), Comp. (YPbPr), DVI-A, Lights red when any 19. It emits red colored light When a wireless module is installed and the Wireless Connection menu is available through BenQ retailers.) messages...
... Turns the Picture In Picture (PIP) window BenQ retailers.) on or off . (on the remote DVI-D, Video, or S-Video. To release the function, press any button on a connected PC) which input signal is a presentation aid for for safe operation on the back of children. LED indicator light (Analog RGB), Comp. (YPbPr), DVI-A, Lights red when any 19. It emits red colored light When a wireless module is installed and the Wireless Connection menu is available through BenQ retailers.) messages...

User Manual
Page 18
If you use the projector with wireless connection. Safety instructions for ceiling mounting of 20m away from your notebook, and switch between presentations on different notebooks instantly without fiddling with cables To use of the wrong gauge or length screws. BenQ recommends that you need to install a BenQ wireless module to the projector and enable your notebook/desktop PC with wireless function, there's no need to bring this...
If you use the projector with wireless connection. Safety instructions for ceiling mounting of 20m away from your notebook, and switch between presentations on different notebooks instantly without fiddling with cables To use of the wrong gauge or length screws. BenQ recommends that you need to install a BenQ wireless module to the projector and enable your notebook/desktop PC with wireless function, there's no need to bring this...

User Manual
Page 26
... alternate sound system available, or if audio is a mixed mono signal and controlled by the projector Volume and Mute settings. DVI-A format is used to directly carry a digital signal to a digital display without signal conversion. Make sure you know which kind of the digital format. Connecting Audio The projector has a built-in mono speaker which is designed to provide basic audio functionality accompanying data presentations for stereo audio reproduction use...
... alternate sound system available, or if audio is a mixed mono signal and controlled by the projector Volume and Mute settings. DVI-A format is used to directly carry a digital signal to a digital display without signal conversion. Make sure you know which kind of the digital format. Connecting Audio The projector has a built-in mono speaker which is designed to provide basic audio functionality accompanying data presentations for stereo audio reproduction use...

User Manual
Page 28
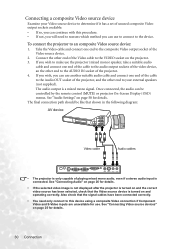
... selected video image is not displayed after the projector is turned on and the correct video source has been selected, check that the signal cables have been connected correctly. 28 Connection See "Connecting Audio" on the projector. 3. IN socket on page 26 for details. Connect the other end to a Digital TV (DTV) tuner, the following diagram: AV device Component Video to VGA (D-Sub) adaptor cable Speakers Audio cable Audio cable If you can use the projector...
... selected video image is not displayed after the projector is turned on and the correct video source has been selected, check that the signal cables have been connected correctly. 28 Connection See "Connecting Audio" on the projector. 3. IN socket on page 26 for details. Connect the other end to a Digital TV (DTV) tuner, the following diagram: AV device Component Video to VGA (D-Sub) adaptor cable Speakers Audio cable Audio cable If you can use the projector...
User Manual
Page 30
... audio input is a mixed mono signal. See "Connecting Video source devices" on page 25 for details. • If the selected video image is not displayed after the projector is turned on and the correct video source has been selected, check that the Video source device is turned on page 26 for details. 30 Connection To connect the projector to the composite Video output socket of the projector. 4. Connect the other end to your Video source...
... audio input is a mixed mono signal. See "Connecting Video source devices" on page 25 for details. • If the selected video image is not displayed after the projector is turned on and the correct video source has been selected, check that the Video source device is turned on page 26 for details. 30 Connection To connect the projector to the composite Video output socket of the projector. 4. Connect the other end to your Video source...
User Manual
Page 31
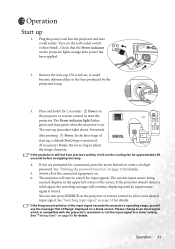
... power cord into the projector and into a wall socket. Remove the lens cap. Switch all of the screen. Operation 31 See "Switching input signal" on , it could become deformed due to the heat produced by the projection lamp. 3. Turn on . If it will continue displaying until an input source signal is on the wall socket switch (where fitted). The start up, a default BenQ logo is projected. (If necessary) Rotate the focus ring to enter a six digit password...
... power cord into the projector and into a wall socket. Remove the lens cap. Switch all of the screen. Operation 31 See "Switching input signal" on , it could become deformed due to the heat produced by the projection lamp. 3. Turn on . If it will continue displaying until an input source signal is on the wall socket switch (where fitted). The start up, a default BenQ logo is projected. (If necessary) Rotate the focus ring to enter a six digit password...
User Manual
Page 32
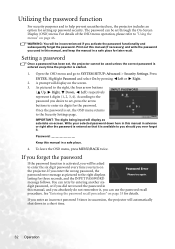
...-Screen Display (OSD) menu. A prompt will be used in this manual, and you did not record the password in a short time. 32 Operation You can be asked to SYSTEM SETUP: Advanced > Security Settings. WARNING: You will display on page 33 for three seconds, and the INPUT PASSWORD message follows. If you will display as pictured to "Using the menus" on page 46. As pictured to the Security Settings page. Password Keep this manual...
...-Screen Display (OSD) menu. A prompt will be used in this manual, and you did not record the password in a short time. 32 Operation You can be asked to SYSTEM SETUP: Advanced > Security Settings. WARNING: You will display on page 33 for three seconds, and the INPUT PASSWORD message follows. If you will display as pictured to "Using the menus" on page 46. As pictured to the Security Settings page. Password Keep this manual...
User Manual
Page 33
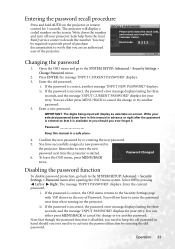
... can either press MENU/BACK to decode the number. Recall code: 0 2 1 2 Exit Changing the password 1. Password Keep this manual in the row of Password. The message 'INPUT PASSWORD' displays. ii. Enter a new password. Disabling the password function To disable password protection, go to cancel the change or try another message 'INPUT NEW PASSWORD' displays. IMPORTANT: The digits being input will display a coded number on the screen. i. You may be required to provide proof of the projector. If the password is disabled...
... can either press MENU/BACK to decode the number. Recall code: 0 2 1 2 Exit Changing the password 1. Password Keep this manual in the row of Password. The message 'INPUT PASSWORD' displays. ii. Enter a new password. Disabling the password function To disable password protection, go to cancel the change or try another message 'INPUT NEW PASSWORD' displays. IMPORTANT: The digits being input will display a coded number on the screen. i. You may be required to provide proof of the projector. If the password is disabled...

User Manual
Page 40
... Timer menu to shut down symptoms, which is not to be used when the environment is higher than 3200 feet, or the temperature is activated with an audio input connected, the audio can set from projecting as well. If the preset time spans are not suitable for details. See "Picture menu" on the projector or remote control. A white color with a low color temperature appears to state that this projector can operate under other image...
... Timer menu to shut down symptoms, which is not to be used when the environment is higher than 3200 feet, or the temperature is activated with an audio input connected, the audio can set from projecting as well. If the preset time spans are not suitable for details. See "Picture menu" on the projector or remote control. A white color with a low color temperature appears to state that this projector can operate under other image...

User Manual
Page 42
... the mouse driver on your computer or video source. 1. If remote paging function doesn't work, check if the USB connection is updated to the latest version. Please wait. 5. Freezing the image Press the FREEZE button on the remote control to freeze the image. 'FREEZE' will still hear the audio even though the image is successful, you will display in the SYSTEM SETUP: Advanced > Splash Screen menu and restart the projector. Press...
... the mouse driver on your computer or video source. 1. If remote paging function doesn't work, check if the USB connection is updated to the latest version. Please wait. 5. Freezing the image Press the FREEZE button on the remote control to freeze the image. 'FREEZE' will still hear the audio even though the image is successful, you will display in the SYSTEM SETUP: Advanced > Splash Screen menu and restart the projector. Press...

User Manual
Page 43
... Power indicator light flashes orange, the projection lamp shuts down the projector 1. To protect the lamp, the projector will continue to any commands during projector start-up the projector and go. Operation 43 To save your preferences. Use Left/ Right to 30 seconds in the SYSTEM SETUP: Basic > Menu Settings menu sets the length of time the OSD will display prompting you. The time length ranges from the wall socket. Disconnect the power cord from 5 to select a screen. Shutting...
... Power indicator light flashes orange, the projection lamp shuts down the projector 1. To protect the lamp, the projector will continue to any commands during projector start-up the projector and go. Operation 43 To save your preferences. Use Left/ Right to 30 seconds in the SYSTEM SETUP: Basic > Menu Settings menu sets the length of time the OSD will display prompting you. The time length ranges from the wall socket. Disconnect the power cord from 5 to select a screen. Shutting...

User Manual
Page 51
... darker projected images. Setting the projector in areas like high altitude or high temperature. Reset Lamp Timer Once the lamp is selected, the light output will still remain: Keystone, Position, Phase, Projector Position, High Altitude Mode, Lamp Settings, and Security Settings. When the function is password-protected. The following settings will be asked to enter the current password before changing to approximately 30 seconds. Once the password is set a password for later recall. System setup: Advanced menu FUNCTION (default setting...
... darker projected images. Setting the projector in areas like high altitude or high temperature. Reset Lamp Timer Once the lamp is selected, the light output will still remain: Keystone, Position, Phase, Projector Position, High Altitude Mode, Lamp Settings, and Security Settings. When the function is password-protected. The following settings will be asked to enter the current password before changing to approximately 30 seconds. Once the password is set a password for later recall. System setup: Advanced menu FUNCTION (default setting...

User Manual
Page 54
... the projector or remote control. Pull out the filter case. 5. Turn the projector off and wait until the fans stop running. 2. OK Filter case 3. If the dirt is difficult to remove or the filter is broken, replace it with the supplied spare filter sponge. A warning message like the one pictured to the right will be cleaned every 500 hours of use. To clean the filter 1. If you to clean the filter. The filter case...
... the projector or remote control. Pull out the filter case. 5. Turn the projector off and wait until the fans stop running. 2. OK Filter case 3. If the dirt is difficult to remove or the filter is broken, replace it with the supplied spare filter sponge. A warning message like the one pictured to the right will be cleaned every 500 hours of use. To clean the filter 1. If you to clean the filter. The filter case...

User Manual
Page 55
... again. Turn the projector back on -screen message as pictured to the right displays to position and retain the sponge into place. The projector will display an on . Make sure that there are small plastic pins along the edges to warn of shutdown in 60 seconds. If the case is not installed well. WARNING Check the Air Filter The air filter is taken. Attach the supplied new filter sponge...
... again. Turn the projector back on -screen message as pictured to the right displays to position and retain the sponge into place. The projector will display an on . Make sure that there are small plastic pins along the edges to warn of shutdown in 60 seconds. If the case is not installed well. WARNING Check the Air Filter The air filter is taken. Attach the supplied new filter sponge...

User Manual
Page 56
.... Message WARNING Replace the Lamp The lamp life is over 2950 hours. If the projected image gets darker, please replace the lamp. A new lamp should be replaced after turning the power back on page 51), you to operate the projector until the 2950 hour lamp warning appears. That is, using the projector in Economic mode helps to extend the lamp hour by the built-in timer. An old lamp may cause a malfunction in the projector and in normal mode. The lamp brightness...
.... Message WARNING Replace the Lamp The lamp life is over 2950 hours. If the projected image gets darker, please replace the lamp. A new lamp should be replaced after turning the power back on page 51), you to operate the projector until the 2950 hour lamp warning appears. That is, using the projector in Economic mode helps to extend the lamp hour by the built-in timer. An old lamp may cause a malfunction in the projector and in normal mode. The lamp brightness...

User Manual
Page 59
... reset to the SYSTEM WARNING SETUP: Advanced > Lamp Settings menu. Do not reset if the lamp is too high. 2. The fans are not working. After the startup logo, open the On-Screen Display (OSD) menu. Reset Lamp Timer? Highlight Reset and press ENTER. Temperature information When the Temperature warning light is on the projector. 12. 9. Do not turn the power on page 60. Press ENTER. Turn the projector off and contact qualified service personnel for further help. Restart the projector. A Reset Cancel warning message displays...
... reset to the SYSTEM WARNING SETUP: Advanced > Lamp Settings menu. Do not reset if the lamp is too high. 2. The fans are not working. After the startup logo, open the On-Screen Display (OSD) menu. Reset Lamp Timer? Highlight Reset and press ENTER. Temperature information When the Temperature warning light is on the projector. 12. 9. Do not turn the power on page 60. Press ENTER. Turn the projector off and contact qualified service personnel for further help. Restart the projector. A Reset Cancel warning message displays...
User Manual
Page 63
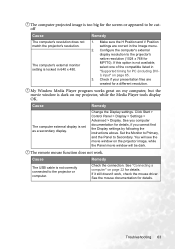
... Start > Control Panel > Display > Settings > Advanced > Display. See you computer documentation for MP770). Cause Remedy The USB cable is locked in 640 x 480. The computer's external monitor setting is not correctly connected to the projector's native resolution (1024 x 768 for details, if you cannot find the Display settings by following the instructions above. Check if your presentation files are correct in "Supported timing for a different resolution. My Window Media Player program works great...
... Start > Control Panel > Display > Settings > Advanced > Display. See you computer documentation for MP770). Cause Remedy The USB cable is locked in 640 x 480. The computer's external monitor setting is not correctly connected to the projector's native resolution (1024 x 768 for details, if you cannot find the Display settings by following the instructions above. Check if your presentation files are correct in "Supported timing for a different resolution. My Window Media Player program works great...


