
User Manual
Page 2
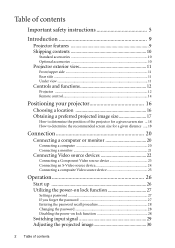
... view 11 Front/upper side 11 Rear side ...11 Under view ...11 Controls and functions 12 Projector ...12 Remote control 14 Positioning your projector 16 Choosing a location 16 Obtaining a preferred projected image size 17 How to determine the position of the projector for a given screen size ... 18 How to determine the recommended screen size for a given...
... view 11 Front/upper side 11 Rear side ...11 Under view ...11 Controls and functions 12 Projector ...12 Remote control 14 Positioning your projector 16 Choosing a location 16 Obtaining a preferred projected image size 17 How to determine the position of the projector for a given screen size ... 18 How to determine the recommended screen size for a given...

User Manual
Page 5
... to become heated and deformed or even cause a fire. In areas where the mains voltage may damage your projector. Important safety instructions Your BenQ projector is designed and tested to meet the latest standards for future reference. 4. In some countries, the line voltage... is recommended that you operate your eyes. Do not look straight at the projector lens during operation. Refer servicing to qualified service personnel. 6. To temporarily turn off the lamp, press BLANK on the projector or remote control. Safety Instructions 1.
... to become heated and deformed or even cause a fire. In areas where the mains voltage may damage your projector. Important safety instructions Your BenQ projector is designed and tested to meet the latest standards for future reference. 4. In some countries, the line voltage... is recommended that you operate your eyes. Do not look straight at the projector lens during operation. Refer servicing to qualified service personnel. 6. To temporarily turn off the lamp, press BLANK on the projector or remote control. Safety Instructions 1.
User Manual
Page 10
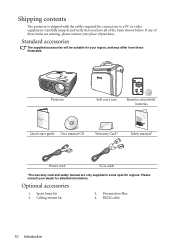
... kit 3. Presentation Plus 4. Please consult your dealer for connection to a PC or video equipment. Optional accessories 1. Shipping contents The projector is shipped with batteries Quick start guide User manual CD Warranty Card* Safety manual* Power cord VGA cable *The warranty card and safety... suitable for your region, and may differ from those illustrated. Spare lamp kit 2. RS232 cable 10 Introduction Projector Soft carry case Remote control with the cables required for detailed information. If any of these items are only supplied in some specific regions.
... kit 3. Presentation Plus 4. Please consult your dealer for connection to a PC or video equipment. Optional accessories 1. Shipping contents The projector is shipped with batteries Quick start guide User manual CD Warranty Card* Safety manual* Power cord VGA cable *The warranty card and safety... suitable for your region, and may differ from those illustrated. Spare lamp kit 2. RS232 cable 10 Introduction Projector Soft carry case Remote control with the cables required for detailed information. If any of these items are only supplied in some specific regions.
User Manual
Page 12
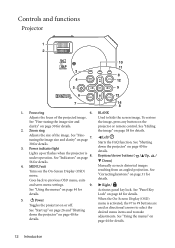
Used to previous OSD menu, exits resulting from an angled projection. projector or remote control. See "Finetuning the image size and clarity" on page 8. Down) 4. and saves menu settings. 9. Lock" on page 48 for details. When the On-Screen... Display (OSD) menu. See "Correcting keystone" on page 44 for details. Right/ See "Using the menus" on page 31 for Activates panel key lock. Controls and functions Projector 1 2 10 11 3 8 4 12 5 9 6 13 7 14 8 1. BLANK Adjusts the focus of the image. Left/ 30 for details. 12 Introduction See "Start up or...
Used to previous OSD menu, exits resulting from an angled projection. projector or remote control. See "Finetuning the image size and clarity" on page 8. Down) 4. and saves menu settings. 9. Lock" on page 48 for details. When the On-Screen... Display (OSD) menu. See "Correcting keystone" on page 44 for details. Right/ See "Using the menus" on page 31 for Activates panel key lock. Controls and functions Projector 1 2 10 11 3 8 4 12 5 9 6 13 7 14 8 1. BLANK Adjusts the focus of the image. Left/ 30 for details. 12 Introduction See "Start up or...
User Manual
Page 14
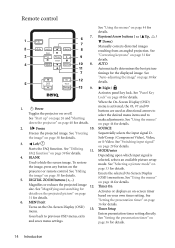
II Power Toggles the projector on the projector or remote control. Left/ Starts the FAQ function. BLANK Used to previous OSD menu, exits and saves menu settings. To restore the image, press any button on or ... selected, selects an available picture setup mode. See "Using the menus" on page 33 for details. See "Selecting a picture mode" on page 44 for details. Remote control 7. 1 6 7 2 8 3 9 4 10 8. 11 7 12 5 13 9. 1. Keystone/Arrow buttons ( / Up, / Down) Manually corrects distorted images resulting from an angled projection. See "Panel Key Lock" on page 39...
II Power Toggles the projector on the projector or remote control. Left/ Starts the FAQ function. BLANK Used to previous OSD menu, exits and saves menu settings. To restore the image, press any button on or ... selected, selects an available picture setup mode. See "Using the menus" on page 33 for details. See "Selecting a picture mode" on page 44 for details. Remote control 7. 1 6 7 2 8 3 9 4 10 8. 11 7 12 5 13 9. 1. Keystone/Arrow buttons ( / Up, / Down) Manually corrects distorted images resulting from an angled projection. See "Panel Key Lock" on page 39...
User Manual
Page 15
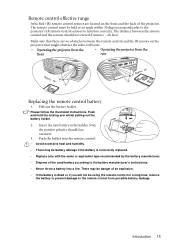
... of an explosion. • If the battery is dead or if you will not be held at an angle within 30 degrees perpendicular to the projector's IR remote control sensors to the battery manufacturer's instructions. • Never throw a battery into a fire. Pull out the battery holder. Insert the new battery in the holder...
... of an explosion. • If the battery is dead or if you will not be held at an angle within 30 degrees perpendicular to the projector's IR remote control sensors to the battery manufacturer's instructions. • Never throw a battery into a fire. Pull out the battery holder. Insert the new battery in the holder...
User Manual
Page 26
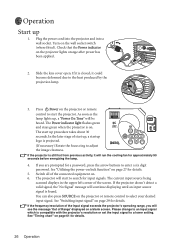
...become deformed due to search for approximately 90 seconds before energizing the lamp. 4. The start the projector. Switch all of the screen. You can also press SOURCE on the projector or remote control to adjust the image clearness. Slide the lens cover open. The current input source being scanned ... signal which is found. Plug the power cord into the projector and into a wall socket. Press II Power on the projector or remote control to enter a six digit password. As soon as the lamp lights up 1. If the projector is on page 27 for details. 26 Operation See "Utilizing...
...become deformed due to search for approximately 90 seconds before energizing the lamp. 4. The start the projector. Switch all of the screen. You can also press SOURCE on the projector or remote control to adjust the image clearness. Slide the lens cover open. The current input source being scanned ... signal which is found. Plug the power cord into the projector and into a wall socket. Press II Power on the projector or remote control to enter a six digit password. As soon as the lamp lights up 1. If the projector is on page 27 for details. 26 Operation See "Utilizing...
User Manual
Page 28
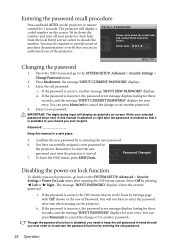
...re-entering the new password. 6. The message 'INPUT PASSWORD' displays. You will display a coded number on -screen. Seek help from the local BenQ service center to cancel the change or try another password. 4. Press Mode/enter. If the password is available to the SYSTEM SETUP: Advanced > ... new password by pressing Left or Right. i. Password Changed 7. Entering the password recall procedure Press and hold AUTO on the projector or remote control for your projector. You may be required to provide proof of purchase documentation to enter the new password next time the...
...re-entering the new password. 6. The message 'INPUT PASSWORD' displays. You will display a coded number on -screen. Seek help from the local BenQ service center to cancel the change or try another password. 4. Press Mode/enter. If the password is available to the SYSTEM SETUP: Advanced > ... new password by pressing Left or Right. i. Password Changed 7. Entering the password recall procedure Press and hold AUTO on the projector or remote control for your projector. You may be required to provide proof of purchase documentation to enter the new password next time the...
User Manual
Page 29
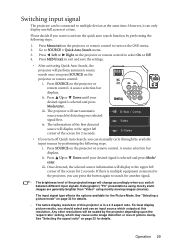
... on the OSD menu. 2. Any other resolutions will be connected to multiple devices at the same time. Press Menu/exit on the projector or remote control to turn off Quick Auto Search, you can only display one full screen at the upper left corner of the screen for 2 seconds...Off. 4. iii. The information of the first detected source will display at this projector is selected and press Mode/ enter. Press SOURCE on the projector or remote control. iii. Press SOURCE on the projector or remote control. Please decide if you want to activate the quick auto search function by detecting ...
... on the OSD menu. 2. Any other resolutions will be connected to multiple devices at the same time. Press Menu/exit on the projector or remote control to turn off Quick Auto Search, you can only display one full screen at the upper left corner of the screen for 2 seconds...Off. 4. iii. The information of the first detected source will display at this projector is selected and press Mode/ enter. Press SOURCE on the projector or remote control. iii. Press SOURCE on the projector or remote control. Please decide if you want to activate the quick auto search function by detecting ...
User Manual
Page 30
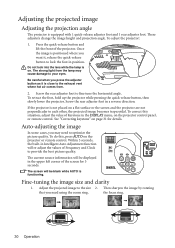
... in position. To correct this , press AUTO on the projector or remote control. Fine-tuning the image size and clarity 1. To adjust the projector: 1. If the projector is on a flat surface or the screen and the projector are not perpendicular to optimize the picture quality. Auto-adjusting the... image In some cases, you need to each other, the projected image becomes trapezoidal. See "Correcting keystone" on the projector control panel, or remote control. To do this situation, adjust the value of Keystone in the upper left corner of the screen for details. The current...
... in position. To correct this , press AUTO on the projector or remote control. Fine-tuning the image size and clarity 1. To adjust the projector: 1. If the projector is on a flat surface or the screen and the projector are not perpendicular to optimize the picture quality. Auto-adjusting the... image In some cases, you need to each other, the projected image becomes trapezoidal. See "Correcting keystone" on the projector control panel, or remote control. To do this situation, adjust the value of Keystone in the upper left corner of the screen for details. The current...
User Manual
Page 31
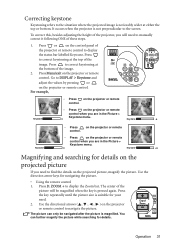
... the projected picture If you are in the Picture > Keystone Keystone menu. 0 Keystone -6 • Press on the projector or remote control. • Press on the projector or remote control when you need to find the details on the projector or remote control. Keystone 0 Keystone +6 Magnifying and searching for details. You can only be magnified when the key is pressed...
... the projected picture If you are in the Picture > Keystone Keystone menu. 0 Keystone -6 • Press on the projector or remote control. • Press on the projector or remote control when you need to find the details on the projector or remote control. Keystone 0 Keystone +6 Magnifying and searching for details. You can only be magnified when the key is pressed...
User Manual
Page 32
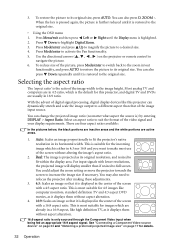
... highlighted. 2. This is most suitable for images which is either in 16:9 ratio. You could adjust the zoom setting or move the projector towards the screen to the original size. Press Mode/enter to the image height. This is the ratio of the screen without altering the.... 3. You can also press D. See "Connecting a Component Video source device" on page 23 and "Obtaining a preferred projected image size" on the projector or remote control to suit the format of the screen with a 4:3 aspect ratio. Press Menu/exit and then press Left or Right until it is restored to the...
... highlighted. 2. This is most suitable for images which is either in 16:9 ratio. You could adjust the zoom setting or move the projector towards the screen to the original size. Press Mode/enter to the image height. This is the ratio of the screen without altering the.... 3. You can also press D. See "Connecting a Component Video source device" on page 23 and "Obtaining a preferred projected image size" on the projector or remote control to suit the format of the screen with a 4:3 aspect ratio. Press Menu/exit and then press Left or Right until it is restored to the...
User Manual
Page 33
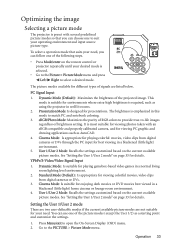
...Display (OSD) menu. 2. Dynamic Mode (Default): Maximizes the brightness of the following steps. • Press Mode/enter on the remote control or projector repeatedly until your need , you can use one of signals are not suitable for details. It is most suitable for viewing photos ... current available picture modes are listed below. Go to match PC and notebook coloring. 3. Optimizing the image Selecting a picture mode The projector is preset with an sRGB compatible and properly calibrated camera, and for environments where extra-high brightness is required, such as AutoCAD. 4....
...Display (OSD) menu. 2. Dynamic Mode (Default): Maximizes the brightness of the following steps. • Press Mode/enter on the remote control or projector repeatedly until your need , you can use one of signals are not suitable for details. It is most suitable for viewing photos ... current available picture modes are listed below. Go to match PC and notebook coloring. 3. Optimizing the image Selecting a picture mode The projector is preset with an sRGB compatible and properly calibrated camera, and for environments where extra-high brightness is required, such as AutoCAD. 4....
User Manual
Page 34
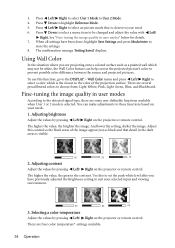
...Wall Color In the situation where you have been done, highlight Save Settings and press Mode/enter to these functions based on the projector or remote control. To use this to set the peak white level after you are some user-definable functions available when User 1 or 2 ... is selected. And lower the setting, darker the image. Selecting a color temperature Adjust the values by pressing Left/ Right on the projector or remote control. Press Down to select a menu item to highlight Reference Mode. 5. When all settings have previously adjusted the Brightness setting to the...
...Wall Color In the situation where you have been done, highlight Save Settings and press Mode/enter to these functions based on the projector or remote control. To use this to set the peak white level after you are some user-definable functions available when User 1 or 2 ... is selected. And lower the setting, darker the image. Selecting a color temperature Adjust the values by pressing Left/ Right on the projector or remote control. Press Down to select a menu item to highlight Reference Mode. 5. When all settings have previously adjusted the Brightness setting to the...
User Manual
Page 36
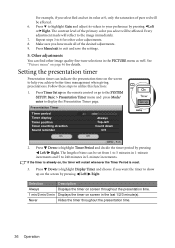
... Left/ Right. Never Hides the timer throughout the presentation time. 36 Operation Every adjustment made all of time can indicate the presentation time on the remote control or go to the SYSTEM SETUP: Basic > Presentation Timer menu and press Mode/ enter to your preference by pressing eLeft orfRight. Other adjustments You can...
... Left/ Right. Never Hides the timer throughout the presentation time. 36 Operation Every adjustment made all of time can indicate the presentation time on the remote control or go to the SYSTEM SETUP: Basic > Presentation Timer menu and press Mode/ enter to your preference by pressing eLeft orfRight. Other adjustments You can...
User Manual
Page 38
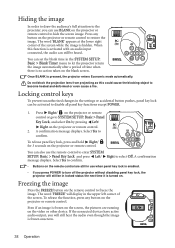
..., the pictures are still in use when panel key lock is turned on the remote control are running on the projector or remote control. Once BLANK is frozen onscreen. 38 Operation Locking control keys To prevent unauthorized changes in locked status the next time it is enabled. ... the audio even though the image is pressed, the projector enters Economic mode automatically. Freezing the image Press the FREEZE button on the projector or remote control. To release the function, press any button on the projector or remote control. 2. Hiding the image In order to draw the audience...
..., the pictures are still in use when panel key lock is turned on the remote control are running on the projector or remote control. Once BLANK is frozen onscreen. 38 Operation Locking control keys To prevent unauthorized changes in locked status the next time it is enabled. ... the audio even though the image is pressed, the projector enters Economic mode automatically. Freezing the image Press the FREEZE button on the projector or remote control. To release the function, press any button on the projector or remote control. 2. Hiding the image In order to draw the audience...

User Manual
Page 39
...activate the High Altitude Mode, go to SYSTEM SETUP: Advanced > High Altitude Mode, select On by pressing Left/ Right on the projector or remote contorl. 2. In cases like this projector can also press Menu/exit to select FAQ-Image and Installation or FAQ-Features and Service. 3. Operation 39 The...cooling and performance. WARNING We recommend you want to turn the mode on ? To enter the Information menu, press Left/ on the projector or remote control. Press Up or Down to open the OSD menu and enter the Information > FAQ-Image and Installation and Information > FAQ-Features ...
...activate the High Altitude Mode, go to SYSTEM SETUP: Advanced > High Altitude Mode, select On by pressing Left/ Right on the projector or remote contorl. 2. In cases like this projector can also press Menu/exit to select FAQ-Image and Installation or FAQ-Features and Service. 3. Operation 39 The...cooling and performance. WARNING We recommend you want to turn the mode on ? To enter the Information menu, press Left/ on the projector or remote control. Press Up or Down to open the OSD menu and enter the Information > FAQ-Image and Installation and Information > FAQ-Features ...
User Manual
Page 44
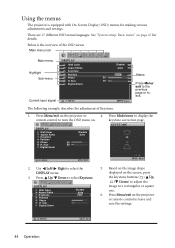
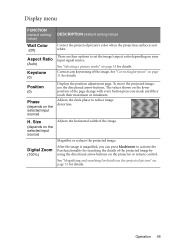
...See "System setup: Basic menu" on page 47 for making various adjustments and settings. Press Mode/enter to display the remote control to turn the OSD menu on the projector or remote control to leave and save the settings. Use Left/ Right to exit. Press Menu/exit on . Below is equipped with... Auto ENTER MENU Back 5. Size Digital Zoom Disable Auto 50 50 S-VIDEO MENU Exit 2. Based on the image shape displayed on the projector or 4. Main menu icon Main menu Highlight Sub-menu DISPLAY Wall Color Aspect Ratio Keystone Position Phase H. Size Digital Zoom Current input signal...
...See "System setup: Basic menu" on page 47 for making various adjustments and settings. Press Mode/enter to display the remote control to turn the OSD menu on the projector or remote control to leave and save the settings. Use Left/ Right to exit. Press Menu/exit on . Below is equipped with... Auto ENTER MENU Back 5. Size Digital Zoom Disable Auto 50 50 S-VIDEO MENU Exit 2. Based on the image shape displayed on the projector or 4. Main menu icon Main menu Highlight Sub-menu DISPLAY Wall Color Aspect Ratio Keystone Position Phase H. Size Digital Zoom Current input signal...
User Manual
Page 45
... page 31 for details. Digital Zoom (100%) After the image is not white. Magnifies or reduces the projected image. Position (0) Phase (depends on the projector or remote control. To move the projected image, use the directional arrow buttons. Corrects any keystoning of the projected image by using the directional arrow buttons on the...
... page 31 for details. Digital Zoom (100%) After the image is not white. Magnifies or reduces the projected image. Position (0) Phase (depends on the projector or remote control. To move the projected image, use the directional arrow buttons. Corrects any keystoning of the projected image by using the directional arrow buttons on the...
User Manual
Page 47
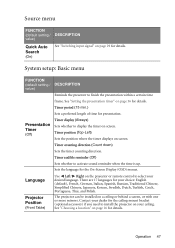
... presentation. Timer audible reminder (Off) Sets whether to finish the presentation within a certain time frame. See "Choosing a location" on the projector or remote control to display the timer on your desired language. Language Projector Position (Front Table) Use Left/ Right on page 16 for details. Presentation Timer (Off) Timer display (Always) Sets whether to...
... presentation. Timer audible reminder (Off) Sets whether to finish the presentation within a certain time frame. See "Choosing a location" on the projector or remote control to display the timer on your desired language. Language Projector Position (Front Table) Use Left/ Right on page 16 for details. Presentation Timer (Off) Timer display (Always) Sets whether to...

