
User Manual
Page 2
... screen size for a given distance ..... 18 Connection 20 Connecting a computer or monitor 20 Connecting a computer 20 Connecting a monitor 21 Connecting Video source devices 22 Connecting a Component Video source device 23 Connecting an S-Video source device 24 Connecting a composite Video source device 25 Operation 26 Start up 26 Utilizing the power-on lock function 27 Setting a password 27 If you forget the password 27 Entering the password recall procedure 28 Changing the password 28 Disabling the power-on lock function 28 Switching input signal 29 Adjusting...
... screen size for a given distance ..... 18 Connection 20 Connecting a computer or monitor 20 Connecting a computer 20 Connecting a monitor 21 Connecting Video source devices 22 Connecting a Component Video source device 23 Connecting an S-Video source device 24 Connecting a composite Video source device 25 Operation 26 Start up 26 Utilizing the power-on lock function 27 Setting a password 27 If you forget the password 27 Entering the password recall procedure 28 Changing the password 28 Disabling the power-on lock function 28 Switching input signal 29 Adjusting...
User Manual
Page 3
... the projector menu display 40 Shutting down the projector 40 Menu operation 41 Menu system 41 Using the menus 44 Display menu 45 Picture menu 46 Source menu 47 System setup: Basic menu 47 System setup: Advanced menu 48 Information menu 50 Maintenance 51 Care of the projector 51 Cleaning the lens 51 Cleaning the projector case 51 Storing the projector 51 Transporting the projector 51 Lamp information 52 Calculation of lamp hour 52 Warning message 52 Replacing the lamp 53 Temperature information 55 Indicators ...56 Troubleshooting...
... the projector menu display 40 Shutting down the projector 40 Menu operation 41 Menu system 41 Using the menus 44 Display menu 45 Picture menu 46 Source menu 47 System setup: Basic menu 47 System setup: Advanced menu 48 Information menu 50 Maintenance 51 Care of the projector 51 Cleaning the lens 51 Cleaning the projector case 51 Storing the projector 51 Transporting the projector 51 Lamp information 52 Calculation of lamp hour 52 Warning message 52 Replacing the lamp 53 Temperature information 55 Indicators ...56 Troubleshooting...

User Manual
Page 5
... Instructions 1. Always open the lens shutter or remove the lens cap when the projector lamp is on the projector or remote control. NOT stable. In some countries, the line voltage is 2. Important safety instructions Your BenQ projector is designed and tested to 240 volts AC, but could cause the objects to ensure safe use of this product, it is important that you operate your projector through a power...
... Instructions 1. Always open the lens shutter or remove the lens cap when the projector lamp is on the projector or remote control. NOT stable. In some countries, the line voltage is 2. Important safety instructions Your BenQ projector is designed and tested to 240 volts AC, but could cause the objects to ensure safe use of this product, it is important that you operate your projector through a power...
User Manual
Page 8
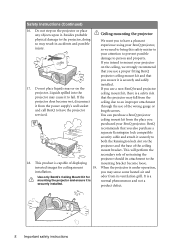
... the projector length screws. If you intend to the projector, doing so may sense some heated air and Use only BenQ's Ceiling Mount Kit for ceiling mount 19. When the projector is a normal phenomenon and not a product defect. 8 Important safety instructions It is under operation, installation. Besides probable Ceiling mounting the projector physical damage to mount your projector on the projector or place any objects upon it is capable of displaying mounting...
... the projector length screws. If you intend to the projector, doing so may sense some heated air and Use only BenQ's Ceiling Mount Kit for ceiling mount 19. When the projector is a normal phenomenon and not a product defect. 8 Important safety instructions It is under operation, installation. Besides probable Ceiling mounting the projector physical damage to mount your projector on the projector or place any objects upon it is capable of displaying mounting...
User Manual
Page 9
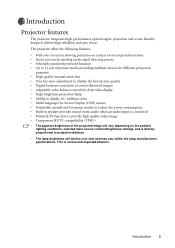
... projection purposes • High quality manual zoom lens • One-key auto-adjustment to display the best picture quality • Digital keystone correction to correct distorted images • Adjustable color balance control for data/video display • High brightness projection lamp • Ability to display 16.7 million colors • Multi-language On-Screen Display (OSD) menus • Switchable normal and Economic modes to reduce the power consumption • Built-in speaker provides mixed mono audio when an audio input is connected...
... projection purposes • High quality manual zoom lens • One-key auto-adjustment to display the best picture quality • Digital keystone correction to correct distorted images • Adjustable color balance control for data/video display • High brightness projection lamp • Ability to display 16.7 million colors • Multi-language On-Screen Display (OSD) menus • Switchable normal and Economic modes to reduce the power consumption • Built-in speaker provides mixed mono audio when an audio input is connected...
User Manual
Page 12
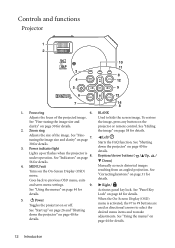
... projected image. See "Indicators" on page 44 for details. See "Using the menus" on page 8. Down) 4. Right/ See "Using the menus" on page 7. projector or remote control. Keystone/Arrow buttons ( / Up, / 56 for details. Focus ring 6. BLANK Adjusts the focus of the image. See "Hiding 2. Starts the FAQ function. See "Finetuning the image size and clarity" on page 44 for details. and saves menu settings. 9. Left/ 30 for details. Power indicator light...
... projected image. See "Indicators" on page 44 for details. See "Using the menus" on page 8. Down) 4. Right/ See "Using the menus" on page 7. projector or remote control. Keystone/Arrow buttons ( / Up, / 56 for details. Focus ring 6. BLANK Adjusts the focus of the image. See "Hiding 2. Starts the FAQ function. See "Finetuning the image size and clarity" on page 44 for details. and saves menu settings. 9. Left/ 30 for details. Power indicator light...
User Manual
Page 13
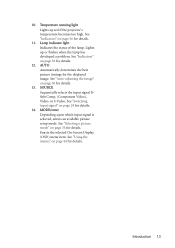
... the projector's temperature becomes too high. See "Switching input signal" on page 56 for details. 13. See "Using the menus" on page 30 for details. 11. See "Auto-adjusting the image" on page 44 for details. 12. Enacts the selected On-Screen Display (OSD) menu item. Temperature warning light Lights up or flashes when the lamp has developed a problem. MODE/enter Depending upon which input signal is selected, selects an available picture setup mode. See "Selecting a picture mode...
... the projector's temperature becomes too high. See "Switching input signal" on page 56 for details. 13. See "Using the menus" on page 30 for details. 11. See "Auto-adjusting the image" on page 44 for details. 12. Enacts the selected On-Screen Display (OSD) menu item. Temperature warning light Lights up or flashes when the lamp has developed a problem. MODE/enter Depending upon which input signal is selected, selects an available picture setup mode. See "Selecting a picture mode...
User Manual
Page 14
... projected picture" on page 31 for details. Goes back to hide the screen image. See "Correcting keystone" on page 31 for details. 3. See "Auto-adjusting the image" on page 39 for details. Right/ Activates panel key lock. Timer On Activates or displays an on-screen timer based on the On-Screen Display (OSD) 13. FAQ function" on page 30 for details. MENU/exit Turns on your own timer setting. See "Switching input signal...
... projected picture" on page 31 for details. Goes back to hide the screen image. See "Correcting keystone" on page 31 for details. 3. See "Auto-adjusting the image" on page 39 for details. Right/ Activates panel key lock. Timer On Activates or displays an on-screen timer based on the On-Screen Display (OSD) 13. FAQ function" on page 30 for details. MENU/exit Turns on your own timer setting. See "Switching input signal...
User Manual
Page 25
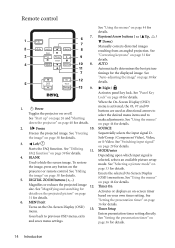
... if a stereo audio input is turned on the projector. See "Connecting Video source devices" on and the correct video source has been selected, check that the signal cables have been connected correctly. • You need to reassess which method you can use . Connection 25 Connect the other end of the Video cable to an composite Video source device: 1. To connect the projector to the VIDEO socket on and operating correctly. Take a Video cable and connect one end...
... if a stereo audio input is turned on the projector. See "Connecting Video source devices" on and the correct video source has been selected, check that the signal cables have been connected correctly. • You need to reassess which method you can use . Connection 25 Connect the other end of the Video cable to an composite Video source device: 1. To connect the projector to the VIDEO socket on and operating correctly. Take a Video cable and connect one end...
User Manual
Page 26
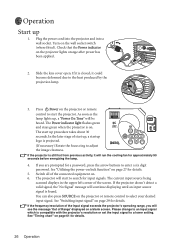
... for details. 5. Switch all of the connected equipment on the projector lights orange after power has been applied. 2. See "Timing chart" on page 27 for details. 26 Operation As soon as the lamp lights up , a startup logo is projected. (If necessary) Rotate the focus ring to adjust the image clearness. The projector will start up 1. If the frequency/resolution of Range' displayed on the projector or remote control to a lower setting. Operation Start up procedure...
... for details. 5. Switch all of the connected equipment on the projector lights orange after power has been applied. 2. See "Timing chart" on page 27 for details. 26 Operation As soon as the lamp lights up , a startup logo is projected. (If necessary) Rotate the focus ring to adjust the image clearness. The projector will start up 1. If the frequency/resolution of Range' displayed on the projector or remote control to a lower setting. Operation Start up procedure...
User Manual
Page 27
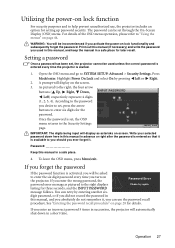
... the password If the password function is started. 1. lasting for details. If you enter the wrong password, the Password Error password error message as asterisks on-screen. WARNING: You will display as pictured to the right displays Please try again. Open the OSD menu and go to the right, the four arrow buttons ( Up, Right, Down, INPUT PASSWORD Left) respectively represent 4 digits (1, 2, 3, 4). As pictured to SYSTEM SETUP: Advanced > Security Settings. Once the password is...
... the password If the password function is started. 1. lasting for details. If you enter the wrong password, the Password Error password error message as asterisks on-screen. WARNING: You will display as pictured to the right displays Please try again. Open the OSD menu and go to the right, the four arrow buttons ( Up, Right, Down, INPUT PASSWORD Left) respectively represent 4 digits (1, 2, 3, 4). As pictured to SYSTEM SETUP: Advanced > Security Settings. Once the password is...
User Manual
Page 28
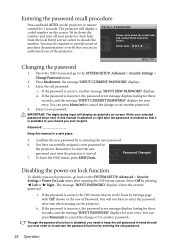
... password is started. If the password is incorrect, the password error message displays lasting for three seconds, and the message 'INPUT CURRENT PASSWORD' displays for 3 seconds. Entering the password recall procedure Press and hold AUTO on -screen. The projector will display as asterisks on the projector or remote control for your retry. You can press Menu/exit to the SYSTEM SETUP: Advanced > Security Settings > Change Password menu. 2. You have to enter the password next time when turning on lock...
... password is started. If the password is incorrect, the password error message displays lasting for three seconds, and the message 'INPUT CURRENT PASSWORD' displays for 3 seconds. Entering the password recall procedure Press and hold AUTO on -screen. The projector will display as asterisks on the projector or remote control for your retry. You can press Menu/exit to the SYSTEM SETUP: Advanced > Security Settings > Change Password menu. 2. You have to enter the password next time when turning on lock...
User Manual
Page 33
... operating environment and input source picture type. Cinema Mode: Is suitable for viewing PC graphic and drawing applications such as AutoCAD. 4. YPbPr/S-Video/Video Signal Input 1. User 1/User 2 Mode: Recalls the settings customized based on the current available picture modes. See "Setting the User 1/User 2 mode" on page 33 for viewing colorful movies, video clips from digital cameras or DVs through the PC input for best viewing in a blackened (little light) environment. 5. Go to open the On-Screen Display (OSD) menu...
... operating environment and input source picture type. Cinema Mode: Is suitable for viewing PC graphic and drawing applications such as AutoCAD. 4. YPbPr/S-Video/Video Signal Input 1. User 1/User 2 Mode: Recalls the settings customized based on the current available picture modes. See "Setting the User 1/User 2 mode" on page 33 for viewing colorful movies, video clips from digital cameras or DVs through the PC input for best viewing in a blackened (little light) environment. 5. Go to open the On-Screen Display (OSD) menu...
User Manual
Page 38
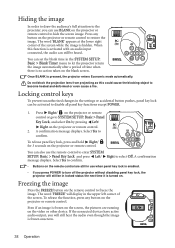
... remote control to confirm. Do not block the projection lens from projecting as this function is activated with an audio input connected, the audio can be in the SYSTEM SETUP: Basic > Blank Timer menu to select Off. Locking control keys To prevent unauthorized changes in use the remote control to enter SYSTEM SETUP: Basic > Panel Key Lock and press Left/ Right to let the projector return the image automatically after a period of the screen...
... remote control to confirm. Do not block the projection lens from projecting as this function is activated with an audio input connected, the audio can be in the SYSTEM SETUP: Basic > Blank Timer menu to select Off. Locking control keys To prevent unauthorized changes in use the remote control to enter SYSTEM SETUP: Basic > Panel Key Lock and press Left/ Right to let the projector return the image automatically after a period of the screen...
User Manual
Page 40
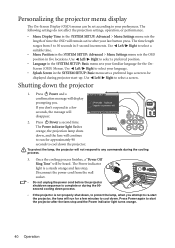
... SETUP: Basic menu sets your familiar language for the OnScreen (OSD) Menus. The Power indicator light flashes orange, the projection lamp shuts down, and the fans will remain active after the fans stop . Press Power again to select a screen. The following settings do not affect the projection settings, operation, or performance. • Menu Display Time in 5-second increments. Use Left/ Right to select a preferred position. • Language in five locations. Use Left/ Right to start the projector...
... SETUP: Basic menu sets your familiar language for the OnScreen (OSD) Menus. The Power indicator light flashes orange, the projection lamp shuts down, and the fans will remain active after the fans stop . Press Power again to select a screen. The following settings do not affect the projection settings, operation, or performance. • Menu Display Time in 5-second increments. Use Left/ Right to select a preferred position. • Language in five locations. Use Left/ Right to start the projector...
User Manual
Page 44
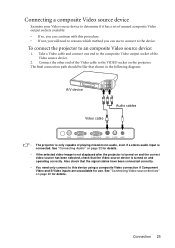
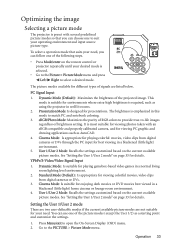
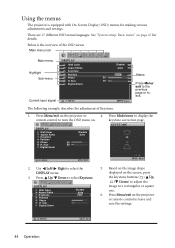
Size Digital Zoom Current input signal S-VIDEO Disable Auto ENTER 50 50 Status Press Menu/ exit to the previous page or to select the DISPLAY menu. 3. MENU Exit The following example describes the adjustment of the OSD menu. Press Menu/exit on the screen, press the keystone buttons ( / Up, / Down) to adjust the image to leave and save the settings. Size Digital Zoom Disable Auto 50 50 S-VIDEO MENU Exit 2. Based on the image shape displayed on the projector or remote control to...
Size Digital Zoom Current input signal S-VIDEO Disable Auto ENTER 50 50 Status Press Menu/ exit to the previous page or to select the DISPLAY menu. 3. MENU Exit The following example describes the adjustment of the OSD menu. Press Menu/exit on the screen, press the keystone buttons ( / Up, / Down) to adjust the image to leave and save the settings. Size Digital Zoom Disable Auto 50 50 S-VIDEO MENU Exit 2. Based on the image shape displayed on the projector or remote control to...
User Manual
Page 49
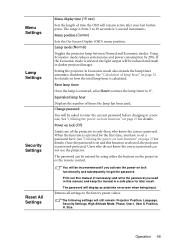
... display as asterisks on-screen when being input. Menu position (Center) Sets the On-Screen Display (OSD) menu position. When the function is calculated. The password can not use of the projector to '0'. See "Utilizing the power-on lock function" on page 27 for details. Equivalent lamp hour Displays the number of hours the lamp has been used in this manual, and keep the manual in darker projected images. You will be entered by 20%. Change password...
... display as asterisks on-screen when being input. Menu position (Center) Sets the On-Screen Display (OSD) menu position. When the function is calculated. The password can not use of the projector to '0'. See "Utilizing the power-on lock function" on page 27 for details. Equivalent lamp hour Displays the number of hours the lamp has been used in this manual, and keep the manual in darker projected images. You will be entered by 20%. Change password...

User Manual
Page 53
... a BenQ projector lamp for at this age. If the lamp is a consumable item. Then use . Notice Lamp-usage time exceeded The lamp MUST be replaced after 3000 hours usage. Turn the projector over. This is strongly recommended that the brightness level has significantly diminished. Replace lamp (refer to fingers and/or compromising image quality by waiting for 4000 hours. Turn the power off and disconnect the power cord before the projector...
... a BenQ projector lamp for at this age. If the lamp is a consumable item. Then use . Notice Lamp-usage time exceeded The lamp MUST be replaced after 3000 hours usage. Turn the projector over. This is strongly recommended that the brightness level has significantly diminished. Replace lamp (refer to fingers and/or compromising image quality by waiting for 4000 hours. Turn the power off and disconnect the power cord before the projector...
User Manual
Page 55
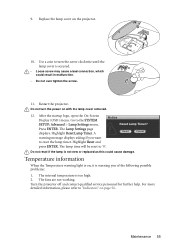
... ENTER. The internal temperature is secured. • Loose screw may cause a bad connection, which could cause damage. Go to reset the lamp timer. Turn the projector off and contact qualified service personnel for further help. After the startup logo, open the On-Screen Display (OSD) menu. Highlight Reset Lamp Timer. A Reset Cancel warning message displays asking if you of the following possible problems: 1. 9. Use a coin to turn the power on page 56. The fans are not working.
... ENTER. The internal temperature is secured. • Loose screw may cause a bad connection, which could cause damage. Go to reset the lamp timer. Turn the projector off and contact qualified service personnel for further help. After the startup logo, open the On-Screen Display (OSD) menu. Highlight Reset Lamp Timer. A Reset Cancel warning message displays asking if you of the following possible problems: 1. 9. Use a coin to turn the power on page 56. The fans are not working.
User Manual
Page 58
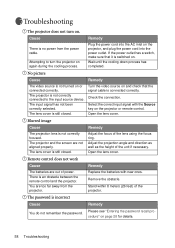
.... Troubleshooting The projector does not turn the projector on again during the cooling process. Attempting to the input source device. If the power outlet has a switch, make sure that the signal cable is still closed . No picture Cause Remedy The video source is an obstacle between the remote control and the projector. The lens cover is connected correctly. Select the correct input signal with new ones. Open the lens cover. Remedy Adjust the focus of power. Open the lens cover. Remedy Replace...
.... Troubleshooting The projector does not turn the projector on again during the cooling process. Attempting to the input source device. If the power outlet has a switch, make sure that the signal cable is still closed . No picture Cause Remedy The video source is an obstacle between the remote control and the projector. The lens cover is connected correctly. Select the correct input signal with new ones. Open the lens cover. Remedy Adjust the focus of power. Open the lens cover. Remedy Replace...


