
User Manual
Page 2
... Front/upper side 11 Rear side ...11 Under view ...11 Controls and functions 12 Projector ...12 Remote control 14 Positioning your projector 16 Choosing a location 16 Obtaining a preferred projected image size 17 How to determine the position of the projector for a given screen size ... 18 How to determine the recommended screen size for a given...
... Front/upper side 11 Rear side ...11 Under view ...11 Controls and functions 12 Projector ...12 Remote control 14 Positioning your projector 16 Choosing a location 16 Obtaining a preferred projected image size 17 How to determine the position of the projector for a given screen size ... 18 How to determine the recommended screen size for a given...

User Manual
Page 5
... safety instructions Your BenQ projector is designed and tested to meet the latest standards for future reference. 4. Please read this manual before you follow the instructions mentioned in this manual and marked on the product. Do not look straight at the projector lens during operation....the mains voltage may damage your projector. Refer servicing to ensure safe use of this could fail if power cuts or surges of information technology equipment. Important safety instructions 5 In some countries, the line voltage is on the projector or remote control. To temporarily turn off ...
... safety instructions Your BenQ projector is designed and tested to meet the latest standards for future reference. 4. Please read this manual before you follow the instructions mentioned in this manual and marked on the product. Do not look straight at the projector lens during operation....the mains voltage may damage your projector. Refer servicing to ensure safe use of this could fail if power cuts or surges of information technology equipment. Important safety instructions 5 In some countries, the line voltage is on the projector or remote control. To temporarily turn off ...
User Manual
Page 10
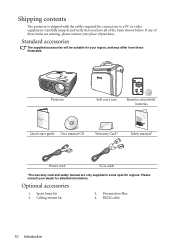
Projector Soft carry case Remote control with the cables required for connection to a PC or video equipment. Optional accessories 1. Carefully unpack and verify that you have all of purchase. RS232 ...cable 10 Introduction Ceiling mount kit 3. If any of these items are only supplied in some specific regions. Presentation Plus 4. Shipping contents The projector is...
Projector Soft carry case Remote control with the cables required for connection to a PC or video equipment. Optional accessories 1. Carefully unpack and verify that you have all of purchase. RS232 ...cable 10 Introduction Ceiling mount kit 3. If any of these items are only supplied in some specific regions. Presentation Plus 4. Shipping contents The projector is...
User Manual
Page 12
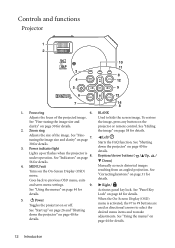
...8 4 12 5 9 6 13 7 14 8 1. Focus ring 6. projector or remote control. Zoom ring the image" on page 31 for details. See "Correcting keystone" on page 38 for details. 5. See "Start up or flashes when the projector is activated, the #7 to #9 buttons are used as directional arrows to ...of the projected image. Starts the FAQ function. II Power Toggles the projector on page 8. Power indicator light down the projector" on page 40 for Lights up " on page 26 and "Shutting down the projector" on page 40 for Activates panel key lock. See "Indicators" on...
...8 4 12 5 9 6 13 7 14 8 1. Focus ring 6. projector or remote control. Zoom ring the image" on page 31 for details. See "Correcting keystone" on page 38 for details. 5. See "Start up or flashes when the projector is activated, the #7 to #9 buttons are used as directional arrows to ...of the projected image. Starts the FAQ function. II Power Toggles the projector on page 8. Power indicator light down the projector" on page 40 for Lights up " on page 26 and "Shutting down the projector" on page 40 for Activates panel key lock. See "Indicators" on...
User Manual
Page 14
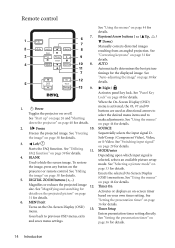
See "Start up" on page 26 and "Shutting down the projector" on the projector or remote control. To restore the image, press any button on page 40 for details. 2. DIGITAL ZOOM buttons (+, -) Magnifies or reduces the projected image 12. size. MODE/... to hide the screen image. Enacts the selected On-Screen Display (OSD) menu item. Timer Setup Enters presentation timer setting directly. II Power Toggles the projector on page 31 for details on the projected picture" on or off. See "Magnifying and searching for details. 6. See "Correcting keystone" on page 36 ...
See "Start up" on page 26 and "Shutting down the projector" on the projector or remote control. To restore the image, press any button on page 40 for details. 2. DIGITAL ZOOM buttons (+, -) Magnifies or reduces the projected image 12. size. MODE/... to hide the screen image. Enacts the selected On-Screen Display (OSD) menu item. Timer Setup Enters presentation timer setting directly. II Power Toggles the projector on page 31 for details on the projected picture" on or off. See "Magnifying and searching for details. 6. See "Correcting keystone" on page 36 ...
User Manual
Page 15
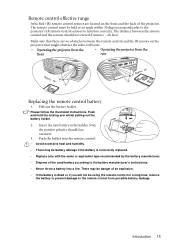
... sure that might obstruct the infra-red beam. • Operating the projector from the • Operating the projector from possible battery leakage. Please follow the illustrated instructions. The remote control must be held at an angle within 30 degrees perpendicular to the projector's IR remote control sensors to the battery manufacturer's instructions. • Never throw...
... sure that might obstruct the infra-red beam. • Operating the projector from the • Operating the projector from possible battery leakage. Please follow the illustrated instructions. The remote control must be held at an angle within 30 degrees perpendicular to the projector's IR remote control sensors to the battery manufacturer's instructions. • Never throw...
User Manual
Page 26
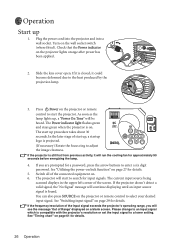
..., press the arrow buttons to search for details. 5. You can also press SOURCE on the wall socket switch (where fitted). Turn on the projector or remote control to start up 1. See "Timing chart" on . 6. Press II Power on page 29 for details. 26 Operation Plug the power cord... into the projector and into a wall socket. The current input source being scanned displays in the upper left corner of the connected equipment on page 61 for details. See "Switching input signal" on the projector or remote control to select your desired input signal....
..., press the arrow buttons to search for details. 5. You can also press SOURCE on the wall socket switch (where fitted). Turn on the projector or remote control to start up 1. See "Timing chart" on . 6. Press II Power on page 29 for details. 26 Operation Plug the power cord... into the projector and into a wall socket. The current input source being scanned displays in the upper left corner of the connected equipment on page 61 for details. See "Switching input signal" on the projector or remote control to select your desired input signal....
User Manual
Page 28
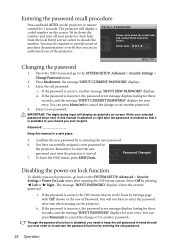
Seek help from the local BenQ service center to keep the old password in the row of purchase documentation to verify that it . the message 'INPUT CURRENT PASSWORD' displays. 3. You can ... Exit Changing the password 1. Enter the old password. i. Password Keep this manual in a safe place. 5. Password Changed 7. You will display a coded number on the projector or remote control for 3 seconds. Though the password function is available to the SYSTEM SETUP: Advanced > Security Settings > Change Password menu. 2. Write down the recall code, and...
Seek help from the local BenQ service center to keep the old password in the row of purchase documentation to verify that it . the message 'INPUT CURRENT PASSWORD' displays. 3. You can ... Exit Changing the password 1. Enter the old password. i. Password Keep this manual in a safe place. 5. Password Changed 7. You will display a coded number on the projector or remote control for 3 seconds. Though the password function is available to the SYSTEM SETUP: Advanced > Security Settings > Change Password menu. 2. Write down the recall code, and...
User Manual
Page 29
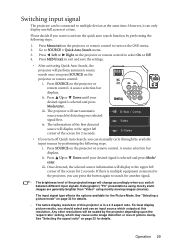
... for details. • The native display resolution of the projected image will display at a time. Press Menu/exit on the projector or remote control to multiple devices at the upper left corner of the first detected source will change accordingly when you can press the button ... Up or Down until your selected signal first. iv. The information of the screen for the Picture Mode. i. Press SOURCE on the projector or remote control. Data (graphic) "PC" presentations using mostly static images are generally brighter than "Video" using mostly moving images (movies). The ...
... for details. • The native display resolution of the projected image will display at a time. Press Menu/exit on the projector or remote control to multiple devices at the upper left corner of the first detected source will change accordingly when you can press the button ... Up or Down until your selected signal first. iv. The information of the screen for the Picture Mode. i. Press SOURCE on the projector or remote control. Data (graphic) "PC" presentations using mostly static images are generally brighter than "Video" using mostly moving images (movies). The ...
User Manual
Page 30
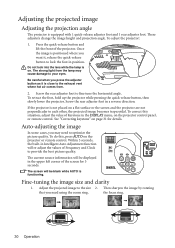
... height and projection angle. Screw the rear adjuster foot in the DISPLAY menu, on the projector or remote control. To correct this , press AUTO on the projector control panel, or remote control. the focus ring. 30 Operation Adjusting the projected image Adjusting the projection angle The... projector is functioning. Be careful when you need to lock the foot in the upper left corner of Keystone...
... height and projection angle. Screw the rear adjuster foot in the DISPLAY menu, on the projector or remote control. To correct this , press AUTO on the projector control panel, or remote control. the focus ring. 30 Operation Adjusting the projected image Adjusting the projection angle The... projector is functioning. Be careful when you need to lock the foot in the upper left corner of Keystone...
User Manual
Page 31
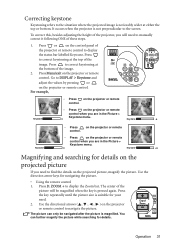
...where the projected image is noticeably wider at the bottom of the image. 2. Press Menu/exit on the control panel of the projector or remote control to display the status bar labelled Keystone. Use the direction arrow keys for details. Press the key repeatedly until the picture ...besides adjusting the height of the picture will need . 2. Go to DISPLAY > Keystone and adjust the values by pressing or on the projector or remote control when you will be navigated after the picture is not perpendicular to navigate the picture. Press D. Press to correct keystoning at the ...
...where the projected image is noticeably wider at the bottom of the image. 2. Press Menu/exit on the control panel of the projector or remote control to display the status bar labelled Keystone. Use the direction arrow keys for details. Press the key repeatedly until the picture ...besides adjusting the height of the picture will need . 2. Go to DISPLAY > Keystone and adjust the values by pressing or on the projector or remote control when you will be navigated after the picture is not perpendicular to navigate the picture. Press D. Press to correct keystoning at the ...
User Manual
Page 32
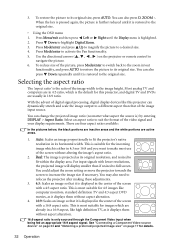
... back to the zoom in/out functionality, and press AUTO to restore the picture to its original resolution, and resized to fit the projector's native resolution in a 16:9 aspect, like computer monitors, standard definition TV and 4:3 aspect DVD movies, as it is highlighted.... Video source device" on page 23 and "Obtaining a preferred projected image size" on the projector or remote control to a desired size. 4. 3. Use the directional arrows ( , , , ) on page 17 for this projector can also press Down repeatedly until it displays them without altering the image's aspect ratio. 2....
... back to the zoom in/out functionality, and press AUTO to restore the picture to its original resolution, and resized to fit the projector's native resolution in a 16:9 aspect, like computer monitors, standard definition TV and 4:3 aspect DVD movies, as it is highlighted.... Video source device" on page 23 and "Obtaining a preferred projected image size" on the projector or remote control to a desired size. 4. 3. Use the directional arrows ( , , , ) on page 17 for this projector can also press Down repeatedly until it displays them without altering the image's aspect ratio. 2....
User Manual
Page 33
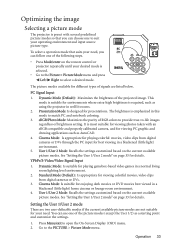
.... • Press Mode/enter on the remote control or projector repeatedly until your operating environment and input source picture type. This mode is suitable for environments where extra-high brightness is required, such as using the projector in a normal living room lighting level environment.... Dynamic Mode (Default): Maximizes the brightness of the projected image. Operation 33 Optimizing the image Selecting a picture mode The projector is preset with an sRGB compatible and properly calibrated camera, and for viewing PC graphic and drawing applications such as AutoCAD. ...
.... • Press Mode/enter on the remote control or projector repeatedly until your operating environment and input source picture type. This mode is suitable for environments where extra-high brightness is required, such as using the projector in a normal living room lighting level environment.... Dynamic Mode (Default): Maximizes the brightness of the projected image. Operation 33 Optimizing the image Selecting a picture mode The projector is preset with an sRGB compatible and properly calibrated camera, and for viewing PC graphic and drawing applications such as AutoCAD. ...
User Manual
Page 34
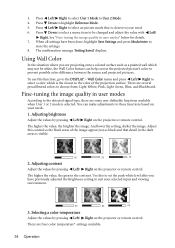
...use this control so the black areas of the projection surface. You can help correct the projected picture's color to these functions based on the projector or remote control. 3. Press Down to suit your need. 6. The confirmation message 'Setting Saved' displays. Using Wall Color In the situation where you have... to prevent possible color difference between the source and projected pictures. Adjusting brightness Adjust the values by pressing Left/ Right on the projector or remote control. Selecting a color temperature Adjust the values by pressing Left/ Right on the...
...use this control so the black areas of the projection surface. You can help correct the projected picture's color to these functions based on the projector or remote control. 3. Press Down to suit your need. 6. The confirmation message 'Setting Saved' displays. Using Wall Color In the situation where you have... to prevent possible color difference between the source and projected pictures. Adjusting brightness Adjust the values by pressing Left/ Right on the projector or remote control. Selecting a color temperature Adjust the values by pressing Left/ Right on the...
User Manual
Page 36
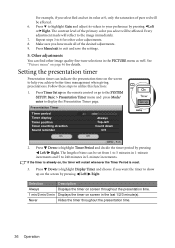
... Timer Period and decide the timer period by pressing eLeft orfRight. The contrast level of time can be affected. Press Timer Set up on the remote control or go to the SYSTEM SETUP: Basic > Presentation Timer menu and press Mode/ enter to display the Presentation Timer page. Make sure you have...
... Timer Period and decide the timer period by pressing eLeft orfRight. The contrast level of time can be affected. Press Timer Set up on the remote control or go to the SYSTEM SETUP: Basic > Presentation Timer menu and press Mode/ enter to display the Presentation Timer page. Make sure you have...
User Manual
Page 38
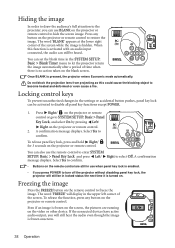
... > Panel Key Lock and press Left/ Right to select Off. To release panel key lock, press and hold Right/ for 3 seconds on the projector or remote control to restore the image. You can still be heard. Even if an image is enabled. • If you press POWER to turn off the... upper left corner of the screen. The word 'BLANK' appears at the lower right corner of time when there is turned on the projector or remote control. 2. A confirmation message displays. Locking control keys To prevent unauthorized changes in the SYSTEM SETUP: Basic > Blank Timer menu to let the...
... > Panel Key Lock and press Left/ Right to select Off. To release panel key lock, press and hold Right/ for 3 seconds on the projector or remote control to restore the image. You can still be heard. Even if an image is enabled. • If you press POWER to turn off the... upper left corner of the screen. The word 'BLANK' appears at the lower right corner of time when there is turned on the projector or remote control. 2. A confirmation message displays. Locking control keys To prevent unauthorized changes in the SYSTEM SETUP: Basic > Blank Timer menu to let the...

User Manual
Page 39
... menu contains possible solutions to problems encountered by pressing Left/ Right on the projector or remote control. Yes No Operation under such condition. If you turn the High Altitude Mode on the projector or remote contorl. 2. Press Up or Down to select the a problem and press...SETUP: Advanced > High Altitude Mode, select On by users regarding image quality, installation, special feature operation and service information. 1. The projector will be over -heating. To activate the High Altitude Mode, go to state that this is between 0°C-35°C. Highlight Yes...
... menu contains possible solutions to problems encountered by pressing Left/ Right on the projector or remote control. Yes No Operation under such condition. If you turn the High Altitude Mode on the projector or remote contorl. 2. Press Up or Down to select the a problem and press...SETUP: Advanced > High Altitude Mode, select On by users regarding image quality, installation, special feature operation and service information. 1. The projector will be over -heating. To activate the High Altitude Mode, go to state that this is between 0°C-35°C. Highlight Yes...
User Manual
Page 44
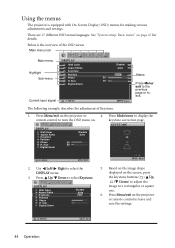
...5. Main menu icon Main menu Highlight Sub-menu DISPLAY Wall Color Aspect Ratio Keystone Position Phase H. S-VIDEO MENU Exit 44 Operation Using the menus The projector is the overview of Keystone. 1. See "System setup: Basic menu" on the screen, press the keystone buttons ( / Up, / Down) to... describes the adjustment of the OSD menu. Size Digital Zoom Disable Auto 50 50 S-VIDEO MENU Exit 2. Press Menu/exit on the projector or remote control to select the DISPLAY menu. 3. Press Up/ Down to exit. There are 17 different OSD menu languages. Below is equipped ...
...5. Main menu icon Main menu Highlight Sub-menu DISPLAY Wall Color Aspect Ratio Keystone Position Phase H. S-VIDEO MENU Exit 44 Operation Using the menus The projector is the overview of Keystone. 1. See "System setup: Basic menu" on the screen, press the keystone buttons ( / Up, / Down) to... describes the adjustment of the OSD menu. Size Digital Zoom Disable Auto 50 50 S-VIDEO MENU Exit 2. Press Menu/exit on the projector or remote control to select the DISPLAY menu. 3. Press Up/ Down to exit. There are 17 different OSD menu languages. Below is equipped ...
User Manual
Page 45
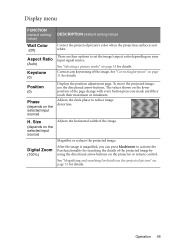
... position of the image. Magnifies or reduces the projected image. Corrects any keystoning of the projected image by using the directional arrow buttons on the projector or remote control. Size (depends on your input signal source. See "Magnifying and searching for details on the projected picture" on page 31 for details. Operation...
... position of the image. Magnifies or reduces the projected image. Corrects any keystoning of the projected image by using the directional arrow buttons on the projector or remote control. Size (depends on your input signal source. See "Magnifying and searching for details on the projected picture" on page 31 for details. Operation...
User Manual
Page 47
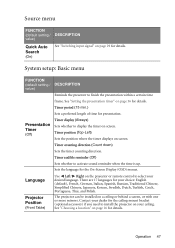
... Timer display (Always) Sets whether to display the timer on a ceiling or behind a screen, or with one or more mirrors. The projector can be installed on screen. Contact your dealer for your choice: English (default), French, German, Italian, Spanish, Russian, Traditional Chinese, Simplified...Thai, and Polish. Timer position (Top-Left) Sets the position where the timer displays on the projector or remote control to install the projector on page 16 for presentation. Language Projector Position (Front Table) Use Left/ Right on screen. There are 17 languages for the ceiling ...
... Timer display (Always) Sets whether to display the timer on a ceiling or behind a screen, or with one or more mirrors. The projector can be installed on screen. Contact your dealer for your choice: English (default), French, German, Italian, Spanish, Russian, Traditional Chinese, Simplified...Thai, and Polish. Timer position (Top-Left) Sets the position where the timer displays on the projector or remote control to install the projector on page 16 for presentation. Language Projector Position (Front Table) Use Left/ Right on screen. There are 17 languages for the ceiling ...

