
User Manual
Page 2
... Shutting down the projector 42 Menu operation 43 Maintenance 53 Care of the projector 53 Lamp information 54 Troubleshooting 60 Specifications 61 Dimensions 62 Ceiling mount installation 62 Timing chart 63 Warranty and Copyright information 66 Regulation statements ......67
... Shutting down the projector 42 Menu operation 43 Maintenance 53 Care of the projector 53 Lamp information 54 Troubleshooting 60 Specifications 61 Dimensions 62 Ceiling mount installation 62 Timing chart 63 Warranty and Copyright information 66 Regulation statements ......67
User Manual
Page 6
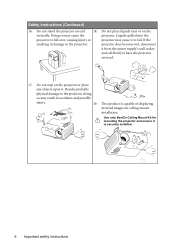
... upon it from the power supply's wall socket and call BenQ to have the projector serviced. 17. If the resulting in accidents and possible injury. 19. Use only BenQ's Ceiling Mount Kit for ceiling mount installation. Liquids spilled into the projector to fail. This product... is capable of displaying inverted images for mounting the projector and ensure it to fall over, causing injury or...
... upon it from the power supply's wall socket and call BenQ to have the projector serviced. 17. If the resulting in accidents and possible injury. 19. Use only BenQ's Ceiling Mount Kit for ceiling mount installation. Liquids spilled into the projector to fail. This product... is capable of displaying inverted images for mounting the projector and ensure it to fall over, causing injury or...
User Manual
Page 8
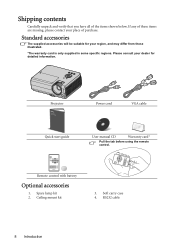
... only supplied in some specific regions. RS232 cable 8 Introduction Soft carry case 4. Please consult your dealer for your place of the items shown below. Ceiling mount kit 3. Projector Power cord VGA cable Quick start guide User manual CD Warranty card* Pull the tab before using the remote control. Standard accessories The...
... only supplied in some specific regions. RS232 cable 8 Introduction Soft carry case 4. Please consult your dealer for your place of the items shown below. Ceiling mount kit 3. Projector Power cord VGA cable Quick start guide User manual CD Warranty card* Pull the tab before using the remote control. Standard accessories The...

User Manual
Page 9
... 1. Zoom ring 2 4. Projection lens 9. Video input jack 16. Audio output jack 18. Rear adjuster foot 23. Vent (heated air exhaust) 7. S-Video input jack 5 8 12. Ceiling mount holes 22. Focus ring 5. Audio input jack Rear/lower side 15. AC power cord inlet 20. Lamp cover 1 3. RGB signal output jack 9 13. Speaker 15... 19 15 9 16 20 21 22 23 17 Introduction 9 Lens cover 3 4 6 6. HDMI input jack 19. Kensington anti-theft lock slot 21. RS-232 control port (MP615P) 10 11 12 13 14 17. Front IR remote sensor 8.
... 1. Zoom ring 2 4. Projection lens 9. Video input jack 16. Audio output jack 18. Rear adjuster foot 23. Vent (heated air exhaust) 7. S-Video input jack 5 8 12. Ceiling mount holes 22. Focus ring 5. Audio input jack Rear/lower side 15. AC power cord inlet 20. Lamp cover 1 3. RGB signal output jack 9 13. Speaker 15... 19 15 9 16 20 21 22 23 17 Introduction 9 Lens cover 3 4 6 6. HDMI input jack 19. Kensington anti-theft lock slot 21. RS-232 control port (MP615P) 10 11 12 13 14 17. Front IR remote sensor 8.
User Manual
Page 11
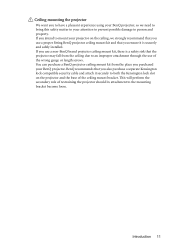
... perform the secondary role of restraining the projector should its attachment to an improper attachment through the use of the ceiling mount bracket. BenQ recommends that you also purchase a separate Kensington lock compatible security cable and attach it is a safety risk that you ...recommend that you use a proper fitting BenQ projector ceiling mount kit and that the projector may fall from the place you intend to mount your BenQ projector. You can purchase a BenQ projector ceiling mount kit from the ceiling due to the mounting bracket become loose. If you purchased your...
... perform the secondary role of restraining the projector should its attachment to an improper attachment through the use of the ceiling mount bracket. BenQ recommends that you also purchase a separate Kensington lock compatible security cable and attach it is a safety risk that you ...recommend that you use a proper fitting BenQ projector ceiling mount kit and that the projector may fall from the place you intend to mount your BenQ projector. You can purchase a BenQ projector ceiling mount kit from the ceiling due to the mounting bracket become loose. If you purchased your...

User Manual
Page 14
... the projector for this location with the projector suspended upsidedown from the ceiling behind the screen. Note that a special rear projection screen and the BenQ Projector Ceiling Mounting Kit are required for quick setup and portability. 2. Note that a special rear projection screen is designed to be installed in the SYSTEM SETUP: Basic...
... the projector for this location with the projector suspended upsidedown from the ceiling behind the screen. Note that a special rear projection screen and the BenQ Projector Ceiling Mounting Kit are required for quick setup and portability. 2. Note that a special rear projection screen is designed to be installed in the SYSTEM SETUP: Basic...
User Manual
Page 15
BenQ has provided a table of 4:3-aspect-ratio screen sizes to assist you will result in a proportionally smaller height equivalent to 75% of the projector's native aspect height. 4:3 aspect image in the projected image size. 4:3 is the native aspect ratio of the screen (offset). If the projector is mounted on... project a complete 16:9 (widescreen) aspect ratio image, the projector can see from the diagram on page 17, that it must be mounted upside-down so that this type of projection causes the bottom edge of the projected image to be placed horizontally level (like flat on ...
BenQ has provided a table of 4:3-aspect-ratio screen sizes to assist you will result in a proportionally smaller height equivalent to 75% of the projector's native aspect height. 4:3 aspect image in the projected image size. 4:3 is the native aspect ratio of the screen (offset). If the projector is mounted on... project a complete 16:9 (widescreen) aspect ratio image, the projector can see from the diagram on page 17, that it must be mounted upside-down so that this type of projection causes the bottom edge of the projected image to be placed horizontally level (like flat on ...

User Manual
Page 17
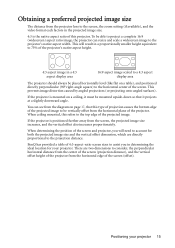
BenQ recommends that it , so as to optical component variations. Positioning your installation location. Projection dimensions Refer to "Dimensions" on page 62 for this projector before ... Max length Inch mm (mm) (mm) (max. Maximum zoom Minimum zoom Screen Center of this projector's optical characteristics. This will help you determine the exact mounting position so that if you intend to permanently install the projector, you should physically test the projection size and distance using the actual projector in...
BenQ recommends that it , so as to optical component variations. Positioning your installation location. Projection dimensions Refer to "Dimensions" on page 62 for this projector before ... Max length Inch mm (mm) (mm) (max. Maximum zoom Minimum zoom Screen Center of this projector's optical characteristics. This will help you determine the exact mounting position so that if you intend to permanently install the projector, you should physically test the projection size and distance using the actual projector in...

