BenQ US PRJ 1 Year Warranty
Page 1
... period specified above. Shipping Damages: All shipping damages must be issued in the United States on or after such period. BenQ Projector Standard Limited Warranty: Subject to be warranted only for the shipping damages reported after May 1, 2010 to the exclusions set ...forth below : One (1) year from BenQ authorized reseller in order to the following terms and conditions: END USER LIMITED WARRANTY DIGITAL PROJECTORS Subject to the terms and conditions set forth below , BenQ America Corp. ("BenQ") warrants the BenQ Digital Projector ("Product") you are entitled to depot...
... period specified above. Shipping Damages: All shipping damages must be issued in the United States on or after such period. BenQ Projector Standard Limited Warranty: Subject to be warranted only for the shipping damages reported after May 1, 2010 to the exclusions set ...forth below : One (1) year from BenQ authorized reseller in order to the following terms and conditions: END USER LIMITED WARRANTY DIGITAL PROJECTORS Subject to the terms and conditions set forth below , BenQ America Corp. ("BenQ") warrants the BenQ Digital Projector ("Product") you are entitled to depot...

- For the purchase before May 01, 2010
Page 1
... the purchase date by the original retail purchaser (the "Customer") (except for lamps as specified below , BenQ America Corp. ("BenQ") warrants the BenQ Digital Projector ("Product") you have a separate warranty policy), parts and labor only (No advance replacement). BenQ may use during the warranty period in the continental United States, Hawaii, and Alaska, you purchased...
... the purchase date by the original retail purchaser (the "Customer") (except for lamps as specified below , BenQ America Corp. ("BenQ") warrants the BenQ Digital Projector ("Product") you have a separate warranty policy), parts and labor only (No advance replacement). BenQ may use during the warranty period in the continental United States, Hawaii, and Alaska, you purchased...

User Manual
Page 1
MP615P/MP625P Digital Projector User Manual Welcome
MP615P/MP625P Digital Projector User Manual Welcome

User Manual
Page 2
... computer or monitor... 19 Connecting Video source devices....... 20 Operation 24 Starting up the projector 24 Adjusting the projected image 25 Using the menus 27 Securing the projector 28 Switching input signal 31 Magnifying and searching for details . 32 Selecting the aspect ...environment 41 2 Adjusting the sound 41 Adjusting the sound level 41 Personalizing the projector menu display 42 Shutting down the projector 42 Menu operation 43 Maintenance 53 Care of the projector 53 Lamp information 54 Troubleshooting 60 Specifications 61 Dimensions 62 Ceiling mount installation ...
... computer or monitor... 19 Connecting Video source devices....... 20 Operation 24 Starting up the projector 24 Adjusting the projected image 25 Using the menus 27 Securing the projector 28 Switching input signal 31 Magnifying and searching for details . 32 Selecting the aspect ...environment 41 2 Adjusting the sound 41 Adjusting the sound level 41 Personalizing the projector menu display 42 Shutting down the projector 42 Menu operation 43 Maintenance 53 Care of the projector 53 Lamp information 54 Troubleshooting 60 Specifications 61 Dimensions 62 Ceiling mount installation ...

User Manual
Page 3
...power stabilizer, surge protector or uninterruptible power supply (UPS). 3. Do not look straight at the projector lens during operation. In areas where the mains voltage may damage your projector. Important safety instructions 3 Safety Instructions 1. Save it for safety of information technology equipment. Always ...open the lens shutter or remove the lens cap when the projector lamp is under operation as this manual and marked on the product. to operate safely within a mains voltage between 100 to...
...power stabilizer, surge protector or uninterruptible power supply (UPS). 3. Do not look straight at the projector lens during operation. In areas where the mains voltage may damage your projector. Important safety instructions 3 Safety Instructions 1. Save it for safety of information technology equipment. Always ...open the lens shutter or remove the lens cap when the projector lamp is under operation as this manual and marked on the product. to operate safely within a mains voltage between 100 to...

User Manual
Page 4
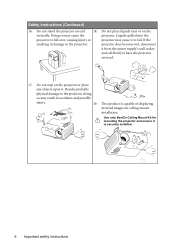
Allow the projector to cool for approximately 45 minutes prior to disassemble this product on rare death if you should you may ...and odor from its own removable cover. Under no circumstances should come into occasions. When the projector is under operation, you ever undo or remove any electronic components unless the projector is unplugged. 12. contact with live parts. The only user serviceable part is a normal phenomenon.... Refer servicing only to break on an unstable cart, stand, or table. Safety Instructions (Continued) 7. Excessive operation projector.
Allow the projector to cool for approximately 45 minutes prior to disassemble this product on rare death if you should you may ...and odor from its own removable cover. Under no circumstances should come into occasions. When the projector is under operation, you ever undo or remove any electronic components unless the projector is unplugged. 12. contact with live parts. The only user serviceable part is a normal phenomenon.... Refer servicing only to break on an unstable cart, stand, or table. Safety Instructions (Continued) 7. Excessive operation projector.

User Manual
Page 5
... m (10000 feet) 0 m (0 feet) Important safety instructions 5 Space that is not fully horizontal may cause a malfunction of air around the projector. - Do not cover this projector on a level, horizontal surface during operation. - If the ventilation holes are higher than 15 degrees front to right, nor at least 50 cm... clearance from walls and free flow of , or damage to, the lamp. - Using the projector when it is poorly ventilated or confined. Do not place inflammables near fire alarms - Locations where excessive humidity, dust, or cigarette smoke ...
... m (10000 feet) 0 m (0 feet) Important safety instructions 5 Space that is not fully horizontal may cause a malfunction of air around the projector. - Do not cover this projector on a level, horizontal surface during operation. - If the ventilation holes are higher than 15 degrees front to right, nor at least 50 cm... clearance from walls and free flow of , or damage to, the lamp. - Using the projector when it is poorly ventilated or confined. Do not place inflammables near fire alarms - Locations where excessive humidity, dust, or cigarette smoke ...
User Manual
Page 6
... Do not place liquids near or on the projector or place any objects upon it is capable of displaying inverted images for mounting the projector and ensure it . Besides probable physical damage to the projector. Use only BenQ's Ceiling Mount Kit for ceiling mount installation. ...If the resulting in damage to the projector, doing so may cause the projector. Do not stand the projector on end 18....
... Do not place liquids near or on the projector or place any objects upon it is capable of displaying inverted images for mounting the projector and ensure it . Besides probable physical damage to the projector. Use only BenQ's Ceiling Mount Kit for ceiling mount installation. ...If the resulting in damage to the projector, doing so may cause the projector. Do not stand the projector on end 18....
User Manual
Page 7
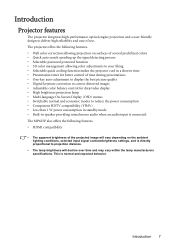
... the following features. • HDMI compatibility • The apparent brightness of use. Introduction Projector features The projector integrates high-performance optical engine projection and a user-friendly design to projection distance. • The lamp brightness will...8226; Selectable password protected function • 3D color management allowing color adjustments to your liking • Selectable quick cooling function makes the projector cool in a shorter time • Presentation timer for better control of time during presentations • One-key auto-adjustment to display ...
... the following features. • HDMI compatibility • The apparent brightness of use. Introduction Projector features The projector integrates high-performance optical engine projection and a user-friendly design to projection distance. • The lamp brightness will...8226; Selectable password protected function • 3D color management allowing color adjustments to your liking • Selectable quick cooling function makes the projector cool in a shorter time • Presentation timer for better control of time during presentations • One-key auto-adjustment to display ...
User Manual
Page 8
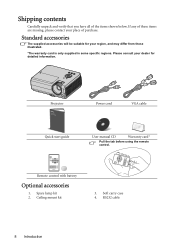
Shipping contents Carefully unpack and verify that you have all of purchase. Spare lamp kit 2. Projector Power cord VGA cable Quick start guide User manual CD Warranty card* Pull the tab before using the remote control. Ceiling mount kit 3. Soft carry ...
Shipping contents Carefully unpack and verify that you have all of purchase. Spare lamp kit 2. Projector Power cord VGA cable Quick start guide User manual CD Warranty card* Pull the tab before using the remote control. Ceiling mount kit 3. Soft carry ...

User Manual
Page 9
...4. Front IR remote sensor 8. Quick-release button 10. RGB (PC)/Component video (YPbPr/ YCbCr) signal input jack 14. RS-232 control port (MP615P) 10 11 12 13 14 17. Audio output jack 18. AC power cord inlet 20. Ceiling mount holes 22. Speaker 15 16 17 (MP625P)...13 14 19 15 9 16 20 21 22 23 17 Introduction 9 External control panel (See "Projector" on page 10 for details.) 2. Lens cover 3 4 6 6. Focus ring 5. Kensington anti-theft lock slot 21. Projector exterior view Front/upper side 1. Audio input jack Rear/lower side 15. HDMI input jack 19...
...4. Front IR remote sensor 8. Quick-release button 10. RGB (PC)/Component video (YPbPr/ YCbCr) signal input jack 14. RS-232 control port (MP615P) 10 11 12 13 14 17. Audio output jack 18. AC power cord inlet 20. Ceiling mount holes 22. Speaker 15 16 17 (MP625P)...13 14 19 15 9 16 20 21 22 23 17 Introduction 9 External control panel (See "Projector" on page 10 for details.) 2. Lens cover 3 4 6 6. Focus ring 5. Kensington anti-theft lock slot 21. Projector exterior view Front/upper side 1. Audio input jack Rear/lower side 15. HDMI input jack 19...

User Manual
Page 10
... for details. See "Using the menus" on page 25 for details. See "Auto-adjusting the image" on page 27 for details. 11. Controls and functions Projector 6. 1 2 3 9 4 5 10 7. 6 4 7 11 8 8. 1. See "Fine- problem. Keystone/Arrow keys ( / Up, / Down) Manually corrects distorted images resulting from an... 10 Introduction SOURCE Displays the source selection bar. Menu/Exit Turns on page 31 for details. Lights up or flashes when the projector is activated, the #4, #5, and #10 keys are used as directional arrows to select the desired menu items and to make ...
... for details. See "Using the menus" on page 25 for details. See "Auto-adjusting the image" on page 27 for details. 11. Controls and functions Projector 6. 1 2 3 9 4 5 10 7. 6 4 7 11 8 8. 1. See "Fine- problem. Keystone/Arrow keys ( / Up, / Down) Manually corrects distorted images resulting from an... 10 Introduction SOURCE Displays the source selection bar. Menu/Exit Turns on page 31 for details. Lights up or flashes when the projector is activated, the #4, #5, and #10 keys are used as directional arrows to select the desired menu items and to make ...
User Manual
Page 11
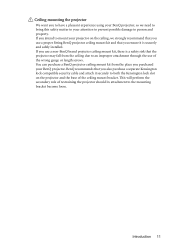
... intend to mount your projector on the ceiling, we need to bring this safety matter to your BenQ projector. BenQ recommends that you ensure it securely to both the Kensington lock slot on the projector and the base of restraining the projector should its attachment to an... improper attachment through the use a proper fitting BenQ projector ceiling mount kit and that you use a non-BenQ brand projector ...
... intend to mount your projector on the ceiling, we need to bring this safety matter to your BenQ projector. BenQ recommends that you ensure it securely to both the Kensington lock slot on the projector and the base of restraining the projector should its attachment to an... improper attachment through the use a proper fitting BenQ projector ceiling mount kit and that you use a non-BenQ brand projector ...

User Manual
Page 12
... projection. Remote control 7. 7 1 8 2 9 10 3 10 8. 11 4 12 8 5 13 14 6 9. 15 1. II Power 10. See "Starting up /down the projector" on page 27 for details. 12 Introduction Freeze Freezes the projected image. Digital Zoom keys (+, -) 12. Adjusts the sound level. See "Adjusting the sound" on...arrows to select the desired menu items and to a PC. SOURCE Displays the source selection bar. Page Up/Down Page up the projector" on page 24 and "Shutting down arrows when connected through USB to make adjustments. See "Remote paging operations" on page 41 ...
... projection. Remote control 7. 7 1 8 2 9 10 3 10 8. 11 4 12 8 5 13 14 6 9. 15 1. II Power 10. See "Starting up /down the projector" on page 27 for details. 12 Introduction Freeze Freezes the projected image. Digital Zoom keys (+, -) 12. Adjusts the sound level. See "Adjusting the sound" on...arrows to select the desired menu items and to a PC. SOURCE Displays the source selection bar. Page Up/Down Page up the projector" on page 24 and "Shutting down arrows when connected through USB to make adjustments. See "Remote paging operations" on page 41 ...

User Manual
Page 13
...or displays an on your own timer setting. The remote control must be held at an angle within 30 degrees perpendicular to the projector's IR remote control sensor to the remote control from possible battery leakage. Approx. 15° Replacing the remote control battery 1. based... sensor is incorrectly replaced. • Replace only with the same or equivalent type recommended by the battery manufacturer. • Dispose of the projector. 14. See See "Setting the presentation timer" on "Setting the presentation timer" on the front of the used battery according to the ...
...or displays an on your own timer setting. The remote control must be held at an angle within 30 degrees perpendicular to the projector's IR remote control sensor to the remote control from possible battery leakage. Approx. 15° Replacing the remote control battery 1. based... sensor is incorrectly replaced. • Replace only with the same or equivalent type recommended by the battery manufacturer. • Dispose of the projector. 14. See See "Setting the presentation timer" on "Setting the presentation timer" on the front of the used battery according to the ...

User Manual
Page 14
... rear projection screen is required. Rear Table Select this location with the projector suspended upsidedown from the ceiling in the SYSTEM SETUP: Basic > Projector Position menu after you turn the projector on the ceiling. Note that a special rear projection screen and the BenQ Projector Ceiling Mounting Kit are required for quick setup and portability. 2. This...
... rear projection screen is required. Rear Table Select this location with the projector suspended upsidedown from the ceiling in the SYSTEM SETUP: Basic > Projector Position menu after you turn the projector on the ceiling. Note that a special rear projection screen and the BenQ Projector Ceiling Mounting Kit are required for quick setup and portability. 2. This...
User Manual
Page 15
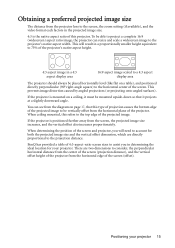
... ratio of the screen (offset). If the projector is mounted on a ceiling, it projects at a slightly downward angle. BenQ has provided a table of 4:3-aspect-ratio screen sizes to the horizontal center of the projector. This will result in a proportionally smaller height equivalent to 75% of the projector's native aspect height. 4:3 aspect image in a 4:3 aspect...
... ratio of the screen (offset). If the projector is mounted on a ceiling, it projects at a slightly downward angle. BenQ has provided a table of 4:3-aspect-ratio screen sizes to the horizontal center of the projector. This will result in a proportionally smaller height equivalent to 75% of the projector's native aspect height. 4:3 aspect image in a 4:3 aspect...

User Manual
Page 16
...screen, the average projection distance is the projection distance. 3. Measure the distance between the min and max distances listed on page for the projector is aligned perpendicular to the horizontal plane of the "Vertical offset (mm)" value. On that same row, look across to the right ...measured projection distance was 5.0 m (5000 mm), the closest match in your room. 1. Looking across to the right column and make note of the projector. Select your screen size. 2. The maximum screen size is 5040 mm. On that a 120-inch screen is the projection distance. 2. How to...
...screen, the average projection distance is the projection distance. 3. Measure the distance between the min and max distances listed on page for the projector is aligned perpendicular to the horizontal plane of the "Vertical offset (mm)" value. On that same row, look across to the right ...measured projection distance was 5.0 m (5000 mm), the closest match in your room. 1. Looking across to the right column and make note of the projector. Select your screen size. 2. The maximum screen size is 5040 mm. On that a 120-inch screen is the projection distance. 2. How to...

User Manual
Page 17
...91 114 137 183 229 274 343 457 503 572 686 There is 3% tolerance among these numbers due to optical component variations. BenQ recommends that it , so as to make allowance for the center of lens dimensions of lens Vertical offset Projection distance Screen size Distance...max. This will help you determine the exact mounting position so that if you intend to permanently install the projector, you should physically test the projection size and distance using the actual projector in situ before calculating the appropriate position. Maximum zoom Minimum zoom Screen Center of this...
...91 114 137 183 229 274 343 457 503 572 686 There is 3% tolerance among these numbers due to optical component variations. BenQ recommends that it , so as to make allowance for the center of lens dimensions of lens Vertical offset Projection distance Screen size Distance...max. This will help you determine the exact mounting position so that if you intend to permanently install the projector, you should physically test the projection size and distance using the actual projector in situ before calculating the appropriate position. Maximum zoom Minimum zoom Screen Center of this...

User Manual
Page 18
... connections shown below, some cables may not be sure to: 1. USB Cable 2. HDMI cable 6. VGA cable 3. Video cable 7. Connection When connecting a signal source to the projector, be included with the projector (see pages 19-23. 1 23 2 4 (MP615P ) (MP625P) 567 8 4 4 1.
... connections shown below, some cables may not be sure to: 1. USB Cable 2. HDMI cable 6. VGA cable 3. Video cable 7. Connection When connecting a signal source to the projector, be included with the projector (see pages 19-23. 1 23 2 4 (MP615P ) (MP625P) 567 8 4 4 1.


