
User Manual
Page 7
... a shorter time • FAQ to troubleshoot operational problems with one quick key press • Presentation timer for better control of time during presentations • High quality manual zoom lens • One-key auto-adjustment to display the best picture quality • Digital keystone correction to correct distorted images • Adjustable color balance control for data/video display • High brightness projection lamp • Multi-language On-Screen Display (OSD) menus • Switchable normal and economic modes to reduce the power consumption...
... a shorter time • FAQ to troubleshoot operational problems with one quick key press • Presentation timer for better control of time during presentations • High quality manual zoom lens • One-key auto-adjustment to display the best picture quality • Digital keystone correction to correct distorted images • Adjustable color balance control for data/video display • High brightness projection lamp • Multi-language On-Screen Display (OSD) menus • Switchable normal and economic modes to reduce the power consumption...
User Manual
Page 10
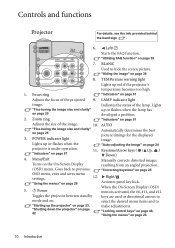
... On-Screen Display resulting from an angled projection. (OSD) menu. "Locking control keys" on page 40, "Using the menus" on page 57 Adjusts the size of the lamp. "Indicators" on page 26 10 Introduction II Power When the On-Screen Display (OSD) menu is under operation. Goes back to "Starting up or flashes when the "Auto-adjusting the image" on page 25 OSD menu, exits and saves menu settings. Right/ Activates panel key lock. 5. Controls and functions Projector...
... On-Screen Display resulting from an angled projection. (OSD) menu. "Locking control keys" on page 40, "Using the menus" on page 57 Adjusts the size of the lamp. "Indicators" on page 26 10 Introduction II Power When the On-Screen Display (OSD) menu is under operation. Goes back to "Starting up or flashes when the "Auto-adjusting the image" on page 25 OSD menu, exits and saves menu settings. Right/ Activates panel key lock. 5. Controls and functions Projector...
User Manual
Page 11
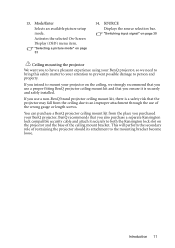
... safely installed. This will perform the secondary role of the ceiling mount bracket. Mode/Enter Selects an available picture setup mode. You can purchase a BenQ projector ceiling mount kit from the ceiling due to person and property. BenQ recommends that you intend to mount your BenQ projector. If you ensure it securely to the mounting bracket become loose. SOURCE Displays the source selection bar. 13. Activates the selected On-Screen Display (OSD) menu...
... safely installed. This will perform the secondary role of the ceiling mount bracket. Mode/Enter Selects an available picture setup mode. You can purchase a BenQ projector ceiling mount kit from the ceiling due to person and property. BenQ recommends that you intend to mount your BenQ projector. If you ensure it securely to the mounting bracket become loose. SOURCE Displays the source selection bar. 13. Activates the selected On-Screen Display (OSD) menu...
User Manual
Page 12
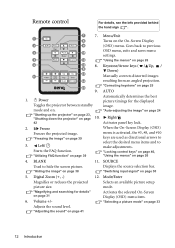
... hide the screen picture. SOURCE Used to make adjustments. Menu/Exit 1 8 Turns on . AUTO 1. "Auto-adjusting the image" on page 24 "Starting up the projector" on page 23, "Shutting down the projector" on page 30 5. "Switching input signal" on page 10. Mode/Enter Magnifies or reduces the projected picture size. "Correcting keystone" on page 39 3. Right/ 42 Activates panel key lock. 2. "Freezing the image" on page 25 15 9. Left/ Starts the FAQ function. Freeze Freezes the projected image. "Locking control keys...
... hide the screen picture. SOURCE Used to make adjustments. Menu/Exit 1 8 Turns on . AUTO 1. "Auto-adjusting the image" on page 24 "Starting up the projector" on page 23, "Shutting down the projector" on page 30 5. "Switching input signal" on page 10. Mode/Enter Magnifies or reduces the projected picture size. "Correcting keystone" on page 39 3. Right/ 42 Activates panel key lock. 2. "Freezing the image" on page 25 15 9. Left/ Starts the FAQ function. Freeze Freezes the projected image. "Locking control keys...
User Manual
Page 14
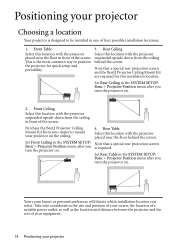
... rear projection screen and the BenQ Projector Ceiling Mount Kit are required for quick setup and portability. Rear Table Select this installation location. the projector for this location with the projector placed near the floor in the SYSTEM SETUP: Basic > Projector Position menu after you turn the projector on the ceiling. 4. Take into consideration the size and position of your screen, the location of a suitable power outlet, as well as the location and distance...
... rear projection screen and the BenQ Projector Ceiling Mount Kit are required for quick setup and portability. Rear Table Select this installation location. the projector for this location with the projector placed near the floor in the SYSTEM SETUP: Basic > Projector Position menu after you turn the projector on the ceiling. 4. Take into consideration the size and position of your screen, the location of a suitable power outlet, as well as the location and distance...

User Manual
Page 19
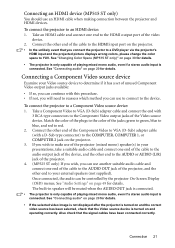
... only works when an appropriate D-Sub input is made to the COMPUTER 1 jack. • If you can connect to the AUDIO OUT jack of the video monitor. Once connected, the audio can use of the computer. 2. Usually a key combo like FN + F3 or CRT/LCD key turns the external display on their external video ports when connected to a projector. Take a suitable VGA cable (only one supplied) and connect one...
... only works when an appropriate D-Sub input is made to the COMPUTER 1 jack. • If you can connect to the AUDIO OUT jack of the video monitor. Once connected, the audio can use of the computer. 2. Usually a key combo like FN + F3 or CRT/LCD key turns the external display on their external video ports when connected to a projector. Take a suitable VGA cable (only one supplied) and connect one...
User Manual
Page 21
... Video source device is turned on page 49 for details. • If the selected video image is not displayed after the projector is turned on and the correct video source has been selected, check that the signal cables have been connected correctly. The built-in your external speakers (not supplied). If you wish to make use an HDMI cable when making connection between the projector and HDMI devices. See "Changing Color Space (MP515 ST...
... Video source device is turned on page 49 for details. • If the selected video image is not displayed after the projector is turned on and the correct video source has been selected, check that the signal cables have been connected correctly. The built-in your external speakers (not supplied). If you wish to make use an HDMI cable when making connection between the projector and HDMI devices. See "Changing Color Space (MP515 ST...

User Manual
Page 22
... S-Video/Video source device: 1. See "Audio Settings" on the projector. 3. Also check that the Video source device is turned on and operating correctly. Once connected, the audio can use another suitable audio cable and connect one end to the AUDIO or AUDIO (L/R) jack of the Video source device. 2. Take an S-Video/Video cable and connect one end of the cable to the AUDIO OUT jack of the projector, and the other end to the S-Video/Video output jack of the projector. 4. (MP525 ST...
... S-Video/Video source device: 1. See "Audio Settings" on the projector. 3. Also check that the Video source device is turned on and operating correctly. Once connected, the audio can use another suitable audio cable and connect one end to the AUDIO or AUDIO (L/R) jack of the Video source device. 2. Take an S-Video/Video cable and connect one end of the cable to the AUDIO OUT jack of the projector, and the other end to the S-Video/Video output jack of the projector. 4. (MP525 ST...

User Manual
Page 24
... image is positioned where you want it is close to the exhaust vent where hot air comes from the lamp If the projector is equipped with the projector's resolution or set the input signal to lock the foot in Intelligent Auto Adjustment function will see "Correcting keystone" on the projector or remote control. while the lamp is compatible with 1 quick-release adjuster foot and 1 rear adjuster foot. The strong light...
... image is positioned where you want it is close to the exhaust vent where hot air comes from the lamp If the projector is equipped with the projector's resolution or set the input signal to lock the foot in Intelligent Auto Adjustment function will see "Correcting keystone" on the projector or remote control. while the lamp is compatible with 1 quick-release adjuster foot and 1 rear adjuster foot. The strong light...

User Manual
Page 28
... projector. 3. Write down the recall code, and contact BenQ Customer Center. Open the OSD menu and go to enter the new password next time the projector is incorrect, the password error message displays lasting for three seconds, and the message "INPUT CURRENT PASSWORD" displays for three seconds, and the INPUT PASSWORD message follows. Press Mode/Enter. Enter the old password. • If the password is correct, another message "INPUT NEW PASSWORD" displays. • If the password is started. 28 Operation Password Keep this manual...
... projector. 3. Write down the recall code, and contact BenQ Customer Center. Open the OSD menu and go to enter the new password next time the projector is incorrect, the password error message displays lasting for three seconds, and the message "INPUT CURRENT PASSWORD" displays for three seconds, and the INPUT PASSWORD message follows. Press Mode/Enter. Enter the old password. • If the password is correct, another message "INPUT NEW PASSWORD" displays. • If the password is started. 28 Operation Password Keep this manual...

User Manual
Page 29
... the Security Settings page with "Off" shown in the row of Power On Lock. Select Off by entering the old password. Enter the current password. Operation 29 The message "INPUT PASSWORD" displays. ii. If the password is incorrect, the password error message displays lasting for three seconds, and the message "INPUT PASSWORD" displays for your retry. If the password is correct, the OSD menu returns to re-activate the password function by...
... the Security Settings page with "Off" shown in the row of Power On Lock. Select Off by entering the old password. Enter the current password. Operation 29 The message "INPUT PASSWORD" displays. ii. If the password is incorrect, the password error message displays lasting for three seconds, and the message "INPUT PASSWORD" displays for your retry. If the password is correct, the OSD menu returns to re-activate the password function by...
User Manual
Page 30
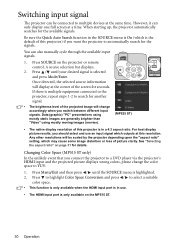
... the projector or remote control. Data (graphic) "PC" presentations using mostly static images are generally brighter than "Video" using mostly moving images (movies). (MP525 ST) • The native display resolution of this resolution. For best display picture results, you connect the projector to a DVD player via the projector's HDMI input and the projected picture displays wrong colors, please change accordingly when you want the projector to multiple devices at this projector) if you switch between different input signals. Press Menu/Exit and...
... the projector or remote control. Data (graphic) "PC" presentations using mostly static images are generally brighter than "Video" using mostly moving images (movies). (MP525 ST) • The native display resolution of this resolution. For best display picture results, you connect the projector to a DVD player via the projector's HDMI input and the projected picture displays wrong colors, please change accordingly when you want the projector to multiple devices at this projector) if you switch between different input signals. Press Menu/Exit and...
User Manual
Page 38
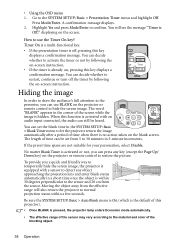
... your personation, select Disable. When this key displays a confirmation message. You can still be set the blank time in the corner of the screen while the image is pressed, the projector lamp enters Economic mode automatically. • The effective range of the sensor may vary according to the SYSTEM SETUP: Basic > Presentation Timer menu and highlight Off. Moving the object away from...
... your personation, select Disable. When this key displays a confirmation message. You can still be set the blank time in the corner of the screen while the image is pressed, the projector lamp enters Economic mode automatically. • The effective range of the sensor may vary according to the SYSTEM SETUP: Basic > Presentation Timer menu and highlight Off. Moving the object away from...
User Manual
Page 43
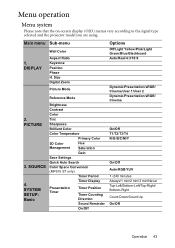
PICTURE 3. SOURCE 4. DISPLAY Wall Color Aspect Ratio Keystone Position Phase H. SYSTEM SETUP: Basic Brightness Contrast Color Tint Sharpness Brilliant Color Color Temperature Primary Color 3D Color Management Hue Saturation Gain Save Settings Quick Auto Search Color Space Conversion (MP515 ST only) Timer Period Timer Display Presentation Timer Timer Position Timer Counting Direction Sound Reminder On/Off Options Off/Light Yellow/Pink/Light Green/Blue/Blackboard Auto/Real/4:3/16:9 Dynamic/Presentation/sRGB/ Cinema/User 1/User 2 Dynamic/Presentation/sRGB/ Cinema On/Off...
PICTURE 3. SOURCE 4. DISPLAY Wall Color Aspect Ratio Keystone Position Phase H. SYSTEM SETUP: Basic Brightness Contrast Color Tint Sharpness Brilliant Color Color Temperature Primary Color 3D Color Management Hue Saturation Gain Save Settings Quick Auto Search Color Space Conversion (MP515 ST only) Timer Period Timer Display Presentation Timer Timer Position Timer Counting Direction Sound Reminder On/Off Options Off/Light Yellow/Pink/Light Green/Blue/Blackboard Auto/Real/4:3/16:9 Dynamic/Presentation/sRGB/ Cinema/User 1/User 2 Dynamic/Presentation/sRGB/ Cinema On/Off...

User Manual
Page 45
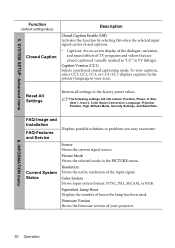
... equipment connected to the products. INFORMATION FAQ-Image and Installation FAQ-Features and Service Current System Status • Source • Picture Mode • Resolution • Color System • Equivalent Lamp Hour • Firmware Version Note that the menu items are available when the projector detects at least one valid signal. SYSTEM SETUP: Advanced Closed Caption Closed Caption Enable Caption Version Reset All Settings On/Off CC1/CC2/CC3/CC4 6. Operation...
... equipment connected to the products. INFORMATION FAQ-Image and Installation FAQ-Features and Service Current System Status • Source • Picture Mode • Resolution • Color System • Equivalent Lamp Hour • Firmware Version Note that the menu items are available when the projector detects at least one valid signal. SYSTEM SETUP: Advanced Closed Caption Closed Caption Enable Caption Version Reset All Settings On/Off CC1/CC2/CC3/CC4 6. Operation...
User Manual
Page 49
... adjust the image size and focus and check that the projected image is intended for details. Equivalent Lamp Hour See "Getting to know the lamp hour" on page 52 for details on page 19 for details. Out See "Connecting a monitor (MP525 ST only)" on how the total lamp hour is in standby mode and the COMPUTER 1 Standby Monitor and MONITOR OUT jacks are correctly connected to a new one. 5. The projector can connect the projector using...
... adjust the image size and focus and check that the projected image is intended for details. Equivalent Lamp Hour See "Getting to know the lamp hour" on page 52 for details on page 19 for details. Out See "Connecting a monitor (MP525 ST only)" on how the total lamp hour is in standby mode and the COMPUTER 1 Standby Monitor and MONITOR OUT jacks are correctly connected to a new one. 5. The projector can connect the projector using...
User Manual
Page 50
... System Status Resolution Shows the native resolution of hours the lamp has been used. Equivalent Lamp Hour Displays the number of the input signal. Source Shows the current signal source. Size, User 1, User 2, Color Space Conversion, Language, Projector Position, High Altitude Mode, Security Settings, and Baud Rate. Reset All Settings Returns all settings to problems you may encounter. FAQ-Image and Installation FAQ-Features and Service Displays possible solutions to the factory preset values. The following settings will still remain: Position, Phase, H. Firmware...
... System Status Resolution Shows the native resolution of hours the lamp has been used. Equivalent Lamp Hour Displays the number of the input signal. Source Shows the current signal source. Size, User 1, User 2, Color Space Conversion, Language, Projector Position, High Altitude Mode, Security Settings, and Baud Rate. Reset All Settings Returns all settings to problems you may encounter. FAQ-Image and Installation FAQ-Features and Service Displays possible solutions to the factory preset values. The following settings will still remain: Position, Phase, H. Firmware...
User Manual
Page 52
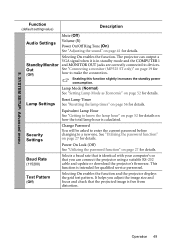
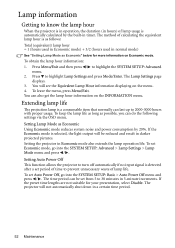
To obtain the lamp hour information: 1. You will see the Equivalent Lamp Hour information displaying on the INFORMATION menu. To keep the lamp life as long as Economic Using Economic mode reduces system noise and power consumption by the built-in timer. Setting Auto Power Off This function allows the projector to turn off automatically if no input signal is detected after a set Auto Power Off, go into the SYSTEM SETUP: Basic > Auto Power Off menu and press...
To obtain the lamp hour information: 1. You will see the Equivalent Lamp Hour information displaying on the INFORMATION menu. To keep the lamp life as long as Economic Using Economic mode reduces system noise and power consumption by the built-in timer. Setting Auto Power Off This function allows the projector to turn off automatically if no input signal is detected after a set Auto Power Off, go into the SYSTEM SETUP: Basic > Auto Power Off menu and press...

User Manual
Page 58
... the password. The projector is not turned on and check that it is an obstacle between the remote control and the projector. The input signal has not been correctly selected. Remedy Adjust the focus of the projector. You are not aligned properly. Replace the battery with the SOURCE key on . Open the lens cover. No picture Cause The video source is not correctly connected to turn on the projector, and plug the power cord into...
... the password. The projector is not turned on and check that it is an obstacle between the remote control and the projector. The input signal has not been correctly selected. Remedy Adjust the focus of the projector. You are not aligned properly. Replace the battery with the SOURCE key on . Open the lens cover. No picture Cause The video source is not correctly connected to turn on the projector, and plug the power cord into...

User Manual
Page 66
... settings of BenQ's monitors and projectors contain additional USB and DVI ports for connection to assist the hearing impaired. • All BenQ monitors and projectors come with a wide range of the visually impaired. Other similar adjustments are color-coded to help users easily connecting products to computer systems correctly. • Some models of pre-programmed flicker-free timing to make the screen shown on compact discs which could be displayed...
... settings of BenQ's monitors and projectors contain additional USB and DVI ports for connection to assist the hearing impaired. • All BenQ monitors and projectors come with a wide range of the visually impaired. Other similar adjustments are color-coded to help users easily connecting products to computer systems correctly. • Some models of pre-programmed flicker-free timing to make the screen shown on compact discs which could be displayed...


