User Guide
Page 4
CONTENTS Introduction ...5 Projector Features...5 Package Contents...6 Projector Overview ...7 Using the Product 9 Control Panel ...9 Connection Ports...10 Remote Control ...11 Replacing the Battery 12 Remote Control Operation 13 Installation ...14 Connecting the Projector 14 Powering On/Off the Projector 15 Adjusting the Projector 16 Menu Operation 18 Maintenance...22 Cleaning the Lens ...22 Cleaning the Projector Housing 22 Replacing the Lamp 23 Specifications 25 Appendix ...26 LED Indicator Messages 26 Compatibility Modes 27 Troubleshooting ...28 EN-4
CONTENTS Introduction ...5 Projector Features...5 Package Contents...6 Projector Overview ...7 Using the Product 9 Control Panel ...9 Connection Ports...10 Remote Control ...11 Replacing the Battery 12 Remote Control Operation 13 Installation ...14 Connecting the Projector 14 Powering On/Off the Projector 15 Adjusting the Projector 16 Menu Operation 18 Maintenance...22 Cleaning the Lens ...22 Cleaning the Projector Housing 22 Replacing the Lamp 23 Specifications 25 Appendix ...26 LED Indicator Messages 26 Compatibility Modes 27 Troubleshooting ...28 EN-4
User Guide
Page 7
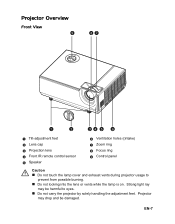
Projector may be damaged. EN-7 Strong light ray may drop and be harmful to prevent from possible burning. „ Do not looking into the lens or vents while the lamp is on. Projector Overview Front View 9 87 1 2 34 5 6 1 Tilt-adjustment feet 2 Lens cap 3 Projection lens 4 Front IR remote control sensor 5 Speaker 6 Ventilation holes ((intake) 7 Zoom ring 8 Focus ring 9 Control panel Caution „ Do not touch the lamp cover and exhaust vents during projector usage to eyes. „ Do not carry the projector by solely handling the adjustment feet.
Projector may be damaged. EN-7 Strong light ray may drop and be harmful to prevent from possible burning. „ Do not looking into the lens or vents while the lamp is on. Projector Overview Front View 9 87 1 2 34 5 6 1 Tilt-adjustment feet 2 Lens cap 3 Projection lens 4 Front IR remote control sensor 5 Speaker 6 Ventilation holes ((intake) 7 Zoom ring 8 Focus ring 9 Control panel Caution „ Do not touch the lamp cover and exhaust vents during projector usage to eyes. „ Do not carry the projector by solely handling the adjustment feet.
User Guide
Page 8
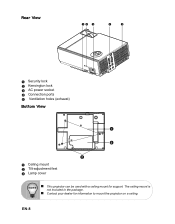
The ceiling mount is not included in the package. „ Contact your dealer for support. EN-8 Rear View 12 3 4 5 1 Security lock 2 Kensington lock 3 AC power socket 4 Connection ports 5 Ventilation holes (exhaust) Bottom View 1 3 2 1 Ceiling mount 2 Tilt-adjustment feet 23 Lamp cover „ This projector can be used with a ceiling mount for information to mount the projector on a ceiling.
The ceiling mount is not included in the package. „ Contact your dealer for support. EN-8 Rear View 12 3 4 5 1 Security lock 2 Kensington lock 3 AC power socket 4 Connection ports 5 Ventilation holes (exhaust) Bottom View 1 3 2 1 Ceiling mount 2 Tilt-adjustment feet 23 Lamp cover „ This projector can be used with a ceiling mount for information to mount the projector on a ceiling.
User Guide
Page 9
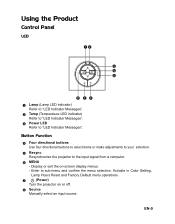
... items or make adjustments to your selection. 5 Resync Resynchronize the projector to "LED Indicator Messages". EN-9 Activate in Color Setting, Lamp Hours Reset and Factory Default menu operations. 7 (Power) Turn the projector on -screen display menus. - Using the Product Control Panel LED 12 3 4 5 8 76 1 Lamp (Lamp LED indicator) Refer to "LED Indicator Messages". 2 Temp (Temperature...
... items or make adjustments to your selection. 5 Resync Resynchronize the projector to "LED Indicator Messages". EN-9 Activate in Color Setting, Lamp Hours Reset and Factory Default menu operations. 7 (Power) Turn the projector on -screen display menus. - Using the Product Control Panel LED 12 3 4 5 8 76 1 Lamp (Lamp LED indicator) Refer to "LED Indicator Messages". 2 Temp (Temperature...
User Guide
Page 13
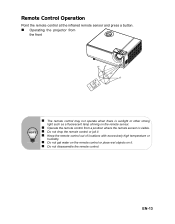
... remote control at the infrared remote sensor and press a button. „ Operating the projector from the front 30 20 7m 10 „ The remote control may not operate when there is sunlight or other strong light such as a fluorescent lamp shining on the remote sensor. „ Operate the remote control from a position...
... remote control at the infrared remote sensor and press a button. „ Operating the projector from the front 30 20 7m 10 „ The remote control may not operate when there is sunlight or other strong light such as a fluorescent lamp shining on the remote sensor. „ Operate the remote control from a position...

User Guide
Page 15
...POWER button on . EN-15 Warning „ Remove the lens cap first before powering on. „ Never look into the lens when the lamp is on the remote control to the projector simultaneously, press the left button on the control panel or the Source button on , you must wait until the... POWER button on the remote control again to confirm. „ The cooling fans continue to operate for cooling cycle. „ When the Lamp LED begins flashing, the projector has entered stand-by mode. Press Power again" appear on the screen. 2. Disconnect the AC power cord from the electrical outlet and the...
...POWER button on . EN-15 Warning „ Remove the lens cap first before powering on. „ Never look into the lens when the lamp is on the remote control to the projector simultaneously, press the left button on the control panel or the Source button on , you must wait until the... POWER button on the remote control again to confirm. „ The cooling fans continue to operate for cooling cycle. „ When the Lamp LED begins flashing, the projector has entered stand-by mode. Press Power again" appear on the screen. 2. Disconnect the AC power cord from the electrical outlet and the...
User Guide
Page 20
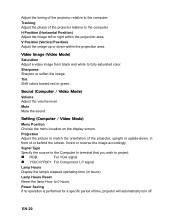
.... Signal Type Specify the source to the Computer In terminal that you wish to match the orientation of the projector: upright or upside-down within the projection area. Lamp Hours Reset Reset the lamp Hour to fully saturated color. Power Saving If no operation is performed for a specific period of or behind .... Tint Shift colors toward red or green. Projection Adjust the picture to project. „ RGB: For VGA signal „ YCbCr/YPbPr: For Component I, P signal Lamp Hours Display the lamp's elapsed operating time (in front of time, projector will automatically turn off.
.... Signal Type Specify the source to the Computer In terminal that you wish to match the orientation of the projector: upright or upside-down within the projection area. Lamp Hours Reset Reset the lamp Hour to fully saturated color. Power Saving If no operation is performed for a specific period of or behind .... Tint Shift colors toward red or green. Projection Adjust the picture to project. „ RGB: For VGA signal „ YCbCr/YPbPr: For Component I, P signal Lamp Hours Display the lamp's elapsed operating time (in front of time, projector will automatically turn off.

User Guide
Page 21
...password. Suggesting to turn Off for most video sources and On for bright, true-to input the preset password when turning on the projector. Factory Default (Computer / Video Mode) Restore settings to achieve proper high altitude cooling of OSD menu display countly starts (at idle...sources. Option (Computer / Video Mode) Blank Screen Blank the screen temporarily, and select the screen color when this function to dim the projector lamp light output which will require to -life images. When the password function is active. Brilliant ColorTM Produce an expanded on -screen menu....
...password. Suggesting to turn Off for most video sources and On for bright, true-to input the preset password when turning on the projector. Factory Default (Computer / Video Mode) Restore settings to achieve proper high altitude cooling of OSD menu display countly starts (at idle...sources. Option (Computer / Video Mode) Blank Screen Blank the screen temporarily, and select the screen color when this function to dim the projector lamp light output which will require to -life images. When the password function is active. Brilliant ColorTM Produce an expanded on -screen menu....

User Guide
Page 23
... at least 45 minutes for replacement. „ The lamp is no guarantee of use as a result of hours of the projector lamp gradually decreases and the lamp becomes more susceptible to replace the lamp yourself. If the lamp bursts, the mercury inside the lamp will damage the lamp and reduce lamp life. Otherwise it could cause headaches, nausea, dizziness...
... at least 45 minutes for replacement. „ The lamp is no guarantee of use as a result of hours of the projector lamp gradually decreases and the lamp becomes more susceptible to replace the lamp yourself. If the lamp bursts, the mercury inside the lamp will damage the lamp and reduce lamp life. Otherwise it could cause headaches, nausea, dizziness...

User Guide
Page 24
.... „ Since the lamp is installed in a ceiling 3 mount, remove it from the lamp module. 5. Turn on after the warm-up the handle, and then pull out the lamp unit by the handle. 6. If the lamp does not turn off the projector. 2. 1. Replace the lamp cover and tighten the screw.... 8. Refer to the Setting (Computer / Video Mode) menu. „ Dispose the used lamp according to turn on the projector. Unplug the power cord. ...
.... „ Since the lamp is installed in a ceiling 3 mount, remove it from the lamp module. 5. Turn on after the warm-up the handle, and then pull out the lamp unit by the handle. 6. If the lamp does not turn off the projector. 2. 1. Replace the lamp cover and tighten the screw.... 8. Refer to the Setting (Computer / Video Mode) menu. „ Dispose the used lamp according to turn on the projector. Unplug the power cord. ...

User Guide
Page 25
EN-25 Specifications Display Type Single 0.55" DLP panel Resolution (Pixels) XGA (1024 × 768) Brightness 2000 ANSI Lumens Lens Manual Zoom (1.1x) Screen Size 30" - 300" Lamp 180W Input Source D-Sub 15 pin, composite video, RS232, Audio input (stereo phone jack), S-video Output Source Audio output (stereo phone jack), D-Sub 15 pin ...
EN-25 Specifications Display Type Single 0.55" DLP panel Resolution (Pixels) XGA (1024 × 768) Brightness 2000 ANSI Lumens Lens Manual Zoom (1.1x) Screen Size 30" - 300" Lamp 180W Input Source D-Sub 15 pin, composite video, RS232, Audio input (stereo phone jack), S-video Output Source Audio output (stereo phone jack), D-Sub 15 pin ...
User Guide
Page 26
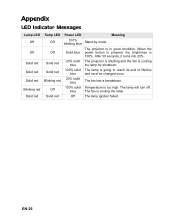
... seconds, it turns into 20%. The lamp will turn off. EN-26 The projector is shutting and the fan is 100%. When the power button is pressed, the brightness is cooling the lamp for shutdown. The fan has a breakdown. The lamp ignition failed. Appendix LED Indicator Messages Lamp LED Off Off Solid red Solid red... Power LED 100% blinking blue Solid blue 20% solid blue 100% solid blue 20% solid blue 100% solid blue Off Meaning Stand-by mode The projector is too high. Temperature is in good condition.
... seconds, it turns into 20%. The lamp will turn off. EN-26 The projector is shutting and the fan is 100%. When the power button is pressed, the brightness is cooling the lamp for shutdown. The fan has a breakdown. The lamp ignition failed. Appendix LED Indicator Messages Lamp LED Off Off Solid red Solid red... Power LED 100% blinking blue Solid blue 20% solid blue 100% solid blue 20% solid blue 100% solid blue Off Meaning Stand-by mode The projector is too high. Temperature is in good condition.


