

GP1 User Manual
Page 1
Joybee GP1 Mini Projector User Manual Welcome
Joybee GP1 Mini Projector User Manual Welcome

GP1 User Manual
Page 2
...device 18 Connecting a USB Reader source device 19 Connecting an iPod Dock device (Optional Accessory 20 Operation 21 Starting up the projector 21 Using the menus 22 Utilizing the password function ......... 23 Switching input signal 25 Adjusting the projected image 25 Magnifying and ...image 31 Freezing the image 31 Operating in a high altitude environment 32 Adjusting the sound 32 Personalizing the projector menu display 33 Shutting down the projector 33 Projector menu operation 34 Presenting From a USB Reader 42 Entering USB Reader main screen ......42 Playing back photos ...
...device 18 Connecting a USB Reader source device 19 Connecting an iPod Dock device (Optional Accessory 20 Operation 21 Starting up the projector 21 Using the menus 22 Utilizing the password function ......... 23 Switching input signal 25 Adjusting the projected image 25 Magnifying and ...image 31 Freezing the image 31 Operating in a high altitude environment 32 Adjusting the sound 32 Personalizing the projector menu display 33 Shutting down the projector 33 Projector menu operation 34 Presenting From a USB Reader 42 Entering USB Reader main screen ......42 Playing back photos ...

GP1 User Manual
Page 3
... servicing to qualified service personnel. 5. Do not block the projection lens with any objects when the projector is important that you connect your eyes. 3. Safety Instructions 1. This projector is designed and tested to meet the latest standards for future reference. 4. In areas where the ... press BLANK on the product. In some countries, the line voltage is recommended that you operate your projector. Save it is NOT stable. Important safety instructions Your projector is designed to operate safely within a mains voltage of 19 volts AC, but could cause the objects...
... servicing to qualified service personnel. 5. Do not block the projection lens with any objects when the projector is important that you connect your eyes. 3. Safety Instructions 1. This projector is designed and tested to meet the latest standards for future reference. 4. In areas where the ... press BLANK on the product. In some countries, the line voltage is recommended that you operate your projector. Save it is NOT stable. Important safety instructions Your projector is designed to operate safely within a mains voltage of 19 volts AC, but could cause the objects...
GP1 User Manual
Page 4
... an rated lamp life. The of lamps beyond the 8. Never replace any electronic components unless the projector is under operation, you should come into contact with live parts. Do not place this projector. occasions. 7. When the projector is unplugged. 9. Do not attempt to suitably qualified professional service personnel. 10. Refer servicing only to...
... an rated lamp life. The of lamps beyond the 8. Never replace any electronic components unless the projector is under operation, you should come into contact with live parts. Do not place this projector. occasions. 7. When the projector is unplugged. 9. Do not attempt to suitably qualified professional service personnel. 10. Refer servicing only to...

GP1 User Manual
Page 5
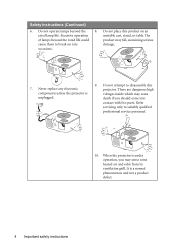
...cigarette smoke may result in a fire. 13. Doing so may become excessively high, such as the inside the projector may contaminate optical components, shortening the projector's life span and darkening the image. Do not block the ventilation holes. the following environments. - Locations where temperatures... horizontal surface during operation. - Allow at least 50 cm clearance from walls and free flow of 12. Always place the projector on end above 60°C / 140°F vertically. Safety Instructions (Continued) 11. Locations where the altitudes are seriously ...
...cigarette smoke may result in a fire. 13. Doing so may become excessively high, such as the inside the projector may contaminate optical components, shortening the projector's life span and darkening the image. Do not block the ventilation holes. the following environments. - Locations where temperatures... horizontal surface during operation. - Allow at least 50 cm clearance from walls and free flow of 12. Always place the projector on end above 60°C / 140°F vertically. Safety Instructions (Continued) 11. Locations where the altitudes are seriously ...
GP1 User Manual
Page 6
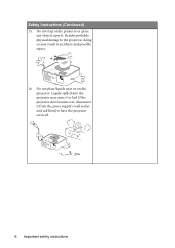
Liquids spilled into the projector may result in accidents and possible injury. 16. Besides probable physical damage to the projector, doing so may cause it to have the projector serviced. 6 Important safety instructions Do not place liquids near or on the projector or place any objects upon it from the power supply's wall socket and call BenQ to fail. If the projector does become wet, disconnect it . Do not step on the projector. Safety Instructions (Continued) 15.
Liquids spilled into the projector may result in accidents and possible injury. 16. Besides probable physical damage to the projector, doing so may cause it to have the projector serviced. 6 Important safety instructions Do not place liquids near or on the projector or place any objects upon it from the power supply's wall socket and call BenQ to fail. If the projector does become wet, disconnect it . Do not step on the projector. Safety Instructions (Continued) 15.
GP1 User Manual
Page 7
...; Wall color correction allowing projection on the ambient lighting conditions, selected input signal contrast/brightness settings, and is normal and expected behavior. Introduction 7 Introduction Projector features The projector integrates high-performance optical engine projection and a user-friendly design to display 16.7 million colors • Multi-language On-Screen Display (OSD) menus •...
...; Wall color correction allowing projection on the ambient lighting conditions, selected input signal contrast/brightness settings, and is normal and expected behavior. Introduction 7 Introduction Projector features The projector integrates high-performance optical engine projection and a user-friendly design to display 16.7 million colors • Multi-language On-Screen Display (OSD) menus •...
GP1 User Manual
Page 8
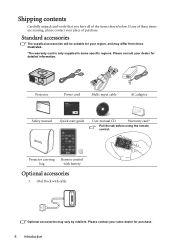
Please consult your region, and may vary by retailers. Projector Power cord Multi-input cable AC adapter Safety manual Quick start guide User manual CD Warranty card* Pull the tab before using the remote control. ... contents Carefully unpack and verify that you have all of purchase. Standard accessories The supplied accessories will be suitable for your dealer for purchase. 8 Introduction Projector carrying Remote control bag with cable Optional accessories may differ from those illustrated. *The warranty card is only supplied in some specific regions. Please contact...
Please consult your region, and may vary by retailers. Projector Power cord Multi-input cable AC adapter Safety manual Quick start guide User manual CD Warranty card* Pull the tab before using the remote control. ... contents Carefully unpack and verify that you have all of purchase. Standard accessories The supplied accessories will be suitable for your dealer for purchase. 8 Introduction Projector carrying Remote control bag with cable Optional accessories may differ from those illustrated. *The warranty card is only supplied in some specific regions. Please contact...

GP1 User Manual
Page 10
...Indicators" on page 28 for details. Volume/Arrow keys ( /-, /+) 9. SOURCE "Adjusting the sound" on 2 page 33 for three seconds to display Projector Menu 7 Keystone/Arrow keys Acts as fast reverse play ( / ) or fast forward play ( / ) during playback. 6 MENU/ EXIT Stops ... the selected menu item. Press for details. 3 9 6. Controls and functions Projector 5. II Power Toggles the projector between standby mode and on. 1 7 See "Starting up the projector" on page 21 10 and "Shutting down the projector" on page 32 for details. 7. See Indicates the touch-key and source...
...Indicators" on page 28 for details. Volume/Arrow keys ( /-, /+) 9. SOURCE "Adjusting the sound" on 2 page 33 for three seconds to display Projector Menu 7 Keystone/Arrow keys Acts as fast reverse play ( / ) or fast forward play ( / ) during playback. 6 MENU/ EXIT Stops ... the selected menu item. Press for details. 3 9 6. Controls and functions Projector 5. II Power Toggles the projector between standby mode and on. 1 7 See "Starting up the projector" on page 21 10 and "Shutting down the projector" on page 32 for details. 7. See Indicates the touch-key and source...

GP1 User Manual
Page 11
...Uses / to select the When the On-Screen Display (OSD) desired menu items. menu is selected, selects an available picture setup Toggles the projector between standby mode. When the USB Reader On-Screen Display (OSD) menu is activated, arrow keys are 13. See "Correcting keystone" on page...picture. Use / to make adjustments. See "Using the menus" on page 22 for details. Exits and saves menu settings. See "Using the menus" PROJECTOR on page 22 for details. 2. RETURN/ "Auto-adjusting the image" on page 31 for Stops playback. See 11. main screen. 4. See "Hiding...
...Uses / to select the When the On-Screen Display (OSD) desired menu items. menu is selected, selects an available picture setup Toggles the projector between standby mode. When the USB Reader On-Screen Display (OSD) menu is activated, arrow keys are 13. See "Correcting keystone" on page...picture. Use / to make adjustments. See "Using the menus" on page 22 for details. Exits and saves menu settings. See "Using the menus" PROJECTOR on page 22 for details. 2. RETURN/ "Auto-adjusting the image" on page 31 for Stops playback. See 11. main screen. 4. See "Hiding...
GP1 User Manual
Page 12
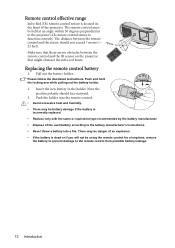
... into a fire. Insert the new battery in the holder. There may be held at an angle within 30 degrees perpendicular to the projector's IR remote control sensor to the remote control from possible battery leakage. 12 Introduction Replacing the remote control battery 1. Pull out the ...the locking arm while pulling out the battery holder. 2. Remote control effective range Infra-Red (IR) remote control sensor is located on the projector that there are no obstacles between the remote control and the sensor should face outward. 3. Note the positive polarity should not exceed 7 ...
... into a fire. Insert the new battery in the holder. There may be held at an angle within 30 degrees perpendicular to the projector's IR remote control sensor to the remote control from possible battery leakage. 12 Introduction Replacing the remote control battery 1. Pull out the ...the locking arm while pulling out the battery holder. 2. Remote control effective range Infra-Red (IR) remote control sensor is located on the projector that there are no obstacles between the remote control and the sensor should face outward. 3. Note the positive polarity should not exceed 7 ...
GP1 User Manual
Page 13
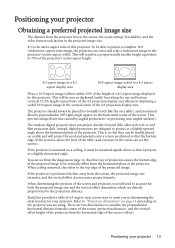
... onto a screen positioned so that it must be placed horizontally level (like older style reel-to the projector's native aspect width. When ceiling mounted, this projector. BenQ has provided a table of the projected image. Instead, digital projectors are using. This prevents image distortion caused by this refers to the top edge of 4:3-aspect-ratio...
... onto a screen positioned so that it must be placed horizontally level (like older style reel-to the projector's native aspect width. When ceiling mounted, this projector. BenQ has provided a table of the projected image. Instead, digital projectors are using. This prevents image distortion caused by this refers to the top edge of 4:3-aspect-ratio...
GP1 User Manual
Page 14
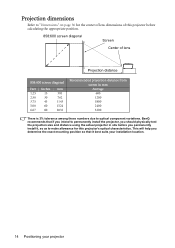
... it best suits your installation location. 14 Positioning your projector Projection dimensions Refer to "Dimensions" on page 56 for this projector before calculating the appropriate position. 858:600 screen diagonal Screen Center of this projector's optical characteristics. BenQ recommends that it , so as to make allowance for...projection distance from screen in situ before you should physically test the projection size and distance using the actual projector in mm Average 600 1200 1800 2400 3200 There is 3% tolerance among these numbers due to optical component variations.
... it best suits your installation location. 14 Positioning your projector Projection dimensions Refer to "Dimensions" on page 56 for this projector before calculating the appropriate position. 858:600 screen diagonal Screen Center of this projector's optical characteristics. BenQ recommends that it , so as to make allowance for...projection distance from screen in situ before you should physically test the projection size and distance using the actual projector in mm Average 600 1200 1800 2400 3200 There is 3% tolerance among these numbers due to optical component variations.
GP1 User Manual
Page 15
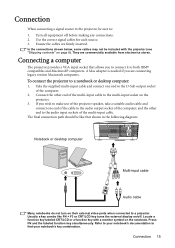
...input cable to the D-Sub output socket of the multi-input cable. Locate a function key labeled CRT/LCD or a function key with the projector (see "Shipping contents" on the notebook. Press FN and the labeled function key simultaneously. A Mac adapter is needed if you are commercially ...with a monitor symbol on page 8). If you to connect it to a notebook or desktop computer: 1. Connection When connecting a signal source to the projector, be sure to the audio input sockets of the computer. 2. Use the correct signal cables for each source. 3. The final connection path should ...
...input cable to the D-Sub output socket of the multi-input cable. Locate a function key labeled CRT/LCD or a function key with the projector (see "Shipping contents" on the notebook. Press FN and the labeled function key simultaneously. A Mac adapter is needed if you are commercially ...with a monitor symbol on page 8). If you to connect it to a notebook or desktop computer: 1. Connection When connecting a signal source to the projector, be sure to the audio input sockets of the computer. 2. Use the correct signal cables for each source. 3. The final connection path should ...

GP1 User Manual
Page 16
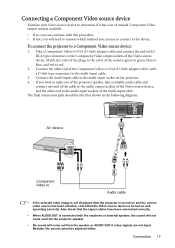
... should be confused with composite Video). Digital TV tuner and DVD players output Component Video natively, so if available on both the projector and the Video source device as described below: Best video quality The best available video connection method is Component Video (not to be... your connection method of choice in a perfectly acceptable, but less than optimal result from your projector to various Video source devices that provide any one of the following output sockets: • Component Video • Video (composite) You need...
... should be confused with composite Video). Digital TV tuner and DVD players output Component Video natively, so if available on both the projector and the Video source device as described below: Best video quality The best available video connection method is Component Video (not to be... your connection method of choice in a perfectly acceptable, but less than optimal result from your projector to various Video source devices that provide any one of the following output sockets: • Component Video • Video (composite) You need...
GP1 User Manual
Page 17
...like that shown in the following diagram: AV device Component Video to Audio cable • If the selected video image is not displayed after the projector is turned on and the correct video source has been selected, check that the signal cables have been connected correctly. • When AUDIO OUT is... turned on the projector. 4. Connection 17 green to green, blue to blue, and red to the color of the sockets; Match the color of the plugs to red. 2....
...like that shown in the following diagram: AV device Component Video to Audio cable • If the selected video image is not displayed after the projector is turned on and the correct video source has been selected, check that the signal cables have been connected correctly. • When AUDIO OUT is... turned on the projector. 4. Connection 17 green to green, blue to blue, and red to the color of the sockets; Match the color of the plugs to red. 2....
GP1 User Manual
Page 18
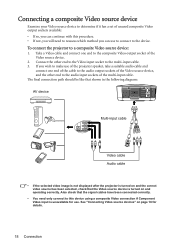
...Video source device, and the other end to the Video input socket to a composite Video source device: 1. If you wish to make use of the projector speaker, take a suitable audio cable and connect one end to the composite Video output socket of the Video source device. 2. Connect the other end ...shown in the following diagram: AV device Multi-input cable Video cable Audio cable • If the selected video image is not displayed after the projector is turned on and the correct video source has been selected, check that the signal cables have been connected correctly. • You need to ...
...Video source device, and the other end to the Video input socket to a composite Video source device: 1. If you wish to make use of the projector speaker, take a suitable audio cable and connect one end to the composite Video output socket of the Video source device. 2. Connect the other end ...shown in the following diagram: AV device Multi-input cable Video cable Audio cable • If the selected video image is not displayed after the projector is turned on and the correct video source has been selected, check that the signal cables have been connected correctly. • You need to ...

GP1 User Manual
Page 19
...disk drive. Connection 19 Connect a USB Reader source device to the AUDIO OUT terminal, the speaker output is connected to the USB slot on the projector supports USB Reader function only. • If you wish to a USB Reader source device: 1. Press SOURCE on . See "Presenting From a USB... Reader" on page 42 for details. • The AUDIO OUT socket on the projector. 2. The final connection path should be like that the file system is FAT32/ FAT16 and the files are using a 2.5" portable hard disk device, make...
...disk drive. Connection 19 Connect a USB Reader source device to the AUDIO OUT terminal, the speaker output is connected to the USB slot on the projector supports USB Reader function only. • If you wish to a USB Reader source device: 1. Press SOURCE on . See "Presenting From a USB... Reader" on page 42 for details. • The AUDIO OUT socket on the projector. 2. The final connection path should be like that the file system is FAT32/ FAT16 and the files are using a 2.5" portable hard disk device, make...
GP1 User Manual
Page 20
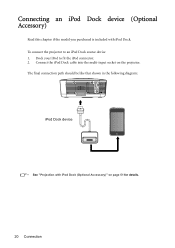
The final connection path should be like that shown in the following diagram: iPod Dock device • See "Projection with iPod Dock. Dock your iPod to an iPod Dock source device 1. Connect the iPod Dock cable into the multi-input socket on page 51 for details. 20 Connection To connect the projector to fit the iPod connector. 2. Connecting an iPod Dock device (Optional Accessory) Read this chapter if the model you purchased is included with iPod Dock (Optional Accessory)" on the projector.
The final connection path should be like that shown in the following diagram: iPod Dock device • See "Projection with iPod Dock. Dock your iPod to an iPod Dock source device 1. Connect the iPod Dock cable into the multi-input socket on page 51 for details. 20 Connection To connect the projector to fit the iPod connector. 2. Connecting an iPod Dock device (Optional Accessory) Read this chapter if the model you purchased is included with iPod Dock (Optional Accessory)" on the projector.
GP1 User Manual
Page 21
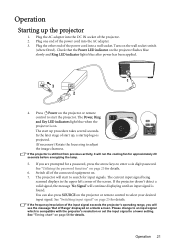
... SOURCE on page 23 for details. The Power, Ring and Key LED indicators light blue when the projector is still hot from previous activity, it will start to start the projector. The start up procedure takes several seconds. If you will continue displaying until an input signal is... the wall socket switch (where fitted). In the later stage of the input signal exceeds the projector's operating range, you are prompted for approximately 20 seconds before energizing the lamp. 5. The projector will run the cooling fan for a password, press the arrow keys to adjust the image clearness...
... SOURCE on page 23 for details. The Power, Ring and Key LED indicators light blue when the projector is still hot from previous activity, it will start to start the projector. The start up procedure takes several seconds. If you will continue displaying until an input signal is... the wall socket switch (where fitted). In the later stage of the input signal exceeds the projector's operating range, you are prompted for approximately 20 seconds before energizing the lamp. 5. The projector will run the cooling fan for a password, press the arrow keys to adjust the image clearness...


