
RS232 Control Guide
Page 1
W2700/ HT3550 Projector RS232 Command Control Installation Guide
W2700/ HT3550 Projector RS232 Command Control Installation Guide
RS232 Control Guide
Page 3
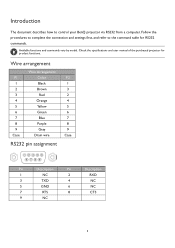
... 1 NC 2 RXD 3 TXD 4 NC 5 GND 6 NC 7 RTS 8 CTS 9 NC 3 Available functions and commands vary by model. Check the specifications and user manual of the purchased projector for RS232 commands. Follow the procedures to complete the connection and settings first, and refer to control your...
... 1 NC 2 RXD 3 TXD 4 NC 5 GND 6 NC 7 RTS 8 CTS 9 NC 3 Available functions and commands vary by model. Check the specifications and user manual of the purchased projector for RS232 commands. Follow the procedures to complete the connection and settings first, and refer to control your...

RS232 Control Guide
Page 4
Determine the COM Port name used for connection, and the specifications of the connections and set up properly before RS232 control. RS232 serial port with a crossover cable D-Sub 9 pin (male) on your Operating System, I/O ports used for reference only. The screens may vary depending on a projector PC or laptop Communication cable (crossover) D-Sub 9 pin (female) Settings On-screen images in this document are for the RS232 communications in Device Manager. 4 Connections and communication settings Choose one of the connected projector. 1.
Determine the COM Port name used for connection, and the specifications of the connections and set up properly before RS232 control. RS232 serial port with a crossover cable D-Sub 9 pin (male) on your Operating System, I/O ports used for reference only. The screens may vary depending on a projector PC or laptop Communication cable (crossover) D-Sub 9 pin (female) Settings On-screen images in this document are for the RS232 communications in Device Manager. 4 Connections and communication settings Choose one of the connected projector. 1.

RS232 Control Guide
Page 6
.... 2. In this given example, COM6 is selected. 6 RS232 via HDBaseT HDBaseT compatible device D-Sub 9 pin RJ45 RJ45 port on a projector PC or laptop LAN cable Settings 1. RS232 via LAN RJ45 port on a projector PC or laptop D-Sub 9 pin LAN cable Settings 1. Choose Serial and the corresponding COM port as the communication port.... Determine the COM Port name used for the RS232 communications in the TCP port # field. Find the Wired LAN IP address of the connected projector from the OSD menu and make sure the projector and the computer are within the same network. 2.
.... 2. In this given example, COM6 is selected. 6 RS232 via HDBaseT HDBaseT compatible device D-Sub 9 pin RJ45 RJ45 port on a projector PC or laptop LAN cable Settings 1. RS232 via LAN RJ45 port on a projector PC or laptop D-Sub 9 pin LAN cable Settings 1. Choose Serial and the corresponding COM port as the communication port.... Determine the COM Port name used for the RS232 communications in the TCP port # field. Find the Wired LAN IP address of the connected projector from the OSD menu and make sure the projector and the computer are within the same network. 2.
RS232 Control Guide
Page 8
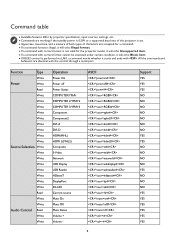
... HDbaseT DisplayPort 3G-SDI Current source Mute On Mute Off Mute Status Volume + Volume - Command table Available features differ by projector specification, input sources, settings, etc.. Commands are working if the standby power is 0.5W or a supported baud rate of the...command. If a command format is illegal, it will echo Illegal format. If a command with correct format is not valid for the projector model, it will echo Unsupported item. If a command with correct format cannot be executed under certain condition, it starts and ends with the ...
... HDbaseT DisplayPort 3G-SDI Current source Mute On Mute Off Mute Status Volume + Volume - Command table Available features differ by projector specification, input sources, settings, etc.. Commands are working if the standby power is 0.5W or a supported baud rate of the...command. If a command format is illegal, it will echo Illegal format. If a command with correct format is not valid for the projector model, it will echo Unsupported item. If a command with correct format cannot be executed under certain condition, it starts and ends with the ...

RS232 Control Guide
Page 11
...Write Quick auto search *QAS=on# NO Write Quick auto search *QAS=off# NO Read Quick auto search status *QAS=?# NO Read Projector Position Status *pp=?# YES Write Direct Power On-on *directpower=on# YES Write Direct Power On-off *directpower=off# YES Read ...cooling off *qcool=off 11 Read Brilliant color status *BC=?# YES Write Projector Position-Front *pp=FT# YES Table Write Projector Position-Rear *pp=RE# YES Table Write Projector Position-Rear *pp=RC# YES Ceiling Write Projector Position-Front *pp=FC# YES Ceiling Write Quick cooling on *qcool=...
...Write Quick auto search *QAS=on# NO Write Quick auto search *QAS=off# NO Read Quick auto search status *QAS=?# NO Read Projector Position Status *pp=?# YES Write Direct Power On-on *directpower=on# YES Write Direct Power On-off *directpower=off# YES Read ...cooling off *qcool=off 11 Read Brilliant color status *BC=?# YES Write Projector Position-Front *pp=FT# YES Table Write Projector Position-Rear *pp=RE# YES Table Write Projector Position-Rear *pp=RC# YES Ceiling Write Projector Position-Front *pp=FC# YES Ceiling Write Quick cooling on *qcool=...

Quick Start Guide
Page 7
...198 300 7620 3736 6641 7599 8761 9923 205 • All measurements are approximate and may vary from the actual sizes. • BenQ recommends that it best suits your installation location. • To optimize your projection quality, we suggest doing the projection by following the ...non-gray cells. • The values in situ before you should physically test the projection size and distance using the actual projector in the gray cells are for this projector's optical characteristics. Shifting the projection lens Desk-front projection 1V min. 0 V max. 0.1 V This will help you ...
...198 300 7620 3736 6641 7599 8761 9923 205 • All measurements are approximate and may vary from the actual sizes. • BenQ recommends that it best suits your installation location. • To optimize your projection quality, we suggest doing the projection by following the ...non-gray cells. • The values in situ before you should physically test the projection size and distance using the actual projector in the gray cells are for this projector's optical characteristics. Shifting the projection lens Desk-front projection 1V min. 0 V max. 0.1 V This will help you ...

Quick Start Guide
Page 8
Dimensions Projector dimensions 380 mm (W) x 127 mm (H) x 263 mm (D) 380 263 127 Unit: mm Ceiling/Wall mount installation diagram Ceiling/Wall mount screw: M4 (Max L = 25 mm; Min L = 20 mm) 222.3 108 175 47.3 49.7 118 226 57 104.3 154 Unit: mm
Dimensions Projector dimensions 380 mm (W) x 127 mm (H) x 263 mm (D) 380 263 127 Unit: mm Ceiling/Wall mount installation diagram Ceiling/Wall mount screw: M4 (Max L = 25 mm; Min L = 20 mm) 222.3 108 175 47.3 49.7 118 226 57 104.3 154 Unit: mm

User Manual
Page 2
...be defective within the warranty period, BenQ's only obligation and your exclusive remedy shall be in-between 10% and 90%, temperature in-between 0°C and 35°C, altitude lower than 4920 feet, and avoiding to operate the projector in the contents hereof without the ... or otherwise, without obligation to the contents hereof and specifically disclaims any warranties, merchantability or fitness for the details on BenQ projector patent coverage. 2 Warranty and Copyright information All rights reserved. No part of this publication may have other information, please visit www...
...be defective within the warranty period, BenQ's only obligation and your exclusive remedy shall be in-between 10% and 90%, temperature in-between 0°C and 35°C, altitude lower than 4920 feet, and avoiding to operate the projector in the contents hereof without the ... or otherwise, without obligation to the contents hereof and specifically disclaims any warranties, merchantability or fitness for the details on BenQ projector patent coverage. 2 Warranty and Copyright information All rights reserved. No part of this publication may have other information, please visit www...
User Manual
Page 3
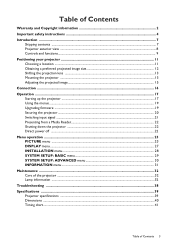
... size 12 Shifting the projection lens ...13 Mounting the projector ...13 Adjusting the projected image...15 Connection ...16 Operation ...17 Starting up the projector ...17 Using the menus ...19 Upgrading firmware ...19 Securing the projector ...20 Switching input signal ...21 Presenting from a Media... Reader...22 Shutting down the projector ...22 Direct power off ...22 Menu operation ...23...
... size 12 Shifting the projection lens ...13 Mounting the projector ...13 Adjusting the projected image...15 Connection ...16 Operation ...17 Starting up the projector ...17 Using the menus ...19 Upgrading firmware ...19 Securing the projector ...20 Switching input signal ...21 Presenting from a Media... Reader...22 Shutting down the projector ...22 Direct power off ...22 Menu operation ...23...
User Manual
Page 4
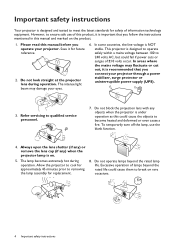
...mains voltage may damage your eyes. 6. Always open the lens shutter (if any) or remove the lens cap (if any objects when the projector is under operation as this manual and marked on . 5. Do not operate lamps beyond the rated life could fail if power cuts or ... 7. Save it is NOT stable. The lamp becomes extremely hot during operation. In some countries, the line voltage is recommended that you operate your projector through a power stabilizer, surge protector or uninterruptible power supply (UPS). 3. To temporarily turn off the lamp, use of lamps beyond the rated lamp ...
...mains voltage may damage your eyes. 6. Always open the lens shutter (if any) or remove the lens cap (if any objects when the projector is under operation as this manual and marked on . 5. Do not operate lamps beyond the rated life could fail if power cuts or ... 7. Save it is NOT stable. The lamp becomes extremely hot during operation. In some countries, the line voltage is recommended that you operate your projector through a power stabilizer, surge protector or uninterruptible power supply (UPS). 3. To temporarily turn off the lamp, use of lamps beyond the rated lamp ...

User Manual
Page 5
...so may cause a malfunction of more than 10 degrees left to right, nor at an angle of more than 15 degrees front to the projector, doing so may fall over, causing injury or resulting in a fire. Do not block the ventilation holes. - Important safety instructions 5 Always place...any objects upon it is a normal phenomenon and not a product defect. Do not use if tilted at angle of , or damage to the projector. 11. There are seriously obstructed, overheating inside which has its ventilation grill. The only user serviceable part is horizontal surface during operation. Do ...
...so may cause a malfunction of more than 10 degrees left to right, nor at an angle of more than 15 degrees front to the projector, doing so may fall over, causing injury or resulting in a fire. Do not block the ventilation holes. - Important safety instructions 5 Always place...any objects upon it is a normal phenomenon and not a product defect. Do not use if tilted at angle of , or damage to the projector. 11. There are seriously obstructed, overheating inside which has its ventilation grill. The only user serviceable part is horizontal surface during operation. Do ...

User Manual
Page 6
...m (10000 feet) 0 m (0 feet) • Hg - Locations where temperatures may contaminate optical components, shorten the projector's life span and darken the image. 18. Locations near or on the projector. Do not place liquids near fire alarms - 17. Allow at least 50 cm clearance from the power supply's power... outlet and call BenQ to fail. This product is poorly ventilated or confined. Locations where ...
...m (10000 feet) 0 m (0 feet) • Hg - Locations where temperatures may contaminate optical components, shorten the projector's life span and darken the image. 18. Locations near or on the projector. Do not place liquids near fire alarms - 17. Allow at least 50 cm clearance from the power supply's power... outlet and call BenQ to fail. This product is poorly ventilated or confined. Locations where ...

User Manual
Page 7
Standard accessories Projector Remote control with the same or equivalent type recommended by the battery manufacturer. • Dispose of an explosion. • If the batteries are dead or ...
Standard accessories Projector Remote control with the same or equivalent type recommended by the battery manufacturer. • Dispose of an explosion. • If the batteries are dead or ...

User Manual
Page 8
... jack 20. Projection lens 4. Security bar 8 Introduction Zoom ring 8. USB Type-A port (USB 2.0: 2.5A power supply) 17. Wall mount holes 21. Vent (air exhaust) 22. Projector exterior view 1 2 3 4 2 20 4 6 5 7 8 9 2 10 12 14 11 13 15 16 17 18 2 20 22 20 2 1. Lens shift wheel 7. USB Type-A port (USB 3.0: 5V 1.5A media...
... jack 20. Projection lens 4. Security bar 8 Introduction Zoom ring 8. USB Type-A port (USB 2.0: 2.5A power supply) 17. Wall mount holes 21. Vent (air exhaust) 22. Projector exterior view 1 2 3 4 2 20 4 6 5 7 8 9 2 10 12 14 11 13 15 16 17 18 2 20 22 20 2 1. Lens shift wheel 7. USB Type-A port (USB 3.0: 5V 1.5A media...

User Manual
Page 9
...Keystone keys ( , ) Displays the keystone correction page. OK Confirms the selected On-Screen Display (OSD) menu item. ON/ Off Toggles the projector between standby mode and on this document are used as directional arrows to select the desired menu items and to reset Keystone. 2. Volume keys /... Decreases or increase the projector volume. 7. LUMI EXPERT Not operational on . POWER Toggles the projector between standby mode and on page 37.) 6. BACK Goes back to previous OSD menu, exits and saves menu...
...Keystone keys ( , ) Displays the keystone correction page. OK Confirms the selected On-Screen Display (OSD) menu item. ON/ Off Toggles the projector between standby mode and on this document are used as directional arrows to select the desired menu items and to reset Keystone. 2. Volume keys /... Decreases or increase the projector volume. 7. LUMI EXPERT Not operational on . POWER Toggles the projector between standby mode and on page 37.) 6. BACK Goes back to previous OSD menu, exits and saves menu...

User Manual
Page 10
... modes. 15. LIGHT Displays the Picture Mode menu. HDR MANAGE, GAMMA, SHARP) Displays the HDR menu. DYNAMIC IRIS Decreases or increases the projector volume. Make sure that there are no obstacles between the remote control and the sensor(s) should not exceed 8 meters (~ 26 feet). CINEMA ...keep the backlight on, press any other key while the backlight is on the projector that might obstruct the infra-red beam. • Operating the projector from the front • Operating the projector from projecting as this could cause the blocking object to become heated and deformed or...
... modes. 15. LIGHT Displays the Picture Mode menu. HDR MANAGE, GAMMA, SHARP) Displays the HDR menu. DYNAMIC IRIS Decreases or increases the projector volume. Make sure that there are no obstacles between the remote control and the sensor(s) should not exceed 8 meters (~ 26 feet). CINEMA ...keep the backlight on, press any other key while the backlight is on the projector that might obstruct the infra-red beam. • Operating the projector from the front • Operating the projector from projecting as this could cause the blocking object to become heated and deformed or...
User Manual
Page 11
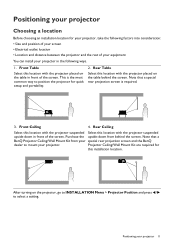
.../Wall Mount Kit are required for quick setup and portability. 2. Positioning your projector. Note that a BenQ Projector Ceiling/Wall Mount Kit from behind the screen. Positioning your projector Choosing a location Before choosing an installation location for your projector, take the following factors into consideration: • Size and position of your screen • Electrical outlet location...
.../Wall Mount Kit are required for quick setup and portability. 2. Positioning your projector. Note that a BenQ Projector Ceiling/Wall Mount Kit from behind the screen. Positioning your projector Choosing a location Before choosing an installation location for your projector, take the following factors into consideration: • Size and position of your screen • Electrical outlet location...

User Manual
Page 12
... Center of lens W Vertical Offset Projection distance • The screen aspect ratio is 16:9 and the projected picture is 3454 mm. 12 Positioning your projector zoom) 750 863 976 1001 1151 1302 1251 1439 1627 1501 1727 1953 1751 2015 2278 2001 2302 2603 2251 2590 2929 2502 2878 3254... 1992 2214 2435 2657 2878 3099 3321 3542 3763 3985 4206 4428 4649 4870 5092 5313 5535 5756 5977 6199 6420 6641 Distance from the projector lens to the screen, the zoom setting (if available), and the video format each factors in the projected image size. Obtaining a preferred ...
... Center of lens W Vertical Offset Projection distance • The screen aspect ratio is 16:9 and the projected picture is 3454 mm. 12 Positioning your projector zoom) 750 863 976 1001 1151 1302 1251 1439 1627 1501 1727 1953 1751 2015 2278 2001 2302 2603 2251 2590 2929 2502 2878 3254... 1992 2214 2435 2657 2878 3099 3321 3542 3763 3985 4206 4428 4649 4870 5092 5313 5535 5756 5977 6199 6420 6641 Distance from the projector lens to the screen, the zoom setting (if available), and the video format each factors in the projected image size. Obtaining a preferred ...

User Manual
Page 13
...values in the non-gray cells. • The values in the gray cells are approximate and may cause damage. Before mounting the projector • Purchase a BenQ projector mounting kit from screen (mm)" column is required. • All measurements are for you ensure it to fall down due to ...an improper attachment through the use a proper fitting BenQ projector mounting kit and that you . Installing the projector on the projector and the base of the mounting bracket. This will perform the secondary role of the wrong gauge or length...
...values in the non-gray cells. • The values in the gray cells are approximate and may cause damage. Before mounting the projector • Purchase a BenQ projector mounting kit from screen (mm)" column is required. • All measurements are for you ensure it to fall down due to ...an improper attachment through the use a proper fitting BenQ projector mounting kit and that you . Installing the projector on the projector and the base of the mounting bracket. This will perform the secondary role of the wrong gauge or length...


