
RS232 Control Guide
Page 3
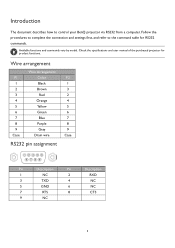
Check the specifications and user manual of the purchased projector for RS232 commands. Introduction The document describes how to the command table for product functions. Follow the procedures to complete the connection and settings first, and refer to control your BenQ projector via RS232 from a computer. Available functions and commands vary by model...
Check the specifications and user manual of the purchased projector for RS232 commands. Introduction The document describes how to the command table for product functions. Follow the procedures to complete the connection and settings first, and refer to control your BenQ projector via RS232 from a computer. Available functions and commands vary by model...
User Manual
Page 2
... permission of their respective companies or organizations. No part of this publication may have other information, please visit www.BenQ.com. Others are trademarks of any means, electronic, mechanical, magnetic, optical, chemical, manual or otherwise, without obligation to operate the projector in a dusty environment. Patents Please go to country. Copyright Copyright ©...
... permission of their respective companies or organizations. No part of this publication may have other information, please visit www.BenQ.com. Others are trademarks of any means, electronic, mechanical, magnetic, optical, chemical, manual or otherwise, without obligation to operate the projector in a dusty environment. Patents Please go to country. Copyright Copyright ©...
User Manual
Page 4
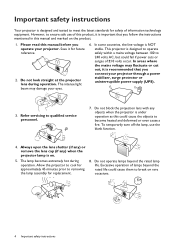
Please read this manual before you connect your projector through a power stabilizer, surge protector or uninterruptible power supply (UPS). 3. In some countries, the line voltage is designed to operate ... even cause a fire. Do not block the projection lens with any ) when the projector lamp is recommended that you follow the instructions mentioned in this manual and marked on rare occasions. 4 Important safety instructions
Please read this manual before you connect your projector through a power stabilizer, surge protector or uninterruptible power supply (UPS). 3. In some countries, the line voltage is designed to operate ... even cause a fire. Do not block the projection lens with any ) when the projector lamp is recommended that you follow the instructions mentioned in this manual and marked on rare occasions. 4 Important safety instructions

User Manual
Page 7
... and batteries in an excessive heat or humid environment like the kitchen, bathroom, sauna, sunroom or in a closed car. • Replace only with batteries User manual CD Quick start guide Warranty card* Power cord • The supplied accessories will not be danger of time, remove the batteries to avoid damage to...
... and batteries in an excessive heat or humid environment like the kitchen, bathroom, sauna, sunroom or in a closed car. • Replace only with batteries User manual CD Quick start guide Warranty card* Power cord • The supplied accessories will not be danger of time, remove the batteries to avoid damage to...

User Manual
Page 14
...; Make sure the power outlet is ceiling/wall mounted. Tightening with torque exceeding the recommended range may be higher than expected. • Read the user manual for the mounting kit about the range of torque. • Consider the surrounding temperature where the projector is at an accessible height so that you...
...; Make sure the power outlet is ceiling/wall mounted. Tightening with torque exceeding the recommended range may be higher than expected. • Read the user manual for the mounting kit about the range of torque. • Consider the surrounding temperature where the projector is at an accessible height so that you...

User Manual
Page 15
... up , long press PIC MODE for 2 seconds to reset Keystone. Sharpen the image by rotating the focus ring. You can use Auto Keystone or Keystone manually correct it following one of the image. Press to correct keystoning at the bottom of the these steps. • Using the remote control or projector...
... up , long press PIC MODE for 2 seconds to reset Keystone. Sharpen the image by rotating the focus ring. You can use Auto Keystone or Keystone manually correct it following one of the image. Press to correct keystoning at the bottom of the these steps. • Using the remote control or projector...
User Manual
Page 24
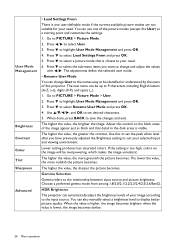
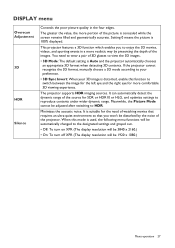
... desired characters. 5. The adjustments define the selected user mode. • Rename User Mode You can also manually select a brightness level to be overpowering, which makes the image unrealistic. Choose a preferred gamma mode from among 1.8/2.0/2.1/2.2/2.3/2.4/2.5/2.6/BenQ. Use this control so the black areas of the image appear just as a starting point and customize...
... desired characters. 5. The adjustments define the selected user mode. • Rename User Mode You can also manually select a brightness level to be overpowering, which makes the image unrealistic. Choose a preferred gamma mode from among 1.8/2.0/2.1/2.2/2.3/2.4/2.5/2.6/BenQ. Use this control so the black areas of the image appear just as a starting point and customize...
User Manual
Page 27
..., the more portion of the picture is suitable for the need to wear a pair of the projector. If the projector cannot recognize the 3D format, manually choose a 3D mode according to your preference. • 3D Sync Invert: When your 3D image is used, the following menu functions will be automatically changed...
..., the more portion of the picture is suitable for the need to wear a pair of the projector. If the projector cannot recognize the 3D format, manually choose a 3D mode according to your preference. • 3D Sync Invert: When your 3D image is used, the following menu functions will be automatically changed...
User Manual
Page 29
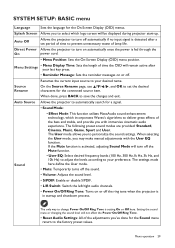
.../Off Ring Tone. • Reset Audio Settings: All of the adjustments you've done for the connected source item. Splash Screen Allows you may make manual adjustments with immersive cinematic audio experience. Menu Settings • Menu Display Time: Sets the length of time the OSD will turn off . Renames the current...
.../Off Ring Tone. • Reset Audio Settings: All of the adjustments you've done for the connected source item. Splash Screen Allows you may make manual adjustments with immersive cinematic audio experience. Menu Settings • Menu Display Time: Sets the length of time the OSD will turn off . Renames the current...
User Manual
Page 33
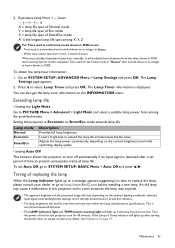
... up if the lamp becomes too hot. This is less than 1 hour, it shows 0 hours. Maintenance 33 When you calculate Equivalent Lamp hour manually, it is directly proportional to an integer in Economic or SmartEco mode extends lamp life. Press to SYSTEM SETUP: ADVANCED Menu > Lamp Settings and...You can also get the lamp hour information on page 37. Setting the projector in Hours. - To set period of time to http://www.BenQ.com before installing a new lamp. Time used is normal and expected behavior. • The LAMP indicator light and TEMPerature warning light will decline ...
... up if the lamp becomes too hot. This is less than 1 hour, it shows 0 hours. Maintenance 33 When you calculate Equivalent Lamp hour manually, it is directly proportional to an integer in Economic or SmartEco mode extends lamp life. Press to SYSTEM SETUP: ADVANCED Menu > Lamp Settings and...You can also get the lamp hour information on page 37. Setting the projector in Hours. - To set period of time to http://www.BenQ.com before installing a new lamp. Time used is normal and expected behavior. • The LAMP indicator light and TEMPerature warning light will decline ...


