

User Manual
Page 2
..., 0.75mm2 must not be operated from the wall outlet before cleaning. Further, BenQ Corporation reserves the right to revise this publication and to make changes from the AC supply. • The power supply cord serves as poor cable quality, unstable power supply, signal interference, or poor grounding, and not limited to the contents hereof and specifically disclaims any warranties, merchantability or fitness for any...
..., 0.75mm2 must not be operated from the wall outlet before cleaning. Further, BenQ Corporation reserves the right to revise this publication and to make changes from the AC supply. • The power supply cord serves as poor cable quality, unstable power supply, signal interference, or poor grounding, and not limited to the contents hereof and specifically disclaims any warranties, merchantability or fitness for any...
User Manual
Page 4
... to install on Windows 10 system (selected models only 20 How to install on Windows 8 (8.1) system 21 How to install on Windows 7 system 22 Menu operation ...23 Navigating the main menu ...25 Luminance menu...25 Color menu ...26 OSD menu ...26 Language menu ...26 Recall menu ...27 Miscellaneous menu...27 Input Select menu...28 Audio menu ...28 Troubleshooting ...29 Frequently asked questions (FAQ) ...29 Need more help?...30 Adjusting the screen resolution 31 Adjusting the screen refresh rate 32 Preset display modes ...33 Specifications ...34...
... to install on Windows 10 system (selected models only 20 How to install on Windows 8 (8.1) system 21 How to install on Windows 7 system 22 Menu operation ...23 Navigating the main menu ...25 Luminance menu...25 Color menu ...26 OSD menu ...26 Language menu ...26 Recall menu ...27 Miscellaneous menu...27 Input Select menu...28 Audio menu ...28 Troubleshooting ...29 Frequently asked questions (FAQ) ...29 Need more help?...30 Adjusting the screen resolution 31 Adjusting the screen refresh rate 32 Preset display modes ...33 Specifications ...34...

User Manual
Page 5
... contact the place of purchase for a replacement. The fitted foam packing is ideal for your region.) Video Cable: HDMI (Optional accessory) Warranty Card • Available accessories and the pictures shown here may subject to transport the monitor. Getting started When unpacking please check you may need to change without prior notice. Getting started 5 BenQ LCD Monitor Monitor Base Quick Start Guide Power Cord (Picture may differ from product supplied for protecting the monitor during transport.
... contact the place of purchase for a replacement. The fitted foam packing is ideal for your region.) Video Cable: HDMI (Optional accessory) Warranty Card • Available accessories and the pictures shown here may subject to transport the monitor. Getting started When unpacking please check you may need to change without prior notice. Getting started 5 BenQ LCD Monitor Monitor Base Quick Start Guide Power Cord (Picture may differ from product supplied for protecting the monitor during transport.

User Manual
Page 9
... HDMI Cable Connect the plug of a digital output device. Connect the other end of the cable to the HDMI port of the HDMI cable to the monitor video socket. Connect the PC video cable To Connect the DVI-D Cable Connect the plug of the cable (at the end without the ferrite filter) to the monitor video socket. You should position the monitor and angle the screen to minimize unwanted reflections from accidentally falling out during use. Connect the other light sources...
... HDMI Cable Connect the plug of a digital output device. Connect the other end of the cable to the HDMI port of the HDMI cable to the monitor video socket. Connect the PC video cable To Connect the DVI-D Cable Connect the plug of the cable (at the end without the ferrite filter) to the monitor video socket. You should position the monitor and angle the screen to minimize unwanted reflections from accidentally falling out during use. Connect the other light sources...
User Manual
Page 16
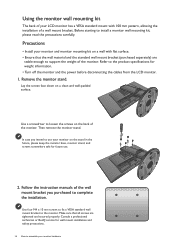
Then remove the monitor stand. Follow the instruction manuals of the wall mount bracket you intend to assemble your monitor hardware Use four M4 x 10 mm screws to fix a VESA standard wall mount bracket to install a monitor wall mounting kit, please read the precautions carefully. Consult a professional technician or BenQ service for future use your monitor on the stand in the future, please keep the monitor base, monitor stand, and screws somewhere safe for wall mount installation and safety precautions. 16 How to use . 2. Precautions...
Then remove the monitor stand. Follow the instruction manuals of the wall mount bracket you intend to assemble your monitor hardware Use four M4 x 10 mm screws to fix a VESA standard wall mount bracket to install a monitor wall mounting kit, please read the precautions carefully. Consult a professional technician or BenQ service for future use your monitor on the stand in the future, please keep the monitor base, monitor stand, and screws somewhere safe for wall mount installation and safety precautions. 16 How to use . 2. Precautions...
User Manual
Page 17
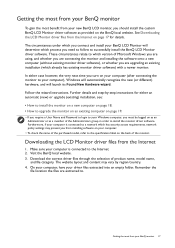
... policy settings may vary by -step instructions for details. These circumstances relate to . Download the correct driver files through the selection of the monitor. Make sure your computer is connected to a network which version of Microsoft Windows you are using, and whether you are connecting the monitor and installing the software onto a new computer (without existing monitor driver software), or whether you connect and install your BenQ LCD Monitor will launch...
... policy settings may vary by -step instructions for details. These circumstances relate to . Download the correct driver files through the selection of the monitor. Make sure your computer is connected to a network which version of Microsoft Windows you are using, and whether you are connecting the monitor and installing the software onto a new computer (without existing monitor driver software), or whether you connect and install your BenQ LCD Monitor will launch...

User Manual
Page 18
... installing the BenQ LCD Monitor driver software on a new computer which has never been used before . How to install the monitor on a new computer This instruction details the procedure for How to upgrade the monitor on an existing computer. 1. Follow the prompts until it will automatically detect the new monitor and launch the Found New Hardware Wizard. When Windows starts, it displays the option to assemble your BenQ monitor...
... installing the BenQ LCD Monitor driver software on a new computer which has never been used before . How to install the monitor on a new computer This instruction details the procedure for How to upgrade the monitor on an existing computer. 1. Follow the prompts until it will automatically detect the new monitor and launch the Found New Hardware Wizard. When Windows starts, it displays the option to assemble your BenQ monitor...
User Manual
Page 19
... perfectly with other versions of Windows, however, as compatible for the particular model monitor you through the file selection and installation process. Windows has an Upgrade Device Driver Wizard to automate the task and guide you have connected, and letting Windows install the corresponding driver files. How to upgrade the monitor on an existing computer This instruction details the procedure for manually updating the existing monitor driver software on your BenQ monitor 19
... perfectly with other versions of Windows, however, as compatible for the particular model monitor you through the file selection and installation process. Windows has an Upgrade Device Driver Wizard to automate the task and guide you have connected, and letting Windows install the corresponding driver files. How to upgrade the monitor on an existing computer This instruction details the procedure for manually updating the existing monitor driver software on your BenQ monitor 19
User Manual
Page 20
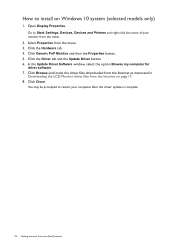
... the driver files downloaded from the Internet as instructed in Downloading the LCD Monitor driver files from the menu. 3. Open Display Properties. Click the Hardware tab. 4. Go to Start, Settings, Devices, Devices and Printers and right-click the name of your monitor from your computer after the driver update is complete. 20 Getting the most from the menu. 2. Click the Driver tab and the Update Driver button. 6. How to install on...
... the driver files downloaded from the Internet as instructed in Downloading the LCD Monitor driver files from the menu. 3. Open Display Properties. Click the Hardware tab. 4. Go to Start, Settings, Devices, Devices and Printers and right-click the name of your monitor from your computer after the driver update is complete. 20 Getting the most from the menu. 2. Click the Driver tab and the Update Driver button. 6. How to install on...
User Manual
Page 21
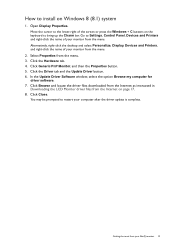
... Close. Select Properties from the menu. 2. Click the Driver tab and the Update Driver button. 6. Click Browse and locate the driver files downloaded from the Internet as instructed in Downloading the LCD Monitor driver files from the Internet on Windows 8 (8.1) system 1. You may be prompted to install on page 17. 8. In the Update Driver Software window, select the option Browse my computer for driver software. 7. Open Display Properties. How to restart your...
... Close. Select Properties from the menu. 2. Click the Driver tab and the Update Driver button. 6. Click Browse and locate the driver files downloaded from the Internet as instructed in Downloading the LCD Monitor driver files from the Internet on Windows 8 (8.1) system 1. You may be prompted to install on page 17. 8. In the Update Driver Software window, select the option Browse my computer for driver software. 7. Open Display Properties. How to restart your...

User Manual
Page 22
... Browse and locate the driver files downloaded from the Internet as instructed in Downloading the LCD Monitor driver files from the menu. 2. You may be prompted to install on page 17. 8. In the Update Driver Software window, select the option Browse my computer for driver software. 7. Open Display Properties. Click the Hardware tab. 4. Click Generic PnP Monitor, and then the Properties button. 5. Go to Start, Control Panel, Hardware and Sound, Devices and Printers...
... Browse and locate the driver files downloaded from the Internet as instructed in Downloading the LCD Monitor driver files from the menu. 2. You may be prompted to install on page 17. 8. In the Update Driver Software window, select the option Browse my computer for driver software. 7. Open Display Properties. Click the Hardware tab. 4. Click Generic PnP Monitor, and then the Properties button. 5. Go to Start, Control Panel, Hardware and Sound, Devices and Printers...
User Manual
Page 23
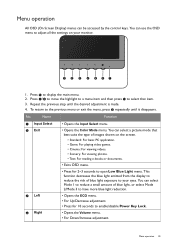
.../disable Power Key Lock. • Opens the Volume menu. • For Down/Increase adjustment. You can select a picture mode that item. 3. Press 3 / 4 to move the highlight to a menu item and then press 5 to select that best suits the type of blue light, or select Mode 2/Mode 3 to have more blue light reduction. • Opens the ECO menu. • For Up/Decrease adjustment. • Press for 2~3 seconds to open Low Blue Light menu. Menu operation All OSD...
.../disable Power Key Lock. • Opens the Volume menu. • For Down/Increase adjustment. You can select a picture mode that item. 3. Press 3 / 4 to move the highlight to a menu item and then press 5 to select that best suits the type of blue light, or select Mode 2/Mode 3 to have more blue light reduction. • Opens the ECO menu. • For Up/Decrease adjustment. • Press for 2~3 seconds to open Low Blue Light menu. Menu operation All OSD...

User Manual
Page 25
... may vary depending on page 23 for details. Luminance Main Menu Recall Color Miscellaneous OSD Input Select Language Audio Luminance menu Item Brightness Contrast Function Adjusts the balance between darkness and lightness. Range 0 to 100 0 to adjust all the settings on your monitor. Navigating the main menu You can use the OSD (On Screen Display) menu to 100 Navigating the main menu 25 Press the Main Menu hot key to access the main...
... may vary depending on page 23 for details. Luminance Main Menu Recall Color Miscellaneous OSD Input Select Language Audio Luminance menu Item Brightness Contrast Function Adjusts the balance between darkness and lightness. Range 0 to 100 0 to adjust all the settings on your monitor. Navigating the main menu You can use the OSD (On Screen Display) menu to 100 Navigating the main menu 25 Press the Main Menu hot key to access the main...

User Manual
Page 26
... Sets the OSD menu language. • English • Français • Deutsch • Italiano • Polski • Español Range • Nederlands esky 26 Navigating the main menu Go to the succeeding R (red), G (green), and B (blue) menus to change the settings. Decreasing one or more of the image. Allows video and still photographs to 30 sec. Position OSD Time Adjusts the horizontal position of the Red, Green and Blue primary colors...
... Sets the OSD menu language. • English • Français • Deutsch • Italiano • Polski • Español Range • Nederlands esky 26 Navigating the main menu Go to the succeeding R (red), G (green), and B (blue) menus to change the settings. Decreasing one or more of the image. Allows video and still photographs to 30 sec. Position OSD Time Adjusts the horizontal position of the Red, Green and Blue primary colors...
User Manual
Page 27
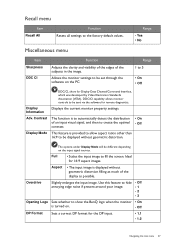
... developed by Video Electronics Standards Association (VESA). Displays the current monitor property settings. Range 1 to the factory default values. DDC/CI capability allows monitor controls to be displayed without geometric distortion filling as much of the display as possible. This feature is turned on the input signal sources. Use this feature to hide • Off annoying edge noise if present around your image. • 1 • 2 • 3 Opening Logo Sets whether...
... developed by Video Electronics Standards Association (VESA). Displays the current monitor property settings. Range 1 to the factory default values. DDC/CI capability allows monitor controls to be displayed without geometric distortion filling as much of the display as possible. This feature is turned on the input signal sources. Use this feature to hide • Off annoying edge noise if present around your image. • 1 • 2 • 3 Opening Logo Sets whether...

User Manual
Page 29
... more pixels are permanently red, green, blue or another color. • Clean the LCD screen. • Cycle power on-off. • These are pixels that are using a display mode that this means you are permanently on or off , please contact your computer and monitor go into a low power "sleep" mode when not actively in Adjusting the screen resolution on page 31, and then select the correct resolution, refresh rate and make adjustments based on the screen during...
... more pixels are permanently red, green, blue or another color. • Clean the LCD screen. • Cycle power on-off. • These are pixels that are using a display mode that this means you are permanently on or off , please contact your computer and monitor go into a low power "sleep" mode when not actively in Adjusting the screen resolution on page 31, and then select the correct resolution, refresh rate and make adjustments based on the screen during...
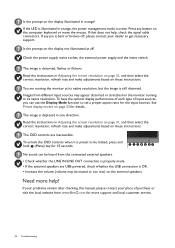
User Manual
Page 30
... button on the monitor running the monitor at its native resolution. The image is bent or broken off, please contact your place of input sources, you can be heard from different input sources may be locked, press and hold 5 (Menu) key for more help , check the signal cable connectors. Images from the connected external speakers. • Check whether the LINE IN/LINE OUT connection is properly made. • If the external speakers are USB-powered, check...
... button on the monitor running the monitor at its native resolution. The image is bent or broken off, please contact your place of input sources, you can be heard from different input sources may be locked, press and hold 5 (Menu) key for more help , check the signal cable connectors. Images from the connected external speakers. • Check whether the LINE IN/LINE OUT connection is properly made. • If the external speakers are USB-powered, check...
User Manual
Page 31
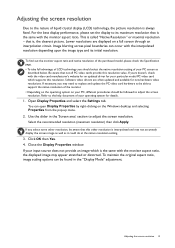
... always fixed. Use the slider in the "Display Mode" adjustment. Select the recommended resolution (maximum resolution) then click Apply. If your input source does not provide an image which supports this resolution value. To find out the monitor aspect ratio and native resolution of the purchased model, please check the Specification page. • To take full advantage of liquid crystal display (LCD) technology, the picture resolution is the same with the video card manufacturer...
... always fixed. Use the slider in the "Display Mode" adjustment. Select the recommended resolution (maximum resolution) then click Apply. If your input source does not provide an image which supports this resolution value. To find out the monitor aspect ratio and native resolution of the purchased model, please check the Specification page. • To take full advantage of liquid crystal display (LCD) technology, the picture resolution is the same with the video card manufacturer...
User Manual
Page 32
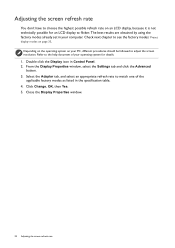
... Display Properties window, select the Settings tab and click the Advanced button. 3. Click Change, OK, then Yes. 5. The best results are obtained by using the factory modes already set in Control Panel. 2. Close the Display Properties window. 32 Adjusting the screen refresh rate Refer to adjust the screen resolution. Adjusting the screen refresh rate You don't have to choose the highest possible refresh rate on an LCD display, because it is not technically possible for details. 1. Check next chapter to flicker...
... Display Properties window, select the Settings tab and click the Advanced button. 3. Click Change, OK, then Yes. 5. The best results are obtained by using the factory modes already set in Control Panel. 2. Close the Display Properties window. 32 Adjusting the screen refresh rate Refer to adjust the screen resolution. Adjusting the screen refresh rate You don't have to choose the highest possible refresh rate on an LCD display, because it is not technically possible for details. 1. Check next chapter to flicker...

User Manual
Page 34
... Panel type Display area Native (maximum) resolution Aspect ratio Colors Contrast / Brightness Dynamic contrast ratio Response time Viewing angle (left/right, up/down /up) Swivel (left/right) Height adjustment Pivot Dimensions (H x W x D) Weight (without prior notice. 6/17/16 34 Specifications power consumption Power saving mode Input signal Speaker Temperature (operating) Air humidity (operating) Operating voltage Tilt (down ) Hor. Frequency (Hz) Controls Max. frequency monitor 50 - 75 Hz modes within these parameters 5 buttons and Power key 55 W < 0.5 W DVI-DL + DP 1.2 + HDMI...
... Panel type Display area Native (maximum) resolution Aspect ratio Colors Contrast / Brightness Dynamic contrast ratio Response time Viewing angle (left/right, up/down /up) Swivel (left/right) Height adjustment Pivot Dimensions (H x W x D) Weight (without prior notice. 6/17/16 34 Specifications power consumption Power saving mode Input signal Speaker Temperature (operating) Air humidity (operating) Operating voltage Tilt (down ) Hor. Frequency (Hz) Controls Max. frequency monitor 50 - 75 Hz modes within these parameters 5 buttons and Power key 55 W < 0.5 W DVI-DL + DP 1.2 + HDMI...


