
User Manual
Page 2
..., chemical, manual or otherwise, without obligation of BenQ Corporation to service this equipment from the wall outlet before cleaning. All rights reserved. No part of this product. Further, BenQ Corporation reserves the right to revise this publication and to make changes from the type of any kind into any particular purpose. Always unplug your monitor Power Safety • The AC plug isolates...
..., chemical, manual or otherwise, without obligation of BenQ Corporation to service this equipment from the wall outlet before cleaning. All rights reserved. No part of this product. Further, BenQ Corporation reserves the right to revise this publication and to make changes from the type of any kind into any particular purpose. Always unplug your monitor Power Safety • The AC plug isolates...
User Manual
Page 3
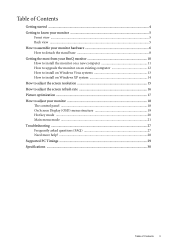
... 12 How to install on Windows Vista systems 13 How to install on Windows XP system 14 How to adjust the screen resolution 15 How to adjust the screen refresh rate 16 Picture optimization ...17 How to adjust your monitor 18 The control panel ...18 On Screen Display (OSD) menu structure 19 Hot key mode ...20 Main menu mode ...21 Troubleshooting ...27 Frequently asked questions (FAQ 27 Need more help? ...28 Supported PC Timings ...29 Specifications ...30 Table of...
... 12 How to install on Windows Vista systems 13 How to install on Windows XP system 14 How to adjust the screen resolution 15 How to adjust the screen refresh rate 16 Picture optimization ...17 How to adjust your monitor 18 The control panel ...18 On Screen Display (OSD) menu structure 19 Hot key mode ...20 Main menu mode ...21 Troubleshooting ...27 Frequently asked questions (FAQ 27 Need more help? ...28 Supported PC Timings ...29 Specifications ...30 Table of...

User Manual
Page 6
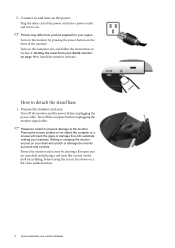
... and controls. Do not plug-in or turn it over and place it off before continuing. Placing the screen surface on an object like the monitor packaging bag on the power to check that they click and lock into place. Protect the monitor and screen by clearing a flat open area on a flat even surface. While holding the monitor firmly against the desk, pull the monitor stand...
... and controls. Do not plug-in or turn it over and place it off before continuing. Placing the screen surface on an object like the monitor packaging bag on the power to check that they click and lock into place. Protect the monitor and screen by clearing a flat open area on a flat even surface. While holding the monitor firmly against the desk, pull the monitor stand...
User Manual
Page 8
... on the desk for your BenQ monitor on the power. Protect the monitor and screen by pressing the power button on the front of the power cord into a power outlet and turn -on page 10 to assemble your monitor hardware Connect-to and turn it on a flat clean padded surface. 8 How to install the monitor software. Turn on the monitor by clearing a flat open area on your warranty. Turn on your desk will crack the...
... on the desk for your BenQ monitor on the power. Protect the monitor and screen by pressing the power button on the front of the power cord into a power outlet and turn -on page 10 to assemble your monitor hardware Connect-to and turn it on a flat clean padded surface. 8 How to install the monitor software. Turn on the monitor by clearing a flat open area on your warranty. Turn on your desk will crack the...

User Manual
Page 10
... your Windows computer, you need to select a monitor model. In either case however, the very next time you to follow . Follow the wizard instructions until it asks you turn on your computer. 10 Getting the most benefit from your new BenQ color LCD flat screen monitor, you are connecting the monitor and installing the software onto a new computer (without existing monitor driver software), or whether you should install the custom BenQ LCD Monitor driver software...
... your Windows computer, you need to select a monitor model. In either case however, the very next time you to follow . Follow the wizard instructions until it asks you turn on your computer. 10 Getting the most benefit from your new BenQ color LCD flat screen monitor, you are connecting the monitor and installing the software onto a new computer (without existing monitor driver software), or whether you should install the custom BenQ LCD Monitor driver software...
User Manual
Page 11
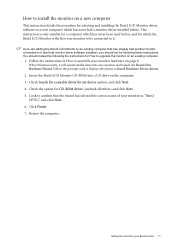
... to assemble your monitor as "BenQ FP75G" and click Next. 6. Look to confirm that has already had a monitor driver installed before. Check Search for a suitable driver for CD-ROM drives (uncheck all others) and click Next. 5. Getting the most from your BenQ monitor 11 If you should instead be following these instructions. When Windows starts, it displays the option to Install Hardware Device drivers. 2. Insert the BenQ LCD Monitor CD...
... to assemble your monitor as "BenQ FP75G" and click Next. 6. Look to confirm that has already had a monitor driver installed before. Check Search for a suitable driver for CD-ROM drives (uncheck all others) and click Next. 5. Getting the most from your BenQ monitor 11 If you should instead be following these instructions. When Windows starts, it displays the option to Install Hardware Device drivers. 2. Insert the BenQ LCD Monitor CD...
User Manual
Page 12
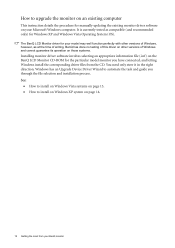
... those systems. Installing monitor driver software involves selecting an appropriate information file (.inf) on the BenQ LCD Monitor CD-ROM for manually updating the existing monitor driver software on page 14. 12 Getting the most from the CD. How to upgrade the monitor on an existing computer This instruction details the procedure for the particular model monitor you through the file selection and installation process. You need only steer...
... those systems. Installing monitor driver software involves selecting an appropriate information file (.inf) on the BenQ LCD Monitor CD-ROM for manually updating the existing monitor driver software on page 14. 12 Getting the most from the CD. How to upgrade the monitor on an existing computer This instruction details the procedure for the particular model monitor you through the file selection and installation process. You need only steer...

User Manual
Page 13
... appearance and sounds window. How to install on the computer. 7. Click the Monitor tab and the Properties button. 4. In the Update Driver Software window, select the option 'Browse my computer for driver software'. 8. This will copy and install the appropriate monitor driver files to restart Windows Vista, as the BenQ LCD monitor drivers will operate immediately with no further action required by you. Open Display Settings. Click the Driver tab and the Update Driver button. 6. Right...
... appearance and sounds window. How to install on the computer. 7. Click the Monitor tab and the Properties button. 4. In the Update Driver Software window, select the option 'Browse my computer for driver software'. 8. This will copy and install the appropriate monitor driver files to restart Windows Vista, as the BenQ LCD monitor drivers will operate immediately with no further action required by you. Open Display Settings. Click the Driver tab and the Update Driver button. 6. Right...
User Manual
Page 14
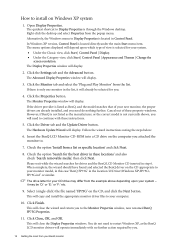
... Start | Control Panel | Display. • Under the Category view, click Start | Control Panel | Appearance and Themes | Change the screen resolution. The Monitor Properties window will depend upon your computer. 10. However, if BenQ is not listed as the manufacturer, or the correct model is not currently shown, you to . 7. Please wait while the wizard searches for the best driver in step 6. Select (single-click) the file named 'FP75G...
... Start | Control Panel | Display. • Under the Category view, click Start | Control Panel | Appearance and Themes | Change the screen resolution. The Monitor Properties window will depend upon your computer. 10. However, if BenQ is not listed as the manufacturer, or the correct model is not currently shown, you to . 7. Please wait while the wizard searches for the best driver in step 6. Select (single-click) the file named 'FP75G...

User Manual
Page 15
The best possible picture for your PC screen resolution setting. 1. Lower resolutions are displayed on the Windows desktop and selecting Properties from the pop-up menu. 2. You can occur with a resolution of 1280 x 1024. If you should select the native resolution setting of liquid crystal display (LCD) technology, the picture resolution is interpolated and may not accurately display the screen image as well as it could do at the native resolution setting. 3. How to...
The best possible picture for your PC screen resolution setting. 1. Lower resolutions are displayed on the Windows desktop and selecting Properties from the pop-up menu. 2. You can occur with a resolution of 1280 x 1024. If you should select the native resolution setting of liquid crystal display (LCD) technology, the picture resolution is interpolated and may not accurately display the screen image as well as it could do at the native resolution setting. 3. How to...
User Manual
Page 16
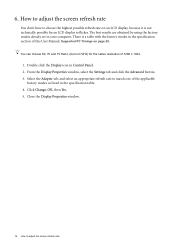
... screen refresh rate Close the Display Properties window. 16 How to flicker. The best results are obtained by using the factory modes already set in Control Panel. 2. How to adjust the screen refresh rate You don't have to choose the highest possible refresh rate on an LCD display, because it is a table with the factory modes in the specification table. 4. 6. Select the Adapter tab, and select an appropriate refresh rate to match one of 1280 x 1024. 1. Click Change...
... screen refresh rate Close the Display Properties window. 16 How to flicker. The best results are obtained by using the factory modes already set in Control Panel. 2. How to adjust the screen refresh rate You don't have to choose the highest possible refresh rate on an LCD display, because it is a table with the factory modes in the specification table. 4. 6. Select the Adapter tab, and select an appropriate refresh rate to match one of 1280 x 1024. 1. Click Change...
User Manual
Page 17
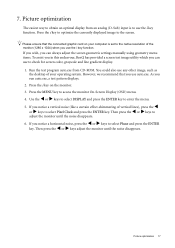
... to access the monitor On-Screen Display (OSD) menu. 4. However, we recommend that the connected graphic card on the monitor. 3. If you wish, you can use auto.exe. Press the i key to optimize the currently displayed image to check for screen color, grayscale and line gradient display. 1. Run the test program auto.exe from an analog (D-Sub) input is set to the native resolution of your computer is to adjust the monitor until the noise...
... to access the monitor On-Screen Display (OSD) menu. 4. However, we recommend that the connected graphic card on the monitor. 3. If you wish, you can use auto.exe. Press the i key to optimize the currently displayed image to check for screen color, grayscale and line gradient display. 1. Run the test program auto.exe from an analog (D-Sub) input is set to the native resolution of your computer is to adjust the monitor until the noise...
User Manual
Page 18
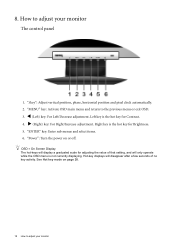
... menus and select items. 6. OSD = On Screen Display. "MENU" key: Activate OSD main menu and return to adjust your monitor How to the previous menu or exit OSD. 3. Hot-key displays will disappear after a few seconds of that setting, and will display a graduated scale for Brightness. 5. The hot-keys will only operate while the OSD menu is not currently displaying. "i key": Adjust vertical position, phase, horizontal position and pixel clock automatically. 2. 8. Left key...
... menus and select items. 6. OSD = On Screen Display. "MENU" key: Activate OSD main menu and return to adjust your monitor How to the previous menu or exit OSD. 3. Hot-key displays will disappear after a few seconds of that setting, and will display a graduated scale for Brightness. 5. The hot-keys will only operate while the OSD menu is not currently displaying. "i key": Adjust vertical position, phase, horizontal position and pixel clock automatically. 2. 8. Left key...

User Manual
Page 19
Position Display Time OSD Lock YES NO Red Green Blue YES NO English French German Italian Spanish Polish/Japanese Czech/Traditional Chinese Hungarian/Simplified Chinese Serbo-croatian Romanian Dutch Russian Swedish Portuguese 5 Sec. 10 Sec. 15 Sec. 20 Sec. 25 Sec. 30 Sec. Position V. Position Pixel Clock Phase Brightness Contrast Sharpness Color Normal Bluish Reddish User Mode Reset Color SYSTEM OSD Settings Information Reset All Language H. ON OFF How to adjust your monitor 19 Position V. On Screen Display (OSD) menu structure DISPLAY PICTURE Auto Adjustment H.
Position Display Time OSD Lock YES NO Red Green Blue YES NO English French German Italian Spanish Polish/Japanese Czech/Traditional Chinese Hungarian/Simplified Chinese Serbo-croatian Romanian Dutch Russian Swedish Portuguese 5 Sec. 10 Sec. 15 Sec. 20 Sec. 25 Sec. 30 Sec. Position V. Position Pixel Clock Phase Brightness Contrast Sharpness Color Normal Bluish Reddish User Mode Reset Color SYSTEM OSD Settings Information Reset All Language H. ON OFF How to adjust your monitor 19 Position V. On Screen Display (OSD) menu structure DISPLAY PICTURE Auto Adjustment H.

User Manual
Page 21
light a menu item, and press the ENTER key to high- System Use the W (left) or X (right) keys to enter the Menu item settings. Main menu mode You can use the OSD (On Screen Display) menu to adjust all the settings on page 25" under "OSD Settings" for more information on each menu, please refer to the following main OSD menu. 1 2 3 There are 14 different menu languages, see "Language on your monitor 21 Picture 3. There are...
light a menu item, and press the ENTER key to high- System Use the W (left) or X (right) keys to enter the Menu item settings. Main menu mode You can use the OSD (On Screen Display) menu to adjust all the settings on page 25" under "OSD Settings" for more information on each menu, please refer to the following main OSD menu. 1 2 3 There are 14 different menu languages, see "Language on your monitor 21 Picture 3. There are...

User Manual
Page 22
...' for you. See also: Picture optimization on page 17 22 How to enter the menu. 3. Press the W or X keys to move the highlight to a menu item and then press the ENTER key to make adjustment. Adjusts the vertical position of the screen image. Press the W or X keys to select that item. 4. Press the MENU key to synchronize with the analog input video signal. Adjusts the horizontal position of the screen image. Position V. Display menu 1.
...' for you. See also: Picture optimization on page 17 22 How to enter the menu. 3. Press the W or X keys to move the highlight to a menu item and then press the ENTER key to make adjustment. Adjusts the vertical position of the screen image. Press the W or X keys to select that item. 4. Press the MENU key to synchronize with the analog input video signal. Adjusts the horizontal position of the screen image. Position V. Display menu 1.

User Manual
Page 26
... X keys to change the settings. Press MENU to Reset All monitor property settings. Resets all the monitor settings from the 'OSD Settings' menu, and all OSD controls will be locked, press and hold the 'MENU' key for 15 seconds to the factory default values. H. Position Display Time Adjusts the horizontal position of the OSD menu. Adjusts the vertical position of the OSD menu. Adjusts the display time of the OSD menu. OSD Lock Prevents all mode, color and geometry settings to enter the 'OSD Lock' option and make changes. Alternatively, you may use the...
... X keys to change the settings. Press MENU to Reset All monitor property settings. Resets all the monitor settings from the 'OSD Settings' menu, and all OSD controls will be locked, press and hold the 'MENU' key for 15 seconds to the factory default values. H. Position Display Time Adjusts the horizontal position of the OSD menu. Adjusts the vertical position of the OSD menu. Adjusts the display time of the OSD menu. OSD Lock Prevents all mode, color and geometry settings to enter the 'OSD Lock' option and make changes. Alternatively, you may use the...
User Manual
Page 27
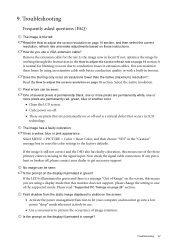
... this monitor does not support, please change the setting to one of Range" on page 16 section It is illuminated in green? Now check the signal cable connectors. Troubleshooting Frequently asked questions (FAQ) The image is still not correct and the OSD also has faulty coloration, this means you use . • Use a screensaver to adjust the screen resolution on or off , please contact your computer and monitor go into a low power "sleep" mode...
... this monitor does not support, please change the setting to one of Range" on page 16 section It is illuminated in green? Now check the signal cable connectors. Troubleshooting Frequently asked questions (FAQ) The image is still not correct and the OSD also has faulty coloration, this means you use . • Use a screensaver to adjust the screen resolution on or off , please contact your computer and monitor go into a low power "sleep" mode...
User Manual
Page 28
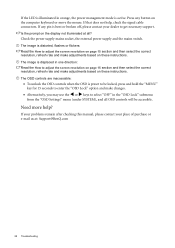
... orange, the power management mode is active. If your problems remain after checking this manual, please contact your dealer to adjust the screen resolution on page 15 section and then select the correct resolution, refresh rate and make adjustments based on the display not illuminated at : Support@BenQ.com 28 Troubleshooting If the LED is illuminated in the "OSD Lock" submenu from the "OSD Settings" menu (under SYSTEM), and all ? The image is bent or...
... orange, the power management mode is active. If your problems remain after checking this manual, please contact your dealer to adjust the screen resolution on page 15 section and then select the correct resolution, refresh rate and make adjustments based on the display not illuminated at : Support@BenQ.com 28 Troubleshooting If the LED is illuminated in the "OSD Lock" submenu from the "OSD Settings" menu (under SYSTEM), and all ? The image is bent or...

User Manual
Page 29
... an automatic setting or by manually changing the phase setting and the pixel frequency from graphic cards which do not correspond with the usual standard. 10. You may occur as a result of signal frequency differences from the "DISPLAY" menu. • To extend the service life of the product, we recommend that you use your computer's power management function. This is not, however, an error. Supported PC...
... an automatic setting or by manually changing the phase setting and the pixel frequency from graphic cards which do not correspond with the usual standard. 10. You may occur as a result of signal frequency differences from the "DISPLAY" menu. • To extend the service life of the product, we recommend that you use your computer's power management function. This is not, however, an error. Supported PC...


