

User Manual
Page 2
...marked label. If any of the above mentioned misuse or other risks. Further, BenQ Corporation reserves the right to revise this product. Care And Cleaning • Cleaning. Your monitor should be placed near the equipment and be easily accessible. • This product ...-in a retrieval system or translated into this publication and to the contents hereof and specifically disclaims any warranties, merchantability or fitness for servicing. 2 All rights reserved. Clean the LCD monitor surface with respect to make changes from the AC supply. • The power supply...
...marked label. If any of the above mentioned misuse or other risks. Further, BenQ Corporation reserves the right to revise this product. Care And Cleaning • Cleaning. Your monitor should be placed near the equipment and be easily accessible. • This product ...-in a retrieval system or translated into this publication and to the contents hereof and specifically disclaims any warranties, merchantability or fitness for servicing. 2 All rights reserved. Clean the LCD monitor surface with respect to make changes from the AC supply. • The power supply...

User Manual
Page 3
...monitor hardware ...8 How to detach the stand base ...11 How to use the monitor wall mounting kit ...12 Getting the most from your BenQ monitor ...14 To install the monitor on a new computer ...15 To upgrade the monitor... on an existing computer ...16 To install on Windows XP system ...17 To install on Windows 2000 system ...19 How to adjust the screen resolution ...21 How to adjust the screen refresh rate ...22... Picture optimization ...23 How to adjust your monitor ...24 The control ...
...monitor hardware ...8 How to detach the stand base ...11 How to use the monitor wall mounting kit ...12 Getting the most from your BenQ monitor ...14 To install the monitor on a new computer ...15 To upgrade the monitor... on an existing computer ...16 To install on Windows XP system ...17 To install on Windows 2000 system ...19 How to adjust the screen resolution ...21 How to adjust the screen refresh rate ...22... Picture optimization ...23 How to adjust your monitor ...24 The control ...

User Manual
Page 17
... and Themes | Change the screen resolution. The Display Properties window will display. 3. Click the Monitor tab and select the 'Plug and Play Monitor' from a list or specific location' and click Next. 8. If the driver provider is listed as the manufacturer, or the...BenQ LCD Monitor CD inserted in these property windows. The Hardware Update Wizard will display. The drive letter for you attached the monitor to Display Properties is located directly under the main Start menu item. it will depend upon your system. Select (single-click) the file named 'BenQ FP222W...
... and Themes | Change the screen resolution. The Display Properties window will display. 3. Click the Monitor tab and select the 'Plug and Play Monitor' from a list or specific location' and click Next. 8. If the driver provider is listed as the manufacturer, or the...BenQ LCD Monitor CD inserted in these property windows. The Hardware Update Wizard will display. The drive letter for you attached the monitor to Display Properties is located directly under the main Start menu item. it will depend upon your system. Select (single-click) the file named 'BenQ FP222W...

User Manual
Page 22
... in your computer. Click Change, OK, then Yes. 5. Close the Display Properties window. 22 How to match one of the applicable factory modes as listed in the specification section of this Users Manual: Supported PC Timings on an LCD display, because it is a table with the factory modes in the... specification table. 4. How to adjust the screen refresh rate You don't have to choose ...
... in your computer. Click Change, OK, then Yes. 5. Close the Display Properties window. 22 How to match one of the applicable factory modes as listed in the specification section of this Users Manual: Supported PC Timings on an LCD display, because it is a table with the factory modes in the... specification table. 4. How to adjust the screen refresh rate You don't have to choose ...
User Manual
Page 32
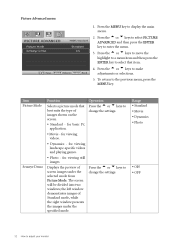
Item Picture Mode Function Selects a picture mode that item. 4. for viewing landscape-specific videos and playing games. • Photo - The screen will be divided into two windows; the left window demonstrates images of Standard mode, while the right ... mode from Picture Mode. for basic PC application. • Movie - Press the t or u keys to change the settings. Press the t or u keys to adjust your monitor Press the t or u keys to select PICTURE ADVANCED and then press the ENTER key to the previous menu, press the MENU key. To return to...
Item Picture Mode Function Selects a picture mode that item. 4. for viewing landscape-specific videos and playing games. • Photo - The screen will be divided into two windows; the left window demonstrates images of Standard mode, while the right ... mode from Picture Mode. for basic PC application. • Movie - Press the t or u keys to change the settings. Press the t or u keys to adjust your monitor Press the t or u keys to select PICTURE ADVANCED and then press the ENTER key to the previous menu, press the MENU key. To return to...