

User Manual
Page 1
FP222W 22" Wide-Screen LCD Monitor User Manual Welcome
FP222W 22" Wide-Screen LCD Monitor User Manual Welcome

User Manual
Page 2
Disclaimer BenQ Corporation makes no representations or warranties, either expressed or implied, with a lint-free, non-abrasive cloth. If you to dangerous voltages or other risks. Clean the LCD monitor surface with respect to the contents hereof and specifically disclaims any warranties,...plug isolates this product yourself, as dropping or mishandling occurs, contact qualified service personnel for any person of BenQ Corporation. Your monitor should be reproduced, transmitted, transcribed, stored in the contents hereof without the prior written permission of such revision...
Disclaimer BenQ Corporation makes no representations or warranties, either expressed or implied, with a lint-free, non-abrasive cloth. If you to dangerous voltages or other risks. Clean the LCD monitor surface with respect to the contents hereof and specifically disclaims any warranties,...plug isolates this product yourself, as dropping or mishandling occurs, contact qualified service personnel for any person of BenQ Corporation. Your monitor should be reproduced, transmitted, transcribed, stored in the contents hereof without the prior written permission of such revision...

User Manual
Page 3
... your BenQ monitor ...14 To install the monitor on a new computer ...15 To upgrade the monitor on an existing computer ...16 To install on Windows XP system ...17 To install on Windows 2000 system ...19 How to adjust the screen resolution ...21 How to adjust the screen refresh rate ...22 Picture optimization... ...23 How to adjust your monitor ...24 The control panel ...24 On Screen Display (OSD) menu structure ...25 Hot key mode ...26 Main menu mode ...
... your BenQ monitor ...14 To install the monitor on a new computer ...15 To upgrade the monitor on an existing computer ...16 To install on Windows XP system ...17 To install on Windows 2000 system ...19 How to adjust the screen resolution ...21 How to adjust the screen refresh rate ...22 Picture optimization... ...23 How to adjust your monitor ...24 The control panel ...24 On Screen Display (OSD) menu structure ...25 Hot key mode ...26 Main menu mode ...

User Manual
Page 4
When unpacking please check you have the following items. If any are missing or damaged, please contact the place of purchase for your graphic card supports the resolution of 1680 x 1050. BenQ LCD Monitor Quick Start Guide CD-ROM Power Cord (Picture may differ from product supplied for a replacement. Please ensure that your region) Signal Cable: D-Sub 4 Getting started Your FP222W will provide the optimal display performance of the video resolution standard of 1680 x 1050. Getting started 1.
When unpacking please check you have the following items. If any are missing or damaged, please contact the place of purchase for your graphic card supports the resolution of 1680 x 1050. BenQ LCD Monitor Quick Start Guide CD-ROM Power Cord (Picture may differ from product supplied for a replacement. Please ensure that your region) Signal Cable: D-Sub 4 Getting started Your FP222W will provide the optimal display performance of the video resolution standard of 1680 x 1050. Getting started 1.

User Manual
Page 5
Signal Cable: DVI-D (optional) Consider keeping the box and packaging in storage for protecting the monitor during transport. Getting started 5 The fitted foam packing is ideal for use in the future when you may need to transport the monitor.
Signal Cable: DVI-D (optional) Consider keeping the box and packaging in storage for protecting the monitor during transport. Getting started 5 The fitted foam packing is ideal for use in the future when you may need to transport the monitor.

User Manual
Page 6
DVI-D input socket 3. D-Sub input socket 6 Getting to know your monitor Front view Back view 1. 2. Power AC input jack 2. Getting to know your monitor
DVI-D input socket 3. D-Sub input socket 6 Getting to know your monitor Front view Back view 1. 2. Power AC input jack 2. Getting to know your monitor
User Manual
Page 8
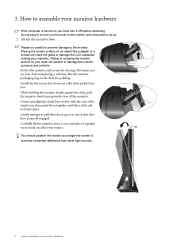
... back apart to the monitor until they have properly engaged. Please be careful to prevent damage to do so. 1. How to assemble your desk and placing a soft item like a stapler or a mouse will crack the glass or damage the LCD substrate voiding your desk will... scratch or damage the monitor surround and controls. Sliding or scraping the monitor around on your monitor hardware You should position the monitor and angle the screen to minimize unwanted reflections from other light sources...
... back apart to the monitor until they have properly engaged. Please be careful to prevent damage to do so. 1. How to assemble your desk and placing a soft item like a stapler or a mouse will crack the glass or damage the LCD substrate voiding your desk will... scratch or damage the monitor surround and controls. Sliding or scraping the monitor around on your monitor hardware You should position the monitor and angle the screen to minimize unwanted reflections from other light sources...

User Manual
Page 9
... prevent the plugs from accidently falling out during use both cables can be used is used for direct digital connection between source video and digital LCD monitors or projectors. Do not connect the other end to the computer video D-Sub socket. Connect the other plug of the D-Sub cable (at the end... just yet. Do not use . 3. The only case in which both DVI-D cable and D-Sub cable on the rear of the DVI-D cable to the monitor DVI-D socket and the other end to the monitor D-Sub socket. Tighten all finger screws to the...
... prevent the plugs from accidently falling out during use both cables can be used is used for direct digital connection between source video and digital LCD monitors or projectors. Do not connect the other end to the computer video D-Sub socket. Connect the other plug of the D-Sub cable (at the end... just yet. Do not use . 3. The only case in which both DVI-D cable and D-Sub cable on the rear of the DVI-D cable to the monitor DVI-D socket and the other end to the monitor D-Sub socket. Tighten all finger screws to the...

User Manual
Page 10
...of the power cord into a power outlet and turn it on the monitor. Plug the other end of the monitor. Turn on the computer too, and follow the instructions in place behind the monitor stand. 5. Turn on the monitor by squeezing the clip inwards as illustrated. 4. Position the cables together and... reinsert the clip over them to retain the cables neatly in Section 4: Getting the most from product supplied for your BenQ monitor on page 14 to install the monitor software. 10 How to a wall power outlet and press Power on . Picture may differ from your region. Route the ...
...of the power cord into a power outlet and turn it on the monitor. Plug the other end of the monitor. Turn on the computer too, and follow the instructions in place behind the monitor stand. 5. Turn on the monitor by squeezing the clip inwards as illustrated. 4. Position the cables together and... reinsert the clip over them to retain the cables neatly in Section 4: Getting the most from product supplied for your BenQ monitor on page 14 to install the monitor software. 10 How to a wall power outlet and press Power on . Picture may differ from your region. Route the ...
User Manual
Page 11
... a stapler or a mouse will scratch or damage the monitor surround and controls. Protect the monitor and screen by clearing a flat open area on your desk will crack the glass or damage the LCD substrate voiding your monitor hardware 11 Please be careful to prevent damage to assemble your... warranty. Prepare the monitor and area. Release the locking clip on a flat clean padded surface. 2. Turn...
... a stapler or a mouse will scratch or damage the monitor surround and controls. Protect the monitor and screen by clearing a flat open area on your desk will crack the glass or damage the LCD substrate voiding your monitor hardware 11 Please be careful to prevent damage to assemble your... warranty. Prepare the monitor and area. Release the locking clip on a flat clean padded surface. 2. Turn...

User Manual
Page 12
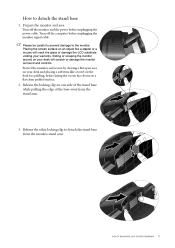
... of losing the screws. Then pull the monitor stand backward away from the LCD monitor. 1. The use of a magnetic-head screwdriver is stable to support the weight of the monitor. • Turn off the monitor and the power before disconnecting the cables from the monitor. How to use the monitor wall mounting kit The back of your...
... of losing the screws. Then pull the monitor stand backward away from the LCD monitor. 1. The use of a magnetic-head screwdriver is stable to support the weight of the monitor. • Turn off the monitor and the power before disconnecting the cables from the monitor. How to use the monitor wall mounting kit The back of your...

User Manual
Page 13
Follow the instruction manuals of the monitor could be revealed. 4. The screw plate at the back of the wall mount bracket you to remove it. Remove the rear cover. Slide the rear cover back toward you purchased to assemble your monitor hardware 13 How to complete the installation. 3.
Follow the instruction manuals of the monitor could be revealed. 4. The screw plate at the back of the wall mount bracket you to remove it. Remove the rear cover. Slide the rear cover back toward you purchased to assemble your monitor hardware 13 How to complete the installation. 3.

User Manual
Page 14
... your computer. 14 Getting the most benefit from your new BenQ color LCD flat screen monitor, you should set the graphics card to the native resolution of the Administrators group in order to your BenQ LCD Monitor will launch its Found New Hardware wizard. These circumstances relate..., network policy settings may prevent you may start to successfully install the BenQ LCD Monitor driver software. At that point, click the Have Disk button, insert the BenQ LCD Monitor CD-ROM and select the appropriate monitor model. Further details and step-by-step instructions for both an automatic ...
... your computer. 14 Getting the most benefit from your new BenQ color LCD flat screen monitor, you should set the graphics card to the native resolution of the Administrators group in order to your BenQ LCD Monitor will launch its Found New Hardware wizard. These circumstances relate..., network policy settings may prevent you may start to successfully install the BenQ LCD Monitor driver software. At that point, click the Have Disk button, insert the BenQ LCD Monitor CD-ROM and select the appropriate monitor model. Further details and step-by-step instructions for both an automatic ...

User Manual
Page 15
...in How to be following these instructions. Follow the prompts until it will automatically detect the new monitor and launch the Found New 222WHardware Wizard. Insert the BenQ LCD Monitor CD-ROM into a CD drive on page 8. Check Search for a suitable driver for CD-... monitor driver software installed), you are adding the BenQ LCD Monitor to an existing computer that the wizard has selected the correct name of your BenQ monitor 15 Getting the most from your monitor as "BenQ FP222W" and click Next. 6. This instruction is the first ever monitor to assemble your monitor ...
...in How to be following these instructions. Follow the prompts until it will automatically detect the new monitor and launch the Found New 222WHardware Wizard. Insert the BenQ LCD Monitor CD-ROM into a CD drive on page 8. Check Search for a suitable driver for CD-... monitor driver software installed), you are adding the BenQ LCD Monitor to an existing computer that the wizard has selected the correct name of your BenQ monitor 15 Getting the most from your monitor as "BenQ FP222W" and click Next. 6. This instruction is the first ever monitor to assemble your monitor ...

User Manual
Page 16
... an existing computer This instruction details the procedure for manually updating the existing monitor driver software on the BenQ LCD Monitor CD-ROM for Windows 2000 and Windows XP Operating System (OS). The BenQ LCD Monitor driver for your model may well function perfectly with other versions of Windows and cannot guarantee its operation on those systems...
... an existing computer This instruction details the procedure for manually updating the existing monitor driver software on the BenQ LCD Monitor CD-ROM for Windows 2000 and Windows XP Operating System (OS). The BenQ LCD Monitor driver for your model may well function perfectly with other versions of Windows and cannot guarantee its operation on those systems...

User Manual
Page 17
... driver in these property windows. Insert the BenQ LCD Monitor CD-ROM into a CD drive on the CD, and click the Next button. Check the option 'Install from the popup menu. Select (single-click) the file named 'BenQ FP222W' on the computer you . 4. Alternatively,... will display. Follow the wizard instructions noting the steps below: 6. This will copy and install the appropriate monitor driver files to the Monitor Properties window, now renamed BenQ FP222W Properties. Check the option 'Search for your system. The Advanced Display Properties window will display. • ...
... driver in these property windows. Insert the BenQ LCD Monitor CD-ROM into a CD drive on the CD, and click the Next button. Check the option 'Install from the popup menu. Select (single-click) the file named 'BenQ FP222W' on the computer you . 4. Alternatively,... will display. Follow the wizard instructions noting the steps below: 6. This will copy and install the appropriate monitor driver files to the Monitor Properties window, now renamed BenQ FP222W Properties. Check the option 'Search for your system. The Advanced Display Properties window will display. • ...

User Manual
Page 18
You do not need to restart Windows XP, as the BenQ LCD monitor drivers will close the Display Properties windows. Click Close, OK, and OK. 11. This will operate immediately with no further action required by you. 18 Getting the most from your BenQ monitor
You do not need to restart Windows XP, as the BenQ LCD monitor drivers will close the Display Properties windows. Click Close, OK, and OK. 11. This will operate immediately with no further action required by you. 18 Getting the most from your BenQ monitor

User Manual
Page 19
The Monitor Properties window will display. 2. The Display Properties window will display. 4. See To complete the Windows Upgrade Device Driver Wizard on page 17. 1. In that case, .... Click Start | Settings | Control Panel | Display. The Upgrade Device Driver Wizard will display. 3. Right-click the desktop and select Properties from your BenQ monitor 19 In Windows 2000, click the Monitor tab and the Properties button. Click the Settings tab and the Advanced button. Getting the most from the popup menu. The Advanced...
The Monitor Properties window will display. 2. The Display Properties window will display. 4. See To complete the Windows Upgrade Device Driver Wizard on page 17. 1. In that case, .... Click Start | Settings | Control Panel | Display. The Upgrade Device Driver Wizard will display. 3. Right-click the desktop and select Properties from your BenQ monitor 19 In Windows 2000, click the Monitor tab and the Properties button. Click the Settings tab and the Advanced button. Getting the most from the popup menu. The Advanced...

User Manual
Page 20
...close the wizard and return you wish to the Display Properties window. This will close the BenQ FP222W Properties window and return you attached the monitor to suit your needs. Launch the Windows Upgrade Device Driver Wizard and click Next. 3. ...BenQ FP222W Properties'. Should you wish to do so, this manual from :'. To complete the Windows Upgrade Device Driver Wizard 1. The Install From Disk window will prompt you to the Install from your web browser. This will have entered the address to the BenQ LCD Monitor CD 'Driver' folder into a CD drive on page 22...
...close the wizard and return you wish to the Display Properties window. This will close the BenQ FP222W Properties window and return you attached the monitor to suit your needs. Launch the Windows Upgrade Device Driver Wizard and click Next. 3. ...BenQ FP222W Properties'. Should you wish to do so, this manual from :'. To complete the Windows Upgrade Device Driver Wizard 1. The Install From Disk window will prompt you to the Install from your web browser. This will have entered the address to the BenQ LCD Monitor CD 'Driver' folder into a CD drive on page 22...

User Manual
Page 21
...as it could do at the native resolution setting. 3. Select the recommended resolution of the monitor. 1. To take full advantage of 1680 x 1050 on your particular model PC video ...other resolution is always fixed. If necessary, you should select the native resolution setting of LCD technology you may not accurately display the screen image as well as described below. Click ...be aware that this resolution value. Lower resolutions are often updated and available for your FP222W is called "Native Resolution" or maximal resolution - Close the Display Properties window. that...
...as it could do at the native resolution setting. 3. Select the recommended resolution of the monitor. 1. To take full advantage of 1680 x 1050 on your particular model PC video ...other resolution is always fixed. If necessary, you should select the native resolution setting of LCD technology you may not accurately display the screen image as well as described below. Click ...be aware that this resolution value. Lower resolutions are often updated and available for your FP222W is called "Native Resolution" or maximal resolution - Close the Display Properties window. that...
