EW2740L User Manual
Page 2
... BenQ Corporation to the contents hereof and specifically disclaims any warranties, merchantability or fitness for any person of this equipment from the AC supply. • The power supply cord serves as poor cable quality, unstable power supply, signal interference, or poor grounding, and not limited to the above mentioned external factors. (Applicable for flicker-free models only.) Power Safety Please follow these safety instructions for best...
... BenQ Corporation to the contents hereof and specifically disclaims any warranties, merchantability or fitness for any person of this equipment from the AC supply. • The power supply cord serves as poor cable quality, unstable power supply, signal interference, or poor grounding, and not limited to the above mentioned external factors. (Applicable for flicker-free models only.) Power Safety Please follow these safety instructions for best...

EW2740L User Manual
Page 4
... How to install on Windows 7 system 20 How to adjust your monitor 21 The control panel...21 Basic menu operation ...22 Picture optimization ...24 Customizing the hot keys...24 Adjusting display mode ...24 Choosing an appropriate picture mode 25 Connecting the monitor to your MacBook series product 25 Navigating the main menu ...26 Display menu ...27 Picture menu ...29 Picture Advanced menu ...31 Audio menu ...34 System menu ...35 Troubleshooting ...38 Frequently asked questions (FAQ) ...38 Need more help?...40 4
... How to install on Windows 7 system 20 How to adjust your monitor 21 The control panel...21 Basic menu operation ...22 Picture optimization ...24 Customizing the hot keys...24 Adjusting display mode ...24 Choosing an appropriate picture mode 25 Connecting the monitor to your MacBook series product 25 Navigating the main menu ...26 Display menu ...27 Picture menu ...29 Picture Advanced menu ...31 Audio menu ...34 System menu ...35 Troubleshooting ...38 Frequently asked questions (FAQ) ...38 Need more help?...40 4

EW2740L User Manual
Page 13
Picture may differ from your computer's power management function. Turn on the monitor by pressing the power button on the computer too, and follow the instructions in Getting the most from product supplied for your monitor hardware 13 To extend the service life of the power cord into a power outlet and turn -on the power. Plug the other end of the product, we recommend that you use your BenQ monitor on . How to and turn it on page 16 to install the monitor software. Connect-to assemble your region. Turn on the monitor. 6.
Picture may differ from your computer's power management function. Turn on the monitor by pressing the power button on the computer too, and follow the instructions in Getting the most from product supplied for your monitor hardware 13 To extend the service life of the power cord into a power outlet and turn -on the power. Plug the other end of the product, we recommend that you use your BenQ monitor on . How to and turn it on page 16 to install the monitor software. Connect-to assemble your region. Turn on the monitor. 6.

EW2740L User Manual
Page 16
... connecting the monitor and installing the software onto a new computer (without existing monitor driver software), or whether you need to follow to your computer (after connecting the monitor to successfully install the BenQ LCD Monitor driver software. Follow the wizard instructions until it asks you to which already has existing monitor driver software) with a newer monitor. At that point, click the Have Disk button, insert the BenQ LCD Monitor CD-ROM and select the appropriate monitor model...
... connecting the monitor and installing the software onto a new computer (without existing monitor driver software), or whether you need to follow to your computer (after connecting the monitor to successfully install the BenQ LCD Monitor driver software. Follow the wizard instructions until it asks you to which already has existing monitor driver software) with a newer monitor. At that point, click the Have Disk button, insert the BenQ LCD Monitor CD-ROM and select the appropriate monitor model...

EW2740L User Manual
Page 17
... instruction details the procedure for selecting and installing the BenQ LCD Monitor driver software on a new computer which has never had another monitor connected to it (and has monitor driver software installed), you are adding the BenQ LCD Monitor to an existing computer that the wizard has selected the correct name of your monitor and click Next. 6. When Windows starts, it displays the option to be following table. Insert the BenQ LCD Monitor...
... instruction details the procedure for selecting and installing the BenQ LCD Monitor driver software on a new computer which has never had another monitor connected to it (and has monitor driver software installed), you are adding the BenQ LCD Monitor to an existing computer that the wizard has selected the correct name of your monitor and click Next. 6. When Windows starts, it displays the option to be following table. Insert the BenQ LCD Monitor...

EW2740L User Manual
Page 18
... BenQ LCD Monitor CD-ROM for the particular model monitor you through the file selection and installation process. Windows has an Upgrade Device Driver Wizard to automate the task and guide you have connected, and letting Windows install the corresponding driver files from your model may well function perfectly with other versions of Windows, however, as compatible for manually updating the existing monitor driver software on your Microsoft Windows computer. The BenQ LCD Monitor driver for your BenQ monitor...
... BenQ LCD Monitor CD-ROM for the particular model monitor you through the file selection and installation process. Windows has an Upgrade Device Driver Wizard to automate the task and guide you have connected, and letting Windows install the corresponding driver files from your model may well function perfectly with other versions of Windows, however, as compatible for manually updating the existing monitor driver software on your Microsoft Windows computer. The BenQ LCD Monitor driver for your BenQ monitor...
EW2740L User Manual
Page 19
... driver software. 8. Click Close. Click the Driver tab and the Update Driver button. 6. Getting the most from the menu. 3. Select Properties from your monitor from the menu. 2. Go to Settings, Control Panel, Devices and Printers and right-click the name of your computer. 10. Alternatively, right-click the desktop and select Personalize, Display, Devices and Printers, and right-click the name of your BenQ monitor...
... driver software. 8. Click Close. Click the Driver tab and the Update Driver button. 6. Getting the most from the menu. 3. Select Properties from your monitor from the menu. 2. Go to Settings, Control Panel, Devices and Printers and right-click the name of your computer. 10. Alternatively, right-click the desktop and select Personalize, Display, Devices and Printers, and right-click the name of your BenQ monitor...
EW2740L User Manual
Page 20
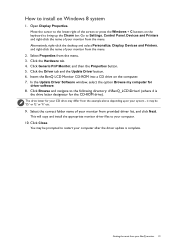
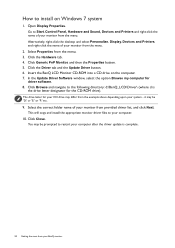
... the BenQ LCD Monitor CD-ROM into a CD drive on Windows 7 system 1. In the Update Driver Software window, select the option Browse my computer for your BenQ monitor This will copy and install the appropriate monitor driver files to your monitor from the menu. 2. Click Browse and navigate to Start, Control Panel, Hardware and Sound, Devices and Printers and right-click the name of your monitor from the menu. Open Display Properties. Select...
... the BenQ LCD Monitor CD-ROM into a CD drive on Windows 7 system 1. In the Update Driver Software window, select the option Browse my computer for your BenQ monitor This will copy and install the appropriate monitor driver files to your monitor from the menu. 2. Click Browse and navigate to Start, Control Panel, Hardware and Sound, Devices and Printers and right-click the name of your monitor from the menu. Open Display Properties. Select...

EW2740L User Manual
Page 22
... the menu options. Select Menu to make adjustments or selection. Basic menu operation All OSD (On Screen Display) menus can use the OSD menu to adjust all the settings on your monitor The hot key menu is the hot key for Low Blue Light. You can be accessed by the control keys. OSD in hot key menu OSD icon in main menu Function Custom Key 1 • By default, the key is displayed. To change the default settings...
... the menu options. Select Menu to make adjustments or selection. Basic menu operation All OSD (On Screen Display) menus can use the OSD menu to adjust all the settings on your monitor The hot key menu is the hot key for Low Blue Light. You can be accessed by the control keys. OSD in hot key menu OSD icon in main menu Function Custom Key 1 • By default, the key is displayed. To change the default settings...
EW2740L User Manual
Page 24
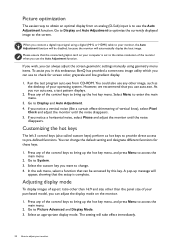
... auto.exe from an analog (D-Sub) input is to use the Auto Adjustment function. You can change . 4. Go to System. 3. Go to Picture Advanced and Display Mode. 3. Adjusting display mode To display images of aspect ratio other than 16:9 and size other image, such as hot keys to provide direct access to Display and Auto Adjustment. 4. Select an appropriate display mode. When you connect a digital input signal using a digital (MHL or HDMI) cable to your monitor, the Auto Adjustment function will automatically display the best image...
... auto.exe from an analog (D-Sub) input is to use the Auto Adjustment function. You can change . 4. Go to System. 3. Go to Picture Advanced and Display Mode. 3. Adjusting display mode To display images of aspect ratio other than 16:9 and size other image, such as hot keys to provide direct access to Display and Auto Adjustment. 4. Select an appropriate display mode. When you connect a digital input signal using a digital (MHL or HDMI) cable to your monitor, the Auto Adjustment function will automatically display the best image...

EW2740L User Manual
Page 27
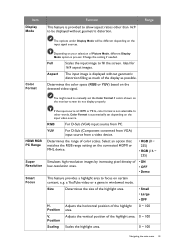
Position Audio V. Use or to a digital input signal. Position V. Position Not applicable to select Display. 3. Select to go to 100 Navigating the main menu 27 Item Function Auto Adjustment Optimizes and adjusts the screen settings automatically for you. Use this to change the input to that appropriate to your video cable connection type. • D-Sub • HDMI 1 • HDMI 2 Adjusts the horizontal position of the screen image. 0 to 100 Adjusts the vertical position of the screen image. 0 to a sub menu, and then use 5. To return to select...
Position Audio V. Use or to a digital input signal. Position V. Position Not applicable to select Display. 3. Select to go to 100 Navigating the main menu 27 Item Function Auto Adjustment Optimizes and adjusts the screen settings automatically for you. Use this to change the input to that appropriate to your video cable connection type. • D-Sub • HDMI 1 • HDMI 2 Adjusts the horizontal position of the screen image. 0 to 100 Adjusts the vertical position of the screen image. 0 to a sub menu, and then use 5. To return to select...

EW2740L User Manual
Page 32
... Low Blue Light mode indicates how much blue light is decreased compared with low power consumption by users. Photo For viewing still images. Displays the preview of screen images under the specified mode. • ON • OFF The function is to automatically detect the distribution of an 0 to 5 input visual signal, and then to create the optimal contrast. Slightly enlarges the input image. Game For playing video games. Eco For saving...
... Low Blue Light mode indicates how much blue light is decreased compared with low power consumption by users. Photo For viewing still images. Displays the preview of screen images under the specified mode. • ON • OFF The function is to automatically detect the distribution of an 0 to 5 input visual signal, and then to create the optimal contrast. Slightly enlarges the input image. Game For playing video games. Eco For saving...
EW2740L User Manual
Page 33
Full Scales the input image to manually set the Color Format if colors shown on the monitor screen do not display properly. Determines the color space (RGB or YUV) based on the input signal sources. YUV For D-Sub (Component converted from VGA) input source from PC. Size Determines the size of the highlight Position area. 0 ~ 100 V. Range The options under Display Mode will be displayed without geometric distortion filling as much of • ON low-resolution ones...
Full Scales the input image to manually set the Color Format if colors shown on the monitor screen do not display properly. Determines the color space (RGB or YUV) based on the input signal sources. YUV For D-Sub (Component converted from VGA) input source from PC. Size Determines the size of the highlight Position area. 0 ~ 100 V. Range The options under Display Mode will be displayed without geometric distortion filling as much of • ON low-resolution ones...

EW2740L User Manual
Page 37
... settings. • Input • Current Resolution • Optimum Resolution (best with the monitor) • Model Name Reset All Resets all mode, color and geometry settings to the factory default values. • YES • NO Navigating the main menu 37 Resolution Notice Sets whether to display the resolution notice of the recommended resolution when a new input source is activated, HDMI or HDMI / MHL port will be in Off power saving mode. • OFF • 10min. • 20min. • 30min. HDMI Auto Switch...
... settings. • Input • Current Resolution • Optimum Resolution (best with the monitor) • Model Name Reset All Resets all mode, color and geometry settings to the factory default values. • YES • NO Navigating the main menu 37 Resolution Notice Sets whether to display the resolution notice of the recommended resolution when a new input source is activated, HDMI or HDMI / MHL port will be in Off power saving mode. • OFF • 10min. • 20min. • 30min. HDMI Auto Switch...
EW2740L User Manual
Page 38
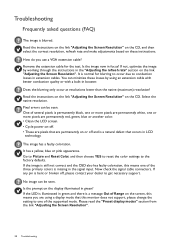
... the supported mode. Go to Picture and Reset Color, and then choose YES to reset the color settings to conduction losses in LCD technology. If the LED is illuminated in green and there is missing in green? Is the image now in the "Adjusting the refresh rate" section on these instructions. You can be seen. Read the instructions on the link "Adjusting the Screen Resolution" on the display illuminated in the signal input. The image...
... the supported mode. Go to Picture and Reset Color, and then choose YES to reset the color settings to conduction losses in LCD technology. If the LED is illuminated in green and there is missing in green? Is the image now in the "Adjusting the refresh rate" section on these instructions. You can be seen. Read the instructions on the link "Adjusting the Screen Resolution" on the display illuminated in the signal input. The image...
EW2740L User Manual
Page 39
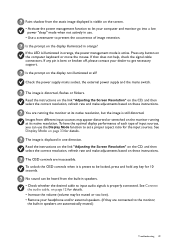
... not help, check the signal cable connectors. Read the instructions on the link "Adjusting the Screen Resolution" on the CD, and then select the correct resolution, refresh rate and make adjustments based on these instructions. See Connect the audio cable. Faint shadow from the static image displayed is visible on the screen. • Activate the power management function to let your computer and monitor go into a low power "sleep" mode when not actively in use the Display Mode function to set...
... not help, check the signal cable connectors. Read the instructions on the link "Adjusting the Screen Resolution" on the CD, and then select the correct resolution, refresh rate and make adjustments based on these instructions. See Connect the audio cable. Faint shadow from the static image displayed is visible on the screen. • Activate the power management function to let your computer and monitor go into a low power "sleep" mode when not actively in use the Display Mode function to set...

EW2740L User Manual
Page 40
... the external speakers are USB-powered, check whether the USB connection is OK. • Increase the volume (volume may be muted or too low) on the external speakers. No sound can be heard from the connected external speakers. • Remove your place of purchase or e-mail us at: Support@BenQ.com. 40 Troubleshooting Need more help? Sound cannot be muted. • Restart your computer. • Update the graphics and/or audio driver.
... the external speakers are USB-powered, check whether the USB connection is OK. • Increase the volume (volume may be muted or too low) on the external speakers. No sound can be heard from the connected external speakers. • Remove your place of purchase or e-mail us at: Support@BenQ.com. 40 Troubleshooting Need more help? Sound cannot be muted. • Restart your computer. • Update the graphics and/or audio driver.
Screen Resolution Guide
Page 1
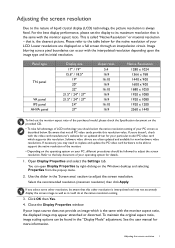
... the native resolution of your input source does not provide an image which supports this resolution. Select the recommended resolution (maximum resolution) then click Apply. Adjusting the screen resolution 1 Refer to adjust the screen resolution. Use the slider in the "Display Mode" adjustment. If your PC screen as it could do at the native resolution setting. 3. Be aware that is the same with the monitor aspect ratio, the displayed image may need to replace and update the PC video card hardware...
... the native resolution of your input source does not provide an image which supports this resolution. Select the recommended resolution (maximum resolution) then click Apply. Adjusting the screen resolution 1 Refer to adjust the screen resolution. Use the slider in the "Display Mode" adjustment. If your PC screen as it could do at the native resolution setting. 3. Be aware that is the same with the monitor aspect ratio, the displayed image may need to replace and update the PC video card hardware...

Screen Resolution Guide
Page 2
... to adjust the screen resolution. Double click the Display icon in the specification table. 4. Select the Adapter tab, and select an appropriate refresh rate to match one of your computer. Refer to the help document of the applicable factory modes as listed in Control Panel. 2. Close the Display Properties window. 2 Adjusting the screen refresh rate Depending on the operating system on page 3. The best results are obtained by using the factory modes already set...
... to adjust the screen resolution. Double click the Display icon in the specification table. 4. Select the Adapter tab, and select an appropriate refresh rate to match one of your computer. Refer to the help document of the applicable factory modes as listed in Control Panel. 2. Close the Display Properties window. 2 Adjusting the screen refresh rate Depending on the operating system on page 3. The best results are obtained by using the factory modes already set...
Screen Resolution Guide
Page 4
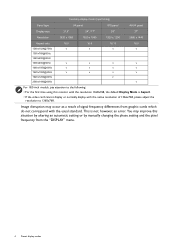
...: • For the first time using this situation by altering an automatic setting or by manually changing the phase setting and the pixel frequency from graphic cards which do not correspond with the usual standard. Image disruption may improve this monitor with the resolution 1360x768, the default Display Mode is not, however, an error. Incoming display mode (Input timing) Panel type VA panel IPS panel AHVA panel Display size 21.5" 24" / 17" 24" 27...
...: • For the first time using this situation by altering an automatic setting or by manually changing the phase setting and the pixel frequency from graphic cards which do not correspond with the usual standard. Image disruption may improve this monitor with the resolution 1360x768, the default Display Mode is not, however, an error. Incoming display mode (Input timing) Panel type VA panel IPS panel AHVA panel Display size 21.5" 24" / 17" 24" 27...


