
User Manual
Page 5
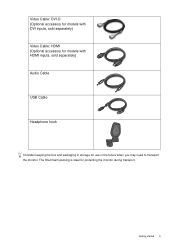
The fitted foam packing is ideal for use in the future when you may need to transport the monitor. Video Cable: DVI-D (Optional accessory for models with DVI inputs, sold separately) Video Cable: HDMI (Optional accessory for models with HDMI inputs, sold separately) Audio Cable USB Cable Headphone hook Consider keeping the box and packaging in storage for protecting the monitor during transport. Getting started 5
The fitted foam packing is ideal for use in the future when you may need to transport the monitor. Video Cable: DVI-D (Optional accessory for models with DVI inputs, sold separately) Video Cable: HDMI (Optional accessory for models with HDMI inputs, sold separately) Audio Cable USB Cable Headphone hook Consider keeping the box and packaging in storage for protecting the monitor during transport. Getting started 5

User Manual
Page 6
DVI-D socket 7. HDMI socket x 2 6. Line In and Line Out 4. D-Sub socket 8. Headphone jack 12.USB port x 2 (downstream; AC Power Input jack 3. USB port x 1 (upstream; Speakers 2. connecting to the ...
DVI-D socket 7. HDMI socket x 2 6. Line In and Line Out 4. D-Sub socket 8. Headphone jack 12.USB port x 2 (downstream; AC Power Input jack 3. USB port x 1 (upstream; Speakers 2. connecting to the ...

User Manual
Page 8
... cable (at the end with the ferrite filter) to the monitor video socket. Connect the other end of the cable to the HDMI port of the two HDMI ports on the LCD model. 8 How to prevent the plugs from accidently falling out during use . Tighten all finger screws to assemble... your monitor hardware To Connect the HDMI Cable Connect the plug of the HDMI cable to prevent the plugs from accidently falling out during use . The video cable included in your package and the socket...
... cable (at the end with the ferrite filter) to the monitor video socket. Connect the other end of the cable to the HDMI port of the two HDMI ports on the LCD model. 8 How to prevent the plugs from accidently falling out during use . Tighten all finger screws to assemble... your monitor hardware To Connect the HDMI Cable Connect the plug of the HDMI cable to prevent the plugs from accidently falling out during use . The video cable included in your package and the socket...
User Manual
Page 19
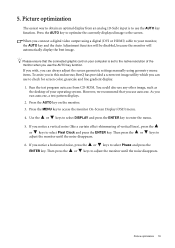
...the monitor when you use the AUTO key function. If you can always adjust the screen geometric settings manually using a digital (DVI or HDMI) cable to select Phase and press the ENTER key. Picture optimization 19 Picture optimization The easiest way to adjust the monitor until the noise... to use the AUTO key function. Please ensure that you connect a digital video output using geometry menu items. To assist you in this endeavour, BenQ has provided a screen test image utility which you notice a vertical noise (like a curtain effect-shimmering of your monitor, the AUTO key and the...
...the monitor when you use the AUTO key function. If you can always adjust the screen geometric settings manually using a digital (DVI or HDMI) cable to select Phase and press the ENTER key. Picture optimization 19 Picture optimization The easiest way to adjust the monitor until the noise... to use the AUTO key function. Please ensure that you connect a digital video output using geometry menu items. To assist you in this endeavour, BenQ has provided a screen test image utility which you notice a vertical noise (like a curtain effect-shimmering of your monitor, the AUTO key and the...
User Manual
Page 23
... and the Auto Adjustment function will be disabled. Position V. The AUTO key is a 'hot key' for you connect a digital video output using a digital (DVI or HDMI) cable to make adjustment. How to select this function. Item Auto Adjustment Function Optimizes and adjusts the screen settings automatically for this option and make...
... and the Auto Adjustment function will be disabled. Position V. The AUTO key is a 'hot key' for you connect a digital video output using a digital (DVI or HDMI) cable to make adjustment. How to select this function. Item Auto Adjustment Function Optimizes and adjusts the screen settings automatically for this option and make...

User Manual
Page 27
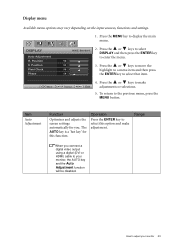
...; Eco - Picture Advanced menu Available menu options may vary depending on the screen. • Standard - Picture Mode Senseye Demo Dynamic Contrast Display Mode Color Format HDMI RGB PC Range Standard OFF 0 RGB RGB(16~235) Move ENTER Select MENU Exit 2. Press the MENU key to make adjustments or selections. 5. for all...
...; Eco - Picture Advanced menu Available menu options may vary depending on the screen. • Standard - Picture Mode Senseye Demo Dynamic Contrast Display Mode Color Format HDMI RGB PC Range Standard OFF 0 RGB RGB(16~235) Move ENTER Select MENU Exit 2. Press the MENU key to make adjustments or selections. 5. for all...

User Manual
Page 28
... preview of screen images under the specified mode. Press the ENTER key to select this feature to change the settings. The input image is from a HDMI or D-Sub (VGA converted from a DVI or D-sub source, and the input image is of non-wide aspect ratio: • Full • Aspect Or When...
... preview of screen images under the specified mode. Press the ENTER key to select this feature to change the settings. The input image is from a HDMI or D-Sub (VGA converted from a DVI or D-sub source, and the input image is of non-wide aspect ratio: • Full • Aspect Or When...

User Manual
Page 29
... set the Color Format if colors shown on the monitor screen do not display properly. • DVI: Color Format is automatically set to RGB. • HDMI: Color Format is automatically set depending on the input video source. Determines the range of color scales. Press the or keys to change the settings...: • D-Sub (VGA) from PC: The default Color Format is RGB. • D-Sub (Component) from a video device: The default Color Format is YUV. Color Format HDMI RGB PC Range Determines the color space (RGB or YUV) based on the connected...
... set the Color Format if colors shown on the monitor screen do not display properly. • DVI: Color Format is automatically set to RGB. • HDMI: Color Format is automatically set depending on the input video source. Determines the range of color scales. Press the or keys to change the settings...: • D-Sub (VGA) from PC: The default Color Format is RGB. • D-Sub (Component) from a video device: The default Color Format is YUV. Color Format HDMI RGB PC Range Determines the color space (RGB or YUV) based on the connected...
User Manual
Page 30
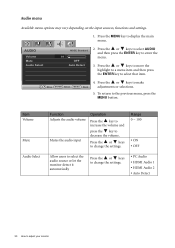
... AUDIO and then press the ENTER key to display the main menu. Press the or keys to change the settings. • PC Audio • HDMI Audio 1 • HDMI Audio 2 • Auto Detect 30 How to change the settings. OFF Auto Detect 3. Press the MENU key to enter the 10 menu. Press the...
... AUDIO and then press the ENTER key to display the main menu. Press the or keys to change the settings. • PC Audio • HDMI Audio 1 • HDMI Audio 2 • Auto Detect 30 How to change the settings. OFF Auto Detect 3. Press the MENU key to enter the 10 menu. Press the...

User Manual
Page 31
... Available menu options may vary depending on the input sources, functions and settings. 1. SYSTEM Input OSD Settings DDC/CI Auto Poowe Off Information HDMI Auto Switch Reset All Move MODE: Standard D-sub 2. Press the or keys to move the highlight to a menu item and then press... to make adjustments or selections. 5. Item Input Function Use this to your monitor 31 Range • DVI • D-sub (VGA) • HDMI 1 • HDMI 2 How to that item. MENU Exit 4. Operation Press the or keys to change the input to adjust your video cable connection type. Press the ...
... Available menu options may vary depending on the input sources, functions and settings. 1. SYSTEM Input OSD Settings DDC/CI Auto Poowe Off Information HDMI Auto Switch Reset All Move MODE: Standard D-sub 2. Press the or keys to move the highlight to a menu item and then press... to make adjustments or selections. 5. Item Input Function Use this to your monitor 31 Range • DVI • D-sub (VGA) • HDMI 1 • HDMI 2 How to that item. MENU Exit 4. Operation Press the or keys to change the input to adjust your video cable connection type. Press the ...

User Manual
Page 33
...the OSD Settings menu. Alternatively, you may use the or keys to enter the "OSD Lock" option and make changes. select this function is activated, HDMI port will be in the "OSD Lock" submenu from the "OSD Settings" menu, and all the monitor settings from being accidentally changed. Press the ... • Optimum Resolution (best with the monitor) • Model Name • ON • OFF • YES • NO *DDC/CI, short for remote diagnostics. HDMI Auto Switch Reset All When this option. Auto Power Sets the time to power off Press the ENTER key to adjust your monitor 33 Press...
...the OSD Settings menu. Alternatively, you may use the or keys to enter the "OSD Lock" option and make changes. select this function is activated, HDMI port will be in the "OSD Lock" submenu from the "OSD Settings" menu, and all the monitor settings from being accidentally changed. Press the ... • Optimum Resolution (best with the monitor) • Model Name • ON • OFF • YES • NO *DDC/CI, short for remote diagnostics. HDMI Auto Switch Reset All When this option. Auto Power Sets the time to power off Press the ENTER key to adjust your monitor 33 Press...