User Manual
Page 1
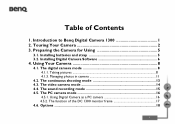
BENQ Digital Camera 1300 Electronic User's Manual Introduction to Benq Digital Camera 1300 1 Touring Your Camera 2 Preparing the Camera for Using 5 Installing batteries and strap 5 Installing Digital Camera Software 6 Using Your Camera 8 The digital camera mode 8 Taking pictures 8 Managing photos in camera 11 The continuous shooting mode 13 The video camera mode 14 The sound recording mode 15 The PC camera mode 16 Options 18 Troubleshooting Tips 25 Service Information 26
BENQ Digital Camera 1300 Electronic User's Manual Introduction to Benq Digital Camera 1300 1 Touring Your Camera 2 Preparing the Camera for Using 5 Installing batteries and strap 5 Installing Digital Camera Software 6 Using Your Camera 8 The digital camera mode 8 Taking pictures 8 Managing photos in camera 11 The continuous shooting mode 13 The video camera mode 14 The sound recording mode 15 The PC camera mode 16 Options 18 Troubleshooting Tips 25 Service Information 26
User Manual
Page 2
... any error that is raining or snowing. • Do not use or store your camera by yourself. • Water may cause severe camera damage. • Do not use the lens brush or soft cloth to the maintenance center. Copyright Copyright (c) 2002 by any means, electronic, mechanical, magnetic, optical, chemical, manual or otherwise, without prior written permission from Benq...
... any error that is raining or snowing. • Do not use or store your camera by yourself. • Water may cause severe camera damage. • Do not use the lens brush or soft cloth to the maintenance center. Copyright Copyright (c) 2002 by any means, electronic, mechanical, magnetic, optical, chemical, manual or otherwise, without prior written permission from Benq...
User Manual
Page 3
Installing batteries and strap 5 3.2. The digital camera mode 8 4.1.1. Managing photos in camera 11 4.2. Introduction to Benq Digital Camera 1300 1 2. Installing Digital Camera Software 6 4. Using Your Camera 8 4.1. The function of Contents 1. Options ...18 i Taking pictures ...8 4.1.3. The video camera mode 14 4.4. Touring Your Camera 2 3. The continuous shooting mode 13 4.3. The PC camera mode 16 4.5.1. Using Digital Camera as a PC camera 16 4.5.2. The sound recording mode 15 4.5. Preparing the Camera for Using 5 3.1. Table of the DC 1300 monitor frame ...
Installing batteries and strap 5 3.2. The digital camera mode 8 4.1.1. Managing photos in camera 11 4.2. Introduction to Benq Digital Camera 1300 1 2. Installing Digital Camera Software 6 4. Using Your Camera 8 4.1. The function of Contents 1. Options ...18 i Taking pictures ...8 4.1.3. The video camera mode 14 4.4. Touring Your Camera 2 3. The continuous shooting mode 13 4.3. The PC camera mode 16 4.5.1. Using Digital Camera as a PC camera 16 4.5.2. The sound recording mode 15 4.5. Preparing the Camera for Using 5 3.1. Table of the DC 1300 monitor frame ...
User Manual
Page 5
... flash light • Built-in self-timer • Fixed focus : 40 cm for macro mode, and 1.5 m to infinity from camera for normal mode • Electronic shutter • Easy recognizable LCD screen for camera and image handling • USB interface for easy and quick connection to Benq Digital Camera 1300 1. Introduction to PC • Automatic power-off system • 5 operation modes: Digital camera mode for taking photos PC camera mode for using the camera as an image capturing device for PC Video camera mode for capturing motion clips with a PC Continuous shooting mode...
... flash light • Built-in self-timer • Fixed focus : 40 cm for macro mode, and 1.5 m to infinity from camera for normal mode • Electronic shutter • Easy recognizable LCD screen for camera and image handling • USB interface for easy and quick connection to Benq Digital Camera 1300 1. Introduction to PC • Automatic power-off system • 5 operation modes: Digital camera mode for taking photos PC camera mode for using the camera as an image capturing device for PC Video camera mode for capturing motion clips with a PC Continuous shooting mode...

User Manual
Page 6
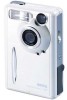
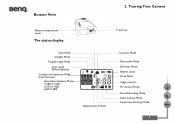
2. Touring Your Camera Front View Shutter Flash light Lens Rear View Viewfinder Busy indicator Status display Flash/ Enter button 2. Touring Your Camera Viewfinder Macro switch Self-timer activation indicator USB connection port Strap Eyelet Power/ Mode button White Balance Mode/ + button Pixel Selection/ _ button 2
2. Touring Your Camera Front View Shutter Flash light Lens Rear View Viewfinder Busy indicator Status display Flash/ Enter button 2. Touring Your Camera Viewfinder Macro switch Self-timer activation indicator USB connection port Strap Eyelet Power/ Mode button White Balance Mode/ + button Pixel Selection/ _ button 2
User Manual
Page 7
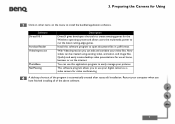
Bottom View 2. Touring Your Camera Battery compartment cover The status display Tripod set Flash Mode Daylight Mode Tungsten Light Mode Auto mode (White Balance) Compression Selection Mode (Fine/ Normal) Resolution Selection Mode (1280 X 1024) (1024 X 768) (640 X 480) Digital Camera Mode Overcast Mode Fluorescent Mode Self-timer Mode Battery status Erase Mode Image counter PC Camera Mode Sound Recording Mode Video Camera Mode Continuous Shooting Mode 3
Bottom View 2. Touring Your Camera Battery compartment cover The status display Tripod set Flash Mode Daylight Mode Tungsten Light Mode Auto mode (White Balance) Compression Selection Mode (Fine/ Normal) Resolution Selection Mode (1280 X 1024) (1024 X 768) (640 X 480) Digital Camera Mode Overcast Mode Fluorescent Mode Self-timer Mode Battery status Erase Mode Image counter PC Camera Mode Sound Recording Mode Video Camera Mode Continuous Shooting Mode 3

User Manual
Page 10
Click to install digital camera driver Click to install Video Impression Click to browse User's Manual Click to install DirectX 8.1 Click to install NetMeeting Click to install Photo Base Click to install Acrobat Reader Click to close the menu and exit You may be prompted to complete the driver intallation. 3. Do not restart your computer until all the software has been installed. 6 Preparing the Camera for Using Click "Camera Driver" on -line instructions to restart the computer at this point. Follow the on the menu.
Click to install digital camera driver Click to install Video Impression Click to browse User's Manual Click to install DirectX 8.1 Click to install NetMeeting Click to install Photo Base Click to install Acrobat Reader Click to close the menu and exit You may be prompted to complete the driver intallation. 3. Do not restart your computer until all the software has been installed. 6 Preparing the Camera for Using Click "Camera Driver" on -line instructions to restart the computer at this point. Follow the on the menu.
User Manual
Page 11
... software program allows you have finished installing all of the program is automatically created after successful installation. New videos can use this software program to run the latest cutting-edge games. Install this application program to easily manage your digital camera as a video camera for the Windows operating system and allows users the multimedia power to open document files in .pdf format. You can be created using existing video, animation, and image files...
... software program allows you have finished installing all of the program is automatically created after successful installation. New videos can use this software program to run the latest cutting-edge games. Install this application program to easily manage your digital camera as a video camera for the Windows operating system and allows users the multimedia power to open document files in .pdf format. You can be created using existing video, animation, and image files...
User Manual
Page 12
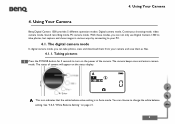
... display. : This icon indicates that the white balance value setting is in various ways by connecting to take photos, view and download them as files. 4.1.1. Taking pictures Press the POWER button for 3 seconds to change the white balance setting. See "4.6.3. With these modes, you can not only use Digital Camera 1300 to your camera and save them from your PC. 4.1. The status of the camera. Using Your Camera Benq Digital Camera 1300 provides 5 different operation modes: Digital camera mode, Continuous shooting mode, video camera mode, Sound recording mode, PC camera mode...
... display. : This icon indicates that the white balance value setting is in various ways by connecting to take photos, view and download them as files. 4.1.1. Taking pictures Press the POWER button for 3 seconds to change the white balance setting. See "4.6.3. With these modes, you can not only use Digital Camera 1300 to your camera and save them from your PC. 4.1. The status of the camera. Using Your Camera Benq Digital Camera 1300 provides 5 different operation modes: Digital camera mode, Continuous shooting mode, video camera mode, Sound recording mode, PC camera mode...
User Manual
Page 13
... another way. : Indicates the battery status. If the battery power becomes low, the battery icon will become empty. : This icon indicates the DC 1300 is set to let the counter display in the center of the viewfinder. 9 Make the object appear in digital camera mode. You can change the flash mode setting by pressing the Pix/ _ button. : This icon indicates the resolution setting is set to flash off mode. You can also change the mode setting by pressing...
... another way. : Indicates the battery status. If the battery power becomes low, the battery icon will become empty. : This icon indicates the DC 1300 is set to let the counter display in the center of the viewfinder. 9 Make the object appear in digital camera mode. You can change the flash mode setting by pressing the Pix/ _ button. : This icon indicates the resolution setting is set to flash off mode. You can also change the mode setting by pressing...
User Manual
Page 14
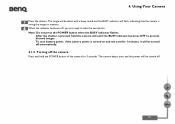
... to take the next photo. After the shutter is turned on and not used for 3 seconds. To save battery power, if the camera power is pressed, hold the POWER button of the camera for 1 minutes, it will flash, indicating that the camera is saving the image to memory. Turning off , you are ready to prevent blurred images. The image will be taken with a beep sound and the BUSY indicator will be turned off automatically. 4.1.2. Using Your Camera...
... to take the next photo. After the shutter is turned on and not used for 3 seconds. To save battery power, if the camera power is pressed, hold the POWER button of the camera for 1 minutes, it will flash, indicating that the camera is saving the image to memory. Turning off , you are ready to prevent blurred images. The image will be taken with a beep sound and the BUSY indicator will be turned off automatically. 4.1.2. Using Your Camera...
User Manual
Page 15
Deleting the last photo taken Press the "Power/ Mode" button 4 times. Deleting all photos When in Erase mode, you can choose to delete the last photo or all the photos saved in Erase Press the "Flash/ Enter" button, the camera will beep once and the BUSY indicator will flash, then the last photo taken will appear on the status display. will be deleted. 4.1.3.2. It indicates the camera is in the memory of camera by pressing the " WB/ +" button or "Pix/ _ " button. 11 Using Your Camera 4.1.3. The icon mode. Managing photos in camera 4.1.3.1. 4.
Deleting the last photo taken Press the "Power/ Mode" button 4 times. Deleting all photos When in Erase mode, you can choose to delete the last photo or all the photos saved in Erase Press the "Flash/ Enter" button, the camera will beep once and the BUSY indicator will flash, then the last photo taken will appear on the status display. will be deleted. 4.1.3.2. It indicates the camera is in the memory of camera by pressing the " WB/ +" button or "Pix/ _ " button. 11 Using Your Camera 4.1.3. The icon mode. Managing photos in camera 4.1.3.1. 4.

User Manual
Page 16
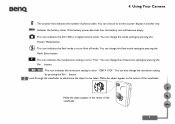
... camera memory will be downloaded to PC using the USB cable. The camera will beep once and the Busy indicator will flash, then all the photos saved in camera memory will appear on Windows Taskbar and select "Setting" in "My Medias" for downloading and saving these images. Downloading photos from camera to delete all photos saved in camera memory, press the "Flash/ Enter" button. When connected, the PC mode icon and the number of the camera by pressing the "Power/Mode" button. on the status display. 4. Using Your Camera...
... camera memory will be downloaded to PC using the USB cable. The camera will beep once and the Busy indicator will flash, then all the photos saved in camera memory will appear on Windows Taskbar and select "Setting" in "My Medias" for downloading and saving these images. Downloading photos from camera to delete all photos saved in camera memory, press the "Flash/ Enter" button. When connected, the PC mode icon and the number of the camera by pressing the "Power/Mode" button. on the status display. 4. Using Your Camera...
User Manual
Page 17
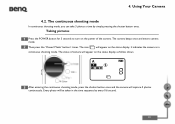
... continuous shooting mode In continuous shooting mode, you can take 3 photos a time by every 0.6 second. 13 It indicates the camera is in the time sequence by simply pressing the shutter button once. After entering the continuous shooting mode, press the shutter button once and the camera will be taken in continuous shooting mode. Using Your Camera 4.2. The icon will appear on the power of camera will appear on the status display as follow shows. Taking pictures Press the POWER button for 3 seconds to turn...
... continuous shooting mode In continuous shooting mode, you can take 3 photos a time by every 0.6 second. 13 It indicates the camera is in the time sequence by simply pressing the shutter button once. After entering the continuous shooting mode, press the shutter button once and the camera will be taken in continuous shooting mode. Using Your Camera 4.2. The icon will appear on the power of camera will appear on the status display as follow shows. Taking pictures Press the POWER button for 3 seconds to turn...

User Manual
Page 18
... indicator will keep on the status display as "AVI" file format. 14 The camera beeps once and enters camera mode. These activation will also keep on the power of camera will appear on flashing. In this mode, you can shoot video up to stop shooting. It indicates the camera is in camera memory as follow shows. Then press the "Power/ Mode" button 2 times. Shoot videos Press the POWER button for 3 seconds to shoot video. The icon will be saved in video camera mode...
... indicator will keep on the status display as "AVI" file format. 14 The camera beeps once and enters camera mode. These activation will also keep on the power of camera will appear on flashing. In this mode, you can shoot video up to stop shooting. It indicates the camera is in camera memory as follow shows. Then press the "Power/ Mode" button 2 times. Shoot videos Press the POWER button for 3 seconds to shoot video. The icon will be saved in video camera mode...

User Manual
Page 19
..." file format. 15 It indicates the camera is in camera memory as follow shows. It will show "REC" on the status display at the same time and the Busy indicator will appear on the power of camera will be saved in sound recording mode. The camera beeps once and enters camera mode. The icon will also keep on flashing. Press the shutter button again to 9 minutes. Using Your Camera 4.4. After entering the sound recording mode, press the shutter button...
..." file format. 15 It indicates the camera is in camera memory as follow shows. It will show "REC" on the status display at the same time and the Busy indicator will appear on the power of camera will be saved in sound recording mode. The camera beeps once and enters camera mode. The icon will also keep on flashing. Press the shutter button again to 9 minutes. Using Your Camera 4.4. After entering the sound recording mode, press the shutter button...
User Manual
Page 20
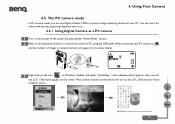
... "Power/Mode" button. Using Your Camera 4.5. You can use it for your PC. Using Digital Camera as a PC camera Turn on the screen. Refer to the illustration below to connect the camera to be a DC 1300 monitor frame as a motion image capturing device for video conferencing, capturing snapshots and so on the status display. 4. Right-click on the icon on Windows Taskbar and select "QuickSnap" in camera memory will turn to PC using...
... "Power/Mode" button. Using Your Camera 4.5. You can use it for your PC. Using Digital Camera as a PC camera Turn on the screen. Refer to the illustration below to connect the camera to be a DC 1300 monitor frame as a motion image capturing device for video conferencing, capturing snapshots and so on the status display. 4. Right-click on the icon on Windows Taskbar and select "QuickSnap" in camera memory will turn to PC using...
User Manual
Page 25
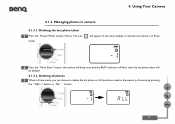
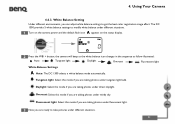
.... Turn on the camera power and the default flash icon appears on the status display. Tungsten light: Select this mode if you can adjust white balance settings to modify white balance under tungsten light bulb. White Balance Setting Under different environments, you are taking photos under different situations. 21 Press the WB/ + button, the camera will beep as the white balance icon changes in the sequence as follow illustrated: Auto Tungsten light Daylight Overcast Fluorescent light White Balance Settings: Auto: The DC 1300 selects a white balance mode...
.... Turn on the camera power and the default flash icon appears on the status display. Tungsten light: Select this mode if you can adjust white balance settings to modify white balance under tungsten light bulb. White Balance Setting Under different environments, you are taking photos under different situations. 21 Press the WB/ + button, the camera will beep as the white balance icon changes in the sequence as follow illustrated: Auto Tungsten light Daylight Overcast Fluorescent light White Balance Settings: Auto: The DC 1300 selects a white balance mode...
User Manual
Page 27
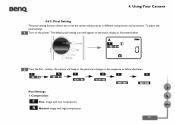
4. Using Your Camera 4.6.5. Normal: Image with low compression. The default pixel setting icon will beep as illustrated below. Pixel Setting The pixel setting function allows you to let the camera take pictures in the sequence as follow illustrates: Pixel Settings: 1. Press the Pix/ _ button, the camera will appear on the power. Compression: Fine: Image with high compression. 23 To adjust the pixel settings: Turn on the status display as the pixel icon changes in different compression and resolution.
4. Using Your Camera 4.6.5. Normal: Image with low compression. The default pixel setting icon will beep as illustrated below. Pixel Setting The pixel setting function allows you to let the camera take pictures in the sequence as follow illustrates: Pixel Settings: 1. Press the Pix/ _ button, the camera will appear on the power. Compression: Fine: Image with high compression. 23 To adjust the pixel settings: Turn on the status display as the pixel icon changes in different compression and resolution.
User Manual
Page 29
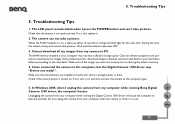
The camera can 't take pictures. During this time the camera is busy and cannot take a picture. Check if the camera power is on, it takes up about 15 seconds to the computer, but the Digital Camera 1300 driver says "Device not ready!". Do not unplug the camera from my camera to download your computer may not have connected the camera to charge the flash light for the next shot. When the FLASH indicator is turned on...
The camera can 't take pictures. During this time the camera is busy and cannot take a picture. Check if the camera power is on, it takes up about 15 seconds to the computer, but the Digital Camera 1300 driver says "Device not ready!". Do not unplug the camera from my camera to download your computer may not have connected the camera to charge the flash light for the next shot. When the FLASH indicator is turned on...


