

User Manual
Page 3
... Instructions 1. projector lamp is a normal phenomenon and not a product defect. In some heated air and odor from its ventilation grill. Important safety instructions Your projector is designed and tested to meet the latest standards for remove the lens cap when the future reference. Refer servicing to ensure safe use of this manual and marked on . 5. Save it is under operation, you connect your projector...
... Instructions 1. projector lamp is a normal phenomenon and not a product defect. In some heated air and odor from its ventilation grill. Important safety instructions Your projector is designed and tested to meet the latest standards for remove the lens cap when the future reference. Refer servicing to ensure safe use of this manual and marked on . 5. Save it is under operation, you connect your projector...

User Manual
Page 7
... the power consumption • Less than 1 W power consumption in standby mode • Built-in a shorter time • FAQ to troubleshoot operational problems with one quick key press • Presentation timer for better control of time during presentations • High quality manual zoom lens • One-key auto-adjustment to display the best picture quality • Digital keystone correction to correct distorted images • Adjustable color balance control for data/video display • High brightness projection lamp • Multi-language On-Screen Display (OSD...
... the power consumption • Less than 1 W power consumption in standby mode • Built-in a shorter time • FAQ to troubleshoot operational problems with one quick key press • Presentation timer for better control of time during presentations • High quality manual zoom lens • One-key auto-adjustment to display the best picture quality • Digital keystone correction to correct distorted images • Adjustable color balance control for data/video display • High brightness projection lamp • Multi-language On-Screen Display (OSD...
User Manual
Page 10
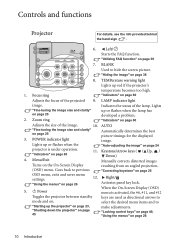
... 8. TEMPerature warning light 14 7 Lights up or flashes when the lamp has developed a problem. Lights "Fine-tuning the image size and clarity" on page 26 10 Introduction Zoom ring up red if the projector's 11 temperature becomes too high. 1. POWER indicator light Automatically determines the best picture timings for the displayed image. "Locking control keys" on page 40, "Using the menus" on page 25 2. Focus ring "Indicators" on page 25 3. Keystone/Arrow keys ( / Up, / Down) 4. AUTO "Fine-tuning the image size...
... 8. TEMPerature warning light 14 7 Lights up or flashes when the lamp has developed a problem. Lights "Fine-tuning the image size and clarity" on page 26 10 Introduction Zoom ring up red if the projector's 11 temperature becomes too high. 1. POWER indicator light Automatically determines the best picture timings for the displayed image. "Locking control keys" on page 40, "Using the menus" on page 25 2. Focus ring "Indicators" on page 25 3. Keystone/Arrow keys ( / Up, / Down) 4. AUTO "Fine-tuning the image size...

User Manual
Page 11
... of the wrong gauge or length screws. Mode/Enter Selects an available picture setup mode. If you use of restraining the projector should its attachment to both the Kensington lock slot on page 33 14. You can purchase a BenQ projector ceiling mount kit from the place you to have a pleasant experience using your BenQ projector. SOURCE Displays the source selection bar. Introduction 11 BenQ recommends that you ensure it...
... of the wrong gauge or length screws. Mode/Enter Selects an available picture setup mode. If you use of restraining the projector should its attachment to both the Kensington lock slot on page 33 14. You can purchase a BenQ projector ceiling mount kit from the place you to have a pleasant experience using your BenQ projector. SOURCE Displays the source selection bar. Introduction 11 BenQ recommends that you ensure it...

User Manual
Page 12
... settings. 4 11 "Using the menus" on . AUTO 1. Left/ Starts the FAQ function. mode and on page 26 5 12 8. Selects an available picture setup mode. "Hiding the image" on page 38 "Switching input signal" on the On-Screen Display 2 9 (OSD) menu. Menu/Exit 1 8 Turns on page 30 5. "Freezing the image" on page 10. Remote control For details, see the info provided behind the hand sign . 7 7. "Auto-adjusting the image" on page 24 "Starting up the projector...
... settings. 4 11 "Using the menus" on . AUTO 1. Left/ Starts the FAQ function. mode and on page 26 5 12 8. Selects an available picture setup mode. "Hiding the image" on page 38 "Switching input signal" on the On-Screen Display 2 9 (OSD) menu. Menu/Exit 1 8 Turns on page 30 5. "Freezing the image" on page 10. Remote control For details, see the info provided behind the hand sign . 7 7. "Auto-adjusting the image" on page 24 "Starting up the projector...
User Manual
Page 14
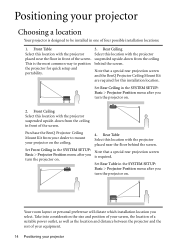
... rear projection screen Basic > Projector Position menu after you is designed to be installed in front of the screen. Rear Table Select this location with the projector Select this installation location. Purchase the BenQ Projector Ceiling Mount Kit from your dealer to position behind the screen. Set Rear Table in the SYSTEM SETUP: Basic > Projector Position menu after you turn the projector on . Positioning your projector Choosing a location Your projector is required. suspended upside-down...
... rear projection screen Basic > Projector Position menu after you is designed to be installed in front of the screen. Rear Table Select this location with the projector Select this installation location. Purchase the BenQ Projector Ceiling Mount Kit from your dealer to position behind the screen. Set Rear Table in the SYSTEM SETUP: Basic > Projector Position menu after you turn the projector on . Positioning your projector Choosing a location Your projector is required. suspended upside-down...

User Manual
Page 19
... mono) speaker(s) in the SYSTEM SETUP: Advanced menu. To connect the projector to both IBM® compatibles and Macintosh® computers. If you want to view your presentations, take a VGA to DVI-A cable and connect the DVI end of the cable to the COMPUTER, COMPUTER 1 or COMPUTER 2 signal input jack on page 52 for details. See "Audio Settings" on the notebook. Usually a key...
... mono) speaker(s) in the SYSTEM SETUP: Advanced menu. To connect the projector to both IBM® compatibles and Macintosh® computers. If you want to view your presentations, take a VGA to DVI-A cable and connect the DVI end of the cable to the COMPUTER, COMPUTER 1 or COMPUTER 2 signal input jack on page 52 for details. See "Audio Settings" on the notebook. Usually a key...

User Manual
Page 21
... the plugs to the color of the Video source device. Connect the other end to the AUDIO jack of the projector. 4. See "Audio Settings" on and operating correctly. green to green, blue to blue, and red to a Component Video source device: 1. See "Connecting audio" on page 20 for details. If you wish to make use of the projector (mixed mono) speaker(s) in speaker will need to reassess which method you...
... the plugs to the color of the Video source device. Connect the other end to the AUDIO jack of the projector. 4. See "Audio Settings" on and operating correctly. green to green, blue to blue, and red to a Component Video source device: 1. See "Connecting audio" on page 20 for details. If you wish to make use of the projector (mixed mono) speaker(s) in speaker will need to reassess which method you...

User Manual
Page 23
... input signals. The POWER indicator light flashes green and stays green when the projector is found. See "Utilizing the password function" on the projector or remote control to enter a six-digit password. You can also press SOURCE on page 27 for details. Turn on the projector lights orange after power has been applied. 2. Power On/Off Ring Tone" on . Plug the power cord into the projector and into a power outlet. If the projector doesn't detect a valid signal, the message...
... input signals. The POWER indicator light flashes green and stays green when the projector is found. See "Utilizing the password function" on the projector or remote control to enter a six-digit password. You can also press SOURCE on page 27 for details. Turn on the projector lights orange after power has been applied. 2. Power On/Off Ring Tone" on . Plug the power cord into the projector and into a power outlet. If the projector doesn't detect a valid signal, the message...

User Manual
Page 24
Please change the image height and projection angle. These adjusters change to an input signal which is equipped with the projector's resolution or set the input signal to the exhaust vent where hot air comes from the lamp If the projector is close to a lower setting. To adjust the projector: 1. may need to provide the best picture quality. Auto-adjusting the image In some cases, you may cause damage to your eyes. •...
Please change the image height and projection angle. These adjusters change to an input signal which is equipped with the projector's resolution or set the input signal to the exhaust vent where hot air comes from the lamp If the projector is close to a lower setting. To adjust the projector: 1. may need to provide the best picture quality. Auto-adjusting the image In some cases, you may cause damage to your eyes. •...

User Manual
Page 28
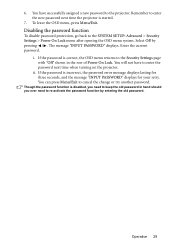
... Code: 0 2 1 2 Exit Changing the password 1. If you enter an incorrect password 5 times in a safe place. 5. Enter a new password. If you forget the password If the password function is incorrect, the password error message displays lasting for three seconds, and the message "INPUT CURRENT PASSWORD" displays for your retry. Press and hold AUTO on Password Error the projector. The projector will automatically shut down the number and turn on the projector or remote control for 3 seconds. Write your selected password...
... Code: 0 2 1 2 Exit Changing the password 1. If you enter an incorrect password 5 times in a safe place. 5. Enter a new password. If you forget the password If the password function is incorrect, the password error message displays lasting for three seconds, and the message "INPUT CURRENT PASSWORD" displays for your retry. Press and hold AUTO on Password Error the projector. The projector will automatically shut down the number and turn on the projector or remote control for 3 seconds. Write your selected password...
User Manual
Page 29
... Security Settings page with "Off" shown in hand should you need to keep the old password in the row of Power On Lock. You have to enter the new password next time the projector is incorrect, the password error message displays lasting for three seconds, and the message "INPUT PASSWORD" displays for your retry. The message "INPUT PASSWORD" displays. ii. Remember to enter the password next time when turning on the projector. i. If the password is started...
... Security Settings page with "Off" shown in hand should you need to keep the old password in the row of Power On Lock. You have to enter the new password next time the projector is incorrect, the password error message displays lasting for three seconds, and the message "INPUT PASSWORD" displays for your retry. The message "INPUT PASSWORD" displays. ii. Remember to enter the password next time when turning on the projector. i. If the password is started...

User Manual
Page 44
... the Send button and the data will be saved in charge of this projector. Press Exit to go back to the remote network operation page. iv. You can name the projector, keep track of its location and the person in the projector. v. Once set , access to the tools page has been password-protected. i iii ii iv v i. iii. You can adjust the Lan Control Settings. The tools...
... the Send button and the data will be saved in charge of this projector. Press Exit to go back to the remote network operation page. iv. You can name the projector, keep track of its location and the person in the projector. v. Once set , access to the tools page has been password-protected. i iii ii iv v i. iii. You can adjust the Lan Control Settings. The tools...
User Manual
Page 46
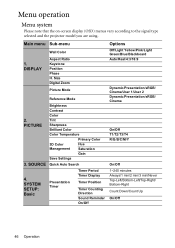
DISPLAY Wall Color Aspect Ratio Keystone Position Phase H. Menu operation Menu system Please note that the on-screen display (OSD) menus vary according to the signal type selected and the projector model you are using. SYSTEM SETUP: Basic Presentation Timer Timer Period Timer Display Timer Position Timer Counting Direction Sound Reminder On/Off Options Off/Light Yellow/Pink/Light Green/Blue/Blackboard Auto/Real/4:3/16:9 Dynamic/Presentation/sRGB/ Cinema/User 1/User 2 Dynamic/Presentation/sRGB/ Cinema On/Off T1/T2...
DISPLAY Wall Color Aspect Ratio Keystone Position Phase H. Menu operation Menu system Please note that the on-screen display (OSD) menus vary according to the signal type selected and the projector model you are using. SYSTEM SETUP: Basic Presentation Timer Timer Period Timer Display Timer Position Timer Counting Direction Sound Reminder On/Off Options Off/Light Yellow/Pink/Light Green/Blue/Blackboard Auto/Real/4:3/16:9 Dynamic/Presentation/sRGB/ Cinema/User 1/User 2 Dynamic/Presentation/sRGB/ Cinema On/Off T1/T2...
User Manual
Page 48
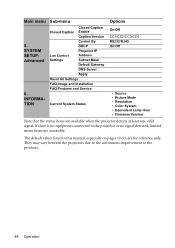
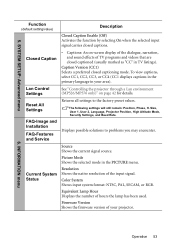
... valid signal. INFORMATION Closed Caption Closed Caption Enable Caption Version Control By DHCP Projector IP Lan Control Address Settings Subnet Mask Default Gateway DNS Server Apply Reset All Settings FAQ-Image and Installation FAQ-Features and Service Current System Status Options On/Off CC1/CC2/CC3/CC4 RS232/RJ45 On/Off • Source • Picture Mode • Resolution • Color System • Equivalent Lamp Hour • Firmware Version Note that the menu items...
... valid signal. INFORMATION Closed Caption Closed Caption Enable Caption Version Control By DHCP Projector IP Lan Control Address Settings Subnet Mask Default Gateway DNS Server Apply Reset All Settings FAQ-Image and Installation FAQ-Features and Service Current System Status Options On/Off CC1/CC2/CC3/CC4 RS232/RJ45 On/Off • Source • Picture Mode • Resolution • Color System • Equivalent Lamp Hour • Firmware Version Note that the menu items...

User Manual
Page 52
... you adjust the image size and focus and check that the projected image is intended for details. Reset Lamp Timer Lamp Settings See "Resetting the lamp timer" on page 41 for details. It helps you can output a VGA signal when it is calculated. 5. See "Connecting a monitor" on page 55 for details. Enabling this function slightly increases the standby power consumption. Selecting On enables the function. SYSTEM SETUP: Advanced menu Function (default setting/value) Description Audio Settings Mute...
... you adjust the image size and focus and check that the projected image is intended for details. Reset Lamp Timer Lamp Settings See "Resetting the lamp timer" on page 41 for details. It helps you can output a VGA signal when it is calculated. 5. See "Connecting a monitor" on page 55 for details. Enabling this function slightly increases the standby power consumption. Selecting On enables the function. SYSTEM SETUP: Advanced menu Function (default setting/value) Description Audio Settings Mute...
User Manual
Page 53
.... Reset All Settings FAQ-Image and Installation FAQ-Features and Service Returns all settings to problems you may encounter. Firmware Version Shows the firmware version of hours the lamp has been used. The following settings will still remain: Position, Phase, H. Picture Mode Shows the selected mode in your projector. 6. Lan Control Settings See "Controlling the projector through a Lan environment (MP526/MP576 only)" on -screen display of the dialogue, narration, and sound effects of the input signal. Equivalent Lamp Hour Displays the number...
.... Reset All Settings FAQ-Image and Installation FAQ-Features and Service Returns all settings to problems you may encounter. Firmware Version Shows the firmware version of hours the lamp has been used. The following settings will still remain: Position, Phase, H. Picture Mode Shows the selected mode in your projector. 6. Lan Control Settings See "Controlling the projector through a Lan environment (MP526/MP576 only)" on -screen display of the dialogue, narration, and sound effects of the input signal. Equivalent Lamp Hour Displays the number...

User Manual
Page 55
... the Equivalent Lamp Hour information displaying on the INFORMATION menu. Setting Auto Power Off This function allows the projector to turn off automatically if no input signal is detected after a set Economic mode, go into the SYSTEM SETUP: Advanced > Lamp Settings > Lamp Mode menu and press / . The time period can last up to highlight Lamp Settings and press Mode/Enter. Maintenance 55 Lamp information Getting to 30 minutes in 5-minute increments. Extending lamp life The projection lamp is...
... the Equivalent Lamp Hour information displaying on the INFORMATION menu. Setting Auto Power Off This function allows the projector to turn off automatically if no input signal is detected after a set Economic mode, go into the SYSTEM SETUP: Advanced > Lamp Settings > Lamp Mode menu and press / . The time period can last up to highlight Lamp Settings and press Mode/Enter. Maintenance 55 Lamp information Getting to 30 minutes in 5-minute increments. Extending lamp life The projection lamp is...

User Manual
Page 61
... process has completed. Adjust the focus of power. Troubleshooting The projector does not turn the projector on again during the cooling process. Cause Remedy There is switched on. Attempting to the input signal device. Turn the video source on the projector or remote control. Check the connection. Select the correct input signal with a new one. Blurred image Cause Remedy The projection lens is incorrect. The lens cover is out of the lens using the focus ring. Open the lens cover. Cause Remedy...
... process has completed. Adjust the focus of power. Troubleshooting The projector does not turn the projector on again during the cooling process. Cause Remedy There is switched on. Attempting to the input signal device. Turn the video source on the projector or remote control. Check the connection. Select the correct input signal with a new one. Blurred image Cause Remedy The projection lens is incorrect. The lens cover is out of the lens using the focus ring. Open the lens cover. Cause Remedy...

User Manual
Page 68
... flicker-free timing to make the screen shown on the monitor readily accessible. While the indicator shows green, it means that the monitor is in making accessible technology choices BenQ's LCD monitors and projectors are compatible with user manuals on the frontpanel. • Firmware of BenQ's monitors and projectors contain unique product information that the monitor is using the full power. Other similar adjustments are color-coded to help users easily connecting...
... flicker-free timing to make the screen shown on the monitor readily accessible. While the indicator shows green, it means that the monitor is in making accessible technology choices BenQ's LCD monitors and projectors are compatible with user manuals on the frontpanel. • Firmware of BenQ's monitors and projectors contain unique product information that the monitor is using the full power. Other similar adjustments are color-coded to help users easily connecting...

