BL3200PT User Manual
Page 2
... operated from the AC supply. • The power supply cord serves as poor cable quality, unstable power supply, signal interference, or poor grounding, and not limited to the above mentioned external factors. (Applicable for flicker-free models only.) Power Safety Please follow these safety instructions for best performance, and long life for your monitor. • The AC plug isolates this product. 2 Your monitor should never be placed...
... operated from the AC supply. • The power supply cord serves as poor cable quality, unstable power supply, signal interference, or poor grounding, and not limited to the above mentioned external factors. (Applicable for flicker-free models only.) Power Safety Please follow these safety instructions for best performance, and long life for your monitor. • The AC plug isolates this product. 2 Your monitor should never be placed...

BL3200PT User Manual
Page 4
... to install on Windows 7 system 26 How to adjust your monitor 27 The control panel...27 OSD Controller ...28 Basic menu operation ...30 Picture optimization ...32 Customizing the hot keys...32 Adjusting display mode ...32 Using Smart Scaling...33 Choosing an appropriate picture mode 33 Connecting the monitor to your MacBook series product 33 Navigating the main menu ...34 Display menu ...35 Picture menu ...37 Picture Advanced menu ...39 Audio menu ...43 System menu ...44 Ergonomics menu ...48 Eco menu ...50 Troubleshooting ...52...
... to install on Windows 7 system 26 How to adjust your monitor 27 The control panel...27 OSD Controller ...28 Basic menu operation ...30 Picture optimization ...32 Customizing the hot keys...32 Adjusting display mode ...32 Using Smart Scaling...33 Choosing an appropriate picture mode 33 Connecting the monitor to your MacBook series product 33 Navigating the main menu ...34 Display menu ...35 Picture menu ...37 Picture Advanced menu ...39 Audio menu ...43 System menu ...44 Ergonomics menu ...48 Eco menu ...50 Troubleshooting ...52...

BL3200PT User Manual
Page 7
Control buttons 3. Cable management hole 10. Power button 1 Back view 4 567 8 9 10 11 23 4. Audio Line In 9. Getting to know your monitor Front view 1. Power switch 12. USB 3.0 ports (upstream; AC power input jack 11. Kensington lock slot 12 Getting to know your monitor 7 Wire holder socket 5. connecting to the PC) 6. connecting to USB devices) 8. OSD Controller socket 7. USB 2.0 ports (downstream; Light sensor / Eco sensor 2.
Control buttons 3. Cable management hole 10. Power button 1 Back view 4 567 8 9 10 11 23 4. Audio Line In 9. Getting to know your monitor Front view 1. Power switch 12. USB 3.0 ports (upstream; AC power input jack 11. Kensington lock slot 12 Getting to know your monitor 7 Wire holder socket 5. connecting to the PC) 6. connecting to USB devices) 8. OSD Controller socket 7. USB 2.0 ports (downstream; Light sensor / Eco sensor 2.

BL3200PT User Manual
Page 12
... not displayed, go to System, DisplayPort and change the setting to take the picture quality of each video cable into consideration before making the connection. - Connect the audio cable between the socket on the rear of the monitor (Line In) and your computer audio outlet. 12 How to the HDMI port on the product supplied for your region. 3. To Connect the HDMI Cable Or Connect the plug of the HDMI cable to assemble your...
... not displayed, go to System, DisplayPort and change the setting to take the picture quality of each video cable into consideration before making the connection. - Connect the audio cable between the socket on the rear of the monitor (Line In) and your computer audio outlet. 12 How to the HDMI port on the product supplied for your region. 3. To Connect the HDMI Cable Or Connect the plug of the HDMI cable to assemble your...

BL3200PT User Manual
Page 19
... tilt and extend the monitor to the highest position before you start to rotate the display. You should be vertically extended to allow to the maximum extended position. Pivot the display. Alternatively, right-click the desktop and select Screen resolution from landscape to adjust the screen orientation. Select On. Click to launch the Display Pilot Software (if installed from the CD), and check Auto Pivot to set the display...
... tilt and extend the monitor to the highest position before you start to rotate the display. You should be vertically extended to allow to the maximum extended position. Pivot the display. Alternatively, right-click the desktop and select Screen resolution from landscape to adjust the screen orientation. Select On. Click to launch the Display Pilot Software (if installed from the CD), and check Auto Pivot to set the display...

BL3200PT User Manual
Page 21
... the installation. Remove the monitor stand. Detach the monitor stand as instructed in step 1~2 in the future, please keep the monitor base, monitor stand, and screws somewhere safe for future use of a magnetic-head screwdriver is stable to use your monitor and monitor mounting kit on the back cover. Follow the instruction manuals of the wall mount bracket you intend to support the weight of the monitor. • Turn off the monitor and the power before disconnecting the cables...
... the installation. Remove the monitor stand. Detach the monitor stand as instructed in step 1~2 in the future, please keep the monitor base, monitor stand, and screws somewhere safe for future use of a magnetic-head screwdriver is stable to use your monitor and monitor mounting kit on the back cover. Follow the instruction manuals of the wall mount bracket you intend to support the weight of the monitor. • Turn off the monitor and the power before disconnecting the cables...

BL3200PT User Manual
Page 22
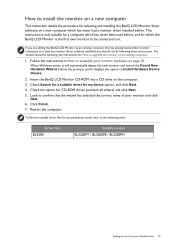
... the BenQ LCD Monitor CD-ROM. At that point, click the Have Disk button, insert the BenQ LCD Monitor CD-ROM and select the appropriate monitor model. Follow the wizard instructions until it asks you need to follow to select a monitor model. The circumstances under which you connect and install your BenQ LCD Monitor will determine which version of Microsoft Windows you are using, and whether you are upgrading an existing installation...
... the BenQ LCD Monitor CD-ROM. At that point, click the Have Disk button, insert the BenQ LCD Monitor CD-ROM and select the appropriate monitor model. Follow the wizard instructions until it asks you need to follow to select a monitor model. The circumstances under which you connect and install your BenQ LCD Monitor will determine which version of Microsoft Windows you are using, and whether you are upgrading an existing installation...
BL3200PT User Manual
Page 23
... has never had another monitor connected to confirm that has already had a monitor driver installed before. Follow the instructions in How to it displays the option to install the monitor on a new computer This instruction details the procedure for selecting and installing the BenQ LCD Monitor driver software on page 10. You should not be following the instructions for the purchased model, refer to upgrade the monitor on the computer...
... has never had another monitor connected to confirm that has already had a monitor driver installed before. Follow the instructions in How to it displays the option to install the monitor on a new computer This instruction details the procedure for selecting and installing the BenQ LCD Monitor driver software on page 10. You should not be following the instructions for the purchased model, refer to upgrade the monitor on the computer...
BL3200PT User Manual
Page 24
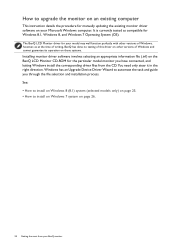
... CD. The BenQ LCD Monitor driver for the particular model monitor you through the file selection and installation process. Windows has an Upgrade Device Driver Wizard to automate the task and guide you have connected, and letting Windows install the corresponding driver files from your model may well function perfectly with other versions of Windows, however, as compatible for manually updating the existing monitor driver software on your Microsoft Windows computer. You need only steer...
... CD. The BenQ LCD Monitor driver for the particular model monitor you through the file selection and installation process. Windows has an Upgrade Device Driver Wizard to automate the task and guide you have connected, and letting Windows install the corresponding driver files from your model may well function perfectly with other versions of Windows, however, as compatible for manually updating the existing monitor driver software on your Microsoft Windows computer. You need only steer...
BL3200PT User Manual
Page 25
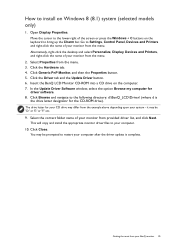
... the keyboard to Settings, Control Panel, Devices and Printers and right-click the name of the screen or press the Windows + C buttons on the computer. 7. Select Properties from your BenQ monitor 25 The drive letter for driver software. 8. Click Generic PnP Monitor, and then the Properties button. 5. Click Close. Click the Driver tab and the Update Driver button. 6. Getting the most from the menu. 3. Open Display Properties. Select the...
... the keyboard to Settings, Control Panel, Devices and Printers and right-click the name of the screen or press the Windows + C buttons on the computer. 7. Select Properties from your BenQ monitor 25 The drive letter for driver software. 8. Click Generic PnP Monitor, and then the Properties button. 5. Click Close. Click the Driver tab and the Update Driver button. 6. Getting the most from the menu. 3. Open Display Properties. Select the...

BL3200PT User Manual
Page 30
... on the OSD Controller. 2. The left three controls are custom keys and are designated for Picture Mode. In the main menu, follow the icons next to the control keys to access the main menu. 4. Basic menu operation All OSD (On Screen Display) menus can use the OSD menu to adjust all the settings on page 32. • For Up/Increase adjustment. 30 How to adjust your monitor. 1 2 4 3 1. To change the default settings, see...
... on the OSD Controller. 2. The left three controls are custom keys and are designated for Picture Mode. In the main menu, follow the icons next to the control keys to access the main menu. 4. Basic menu operation All OSD (On Screen Display) menus can use the OSD menu to adjust all the settings on page 32. • For Up/Increase adjustment. 30 How to adjust your monitor. 1 2 4 3 1. To change the default settings, see...
BL3200PT User Manual
Page 32
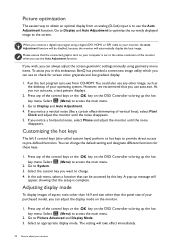
... you can always adjust the screen geometric settings manually using a digital (DVI, HDMI, or DP) cable to change the default setting and designate different functions for screen color, grayscale and line gradient display. 1. Press any of vertical lines), select Pixel Clock and adjust the monitor until the noise disappears. Select an appropriate display mode. Go to Display and Auto Adjustment to optimize the currently displayed image to Picture Advanced and Display Mode. 3. If you wish, you can use any of the...
... you can always adjust the screen geometric settings manually using a digital (DVI, HDMI, or DP) cable to change the default setting and designate different functions for screen color, grayscale and line gradient display. 1. Press any of vertical lines), select Pixel Clock and adjust the monitor until the noise disappears. Select an appropriate display mode. Go to Display and Auto Adjustment to optimize the currently displayed image to Picture Advanced and Display Mode. 3. If you wish, you can use any of the...

BL3200PT User Manual
Page 35
... your video cable connection type. • ON • OFF • D-Sub • DVI • HDMI • DisplayPort Navigating the main menu 35 or to rotate the display with the monitor. Display menu Available menu options may vary depending on the input sources, functions and settings. Sets to select a menu item. Use or to a digital input signal. And keys that are not available will disappear. Range Auto Pivot Input Not applicable to make selection. Position Ergonomics Pixel...
... your video cable connection type. • ON • OFF • D-Sub • DVI • HDMI • DisplayPort Navigating the main menu 35 or to rotate the display with the monitor. Display menu Available menu options may vary depending on the input sources, functions and settings. Sets to select a menu item. Use or to a digital input signal. And keys that are not available will disappear. Range Auto Pivot Input Not applicable to make selection. Position Ergonomics Pixel...

BL3200PT User Manual
Page 40
... Available only when the input source is decreased compared with the Standard mode. the left window demonstrates images of blue light exposure to create the optimal contrast. User Applies a combination of color, contrast, and brightness between the monitor and the connected MacBook series product. Use this feature to reduce the risk of Standard mode, while the right window presents the images under the selected mode from the display to hide annoying edge...
... Available only when the input source is decreased compared with the Standard mode. the left window demonstrates images of blue light exposure to create the optimal contrast. User Applies a combination of color, contrast, and brightness between the monitor and the connected MacBook series product. Use this feature to reduce the risk of Standard mode, while the right window presents the images under the selected mode from the display to hide annoying edge...

BL3200PT User Manual
Page 46
... Navigating the main menu Otherwise, HDMI can only be selected • OFF by input select or by hot key. • ON • OFF Auto Power Sets the time to power off the monitor automatically in the input auto select loop. Resolution Notice Sets whether to display the resolution notice of the recommended resolution when a new input source is activated, DP port will be in Off power saving mode. • OFF •...
... Navigating the main menu Otherwise, HDMI can only be selected • OFF by input select or by hot key. • ON • OFF Auto Power Sets the time to power off the monitor automatically in the input auto select loop. Resolution Notice Sets whether to display the resolution notice of the recommended resolution when a new input source is activated, DP port will be in Off power saving mode. • OFF •...
BL3200PT User Manual
Page 47
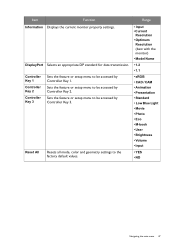
...; 1.1 Controller Key 1 Controller Key 2 Controller Key 3 Sets the feature or setup menu to be accessed by Controller Key 2. Sets the feature or setup menu to be accessed by Controller Key 3. • sRGB • CAD / CAM • Animation • Presentation • Standard • Low Blue Light • Movie • Photo • Eco • M-book • User • Brightness • Volume • Input Reset All Resets all mode, color and geometry settings to the factory default...
...; 1.1 Controller Key 1 Controller Key 2 Controller Key 3 Sets the feature or setup menu to be accessed by Controller Key 2. Sets the feature or setup menu to be accessed by Controller Key 3. • sRGB • CAD / CAM • Animation • Presentation • Standard • Low Blue Light • Movie • Photo • Eco • M-book • User • Brightness • Volume • Input Reset All Resets all mode, color and geometry settings to the factory default...

BL3200PT User Manual
Page 52
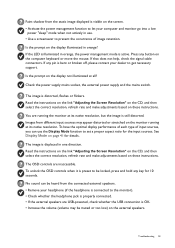
... native resolution. No image can be seen. The image has a faulty coloration. Now check the signal cable connectors. Does the blurring only occur at resolutions lower than the native (maximum) resolution? Please read the "Preset display modes" section from the link "Adjusting the Screen Resolution". 52 Troubleshooting Read the instructions on the link "Adjusting the Screen Resolution" on the CD, and then select the correct resolution, refresh rate and make adjustments based on the link "Adjusting the Screen Resolution". Remove the extension cable...
... native resolution. No image can be seen. The image has a faulty coloration. Now check the signal cable connectors. Does the blurring only occur at resolutions lower than the native (maximum) resolution? Please read the "Preset display modes" section from the link "Adjusting the Screen Resolution". 52 Troubleshooting Read the instructions on the link "Adjusting the Screen Resolution" on the CD, and then select the correct resolution, refresh rate and make adjustments based on the link "Adjusting the Screen Resolution". Remove the extension cable...
BL3200PT User Manual
Page 53
... instructions on the link "Adjusting the Screen Resolution" on the CD, and then select the correct resolution, refresh rate and make adjustments based on the monitor running the monitor at all? If that does not help, check the signal cable connectors. To have the optimal display performance of each type of image retention. If the LED is illuminated in orange, the power management mode is displaced in orange? The image is active. No sound can use...
... instructions on the link "Adjusting the Screen Resolution" on the CD, and then select the correct resolution, refresh rate and make adjustments based on the monitor running the monitor at all? If that does not help, check the signal cable connectors. To have the optimal display performance of each type of image retention. If the LED is illuminated in orange, the power management mode is displaced in orange? The image is active. No sound can use...

BL3200PT User Manual
Page 54
... bottom of the monitor. No sound can be heard from the built-in speakers: • Check whether Line In is properly connected. • Increase the volume (volume may affect the detection. The light sensor is located at : Support@BenQ.com. 54 Troubleshooting Please be noted that keep the sensor from detecting your presence properly. • If you and the monitor. Adjust the sensor range if needed.
... bottom of the monitor. No sound can be heard from the built-in speakers: • Check whether Line In is properly connected. • Increase the volume (volume may affect the detection. The light sensor is located at : Support@BenQ.com. 54 Troubleshooting Please be noted that keep the sensor from detecting your presence properly. • If you and the monitor. Adjust the sensor range if needed.
BL3200PT Data Sheet
Page 1
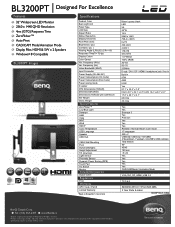
... Weight Special Features ZeroFlicker™ Low Blue Light Senseye AMA Vista Win7 Win8 HDCP Color Temperature OSD Language Speaker USB Hub VESA Wall Mounting Pivot Swivel (left/right) Height Adjustment Tilt (down/up) Light Sensor Proximity Sensor Dynamic Power Saving (DPS) Touch Pad AC Switch Modes TM Included Accessories HIGH-DEFINITION MULTIMEDIA INTERFACE Signal Cable Regulations Mac TCO Warranty UPC Code / Part # Limited Warranty *Based on Energy Star 5.1 test criteria Black / glossy black LED VA 32"W 16:9 2560 x 1440...
... Weight Special Features ZeroFlicker™ Low Blue Light Senseye AMA Vista Win7 Win8 HDCP Color Temperature OSD Language Speaker USB Hub VESA Wall Mounting Pivot Swivel (left/right) Height Adjustment Tilt (down/up) Light Sensor Proximity Sensor Dynamic Power Saving (DPS) Touch Pad AC Switch Modes TM Included Accessories HIGH-DEFINITION MULTIMEDIA INTERFACE Signal Cable Regulations Mac TCO Warranty UPC Code / Part # Limited Warranty *Based on Energy Star 5.1 test criteria Black / glossy black LED VA 32"W 16:9 2560 x 1440...


