F5D5730au User Manual
Page 4
...• DHCP Server • ANSI T1.413 Issue 2, ITU-T G.DMT (G.992.1), G.Lite (G.992.2) and G.hs (G.994.1) • IP Sharing via NAT routing function (Network Address Translation) • NAT function for NetMeeting®, ICQ®, CU-SeeMe®, etc. • PPPoE, PPPoA, Bridged and Routed...8226; RJ45 Ethernet interface support via Web Browser Interface • Two-level password protection for device management • Flash memory for purchasing the Belkin High-Speed ADSL Modem with USB and Ethernet • Power Adapter • RJ45 Crossover Cable • A-B USB Cable • RJ11...
...• DHCP Server • ANSI T1.413 Issue 2, ITU-T G.DMT (G.992.1), G.Lite (G.992.2) and G.hs (G.994.1) • IP Sharing via NAT routing function (Network Address Translation) • NAT function for NetMeeting®, ICQ®, CU-SeeMe®, etc. • PPPoE, PPPoA, Bridged and Routed...8226; RJ45 Ethernet interface support via Web Browser Interface • Two-level password protection for device management • Flash memory for purchasing the Belkin High-Speed ADSL Modem with USB and Ethernet • Power Adapter • RJ45 Crossover Cable • A-B USB Cable • RJ11...
F5D5730au User Manual
Page 7
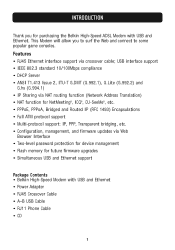
... protocol installed on successful installation. TIP: After plugging in the power cord, the Modem initialises and starts working after 20 seconds. IP address, DNS, and gateway settings from your Modem you push the Reset button, all the parameter settings will revert back to disable any firewall or anti-...
... protocol installed on successful installation. TIP: After plugging in the power cord, the Modem initialises and starts working after 20 seconds. IP address, DNS, and gateway settings from your Modem you push the Reset button, all the parameter settings will revert back to disable any firewall or anti-...
F5D5730au User Manual
Page 9
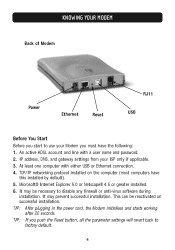
...the rectangular end of next page). 6. Insert the square end of the USB cable into the USB port of the Ethernet crossover cable to the address bar-IP address: 10.0.0.2 (see image on your PC before continuing. 9. Connect the RJ11 phone line provided for ADSL into a USB port on the top... Configuration" on the Modem; Connect the RJ11 phone line provided for ADSL into the CD-ROM drive and follow the on-screen instructions to the address bar-IP address: 10.0.0.2 (see image on the Modem; USB 1. After installation, the Modem will be installed as "USB Net Card". 7. You will be ...
...the rectangular end of next page). 6. Insert the square end of the USB cable into the USB port of the Ethernet crossover cable to the address bar-IP address: 10.0.0.2 (see image on your PC before continuing. 9. Connect the RJ11 phone line provided for ADSL into a USB port on the top... Configuration" on the Modem; Connect the RJ11 phone line provided for ADSL into the CD-ROM drive and follow the on-screen instructions to the address bar-IP address: 10.0.0.2 (see image on the Modem; USB 1. After installation, the Modem will be installed as "USB Net Card". 7. You will be ...
F5D5730au User Manual
Page 16
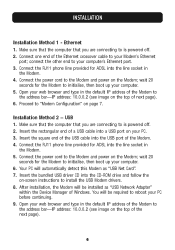
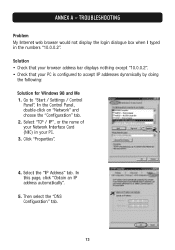
... the Control Panel, double-click on "Network" and choose the "Configuration" tab. 2. Select "TCP / IP", or the name of your Network Interface Card (NIC) in the numbers "10.0.0.2". Select the "IP Address" tab. Solution • Check that your browser address bar displays nothing except "10.0.0.2". • Check that your PC. 3. TROUBLESHOOTING Problem My Internet...
... the Control Panel, double-click on "Network" and choose the "Configuration" tab. 2. Select "TCP / IP", or the name of your Network Interface Card (NIC) in the numbers "10.0.0.2". Select the "IP Address" tab. Solution • Check that your browser address bar displays nothing except "10.0.0.2". • Check that your PC. 3. TROUBLESHOOTING Problem My Internet...
F5D5730au User Manual
Page 19
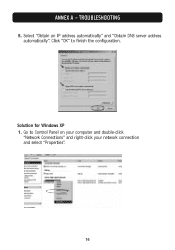
Solution for Windows XP 1. TROUBLESHOOTING 5. ANNEX A - Click "OK" to Control Panel on your computer and double-click "Network Connections" and right-click your network connection and select "Properties". 16 Select "Obtain an IP address automatically" and "Obtain DNS server address automatically". Go to finish the configuration.
Solution for Windows XP 1. TROUBLESHOOTING 5. ANNEX A - Click "OK" to Control Panel on your computer and double-click "Network Connections" and right-click your network connection and select "Properties". 16 Select "Obtain an IP address automatically" and "Obtain DNS server address automatically". Go to finish the configuration.
F5D5730au User Manual
Page 20
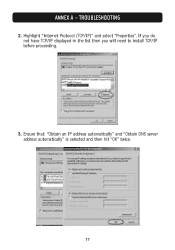
Ensure that: "Obtain an IP address automatically" and "Obtain DNS server address automatically" is selected and then hit "OK" twice. 17 If you do not have TCP/IP displayed in the list then you will need to install TCP/IP before proceeding. 3. ANNEX A - Highlight "Internet Protocol (TCP/IP)" and select "Properties". TROUBLESHOOTING 2.
Ensure that: "Obtain an IP address automatically" and "Obtain DNS server address automatically" is selected and then hit "OK" twice. 17 If you do not have TCP/IP displayed in the list then you will need to install TCP/IP before proceeding. 3. ANNEX A - Highlight "Internet Protocol (TCP/IP)" and select "Properties". TROUBLESHOOTING 2.
F5D5730au User Manual
Page 21
... and have the Ethernet cable from your additional computers to the hub and access the Internet at the same time? The Modem will allocate a WAN IP address to your router and then you can connect your PC to your client machines by configuring your modem. I connect a wired or wireless router to... a hub and have two computers using USB and then connect either a Belkin 802.11b or 802.11g Access Point to assist in your Modem. You can I connect my Modem to my Modem? The following website has a wealth...
... and have the Ethernet cable from your additional computers to the hub and access the Internet at the same time? The Modem will allocate a WAN IP address to your router and then you can connect your PC to your client machines by configuring your modem. I connect a wired or wireless router to... a hub and have two computers using USB and then connect either a Belkin 802.11b or 802.11g Access Point to assist in your Modem. You can I connect my Modem to my Modem? The following website has a wealth...