F5D5730au User Manual
Page 2
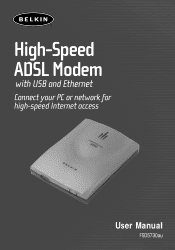
High-Speed ADSL Modem with USB and Ethernet Connect your PC or network for high-speed Internet access User Manual F5D5730au
High-Speed ADSL Modem with USB and Ethernet Connect your PC or network for high-speed Internet access User Manual F5D5730au
F5D5730au User Manual
Page 4
This Modem will allow you for purchasing the Belkin High-Speed ADSL Modem with USB and Ethernet • Power Adapter • RJ45 Crossover Cable • A-B USB Cable • RJ11 Phone Cable • CD 1 Features • RJ45 Ethernet interface support via Web Browser Interface • Two-level password protection for device management &#... G.hs (G.994.1) • IP Sharing via NAT routing function (Network Address Translation) • NAT function for future firmware upgrades • Simultaneous USB and Ethernet support Package Contents • Belkin High-Speed Modem with USB and...
This Modem will allow you for purchasing the Belkin High-Speed ADSL Modem with USB and Ethernet • Power Adapter • RJ45 Crossover Cable • A-B USB Cable • RJ11 Phone Cable • CD 1 Features • RJ45 Ethernet interface support via Web Browser Interface • Two-level password protection for device management &#... G.hs (G.994.1) • IP Sharing via NAT routing function (Network Address Translation) • NAT function for future firmware upgrades • Simultaneous USB and Ethernet support Package Contents • Belkin High-Speed Modem with USB and...

F5D5730au User Manual
Page 5
INTRODUCTION System Requirements PC running Windows® 98SE , Me, 2000, XP CD-ROM drive (For USB Installation Only) One free USB port (For USB Installation Only) One RJ45 Ethernet port (Ethernet Installation Only) 2
INTRODUCTION System Requirements PC running Windows® 98SE , Me, 2000, XP CD-ROM drive (For USB Installation Only) One free USB port (For USB Installation Only) One RJ45 Ethernet port (Ethernet Installation Only) 2
F5D5730au User Manual
Page 7
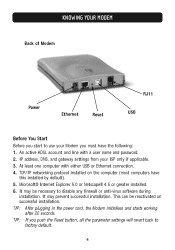
... successful installation. This can be necessary to use your ISP only if applicable. 3. KNOWING YOUR MODEM Back of Modem Power Ethernet Reset RJ11 USB Before You Start Before you start to disable any firewall or anti-virus software during installation. TIP: After ... successful installation. It may be reactivated on the computer (most computers have the following: 1. An active ADSL account and line with either USB or Ethernet connection. 4. At least one computer with a user name and password. 2. Microsoft® Internet Explorer 5.0 or Netscape® 4.5 or greater installed...
... successful installation. This can be necessary to use your ISP only if applicable. 3. KNOWING YOUR MODEM Back of Modem Power Ethernet Reset RJ11 USB Before You Start Before you start to disable any firewall or anti-virus software during installation. TIP: After ... successful installation. It may be reactivated on the computer (most computers have the following: 1. An active ADSL account and line with either USB or Ethernet connection. 4. At least one computer with a user name and password. 2. Microsoft® Internet Explorer 5.0 or Netscape® 4.5 or greater installed...
F5D5730au User Manual
Page 8
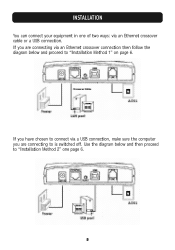
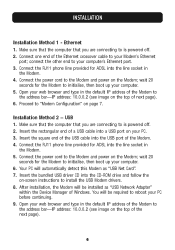
If you are connecting via an Ethernet crossover connection then follow the diagram below and then proceed to "Installation Method 1" on page 6. Use the diagram below and proceed to "Installation Method 2" one of two ways: via a USB connection, make sure the computer you are connecting to is switched off. If you have chosen to connect via an Ethernet crossover cable or a USB connection. INSTALLATION You can connect your equipment in one page 6. 5
If you are connecting via an Ethernet crossover connection then follow the diagram below and then proceed to "Installation Method 1" on page 6. Use the diagram below and proceed to "Installation Method 2" one of two ways: via a USB connection, make sure the computer you are connecting to is switched off. If you have chosen to connect via an Ethernet crossover cable or a USB connection. INSTALLATION You can connect your equipment in one page 6. 5
F5D5730au User Manual
Page 9
Connect one end of the Ethernet crossover cable to your Modem's Ethernet port; connect the other end to your computer's Ethernet port. 3. Proceed to is powered off . 2. Your PC will be installed as "USB Net Card". 7. Open your PC before continuing. 9. Make sure that the computer ... of the next page). 6 Connect the RJ11 phone line provided for the Modem to the address bar-IP address: 10.0.0.2 (see image on the Modem; Ethernet 1. Connect the power cord to the Modem and power on the top of the Modem. 4. USB 1. Connect the power cord to the Modem and power...
Connect one end of the Ethernet crossover cable to your Modem's Ethernet port; connect the other end to your computer's Ethernet port. 3. Proceed to is powered off . 2. Your PC will be installed as "USB Net Card". 7. Open your PC before continuing. 9. Make sure that the computer ... of the next page). 6 Connect the RJ11 phone line provided for the Modem to the address bar-IP address: 10.0.0.2 (see image on the Modem; Ethernet 1. Connect the power cord to the Modem and power on the top of the Modem. 4. USB 1. Connect the power cord to the Modem and power...
F5D5730au User Manual
Page 21
... the modem using the USB cable and have two computers using USB and then connect either a Belkin 802.11b or 802.11g Access Point to my Modem? ANNEX B - Can I connect my Modem to the Ethernet port of your desktop machine to the Modem using the Modem at the same time? Can I ... to be on your Modem. Authentication to your ISP needs to your router and then you can I connect a wired or wireless router to the Ethernet port of your Modem without running into a hub, then attach your additional computers to your Modem so simply connect you wish to allocate to Xtra...
... the modem using the USB cable and have two computers using USB and then connect either a Belkin 802.11b or 802.11g Access Point to my Modem? ANNEX B - Can I connect my Modem to the Ethernet port of your desktop machine to the Modem using the Modem at the same time? Can I ... to be on your Modem. Authentication to your ISP needs to your router and then you can I connect a wired or wireless router to the Ethernet port of your Modem without running into a hub, then attach your additional computers to your Modem so simply connect you wish to allocate to Xtra...