User Manual
Page 1
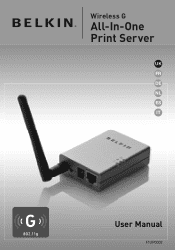
Wireless G All-In-One Print Server UK FR DE NL ES IT User Manual F1UP0002
Wireless G All-In-One Print Server UK FR DE NL ES IT User Manual F1UP0002
User Manual
Page 2
... Favorite 38 Auto Connect List 39 Quick Setup 42 General Settings 43 7 Print Server Manager 45 Introduction 45 Search for Print Servers 46 Status of Print Servers 47 Set Up the All-In-One Print Server 48 Connecting Devices to your Print Server 7 LEDs 7 Reset Button 8 3 Placement of the Print Server 9 Placement on a Flat Surface 9 Mounting on a Printer 9 4 Installation Procedure 10 Step...
... Favorite 38 Auto Connect List 39 Quick Setup 42 General Settings 43 7 Print Server Manager 45 Introduction 45 Search for Print Servers 46 Status of Print Servers 47 Set Up the All-In-One Print Server 48 Connecting Devices to your Print Server 7 LEDs 7 Reset Button 8 3 Placement of the Print Server 9 Placement on a Flat Surface 9 Mounting on a Printer 9 4 Installation Procedure 10 Step...
User Manual
Page 3
... 8 Web Management 67 Introduction 67 Login 67 Device Settings 68 Setup Server 69 Wireless 70 Setup TCP/IP 75 Utilities 78 Home|Help|Logout 80 9 LPR Printing 82 10 RAW Printing 88 11 IPP Printing 94 Introduction 94 System Setup 94 12 Print-Server Installation in Windows 98SE/Me/NT 99 Software-Installation Procedure 99 Network...
... 8 Web Management 67 Introduction 67 Login 67 Device Settings 68 Setup Server 69 Wireless 70 Setup TCP/IP 75 Utilities 78 Home|Help|Logout 80 9 LPR Printing 82 10 RAW Printing 88 11 IPP Printing 94 Introduction 94 System Setup 94 12 Print-Server Installation in Windows 98SE/Me/NT 99 Software-Installation Procedure 99 Network...
User Manual
Page 4
... Windows® 2000 5 SP4 and higher, and XP SP1 and higher. The Print 11 Server can share print functions in - Advanced features let you for purchasing and using our Wireless G (the Print Server). 1 This innovative product easily shares your standard printer or all-in the various... wired network. 12 13 Product Features The Print Server simultaneously supports dual functionalities: All-In- 14 One-Print-Server mode (AIO-PS mode) and Print-Server mode (PS mode). one USB 2.0/1.1 port for MFPs or standard printers. Unlike many print 2 servers, it can choose one of the modes ...
... Windows® 2000 5 SP4 and higher, and XP SP1 and higher. The Print 11 Server can share print functions in - Advanced features let you for purchasing and using our Wireless G (the Print Server). 1 This innovative product easily shares your standard printer or all-in the various... wired network. 12 13 Product Features The Print Server simultaneously supports dual functionalities: All-In- 14 One-Print-Server mode (AIO-PS mode) and Print-Server mode (PS mode). one USB 2.0/1.1 port for MFPs or standard printers. Unlike many print 2 servers, it can choose one of the modes ...
User Manual
Page 5
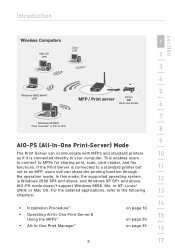
...13 chapters: • Installation Procedure" 14 on page 10 • Operating All-In-One Print Server & Using the MFPs" 15 on page 30 • All-In-One Print Manager" on page 35 16 5 17 If the Print Server is Windows 2000 SP4 and above, and Windows XP SP1 and above. 12 AIO-PS ...NT; For the detailed applications, refer to your computer. Introduction section Wireless Computers 1 Linux LPR Mac OS LPR 2 3 4 Windows 98SE/Me/NT LPR 5 MFP / Print server Printer OR All-in-one Printer 6 7 Windows XP/2000 Click "connect" or IPP or LPR 8 9 AIO-PS (All-In-One...
...13 chapters: • Installation Procedure" 14 on page 10 • Operating All-In-One Print Server & Using the MFPs" 15 on page 30 • All-In-One Print Manager" on page 35 16 5 17 If the Print Server is Windows 2000 SP4 and above, and Windows XP SP1 and above. 12 AIO-PS ...NT; For the detailed applications, refer to your computer. Introduction section Wireless Computers 1 Linux LPR Mac OS LPR 2 3 4 Windows 98SE/Me/NT LPR 5 MFP / Print server Printer OR All-in-one Printer 6 7 Windows XP/2000 Click "connect" or IPP or LPR 8 9 AIO-PS (All-In-One...
User Manual
Page 6
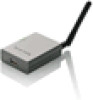
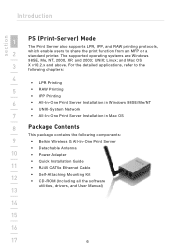
... the following chapters: 4 • LPR Printing 5 • RAW Printing • IPP Printing 6 • All-In-One Print Server Installation in Windows 98SE/Me/NT • UNIX-System Network 7 • All-In-One Print Server Installation in Mac OS 8 Package Contents This package contains the following components: 9 • Belkin Wireless G All-In-One Print Server • Detachable Antenna 10 • Power...
... the following chapters: 4 • LPR Printing 5 • RAW Printing • IPP Printing 6 • All-In-One Print Server Installation in Windows 98SE/Me/NT • UNIX-System Network 7 • All-In-One Print Server Installation in Mac OS 8 Package Contents This package contains the following components: 9 • Belkin Wireless G All-In-One Print Server • Detachable Antenna 10 • Power...
User Manual
Page 7
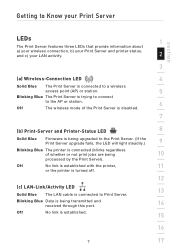
... Off No link is connected (blinks regardless of the Print Server is disabled. 7 (b) Print-Server and Printer-Status LED 8 Solid Blue Firmware is being 10 processed by the Print Server). Getting to Know your Print Server section LEDs 1 The Print Server features three LEDs that provide information about a) your wireless connection, b) your Print Server and printer status, and c) your LAN activity. 2 3 (a) Wireless...
... Off No link is connected (blinks regardless of the Print Server is disabled. 7 (b) Print-Server and Printer-Status LED 8 Solid Blue Firmware is being 10 processed by the Print Server). Getting to Know your Print Server section LEDs 1 The Print Server features three LEDs that provide information about a) your wireless connection, b) your Print Server and printer status, and c) your LAN activity. 2 3 (a) Wireless...

User Manual
Page 8
...Reset" button with a 2 pencil tip for less than 5 seconds) • While the Reset button is pressed, the Wireless-Connection, and Print-Server and Printer-Status LEDs will be OFF in the beginning and then briefly turn ON and then OFF. 5 Reset to factory default (Press the ... with a pencil tip 6 for longer than 5 seconds) • When the Print Server is rebooting, the Wireless- 4 Connection, and Print-Server and Printer Status LEDs will briefly turn ON and then back OFF. Connection, and Print-Server and Printer-Status 7 LEDs will be OFF, 3 awaiting the user to the ...
...Reset" button with a 2 pencil tip for less than 5 seconds) • While the Reset button is pressed, the Wireless-Connection, and Print-Server and Printer-Status LEDs will be OFF in the beginning and then briefly turn ON and then OFF. 5 Reset to factory default (Press the ... with a pencil tip 6 for longer than 5 seconds) • When the Print Server is rebooting, the Wireless- 4 Connection, and Print-Server and Printer Status LEDs will briefly turn ON and then back OFF. Connection, and Print-Server and Printer-Status 7 LEDs will be OFF, 3 awaiting the user to the ...
User Manual
Page 9
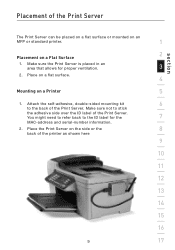
... might need to refer back to the back of the printer as shown here 9 10 11 12 13 14 15 16 9 17 Place the Print Server on a Printer 5 1. Attach the self-adhesive, double-sided mounting kit 6 to the ID label for proper ventilation. 3 2. Make sure not to stick ...the adhesive side over the ID label of the Print Server section The Print Server can be placed on a flat surface or mounted on an MFP or standard printer. 1 2 Placement on a Flat Surface 1. Placement of the...
... might need to refer back to the back of the printer as shown here 9 10 11 12 13 14 15 16 9 17 Place the Print Server on a Printer 5 1. Attach the self-adhesive, double-sided mounting kit 6 to the ID label for proper ventilation. 3 2. Make sure not to stick ...the adhesive side over the ID label of the Print Server section The Print Server can be placed on a flat surface or mounted on an MFP or standard printer. 1 2 Placement on a Flat Surface 1. Placement of the...
User Manual
Page 10
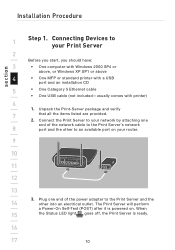
...Plug one end of the power adapter to the Print Server and the 14 other to your router. 9 10 11 12 13 3. The Print Server will perform a Power-On Self-Test (POST ) after it is ready. 16 17 10 Unpack the Print-Server package and verify 7 that all the items listed.... 2. Installation Procedure section 1 Step 1. Connecting Devices to an available port on . When 15 the Status LED light goes off, the Print Server is powered on your Print Server 2 Before you start, you should have: 3 • One computer with Windows 2000 SP4 or above, or Windows XP SP1 or above...
...Plug one end of the power adapter to the Print Server and the 14 other to your router. 9 10 11 12 13 3. The Print Server will perform a Power-On Self-Test (POST ) after it is ready. 16 17 10 Unpack the Print-Server package and verify 7 that all the items listed.... 2. Installation Procedure section 1 Step 1. Connecting Devices to an available port on . When 15 the Status LED light goes off, the Print Server is powered on your Print Server 2 Before you start, you should have: 3 • One computer with Windows 2000 SP4 or above, or Windows XP SP1 or above...
User Manual
Page 11
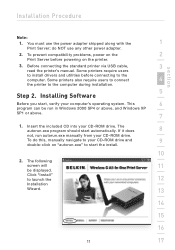
.... The autorun.exe program should start , verify your CD-ROM drive. To do NOT use the power adapter shipped along with the 1 Print Server; Click "Install" to the computer during installation. 5 Step 2. Installation Procedure section Note: 1. If it does 8 not, run in ...Windows 2000 SP4 or above, and Windows XP SP1 or above. 7 1. To prevent compatibility problems, power on the 2 Print Server before connecting to start the install. 10 2. Before connecting the standard printer via USB cable, 3 read the printer's manual. Installing Software Before ...
.... The autorun.exe program should start , verify your CD-ROM drive. To do NOT use the power adapter shipped along with the 1 Print Server; Click "Install" to the computer during installation. 5 Step 2. Installation Procedure section Note: 1. If it does 8 not, run in ...Windows 2000 SP4 or above, and Windows XP SP1 or above. 7 1. To prevent compatibility problems, power on the 2 Print Server before connecting to start the install. 10 2. Before connecting the standard printer via USB cable, 3 read the printer's manual. Installing Software Before ...
User Manual
Page 12
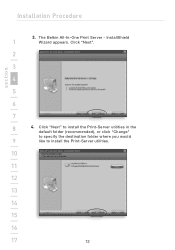
The Belkin All-In-One Print Server - Click "Next" to install the Print-Server utilities in the default folder (recommended), or click "Change" to specify the destination folder where you would 9 like to install the Print-Server utilities. 10 11 12 13 14 15 16 17 12 Click "Next". 2 3 4 5 6 7 8 4. Installation Procedure section 3. InstallShield 1 Wizard appears.
The Belkin All-In-One Print Server - Click "Next" to install the Print-Server utilities in the default folder (recommended), or click "Change" to specify the destination folder where you would 9 like to install the Print-Server utilities. 10 11 12 13 14 15 16 17 12 Click "Next". 2 3 4 5 6 7 8 4. Installation Procedure section 3. InstallShield 1 Wizard appears.
User Manual
Page 13
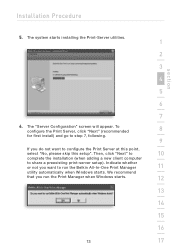
... when Windows starts. 12 13 14 15 16 13 17 The "Server Configuration" screen will appear. We recommend that you want to share a preexisting print-server setup). Indicate whether or not you run the Belkin All-In-One Print Manager 11 utility automatically when Windows starts. Then, click "Next" to 10 complete the installation (when...
... when Windows starts. 12 13 14 15 16 13 17 The "Server Configuration" screen will appear. We recommend that you want to share a preexisting print-server setup). Indicate whether or not you run the Belkin All-In-One Print Manager 11 utility automatically when Windows starts. Then, click "Next" to 10 complete the installation (when...
User Manual
Page 14
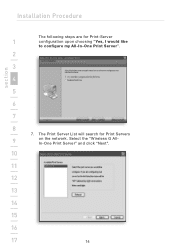
The Print Server List will search for Print-Server 1 configuration upon choosing "Yes, I would like to configure my All-In-One Print Server". 2 3 4 5 6 7 8 7. Select the "Wireless G AllIn-One Print Server" and click "Next". 10 11 12 13 14 15 16 17 14 Installation Procedure section The following steps are for Print Servers 9 on the network.
The Print Server List will search for Print-Server 1 configuration upon choosing "Yes, I would like to configure my All-In-One Print Server". 2 3 4 5 6 7 8 7. Select the "Wireless G AllIn-One Print Server" and click "Next". 10 11 12 13 14 15 16 17 14 Installation Procedure section The following steps are for Print Servers 9 on the network.
User Manual
Page 15
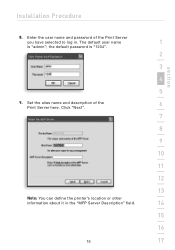
Set the alias name and description of the Print Server you have selected to log in the "MFP Server Description" field. 14 15 16 15 17 The default user name 1 is "1234". 2 3 4 5 9. Click "Next". 7 8 9 10 11 12 13 Note: You can define the printer's location or other information about it in . Installation Procedure section 8. Enter the user name and password of the 6 Print Server here. the default password is "admin";
Set the alias name and description of the Print Server you have selected to log in the "MFP Server Description" field. 14 15 16 15 17 The default user name 1 is "1234". 2 3 4 5 9. Click "Next". 7 8 9 10 11 12 13 Note: You can define the printer's location or other information about it in . Installation Procedure section 8. Enter the user name and password of the 6 Print Server here. the default password is "admin";

User Manual
Page 16
Click 14 "Next" to continue on to step 3 in the "TCP/IP Configuration" window for the TCP/IP configuration. 2 3 4 5 6 7 8 The Print Server by default will try to "DHCP" for your reference. Installation Procedure section 10. To set up the IP address of the Print Server, the default 1 is set to get an IP 9 address from the connected Belkin Router running the Dynamic Host Configuration Protocol (DHCP) 10 server and the following screen will appear. 11 12 13 The newly assigned TCP/IP settings will be displayed in the installation process. 15 16 17 16
Click 14 "Next" to continue on to step 3 in the "TCP/IP Configuration" window for the TCP/IP configuration. 2 3 4 5 6 7 8 The Print Server by default will try to "DHCP" for your reference. Installation Procedure section 10. To set up the IP address of the Print Server, the default 1 is set to get an IP 9 address from the connected Belkin Router running the Dynamic Host Configuration Protocol (DHCP) 10 server and the following screen will appear. 11 12 13 The newly assigned TCP/IP settings will be displayed in the installation process. 15 16 17 16
User Manual
Page 17
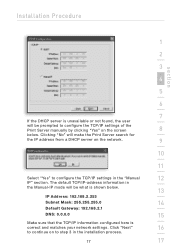
Clicking "No" will be prompted to configure the TCP/IP settings of the Print Server manually by clicking "Yes" on the screen 8 below . 13 IP Address: 192.168.2.253 Subnet Mask: 255.255.255.0 14 Default Gateway: 192.168.2.1 DNS: 0.0.0.0 ...15 Make sure that the TCP/IP information configured here is unavailable or not found, the user will make the Print Server search for the IP address from a DHCP server on to configure the TCP/IP settings in the installation process. 17 17 The default TCP/IP-address information in the Manual...
Clicking "No" will be prompted to configure the TCP/IP settings of the Print Server manually by clicking "Yes" on the screen 8 below . 13 IP Address: 192.168.2.253 Subnet Mask: 255.255.255.0 14 Default Gateway: 192.168.2.1 DNS: 0.0.0.0 ...15 Make sure that the TCP/IP information configured here is unavailable or not found, the user will make the Print Server search for the IP address from a DHCP server on to configure the TCP/IP settings in the installation process. 17 17 The default TCP/IP-address information in the Manual...
User Manual
Page 18
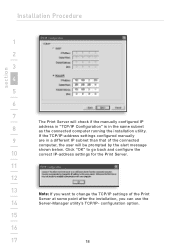
... check if the manually configured IP 8 address in "TCP/IP Configuration" is in a different IP subnet than that of the Print Server at some point after the installation, you can use the 14 Server-Manager utility's TCP/IP- Click "OK" to go back and configure the 10 correct IP-address settings for the... Print Server. 11 12 13 Note: If you want to change the TCP/IP settings of the connected computer, the user will be prompted by the alert ...
... check if the manually configured IP 8 address in "TCP/IP Configuration" is in a different IP subnet than that of the Print Server at some point after the installation, you can use the 14 Server-Manager utility's TCP/IP- Click "OK" to go back and configure the 10 correct IP-address settings for the... Print Server. 11 12 13 Note: If you want to change the TCP/IP settings of the connected computer, the user will be prompted by the alert ...
User Manual
Page 19
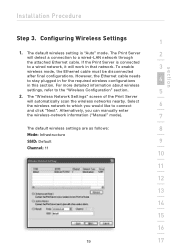
...wireless settings, refer to a wired network, it will work in this section. The "Wireless Network Settings" screen of the Print Server will detect a connection to connect 6 and click "Next". The default wireless setting is connected to the "Wireless Configuration" section. 5 2. If... the Print Server is "Auto" mode. However, the Ethernet cable needs to which you can manually enter the wireless-network information ("Manual" mode). 7...
...wireless settings, refer to a wired network, it will work in this section. The "Wireless Network Settings" screen of the Print Server will detect a connection to connect 6 and click "Next". The default wireless setting is connected to the "Wireless Configuration" section. 5 2. If... the Print Server is "Auto" mode. However, the Ethernet cable needs to which you can manually enter the wireless-network information ("Manual" mode). 7...

User Manual
Page 21
.... 21 17 Indicate whether or not you do run the Belkin All-In-One Print Manager utility automatically when 12 Windows starts. These ports will only 10 be opened for the Print-Server program to run the Print Manager when Windows starts. 13 14 15 You will now ...start seeing the Print-Server logo on your system. 11 6. Installation Procedure section 1 2 3 4 5 6 7 8 Note: If ...
.... 21 17 Indicate whether or not you do run the Belkin All-In-One Print Manager utility automatically when 12 Windows starts. These ports will only 10 be opened for the Print-Server program to run the Print Manager when Windows starts. 13 14 15 You will now ...start seeing the Print-Server logo on your system. 11 6. Installation Procedure section 1 2 3 4 5 6 7 8 Note: If ...