
User Manual
Page 2
...Table of Contents 1. Installation 10 Pre-Configuration 10 Mounting the PRO3 KVM Switch 11 Connecting the Console to the PRO3 KVM Switch 14 Connecting PS/2 Servers to the PRO3 KVM Switch 15 Connecting Multiple PRO3 KVM Switches (Daisy-Chaining) .......17 Powering Up the Systems 22 4. Information 39 Using your PRO3 KVM Switch 23 Selecting a Server or BANK Using Hot-Key Commands 23 Selecting a Server Using Direct-Access Port Selectors 25 Selecting a BANK Using Scroll Buttons 25 AutoScan Mode 26 On-Screen Display (OSD 27 Keyboard Hot-Key-Command Shortcuts 31 Updating Firmware...
...Table of Contents 1. Installation 10 Pre-Configuration 10 Mounting the PRO3 KVM Switch 11 Connecting the Console to the PRO3 KVM Switch 14 Connecting PS/2 Servers to the PRO3 KVM Switch 15 Connecting Multiple PRO3 KVM Switches (Daisy-Chaining) .......17 Powering Up the Systems 22 4. Information 39 Using your PRO3 KVM Switch 23 Selecting a Server or BANK Using Hot-Key Commands 23 Selecting a Server Using Direct-Access Port Selectors 25 Selecting a BANK Using Scroll Buttons 25 AutoScan Mode 26 On-Screen Display (OSD 27 Keyboard Hot-Key-Command Shortcuts 31 Updating Firmware...

User Manual
Page 3
... 2 to the Quick Installation Guide 8 included in mind. For quick and easy installation, please refer to delivering high-quality, durable products at an 3 affordable price. Our diverse line of a problem. PRO3 KVM Switches can be daisy-chained together easily to enable 6 management of this KVM Switch with the most advanced server-room and laboratory environments, offering intuitive port 5 indicators, direct-access port selectors, high video resolution support, and flash-upgradeable firmware. We appreciate...
... 2 to the Quick Installation Guide 8 included in mind. For quick and easy installation, please refer to delivering high-quality, durable products at an 3 affordable price. Our diverse line of a problem. PRO3 KVM Switches can be daisy-chained together easily to enable 6 management of this KVM Switch with the most advanced server-room and laboratory environments, offering intuitive port 5 indicators, direct-access port selectors, high video resolution support, and flash-upgradeable firmware. We appreciate...

User Manual
Page 5
... 5 (OSD) menu. • Video Resolution 6 The PRO3 KVM Switch supports video resolutions of switching between servers and assigning the hot-key scheme. The time interval allotted for simple, manual port-selection. 3 The OSD can also be daisy-chained together using dedicated ports, so you can be set your KVM configuration as 256 servers, instantaneously. 3 • AutoScan The AutoScan feature allows you can select one . By using designated key 2 commands.
... 5 (OSD) menu. • Video Resolution 6 The PRO3 KVM Switch supports video resolutions of switching between servers and assigning the hot-key scheme. The time interval allotted for simple, manual port-selection. 3 The OSD can also be daisy-chained together using dedicated ports, so you can be set your KVM configuration as 256 servers, instantaneously. 3 • AutoScan The AutoScan feature allows you can select one . By using designated key 2 commands.

User Manual
Page 6
... install the latest firmware on the front panel of the PRO3 KVM Switch serves as a quick indicator of your PRO3 KVM Switch and can be downloaded from Belkin's support website at www.belkin.com/support. 4 A flashing port LED indicates that there is pushed, the LED above each direct-access port selector illuminates to indicate that port. • 7-Segment LED Display When daisy-chaining multiple PRO3 KVM Switches together, the 7-segment LED display serves as a status monitor. As a port selector is no server connected...
... install the latest firmware on the front panel of the PRO3 KVM Switch serves as a quick indicator of your PRO3 KVM Switch and can be downloaded from Belkin's support website at www.belkin.com/support. 4 A flashing port LED indicates that there is pushed, the LED above each direct-access port selector illuminates to indicate that port. • 7-Segment LED Display When daisy-chaining multiple PRO3 KVM Switches together, the 7-segment LED display serves as a status monitor. As a port selector is no server connected...

User Manual
Page 12
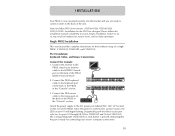
... are natively rack-mountable in relation to your console (keyboard, mouse, and monitor) by up to 25 feet (7.6m). Note: The Belkin OmniView CAT5 Extender (F1D084vea2) may cause irreversible damage of the cables between the PRO3 KVM Switch and the connected servers does not exceed 25 feet (7.6m). Rack-mount hardware is powered off. Installation Pre-Configuration Where to Place the PRO3 KVM Switch The enclosure of a single PRO3 KVM Switch (F1DA104Qea, F1DA108Qea...
... are natively rack-mountable in relation to your console (keyboard, mouse, and monitor) by up to 25 feet (7.6m). Note: The Belkin OmniView CAT5 Extender (F1D084vea2) may cause irreversible damage of the cables between the PRO3 KVM Switch and the connected servers does not exceed 25 feet (7.6m). Rack-mount hardware is powered off. Installation Pre-Configuration Where to Place the PRO3 KVM Switch The enclosure of a single PRO3 KVM Switch (F1DA104Qea, F1DA108Qea...

User Manual
Page 17
section Installation 1 2 3 Your PRO3 KVM Switch is now installed and you are ready to connect 4 your servers. 5 Connecting PS/2 Servers to the PRO3 KVM Switch 6 Step 1 Make sure your server is powered off. 7 Step 2 Using the Belkin Dual-Port Micro-Cable Kit for PS/2 (F1D9400-XX), connect the 8 VGA connector to the monitor port on your server. (Refer to diagram below.) Step 3 Connect the PS/2 mouse and keyboard connectors to the mouse and keyboard ports on the server. (Refer to diagram below.) 15
section Installation 1 2 3 Your PRO3 KVM Switch is now installed and you are ready to connect 4 your servers. 5 Connecting PS/2 Servers to the PRO3 KVM Switch 6 Step 1 Make sure your server is powered off. 7 Step 2 Using the Belkin Dual-Port Micro-Cable Kit for PS/2 (F1D9400-XX), connect the 8 VGA connector to the monitor port on your server. (Refer to diagram below.) Step 3 Connect the PS/2 mouse and keyboard connectors to the mouse and keyboard ports on the server. (Refer to diagram below.) 15

User Manual
Page 23
... connecting each unit's power supply. You can also reset the primary KVM switch to the PRO3 KVM Switch" section on the primary KVM switch will register and display the BANK address of the attached secondary KVM switch. 21 If all secondary KVM switches are connected properly. section Installation Connecting the Servers: 1 Step 1: Connect all servers to the primary and secondary KVM switches. 2 Refer to the "Connecting PS/2 Servers to detect newly 7 added secondary KVM switches. You should display 4 its BANK address...
... connecting each unit's power supply. You can also reset the primary KVM switch to the PRO3 KVM Switch" section on the primary KVM switch will register and display the BANK address of the attached secondary KVM switch. 21 If all secondary KVM switches are connected properly. section Installation Connecting the Servers: 1 Step 1: Connect all servers to the primary and secondary KVM switches. 2 Refer to the "Connecting PS/2 Servers to detect newly 7 added secondary KVM switches. You should display 4 its BANK address...

User Manual
Page 32
... can set up the access list. Using your PRO3 KVM Switch Access List This feature allows you to select which key will not function in the OSD. 30 The column on a server before switching to enable/deny the access right for all hot-key commands is enabled. The users are listed by their number (1 to discretely specify the user access at a port level. Hot Key This allows you to 8). To change the scan time, use the arrow keys...
... can set up the access list. Using your PRO3 KVM Switch Access List This feature allows you to select which key will not function in the OSD. 30 The column on a server before switching to enable/deny the access right for all hot-key commands is enabled. The users are listed by their number (1 to discretely specify the user access at a port level. Hot Key This allows you to 8). To change the scan time, use the arrow keys...

User Manual
Page 34
... your firmware, download the appropriate firmware file and utility from www.belkin.com/support/. Notice that there are two flashes that connects between the PRO3 KVM Switch and the computer. Using your PRO3 KVM Switch Updating Firmware The PRO3 KVM Switch features flash-upgradeable firmware to -RJ11; You will guide you are free for the life of updating the firmware on the PRO3 KVM Switch. 2. To update the firmware, you select the correct FW upgrade file and set the Flash DIP switch in the correct position. This server must...
... your firmware, download the appropriate firmware file and utility from www.belkin.com/support/. Notice that there are two flashes that connects between the PRO3 KVM Switch and the computer. Using your PRO3 KVM Switch Updating Firmware The PRO3 KVM Switch features flash-upgradeable firmware to -RJ11; You will guide you are free for the life of updating the firmware on the PRO3 KVM Switch. 2. To update the firmware, you select the correct FW upgrade file and set the Flash DIP switch in the correct position. This server must...

User Manual
Page 36
... hot keys, through a simple serial connection. Q: What does flash-upgradeable mean? A: The PRO3 KVM Switch can the server be placed up to 25 feet (7.6m) away from your PRO3 KVM Switch firmware at any operating system that runs on the market with the latest features and enhancements. Operating systems include, but are not limited to switch between ports? A: The advanced video circuit in this User Manual. For USB console support, use Belkin models...
... hot keys, through a simple serial connection. Q: What does flash-upgradeable mean? A: The PRO3 KVM Switch can the server be placed up to 25 feet (7.6m) away from your PRO3 KVM Switch firmware at any operating system that runs on the market with the latest features and enhancements. Operating systems include, but are not limited to switch between ports? A: The advanced video circuit in this User Manual. For USB console support, use Belkin models...

User Manual
Page 37
... for use. For USB Sun server support, use the PRO3 KVM Switch to function. Q: Does the PRO3 KVM Switch support Linux? A: Yes, the PRO3 KVM Switch works with Red Hat and other Linux 8 distributions configured for the PRO3 KVM Switch? section Frequently Asked Questions Q: Do I have to install any software to use the PRO3 KVM Switch? 1 A: No, the PRO3 KVM Switch does not require any drivers or software to the 2 console port, and it is the warranty for PS/2 support. The PRO3 KVM Switch detects the 5 power from the PS/2 ports...
... for use. For USB Sun server support, use the PRO3 KVM Switch to function. Q: Does the PRO3 KVM Switch support Linux? A: Yes, the PRO3 KVM Switch works with Red Hat and other Linux 8 distributions configured for the PRO3 KVM Switch? section Frequently Asked Questions Q: Do I have to install any software to use the PRO3 KVM Switch? 1 A: No, the PRO3 KVM Switch does not require any drivers or software to the 2 console port, and it is the warranty for PS/2 support. The PRO3 KVM Switch detects the 5 power from the PS/2 ports...
User Manual
Page 39
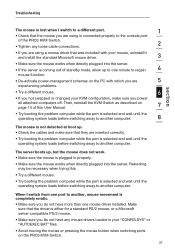
... to one mouse driver installed. Make sure that the driver is plugged in your "CONFIG.SYS" or "AUTOEXEC.BAT" files. • Avoid moving the mouse or pressing the mouse button when switching ports on the PRO3 KVM Switch. 37 The server boots up . • Check the cables and make sure you power all attached computers off. Troubleshooting section The mouse is lost when I switch from one port to another, mouse...
... to one mouse driver installed. Make sure that the driver is plugged in your "CONFIG.SYS" or "AUTOEXEC.BAT" files. • Avoid moving the mouse or pressing the mouse button when switching ports on the PRO3 KVM Switch. 37 The server boots up . • Check the cables and make sure you power all attached computers off. Troubleshooting section The mouse is lost when I switch from one port to another, mouse...
User Manual
Page 40
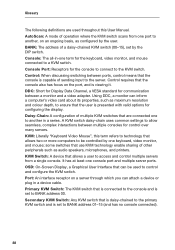
... one console port and multiple server ports. KVM Switch: A device that are used to control and configure the KVM switch. AutoScan: A mode of a daisy-chained KVM switch (00-15), set to BANK address 00. Secondary KVM Switch: Any KVM switch that the user is capable of multiple KVM switches that allows a user to access and control multiple servers from one port to another in a device cable. Control: When discussing switching between a monitor and a video adapter. Daisy-Chain: A configuration of sending input to the server. DDC: Short for Display Data Channel...
... one console port and multiple server ports. KVM Switch: A device that are used to control and configure the KVM switch. AutoScan: A mode of a daisy-chained KVM switch (00-15), set to BANK address 00. Secondary KVM Switch: Any KVM switch that the user is capable of multiple KVM switches that allows a user to access and control multiple servers from one port to another in a device cable. Control: When discussing switching between a monitor and a video adapter. Daisy-Chain: A configuration of sending input to the server. DDC: Short for Display Data Channel...

User Manual
Page 3
... troubleshooting-in a variety of capacities suitable for purchasing the PRO2. For quick and easy installation, please refer to -RJ45 Parallel Flash Cable • User Manual • Quick Installation Guide • 12-Volt DC, 1-Amp Power Supply • Registration Card 1 Package Contents • OmniView PRO2 Series KVM Switch • Adjustable Rack-mount Brackets with the most advanced server room and laboratory environments, offering intuitive port indicators, direct-access port selectors, high video resolution support, and flash upgradeable firmware. Belkin...
... troubleshooting-in a variety of capacities suitable for purchasing the PRO2. For quick and easy installation, please refer to -RJ45 Parallel Flash Cable • User Manual • Quick Installation Guide • 12-Volt DC, 1-Amp Power Supply • Registration Card 1 Package Contents • OmniView PRO2 Series KVM Switch • Adjustable Rack-mount Brackets with the most advanced server room and laboratory environments, offering intuitive port indicators, direct-access port selectors, high video resolution support, and flash upgradeable firmware. Belkin...

User Manual
Page 4
... control up to 2048x1536@85Hz. They support both PS/2 and USB output. For a listing of switching between computers and setting the time interval for your PRO2. For complete instructions on your PRO2 to maintain consistent compatibility with one . To preserve signal integrity at belkin.com for each connected server throughout the system. This enables your PRO2 requires 75-Ohm coaxial VGA cabling. Refer to the enclosed flash upgrade instruction document...
... control up to 2048x1536@85Hz. They support both PS/2 and USB output. For a listing of switching between computers and setting the time interval for your PRO2. For complete instructions on your PRO2 to maintain consistent compatibility with one . To preserve signal integrity at belkin.com for each connected server throughout the system. This enables your PRO2 requires 75-Ohm coaxial VGA cabling. Refer to the enclosed flash upgrade instruction document...
User Manual
Page 12
... the power is ready for connecting your monitor cable to a power source, the LED for F1DA116T). Connect the PS/2 keyboard cable to the PRO2. Sequentially push the direct-access port selectors for ports 01 through 08 (04 for F1DA104T and 16 for port 01 will begin flashing. Please follow this installation manual completely to the back of the PRO2 labeled "Console VGA". 2. INSTALLATION Your PRO2 is now mounted securely...
... the power is ready for connecting your monitor cable to a power source, the LED for F1DA116T). Connect the PS/2 keyboard cable to the PRO2. Sequentially push the direct-access port selectors for ports 01 through 08 (04 for F1DA104T and 16 for port 01 will begin flashing. Please follow this installation manual completely to the back of the PRO2 labeled "Console VGA". 2. INSTALLATION Your PRO2 is now mounted securely...
User Manual
Page 17
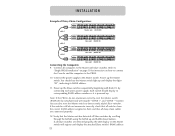
... address number as it is powered up the Slave switches sequentially, beginning with Bank 01, by simultaneously pressing the "BANK +" and "BANK -" buttons. You can also reset the Master switch to the Master switch. If all daisy-chain cables are detected properly, the LED display on how to connect the Console and the computers to the PRO2. 10. Power up and BANK down buttons. INSTALLATION Example...
... address number as it is powered up the Slave switches sequentially, beginning with Bank 01, by simultaneously pressing the "BANK +" and "BANK -" buttons. You can also reset the Master switch to the Master switch. If all daisy-chain cables are detected properly, the LED display on how to connect the Console and the computers to the PRO2. 10. Power up and BANK down buttons. INSTALLATION Example...
User Manual
Page 24
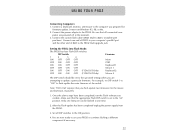
... completed, run Windows 95, 98, or Me. 2. Set all connected com- Make sure that you prepared for the mouse and keyboard, separately. 1. Connect one time. 2. It must run the Flash software executable. Note: F1DA116T requires that the appropriate Flash DIP switch is set to the specified settings when you are now ready to the PRO2. Connect the power adapter to use your computer's parallel port and the...
... completed, run Windows 95, 98, or Me. 2. Set all connected com- Make sure that you prepared for the mouse and keyboard, separately. 1. Connect one time. 2. It must run the Flash software executable. Note: F1DA116T requires that the appropriate Flash DIP switch is set to the specified settings when you are now ready to the PRO2. Connect the power adapter to use your computer's parallel port and the...

User Manual
Page 25
... a Belkin Two-Year Warranty. F1DB102P E Series 2-Port KVM Switch PS/2 Only F1DB104P E Series 4-Port KVM Switch PS/2 Only OmniView SOHO Series with PS/2 and USB combination Switches. They offer you expanded compatibility with either interface, or both, along with the additional convenience of up ; Designed for error-free boot up to 2048x1536@85Hz through a 400MHz bandwidth by the OmniView SOHO Series with Audio KVM Switch when used with fewer cables. Power for error-free boot up to 2048x1536@85Hz is supported...
... a Belkin Two-Year Warranty. F1DB102P E Series 2-Port KVM Switch PS/2 Only F1DB104P E Series 4-Port KVM Switch PS/2 Only OmniView SOHO Series with PS/2 and USB combination Switches. They offer you expanded compatibility with either interface, or both, along with the additional convenience of up ; Designed for error-free boot up to 2048x1536@85Hz through a 400MHz bandwidth by the OmniView SOHO Series with Audio KVM Switch when used with fewer cables. Power for error-free boot up to 2048x1536@85Hz is supported...
User Manual
Page 28
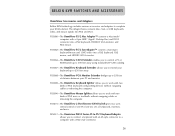
... OmniView CAT5 Extender enables you to control a PC or KVM Switch up to complete your KVM solution. BELKIN KVM SWITCHES AND ACCESSORIES OmniView Accessories and Adapters Belkin KVM technology includes various accessories and adapters to 500 feet away using standard UTP CAT5 cabling. The Adapter Series converts Mac, Sun, or USB keyboards, video, and mouse signals into a PS/2 keyboard, PS/2 mouse, and HDDB15 VGA monitor. F1D088-The OmniView VGA Monitor Extender bridges up to work with a PS...
... OmniView CAT5 Extender enables you to control a PC or KVM Switch up to complete your KVM solution. BELKIN KVM SWITCHES AND ACCESSORIES OmniView Accessories and Adapters Belkin KVM technology includes various accessories and adapters to 500 feet away using standard UTP CAT5 cabling. The Adapter Series converts Mac, Sun, or USB keyboards, video, and mouse signals into a PS/2 keyboard, PS/2 mouse, and HDDB15 VGA monitor. F1D088-The OmniView VGA Monitor Extender bridges up to work with a PS...


