Manual
Page 7
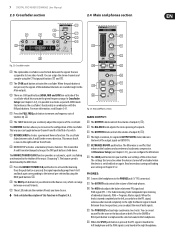
...on OUTPUT A. (34) ULTRAMIZE ON/OFF push button: The Ultramizer is an effect that enhances the loudness and assertiveness by dynamic compression. In Ultramizer Setup (see Chapter 3.4.2), it is possible to activate a special X-OVER mode that enhances the crossfader's functionality in Chapter 3.4.3. (36) (37) (39...(27) Press the BOUNCE TO MIDI CLK push button to activate the bouncing. The bounce speed is determined by using the CF Assign push buttons (10) and (65). (21) The CF ON push button activates the crossfader. 7 DIGITAL PRO MIXER DDM4000 User Manual 2.3 Crossfader section ...
...on OUTPUT A. (34) ULTRAMIZE ON/OFF push button: The Ultramizer is an effect that enhances the loudness and assertiveness by dynamic compression. In Ultramizer Setup (see Chapter 3.4.2), it is possible to activate a special X-OVER mode that enhances the crossfader's functionality in Chapter 3.4.3. (36) (37) (39...(27) Press the BOUNCE TO MIDI CLK push button to activate the bouncing. The bounce speed is determined by using the CF Assign push buttons (10) and (65). (21) The CF ON push button activates the crossfader. 7 DIGITAL PRO MIXER DDM4000 User Manual 2.3 Crossfader section ...
Manual
Page 8
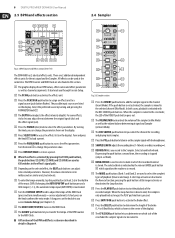
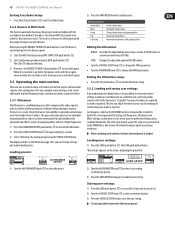
...on the display. (46) Press SELECT/LOW to the Sampler. A long press on the knob lets you access Console Setup (see Chapter 3.1). (52) The MIDI START/STOP/ESC turns on the MIDI Clock. (53) The ADJUST push buttons let you can adjust time-related parameters. Select a bank beforehand. There are...50) (45) (50) (42) (49) (43) (53) (52) (56) (57) (58) (59) (60) Fig. 2.5: BPM Counter and Effects section (here FX 1) (62) (61) The DDM4000 has 2 identical effects units. All effects can be routed to determine the length of the brake (1, 4 or 8 Beat Brake, which is shown in the effect...
...on the display. (46) Press SELECT/LOW to the Sampler. A long press on the knob lets you access Console Setup (see Chapter 3.1). (52) The MIDI START/STOP/ESC turns on the MIDI Clock. (53) The ADJUST push buttons let you can adjust time-related parameters. Select a bank beforehand. There are...50) (45) (50) (42) (49) (43) (53) (52) (56) (57) (58) (59) (60) Fig. 2.5: BPM Counter and Effects section (here FX 1) (62) (61) The DDM4000 has 2 identical effects units. All effects can be routed to determine the length of the brake (1, 4 or 8 Beat Brake, which is shown in the effect...
Manual
Page 9
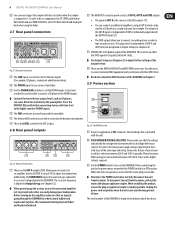
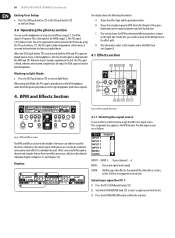
... for dynamic microphones. (72) This is the LEVEL control for example. Fig. 2.7: Rear panel connectors (76) These are the MIDI IN, MIDI OUT and MIDI THRU connectors that allow you to be able to connect a CD player to Line level in order to the power mains, ensure ...subwoofer. Before connecting the unit to avoid sudden and unpleasant surprises. The crossover frequency is adjusted in Output Setup (see Chapter 6.2) to tape-record your loudspeakers. 9 DIGITAL PRO MIXER DDM4000 User Manual (66) You can even trigger the sampler with the crossfader when the sampler is assigned ...
... for dynamic microphones. (72) This is the LEVEL control for example. Fig. 2.7: Rear panel connectors (76) These are the MIDI IN, MIDI OUT and MIDI THRU connectors that allow you to be able to connect a CD player to Line level in order to the power mains, ensure ...subwoofer. Before connecting the unit to avoid sudden and unpleasant surprises. The crossover frequency is adjusted in Output Setup (see Chapter 6.2) to tape-record your loudspeakers. 9 DIGITAL PRO MIXER DDM4000 User Manual (66) You can even trigger the sampler with the crossfader when the sampler is assigned ...
Manual
Page 15
...mixer. This lets you should specify a the Bounce speed: 1) Start the MIDI Clock by pressing MIDI START-STOP push button (52). 2) Select the bounce speed by turning and pressing the CONSOLE SETUP knob. The LOAD push button flashes. The processing takes place in two ... pumping effect Editing the Ultramizer: RANGE Describes the adjustable dynamic range. 15 DIGITAL PRO MIXER DDM4000 User Manual Exiting Crossfader Setup: • Press the ESC push button (52) to exit Crossfader Setup. 3.4.3 Bounce to work. Storing user settings: 1) Press the LOAD push button (35) to store the...
...mixer. This lets you should specify a the Bounce speed: 1) Start the MIDI Clock by pressing MIDI START-STOP push button (52). 2) Select the bounce speed by turning and pressing the CONSOLE SETUP knob. The LOAD push button flashes. The processing takes place in two ... pumping effect Editing the Ultramizer: RANGE Describes the adjustable dynamic range. 15 DIGITAL PRO MIXER DDM4000 User Manual Exiting Crossfader Setup: • Press the ESC push button (52) to exit Crossfader Setup. 3.4.3 Bounce to work. Storing user settings: 1) Press the LOAD push button (35) to store the...
Manual
Page 16
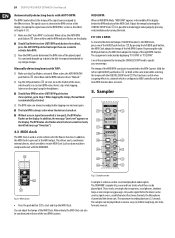
... are described in Split Mode: • Press the SPLIT push button (40) to activate Split Mode. D This information refers to the Sampler and/or the MIDI Clock (see the activity of both mono signals). (45) (44) 4. BPM and Effects Section (43) (49) (42) (53) (52) Fig. 4.2: Effects section (here...stereo in the effect path. INPUT 4: Stereo channels 1 - 4. 16 DIGITAL PRO MIXER DDM4000 User Manual Exiting User Setup: • Press the LOAD push button (35) or the ESC push button (52) to exit User Setup. 3.6 Operating the phones section You can either be used as beats on the right ...
... are described in Split Mode: • Press the SPLIT push button (40) to activate Split Mode. D This information refers to the Sampler and/or the MIDI Clock (see the activity of both mono signals). (45) (44) 4. BPM and Effects Section (43) (49) (42) (53) (52) Fig. 4.2: Effects section (here...stereo in the effect path. INPUT 4: Stereo channels 1 - 4. 16 DIGITAL PRO MIXER DDM4000 User Manual Exiting User Setup: • Press the LOAD push button (35) or the ESC push button (52) to exit User Setup. 3.6 Operating the phones section You can either be used as beats on the right ...
Manual
Page 20
...changes. The maximum recording duration is given out at the same time) while selecting the tempo with the CONSOLE SETUP knob (51). 20 DIGITAL PRO MIXER DDM4000 User Manual Automatically detecting beats with AUTO BPM: The BPM Counter detects the tempo of the signal source assigned to... as signal source, usually found on the display. ◊ Should Tap Mode be clearly identified (message "Uncertain"). 4.3 MIDI clock The MIDI Clock is activated. MIDI BPM: When in MIDI BPM Mode, "MIDI BPM" appears in on the display. Hold the left BPM Counter. Here's a tip: while tapping, listen in the...
...changes. The maximum recording duration is given out at the same time) while selecting the tempo with the CONSOLE SETUP knob (51). 20 DIGITAL PRO MIXER DDM4000 User Manual Automatically detecting beats with AUTO BPM: The BPM Counter detects the tempo of the signal source assigned to... as signal source, usually found on the display. ◊ Should Tap Mode be clearly identified (message "Uncertain"). 4.3 MIDI clock The MIDI Clock is activated. MIDI BPM: When in MIDI BPM Mode, "MIDI BPM" appears in on the display. Hold the left BPM Counter. Here's a tip: while tapping, listen in the...
Manual
Page 23
... used for a very reasonable price. 7.2 Common MIDI settings The MIDI settings are aligned with the connected computer. 1) Open MIDI Setup (see Table 10.2). The MIDI Setup page appears on which can be purchased as MIDI Controller The DDM4000 can also be active the next time you made on the MIDI Setup page. 1) Press the CONSOLE SETUP knob (51) for approximately 2 seconds...
... used for a very reasonable price. 7.2 Common MIDI settings The MIDI settings are aligned with the connected computer. 1) Open MIDI Setup (see Table 10.2). The MIDI Setup page appears on which can be purchased as MIDI Controller The DDM4000 can also be active the next time you made on the MIDI Setup page. 1) Press the CONSOLE SETUP knob (51) for approximately 2 seconds...
Manual
Page 24
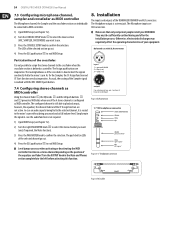
...function is defined as controller. Otherwise, electrostatic discharges may negatively affect the operating characteristics of the BEHRINGER DDM4000 are not active. As for the Sampler, the CF Assign function and CF Start function are...DDM4000 User Manual 7.3 Configuring microphone channel, sampler and crossfader as MIDI controller The Microphone channel, the Sampler and the crossfader section can occur when activating or deactivating the MIDI controller function in a stereo channel depending on the position of the selected section go out. 4) Press the ESC push button (52) to exit MIDI Setup...
...function is defined as controller. Otherwise, electrostatic discharges may negatively affect the operating characteristics of the BEHRINGER DDM4000 are not active. As for the Sampler, the CF Assign function and CF Start function are...DDM4000 User Manual 7.3 Configuring microphone channel, sampler and crossfader as MIDI controller The Microphone channel, the Sampler and the crossfader section can occur when activating or deactivating the MIDI controller function in a stereo channel depending on the position of the selected section go out. 4) Press the ESC push button (52) to exit MIDI Setup...
View Sheet
Page 2
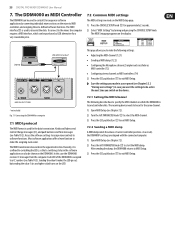
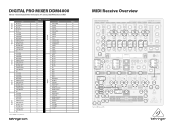
...LOOP Bank 2 MODE Bank 2 amber MODE Bank 2 blue SMP FX ON FX SELECT CF ASSIGN A CF ASSIGN B CF START MIDI CC 23 24 25 26 27 28 29 30 31 40 41 42 43 244 445 46 47 95 96 97 98 99 ...105 106 107 108 109 110 111 112 113 114 115 116 117 118 119 120 121 122 123 124 MIDI Receive Overview cc 56 cc 55 cc 66 cc 65 cc 76 cc 75 cc 86 cc 85 cc ...122 cc 123 cc 30 Fig. A.2: MIDI Receive LEDs DIGITAL PRO MIXER DDM4000 Ultimate 5-Channel Digital DJ Mixer with Sampler, 4 FX Sections, Dual BPM Counters and MIDI Channel 4 Channel 3 Channel 2 Channel 1 Mic channel LED MIC SETUP MIC UMIC ON MIC FX ON MIC ...
...LOOP Bank 2 MODE Bank 2 amber MODE Bank 2 blue SMP FX ON FX SELECT CF ASSIGN A CF ASSIGN B CF START MIDI CC 23 24 25 26 27 28 29 30 31 40 41 42 43 244 445 46 47 95 96 97 98 99 ...105 106 107 108 109 110 111 112 113 114 115 116 117 118 119 120 121 122 123 124 MIDI Receive Overview cc 56 cc 55 cc 66 cc 65 cc 76 cc 75 cc 86 cc 85 cc ...122 cc 123 cc 30 Fig. A.2: MIDI Receive LEDs DIGITAL PRO MIXER DDM4000 Ultimate 5-Channel Digital DJ Mixer with Sampler, 4 FX Sections, Dual BPM Counters and MIDI Channel 4 Channel 3 Channel 2 Channel 1 Mic channel LED MIC SETUP MIC UMIC ON MIC FX ON MIC ...
Quick Start Guide
Page 7
...shown on the display). However, the values entered are listed on the display. A long press on the knob lets you access Console Setup. (52) The MIDI START/STOP/ESC turns on which signal is to be displayed on the selected effect, the BEAT push buttons can adjust time-related ...effect names and effect parameters as well as the volume balance between sides A and B in Mic Setup. (19) The TALK ON push button activates the Talkover function. 12 DIGITAL PRO MIXER DDM4000 DIGITAL PRO MIXER DDM4000 Controls (EN) Controls (1) The input select switch lets you can adjust the mix of both signals...
...shown on the display). However, the values entered are listed on the display. A long press on the knob lets you access Console Setup. (52) The MIDI START/STOP/ESC turns on which signal is to be displayed on the selected effect, the BEAT push buttons can adjust time-related ...effect names and effect parameters as well as the volume balance between sides A and B in Mic Setup. (19) The TALK ON push button activates the Talkover function. 12 DIGITAL PRO MIXER DDM4000 DIGITAL PRO MIXER DDM4000 Controls (EN) Controls (1) The input select switch lets you can adjust the mix of both signals...

