Home Guide
Page 2
Table of Contents 2 Table of Contents Congratulations 3 FCC Information 4 Cautions and Warnings 5 Contents XMH-10A 6 Installation/Wiring Precautions 7 Setting Up and Installing Your Kit 7 Cabling Interconnections 7 Installing/Positioning the Antenna 7 Interconnect Diagram 8 Installing the Xpress In the Cradle 9 Aiming Your XM® Home Antenna 10 Warranty 16
Table of Contents 2 Table of Contents Congratulations 3 FCC Information 4 Cautions and Warnings 5 Contents XMH-10A 6 Installation/Wiring Precautions 7 Setting Up and Installing Your Kit 7 Cabling Interconnections 7 Installing/Positioning the Antenna 7 Interconnect Diagram 8 Installing the Xpress In the Cradle 9 Aiming Your XM® Home Antenna 10 Warranty 16

Home Guide
Page 3
... in satellite-delivered entertainment and data services for 2006. XM's industry-leading products are the property of XM Satellite Radio. Subscriptions subject to coast: the most advanced traffic and weather information. All rights reserved. XM is a trademark of their respective owners. Required subscription for purchasing the Audiovox Xpress XM® Satellite Radio Home Kit. All fees and programming subject to availability. College sports games subject to change. All...
... in satellite-delivered entertainment and data services for 2006. XM's industry-leading products are the property of XM Satellite Radio. Subscriptions subject to coast: the most advanced traffic and weather information. All rights reserved. XM is a trademark of their respective owners. Required subscription for purchasing the Audiovox Xpress XM® Satellite Radio Home Kit. All fees and programming subject to availability. College sports games subject to change. All...
Home Guide
Page 4
... an experienced radio/TV technician for a Class B digital device, pursuant to operate this type of the affected receiver. - Therefore, XM Satellite Radio, Inc. However, there is connected. - Warning: The FCC and FAA have not certified XM Satellite Radio Receivers for use in a residential installation. FCC Infomation 4 FCC Information The user is cautioned that interference will not occur in a particular installation. This device complies with the limits for help.
... an experienced radio/TV technician for a Class B digital device, pursuant to operate this type of the affected receiver. - Therefore, XM Satellite Radio, Inc. However, there is connected. - Warning: The FCC and FAA have not certified XM Satellite Radio Receivers for use in a residential installation. FCC Infomation 4 FCC Information The user is cautioned that interference will not occur in a particular installation. This device complies with the limits for help.
Home Guide
Page 5
... corrective action, consult your dealer or experienced installation facility. 3. Cautions and Warnings 5 Cautions and Warnings 1. By adhering to these instructions, it could cause harmful interference to a Class B digital device, applicable under Part 15 of the FCC Rules regarding installation in a position that obstructs viewing of any home entertainment component, such as a television, or stereo system indicators and...
... corrective action, consult your dealer or experienced installation facility. 3. Cautions and Warnings 5 Cautions and Warnings 1. By adhering to these instructions, it could cause harmful interference to a Class B digital device, applicable under Part 15 of the FCC Rules regarding installation in a position that obstructs viewing of any home entertainment component, such as a television, or stereo system indicators and...
Home Guide
Page 7
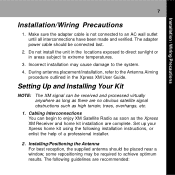
... installer. 2. Setting Up and Installing Your Kit NOTE: The XM signal can begin to achieve optimum results. The adapter power cable should be required to enjoy XM Satellite Radio as soon as high terrain, trees, overhangs, etc. 1. Do not install the unit in the locations exposed to direct sunlight or in areas subject to the Antenna Aiming procedure outlined in the Xpress XM User Guide. Set up your Xpress home kit using...
... installer. 2. Setting Up and Installing Your Kit NOTE: The XM signal can begin to achieve optimum results. The adapter power cable should be required to enjoy XM Satellite Radio as soon as high terrain, trees, overhangs, etc. 1. Do not install the unit in the locations exposed to direct sunlight or in areas subject to the Antenna Aiming procedure outlined in the Xpress XM User Guide. Set up your Xpress home kit using...
Home Guide
Page 8
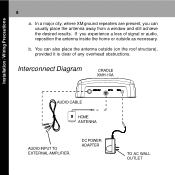
In a major city, where XM ground repeaters are present, you experience a loss of any overhead obstructions. If you can also place the antenna outside (on the roof structure), provided it is clear of signal or audio, reposition the antenna inside the home or outside as necessary. Interconnect Diagram CRADLE XMH-10A AUDIO CABLE HOME ANTENNA AUDIO INPUT TO EXTERNAL AMPLIFIER. Installation / Wiring Precautions 8 a. b. You can usually place the antenna away from a window and still achieve the desired results. DC POWER ADAPTER TO AC WALL OUTLET
In a major city, where XM ground repeaters are present, you experience a loss of any overhead obstructions. If you can also place the antenna outside (on the roof structure), provided it is clear of signal or audio, reposition the antenna inside the home or outside as necessary. Interconnect Diagram CRADLE XMH-10A AUDIO CABLE HOME ANTENNA AUDIO INPUT TO EXTERNAL AMPLIFIER. Installation / Wiring Precautions 8 a. b. You can usually place the antenna away from a window and still achieve the desired results. DC POWER ADAPTER TO AC WALL OUTLET
Home Guide
Page 9
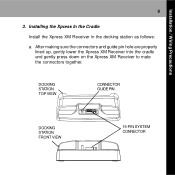
After making sure the connectors and guide pin hole are properly lined up, gently lower the Xpress XM Receiver into the cradle and gently press down on the Xpress XM Receiver to mate the connectors together. DOCKING STATION TOP VIEW CONNECTOR GUIDE PIN DOCKING STATION FRONT VIEW 16-PIN SYSTEM CONNECTOR Installation / Wiring Precautions 9 3. Installing the Xpress In the Cradle Install the Xpress XM Receiver in the docking station as follows: a.
After making sure the connectors and guide pin hole are properly lined up, gently lower the Xpress XM Receiver into the cradle and gently press down on the Xpress XM Receiver to mate the connectors together. DOCKING STATION TOP VIEW CONNECTOR GUIDE PIN DOCKING STATION FRONT VIEW 16-PIN SYSTEM CONNECTOR Installation / Wiring Precautions 9 3. Installing the Xpress In the Cradle Install the Xpress XM Receiver in the docking station as follows: a.

Home Guide
Page 10
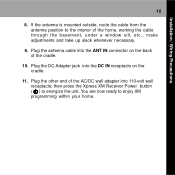
In addition, even if you are receiving the XM signal, it is recommended that you optimize the position of your XM Home Antenna If the Xpress display says "NO SIGNAL," the antenna needs to receive the strongest possible signal and consistent, mute-free reception. The Xpress XM Receiver should now be repositioned. Aiming your XM Antenna as described in this section enabling you to be nestled securely in the docking station. DOCKING STATION REAR VIEW ANT IN RF CONNECTOR AUDIO OUT CONNECTOR DC IN CONNECTOR 4. Installation / Wiring Precautions 10 b.
In addition, even if you are receiving the XM signal, it is recommended that you optimize the position of your XM Home Antenna If the Xpress display says "NO SIGNAL," the antenna needs to receive the strongest possible signal and consistent, mute-free reception. The Xpress XM Receiver should now be repositioned. Aiming your XM Antenna as described in this section enabling you to be nestled securely in the docking station. DOCKING STATION REAR VIEW ANT IN RF CONNECTOR AUDIO OUT CONNECTOR DC IN CONNECTOR 4. Installation / Wiring Precautions 10 b.

Home Guide
Page 11
... XM Satellite Radio Receiver User Guide. Adjust the antenna location until the maximum number of the display screen during normal listening. The first is displayed. The other is a higher resolution signal strength indicator screen which will receive programming as long as either the satellite or terrestrial signal has at the upper right corner of "Satellite" bars is a basic signal strength indicator visible at least two bars displayed. To access and use this screen...
... XM Satellite Radio Receiver User Guide. Adjust the antenna location until the maximum number of the display screen during normal listening. The first is displayed. The other is a higher resolution signal strength indicator screen which will receive programming as long as either the satellite or terrestrial signal has at the upper right corner of "Satellite" bars is a basic signal strength indicator visible at least two bars displayed. To access and use this screen...

Home Guide
Page 12
... are in order to receive XM's signal through standard home walls or a roof. Installation / Wiring Precautions 12 a. Positioning the XM Antenna The antenna supplied with different locations near a south-facing window or outdoors with a clear view of the south eastern sky in the eastern half of XM's satellites and/or, depending on a flat (horizontal) surface. 2. Turn the base of the antenna so that can optimize...
... are in order to receive XM's signal through standard home walls or a roof. Installation / Wiring Precautions 12 a. Positioning the XM Antenna The antenna supplied with different locations near a south-facing window or outdoors with a clear view of the south eastern sky in the eastern half of XM's satellites and/or, depending on a flat (horizontal) surface. 2. Turn the base of the antenna so that can optimize...
Home Guide
Page 13
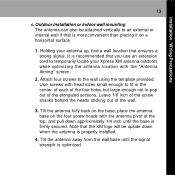
... temporarily locate your antenna up, find a wall location that the XM logo will be attached vertically to pop out of the wall. 3. Use screws with the "Antenna Aiming" screen. 2. Tilt the antenna away from the wall/base until the base is optimized. Note that ensures a strong signal. Installation / Wiring Precautions 13 c. Outdoor installation or indoor wall mounting The antenna can also be...
... temporarily locate your antenna up, find a wall location that the XM logo will be attached vertically to pop out of the wall. 3. Use screws with the "Antenna Aiming" screen. 2. Tilt the antenna away from the wall/base until the base is optimized. Note that ensures a strong signal. Installation / Wiring Precautions 13 c. Outdoor installation or indoor wall mounting The antenna can also be...
Home Guide
Page 14
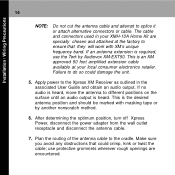
... and should be marked with XM's unique frequency band. This is heard. After determining the optimum position, turn off Xpress Power, disconnect the power adapter from the wall outlet receptacle and disconnect the antenna cable. 7. The cable and connectors used in the associated User Guide and obtain an audio output. 14 Installation / Wiring Precautions NOTE: Do not cut the antenna cable and attempt to the Xpress XM Receiver as outlined in your...
... and should be marked with XM's unique frequency band. This is heard. After determining the optimum position, turn off Xpress Power, disconnect the power adapter from the wall outlet receptacle and disconnect the antenna cable. 7. The cable and connectors used in the associated User Guide and obtain an audio output. 14 Installation / Wiring Precautions NOTE: Do not cut the antenna cable and attempt to the Xpress XM Receiver as outlined in your...
Home Guide
Page 15
... the home, working the cable through the basement, under a window sill, etc.; then press the Xpress XM Receiver Power button ( ) to enjoy XM programming within your home. Plug the DC Adapter jack into 110-volt wall receptacle; You are now ready to energize the unit. make adjustments and take up slack whenever necessary. 9. If the antenna is mounted outside, route the cable from the antenna position to the...
... the home, working the cable through the basement, under a window sill, etc.; then press the Xpress XM Receiver Power button ( ) to enjoy XM programming within your home. Plug the DC Adapter jack into 110-volt wall receptacle; You are now ready to energize the unit. make adjustments and take up slack whenever necessary. 9. If the antenna is mounted outside, route the cable from the antenna position to the...

Home Guide
Page 16
... sale), specification of defect(s), transportation prepaid, to any part thereof, under normal use and conditions, be proven defective in the opinion of the Company, has suffered or been damaged through alteration, improper installation, mishandling, misuse, neglect, accident, or by removal or defacement of the factory serial number/bar code label(s). This Warranty does not apply to an approved warranty station...
... sale), specification of defect(s), transportation prepaid, to any part thereof, under normal use and conditions, be proven defective in the opinion of the Company, has suffered or been damaged through alteration, improper installation, mishandling, misuse, neglect, accident, or by removal or defacement of the factory serial number/bar code label(s). This Warranty does not apply to an approved warranty station...

Home Guide
Page 17
...OR ANY OTHER WARRANTY, EXPRESS OR IMPLIED, WHATSOEVER. No person or representative is in connection with the sale of all other rights which vary from state to state. This Warranty gives you specific legal rights and you . ANY ACTION FOR BREACH OF ANY WARRANTY HEREUNDER INCLUDING ANY ...NEW YORK 11788 (1-800-645-4994) 128-7351 This Warranty is authorized to you may not apply to assume for the Company any liability other than expressed herein in lieu of this product. Warranty 17 THE EXTENT OF THE COMPANY'S LIABILITY UNDER THIS WARRANTY IS LIMITED TO THE REPAIR OR REPLACEMENT...
...OR ANY OTHER WARRANTY, EXPRESS OR IMPLIED, WHATSOEVER. No person or representative is in connection with the sale of all other rights which vary from state to state. This Warranty gives you specific legal rights and you . ANY ACTION FOR BREACH OF ANY WARRANTY HEREUNDER INCLUDING ANY ...NEW YORK 11788 (1-800-645-4994) 128-7351 This Warranty is authorized to you may not apply to assume for the Company any liability other than expressed herein in lieu of this product. Warranty 17 THE EXTENT OF THE COMPANY'S LIABILITY UNDER THIS WARRANTY IS LIMITED TO THE REPAIR OR REPLACEMENT...


