Instruction Manual
Page 3
... 21 MP3/WMA Operation 21 iPod Operation 22 Accessing iPod Mode 22 Controlling your new Jensen VM9311 Mobile Multimedia AM/FM/DVD Receiver for choosing a Jensen product. Preparation ...1 Features ...1 Tools and Supplies...1 Optional Accessories ...1 ...Disconnecting the Battery 2 Installation ...5 Pre-installation ...5 Wiring ...5 Final Installation ...5 Final ISO-DIN Installation 5 Controls and Indicators 6 Button Operation ...6 LCD Display/Indicators 8 Remote...
... 21 MP3/WMA Operation 21 iPod Operation 22 Accessing iPod Mode 22 Controlling your new Jensen VM9311 Mobile Multimedia AM/FM/DVD Receiver for choosing a Jensen product. Preparation ...1 Features ...1 Tools and Supplies...1 Optional Accessories ...1 ...Disconnecting the Battery 2 Installation ...5 Pre-installation ...5 Wiring ...5 Final Installation ...5 Final ISO-DIN Installation 5 Controls and Indicators 6 Button Operation ...6 LCD Display/Indicators 8 Remote...
Instruction Manual
Page 7
...nominal temperatures • Heavy duty galvanized chassis General • Full function infrared remote control • 1 NTSC composite video output for rear view video camera) never... impact to a12-volt power supply with safe driving conditions. Features DVD • Compatible formats: DVD-R, DVD-RW, DVD+R, DVD+RW, CD-R, CD-RW, CD-DA, MP3, WMA, SVCD, VCD and MPEG1, MPEG2 and ...Flex fader • Front panel (when screen is a violation of the Jensen VM9311 Mobile Multimedia Receiver. Never install this unit where operation and viewing could interfere with proper grounding. ...
...nominal temperatures • Heavy duty galvanized chassis General • Full function infrared remote control • 1 NTSC composite video output for rear view video camera) never... impact to a12-volt power supply with safe driving conditions. Features DVD • Compatible formats: DVD-R, DVD-RW, DVD+R, DVD+RW, CD-R, CD-RW, CD-DA, MP3, WMA, SVCD, VCD and MPEG1, MPEG2 and ...Flex fader • Front panel (when screen is a violation of the Jensen VM9311 Mobile Multimedia Receiver. Never install this unit where operation and viewing could interfere with proper grounding. ...

Instruction Manual
Page 13
... reset core mechanism position. 22. Press and hold to store the current radio station in preset channel 6. 14. VM9311 CONTROLS AND INDICATORS 10. 3/SCN DVD Mode: Press once to play preset radio station channel 5. TUNER Mode: Press once to start scan playback. BAND ...TUNER Mode: Press to start a playback. Press and hold to store the current radio station in preset channel 3. 11. 4/REP DVD Mode: Press once to switch between FM and AM. 15. IR Remote Control Receiver...
... reset core mechanism position. 22. Press and hold to store the current radio station in preset channel 6. 14. VM9311 CONTROLS AND INDICATORS 10. 3/SCN DVD Mode: Press once to play preset radio station channel 5. TUNER Mode: Press once to start scan playback. BAND ...TUNER Mode: Press to start a playback. Press and hold to store the current radio station in preset channel 3. 11. 4/REP DVD Mode: Press once to switch between FM and AM. 15. IR Remote Control Receiver...
Instruction Manual
Page 15
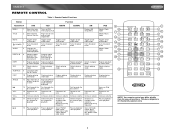
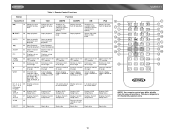
... frame A to repeat playback from the one pictured here. plays/ stores radio station; plays/stores radio station; VM9311 REMOTE CONTROL Table 1: Remote Control Functions Button Function Name/Ref # DVD VCD AM/FM CD/MP3 XM iPod MENU 1 TITLE 2 MUTE 3 POWER 4 AUDIO 5 REPT A-B 6 REPT 7 SRC 8 ... frame B Repeats playback of current chapter Selects playing mode Selects playing mode Displays playing information Plays back Picture CD with different angle of picture displayed Fast forwards the disc content Decreases volume Increases volume Selects the previous chapter ...
... frame A to repeat playback from the one pictured here. plays/ stores radio station; plays/stores radio station; VM9311 REMOTE CONTROL Table 1: Remote Control Functions Button Function Name/Ref # DVD VCD AM/FM CD/MP3 XM iPod MENU 1 TITLE 2 MUTE 3 POWER 4 AUDIO 5 REPT A-B 6 REPT 7 SRC 8 ... frame B Repeats playback of current chapter Selects playing mode Selects playing mode Displays playing information Plays back Picture CD with different angle of picture displayed Fast forwards the disc content Decreases volume Increases volume Selects the previous chapter ...
Instruction Manual
Page 16
...illustrative purposes only. 10 The above diagram is for current band DVD SETUP 30 Displays DVD Setup menu Displays DVD Setup menu Displays DVD Setup menu Displays DVD Setup menu Displays DVD Setup menu Displays DVD Setup menu SYS SETUP 31 Displays System Displays System Displays System ...disc Ejects disc Ejects disc Ejects disc Ejects disc VM9311 NOTE: Your remote control may differ slightly from the one pictured here. Decreases moni- Table 1: Remote Control Functions Button Function Name/Ref # DVD VCD AM/FM CD/MP3 XM iPod 19 Selects the next chapter for...
...illustrative purposes only. 10 The above diagram is for current band DVD SETUP 30 Displays DVD Setup menu Displays DVD Setup menu Displays DVD Setup menu Displays DVD Setup menu Displays DVD Setup menu Displays DVD Setup menu SYS SETUP 31 Displays System Displays System Displays System ...disc Ejects disc Ejects disc Ejects disc Ejects disc VM9311 NOTE: Your remote control may differ slightly from the one pictured here. Decreases moni- Table 1: Remote Control Functions Button Function Name/Ref # DVD VCD AM/FM CD/MP3 XM iPod 19 Selects the next chapter for...
Instruction Manual
Page 17
...PICTURE button (2) on the monitor panel. 2. Aspect Ratio Press the WIDE button (28) on the remote control or WIDE/ PICTURE button (2) on the monitor to adjust the aspect ratio as follows: CINEMA ...Output Modes Playing Source Video Output Modes AM/FM TUNER YUV Mode XM TUNER YUV Mode iPod YUV Mode DVD YUV Mode AUX IN CVBS Mode *CVBS - Select Item to 9. TFT Monitor Auto Open If "... the ( ) button (25) of the front zone remote control to activate the mechanism that moves the display panel into the viewing position. VM9311 USING THE TFT MONITOR Open/Close TFT Monitor Press the OPEN...
...PICTURE button (2) on the monitor panel. 2. Aspect Ratio Press the WIDE button (28) on the remote control or WIDE/ PICTURE button (2) on the monitor to adjust the aspect ratio as follows: CINEMA ...Output Modes Playing Source Video Output Modes AM/FM TUNER YUV Mode XM TUNER YUV Mode iPod YUV Mode DVD YUV Mode AUX IN CVBS Mode *CVBS - Select Item to 9. TFT Monitor Auto Open If "... the ( ) button (25) of the front zone remote control to activate the mechanism that moves the display panel into the viewing position. VM9311 USING THE TFT MONITOR Open/Close TFT Monitor Press the OPEN...

Instruction Manual
Page 18
... On / Off Press the /MUTE button (1) to turn the ROTARY ENCODER (6) on the front panel or press the VOL+/ VOLbuttons (15, 16) on remote control. Audible Beep Confirmation An audible beep tone confirms each function selection. Press the MUTE button again to mute the volume from the unit. Volume... to confirm your vehicle, which vary depending on volume setting regardless of the audio set-up and "WELCOME" appears briefly in the following order: Tuner, DVD/CD, XM, iPod, Aux In, Camera (rear view video camera) and TV. The unit will beep two times to display the "AUDIO" menu. Accessing ...
... On / Off Press the /MUTE button (1) to turn the ROTARY ENCODER (6) on the front panel or press the VOL+/ VOLbuttons (15, 16) on remote control. Audible Beep Confirmation An audible beep tone confirms each function selection. Press the MUTE button again to mute the volume from the unit. Volume... to confirm your vehicle, which vary depending on volume setting regardless of the audio set-up and "WELCOME" appears briefly in the following order: Tuner, DVD/CD, XM, iPod, Aux In, Camera (rear view video camera) and TV. The unit will beep two times to display the "AUDIO" menu. Accessing ...
Instruction Manual
Page 19
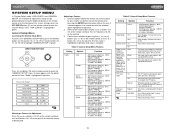
...Setup Menu To access the "GENERAL SETUP" Menu, press the direction buttons on the remote control to enter the "GENERAL SETUP" menu. Selecting a Feature for Adjustment Press the >> or /|| button (18) on the unit. VM9311 SYSTEM SETUP MENU In "System Setup" mode, "ASP CONFIG" and "GENERAL SETUP"... are available for the first item, "Radio", highlighted in light blue. 2. DIRECTION BUTTONS Press the >/|| button (18) on the joystick (16, 17, 18, 19) or remote control (14, 17, 18, 19,...
...Setup Menu To access the "GENERAL SETUP" Menu, press the direction buttons on the remote control to enter the "GENERAL SETUP" menu. Selecting a Feature for Adjustment Press the >> or /|| button (18) on the unit. VM9311 SYSTEM SETUP MENU In "System Setup" mode, "ASP CONFIG" and "GENERAL SETUP"... are available for the first item, "Radio", highlighted in light blue. 2. DIRECTION BUTTONS Press the >/|| button (18) on the joystick (16, 17, 18, 19) or remote control (14, 17, 18, 19,...

Instruction Manual
Page 20
...Clock Method 1 - Press the >> or buttons (16, 17) on the joystick (16, 17, 18, 19) or remote control (14, 17, 18, 19, 22) to adjust by pressing the >/|| button (18) on the remote or by pressing the >> or A submenu appears in light blue. 2. TFT screen open: 1. Returning to the System ...Setup Menu To return to the System Setup menu, move to press the >/|| button on the remote control. , then ASP (Audio Sound Processing) Config Menu The ASP Config Menu allows you want to highlight "ASP CONFIG" in light blue. Select a new...
...Clock Method 1 - Press the >> or buttons (16, 17) on the joystick (16, 17, 18, 19) or remote control (14, 17, 18, 19, 22) to adjust by pressing the >/|| button (18) on the remote or by pressing the >> or A submenu appears in light blue. 2. TFT screen open: 1. Returning to the System ...Setup Menu To return to the System Setup menu, move to press the >/|| button on the remote control. , then ASP (Audio Sound Processing) Config Menu The ASP Config Menu allows you want to highlight "ASP CONFIG" in light blue. Select a new...

Instruction Manual
Page 21
VM9311 AM/FM TUNER OPERATION Tuner TFT Display Switch to Radio Tuner source Press the SRC button (15) on the front panel or remote control (8) to switch to change between the following bands: FM1, FM2, FM3, AM1, and AM2. Select FM/AM Band Press the BAND button (14) on the joystick (17) to seek the next station higher. Press the | The Tuner TFT or LCD display appears. Seek Tuning Press the >>| button (19) on remote control or the > button on the front panel or the remote control (20) to the RADIO TUNER source.
VM9311 AM/FM TUNER OPERATION Tuner TFT Display Switch to Radio Tuner source Press the SRC button (15) on the front panel or remote control (8) to switch to change between the following bands: FM1, FM2, FM3, AM1, and AM2. Select FM/AM Band Press the BAND button (14) on the joystick (17) to seek the next station higher. Press the | The Tuner TFT or LCD display appears. Seek Tuning Press the >>| button (19) on remote control or the > button on the front panel or the remote control (20) to the RADIO TUNER source.

Instruction Manual
Page 22
...on the screen. The unit automatically reverts to close the TFT screen. VM9311 • Press the REPT A-B button again once you reach the desired end point (B) of a disc to repeat. • Press the REPT A-B button (6) on the remote control to activate random playback and play the next random track. "... is closed , the LCD panel displays the current status. Random Playback With a DVD, VCD, or CD playing, press the 5/RDM button (12) on the front panel or the RDM button (33) on the remote control to stop repeat play , the repeat function is not available if PBC is not authorized,...
...on the screen. The unit automatically reverts to close the TFT screen. VM9311 • Press the REPT A-B button again once you reach the desired end point (B) of a disc to repeat. • Press the REPT A-B button (6) on the remote control to activate random playback and play the next random track. "... is closed , the LCD panel displays the current status. Random Playback With a DVD, VCD, or CD playing, press the 5/RDM button (12) on the front panel or the RDM button (33) on the remote control to stop repeat play , the repeat function is not available if PBC is not authorized,...

Instruction Manual
Page 23
..."2 / 16" indicates the second of 18 tracks on remote control to Level 1 loudness. 17 The following information appears at the top of the screen during DVD or CD playback: Front: DVD/CD EQ: Flat Loud: Level 1 • Front: DVD/CD - "6/18" indicates the sixth of 16 titles on ... additional controls for VCD playback. VM9311 DVD Search Time - Enter a time into the field using the following information is currently playing. • C : 2/16 - Press the >/|| button (18) on the remote control. 4. Direct Chapter / Track Selection During DVD, VCD and CD playback, you would like the ...
..."2 / 16" indicates the second of 18 tracks on remote control to Level 1 loudness. 17 The following information appears at the top of the screen during DVD or CD playback: Front: DVD/CD EQ: Flat Loud: Level 1 • Front: DVD/CD - "6/18" indicates the sixth of 16 titles on ... additional controls for VCD playback. VM9311 DVD Search Time - Enter a time into the field using the following information is currently playing. • C : 2/16 - Press the >/|| button (18) on the remote control. 4. Direct Chapter / Track Selection During DVD, VCD and CD playback, you would like the ...

Instruction Manual
Page 25
...with the selected option highlighted in green. Accessing the DVD Setup Screen For system settings, press the DVD SETUP button (31) on the front panel. "LANGUAGE" is playing, press the DVD SETUP button on the joystick (16, 17, 18, 19) or remote control (14, 17, 18, 19, 22) to... the remote or by pressing the >> or Accessing a Menu To access a menu (LANGUAGE, VIDEO, AUDIO or RATING), press the direction buttons on the remote to accessing the DVD Setup menu. VM9311 DVD/DISC SETUP MENU NOTE: A DVD/disc must be performed using the remote control or joystick controls. While the DVD/disc is...
...with the selected option highlighted in green. Accessing the DVD Setup Screen For system settings, press the DVD SETUP button (31) on the front panel. "LANGUAGE" is playing, press the DVD SETUP button on the joystick (16, 17, 18, 19) or remote control (14, 17, 18, 19, 22) to... the remote or by pressing the >> or Accessing a Menu To access a menu (LANGUAGE, VIDEO, AUDIO or RATING), press the direction buttons on the remote to accessing the DVD Setup menu. VM9311 DVD/DISC SETUP MENU NOTE: A DVD/disc must be performed using the remote control or joystick controls. While the DVD/disc is...
Instruction Manual
Page 27
...remote control (18) to suspend or resume disc play music or other audio files from "2X" to prevent illegal disc operation. MP3 Format Compatibility The file naming formats listed below are the same for DVD, CD and MP3 operation. Also, use the 2X or 4X burning option, if available. VM9311 DVD... burning DVDs. 21 The VM9311 will help eliminate buffer errors and increase disc reading reliability. For CD-RW discs, please make sure it may occur. Please see the DVD/Disc Video Operation section for a MEGA DVD music mix. Press the || button (17, 19) on remote control or...
...remote control (18) to suspend or resume disc play music or other audio files from "2X" to prevent illegal disc operation. MP3 Format Compatibility The file naming formats listed below are the same for DVD, CD and MP3 operation. Also, use the 2X or 4X burning option, if available. VM9311 DVD... burning DVDs. 21 The VM9311 will help eliminate buffer errors and increase disc reading reliability. For CD-RW discs, please make sure it may occur. Please see the DVD/Disc Video Operation section for a MEGA DVD music mix. Press the || button (17, 19) on remote control or...

Instruction Manual
Page 28
... of pages and files in one of the page. The selected directory will be displayed on the VM9311 TFT monitor. The VM9311 will release control back to the iPod so you must set the following remote control buttons are used to access the iPod menus: TITLE = Music MENU = Photos AUDIO = Videos ...Use the joystick on the unit or the directional keys on the remote control to access the iPod PHOTO mode. NOTE: After disconnecting your iPod, the VM9311 will always return to last mode accessed when your iPod is plugged into the unit. To access the page...
... of pages and files in one of the page. The selected directory will be displayed on the VM9311 TFT monitor. The VM9311 will release control back to the iPod so you must set the following remote control buttons are used to access the iPod menus: TITLE = Music MENU = Photos AUDIO = Videos ...Use the joystick on the unit or the directional keys on the remote control to access the iPod PHOTO mode. NOTE: After disconnecting your iPod, the VM9311 will always return to last mode accessed when your iPod is plugged into the unit. To access the page...

Instruction Manual
Page 29
... (9) on the display. Selecting a Station Press the < or > buttons (8, 9) on the joystick or the |>| buttons (17, 19) on remote control to change to XM-1, XM-2, or XM-3 (indicated in the corresponding preset box on the joystick repeatedly to tune to select the corresponding stored...NAME". XM 1 4 2 5 3 6 Press the >> button (14) on the remote control or the /\ button (18) on the joystick to view the next page of stations. VM9311 XM® RADIO OPERATION Listeners can receive a limited number of free-to-air channels without activation. Six numbered preset buttons store and...
... (9) on the display. Selecting a Station Press the < or > buttons (8, 9) on the joystick or the |>| buttons (17, 19) on remote control to change to XM-1, XM-2, or XM-3 (indicated in the corresponding preset box on the joystick repeatedly to tune to select the corresponding stored...NAME". XM 1 4 2 5 3 6 Press the >> button (14) on the remote control or the /\ button (18) on the joystick to view the next page of stations. VM9311 XM® RADIO OPERATION Listeners can receive a limited number of free-to-air channels without activation. Six numbered preset buttons store and...

Instruction Manual
Page 30
... to the previous screen. To lock a station, press the button on the remote control or /\ button (18) on the remote control to the main XM page. 24 VM9311 Parental Control By default, this feature is reserved for use by anyone listening to Password - Press the MENU button (1) twice to return to enter the...
... to the previous screen. To lock a station, press the button on the remote control or /\ button (18) on the remote control to the main XM page. 24 VM9311 Parental Control By default, this feature is reserved for use by anyone listening to Password - Press the MENU button (1) twice to return to enter the...
Instruction Manual
Page 31
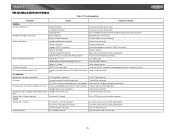
VM9311 TROUBLESHOOTING Table 13: Troubleshooting Problem Cause Corrective Action GENERAL Unit will not power on Radio Fuse blown Car battery fuse blown Illegal operation Remote control does not function Battery depleted Battery installed incorrectly No/low audio output Improper audio output connection Volume ... "MUTE" connection is not grounded and that it's properly insulated Check wiring and correct Turn TFT Auto Open on screen DVD is in contact with metal part of the front panel Replace battery with current TV system settings Improper video signal connections Prolonged...
VM9311 TROUBLESHOOTING Table 13: Troubleshooting Problem Cause Corrective Action GENERAL Unit will not power on Radio Fuse blown Car battery fuse blown Illegal operation Remote control does not function Battery depleted Battery installed incorrectly No/low audio output Improper audio output connection Volume ... "MUTE" connection is not grounded and that it's properly insulated Check wiring and correct Turn TFT Auto Open on screen DVD is in contact with metal part of the front panel Replace battery with current TV system settings Improper video signal connections Prolonged...
Instruction Manual
Page 34
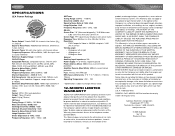
...16VDC, negative ground Power Antenna (Blue): 500mA max, current limited protection Amplifier Remote (Blue/White): 500mA, current limited protection Fuse: 15-amp, mini ATM ...70C * Specifications subject to change without notice. 12-MONTH LIMITED WARRANTY AUDIOVOX CORPORATION (the Company) warrants to the original retail purchaser of this...for installation, removal, or reinstallation of the VM9311 product, or damage to tapes, compact ...reference Reference Supply Voltage: 14.4VDC DVD/CD Player Compatible Formats: Compatible formats: DVD-R, DVDRW, DVD+R, DVD+RW, CD-R, CD-RW, CD-DA, MP3, WMA, SVCD, VCD...
...16VDC, negative ground Power Antenna (Blue): 500mA max, current limited protection Amplifier Remote (Blue/White): 500mA, current limited protection Fuse: 15-amp, mini ATM ...70C * Specifications subject to change without notice. 12-MONTH LIMITED WARRANTY AUDIOVOX CORPORATION (the Company) warrants to the original retail purchaser of this...for installation, removal, or reinstallation of the VM9311 product, or damage to tapes, compact ...reference Reference Supply Voltage: 14.4VDC DVD/CD Player Compatible Formats: Compatible formats: DVD-R, DVDRW, DVD+R, DVD+RW, CD-R, CD-RW, CD-DA, MP3, WMA, SVCD, VCD...


