
Owners Manual
Page 5
...shaped discs such as heart or star-shaped discs as they may result in the Run and/or Accessory positions. Power should be powered from the power source. Use only the supplied power cable matching this may cause the unit to disassemble the cabinet. There is in a fire or electric shock). ...3. Do not stick paper, tape or glue on the unit. Always disconnect the power source first and then the jack from...
...shaped discs such as heart or star-shaped discs as they may result in the Run and/or Accessory positions. Power should be powered from the power source. Use only the supplied power cable matching this may cause the unit to disassemble the cabinet. There is in a fire or electric shock). ...3. Do not stick paper, tape or glue on the unit. Always disconnect the power source first and then the jack from...

Owners Manual
Page 6
to restore normal picture. 3 Handle the disc by wiping the disc from the player. Also refer to the disc contents the software producers designed, some playback features may be snowy and the auto-tracking will be intentionally fixed by ... disc from the unit and store it from the center out with the discs. 8. VIDEO CASSETTE Do not force a cassette into the compartment when the power cord is unplugged. Do not touch the surface of disc. Clean the disc by its case after playing. Since this unit plays discs according to...
to restore normal picture. 3 Handle the disc by wiping the disc from the player. Also refer to the disc contents the software producers designed, some playback features may be snowy and the auto-tracking will be intentionally fixed by ... disc from the unit and store it from the center out with the discs. 8. VIDEO CASSETTE Do not force a cassette into the compartment when the power cord is unplugged. Do not touch the surface of disc. Clean the disc by its case after playing. Since this unit plays discs according to...
Owners Manual
Page 14
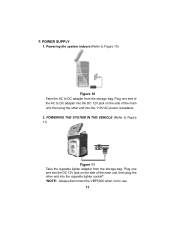
... IN THE VEHICLE (Refer to DC adapter from the storage bag. Powering the system indoors (Refer to Figure 10) Figure 10 Take the AC to Figure 11) Figure 11 Take the cigarette lighter adapter from the storage ... the side of the main unit, then plug the other end into the 110V AC power receptacle. 2. Plug one end into the DC 12V jack on the side of the main unit, then plug the other end into the cigarette lighter socket*. *NOTE: Always disconnect the VBP5000 when not in use. 11 POWER SUPPLY 1. F.
... IN THE VEHICLE (Refer to DC adapter from the storage bag. Powering the system indoors (Refer to Figure 10) Figure 10 Take the AC to Figure 11) Figure 11 Take the cigarette lighter adapter from the storage ... the side of the main unit, then plug the other end into the 110V AC power receptacle. 2. Plug one end into the DC 12V jack on the side of the main unit, then plug the other end into the cigarette lighter socket*. *NOTE: Always disconnect the VBP5000 when not in use. 11 POWER SUPPLY 1. F.

Owners Manual
Page 16
... two monitors either MONITOR 1 port or MONITOR 2 port on the side of the main unit with the DIN cable, DC 12V power, Audio/Video and IR signals will be supplied from the storage bag, plug one end into the DC 12V jack on the side of the monitor, then plug the other... the side of the monitor to either combined with the main unit or connected to the main unit with the main unit DC 12V power will all be supplied through the DIN cable to the connected monitor. Take the cigarette lighter adapter from the main unit to the monitor, so there is...
... two monitors either MONITOR 1 port or MONITOR 2 port on the side of the main unit with the DIN cable, DC 12V power, Audio/Video and IR signals will be supplied from the storage bag, plug one end into the DC 12V jack on the side of the monitor, then plug the other... the side of the monitor to either combined with the main unit or connected to the main unit with the main unit DC 12V power will all be supplied through the DIN cable to the connected monitor. Take the cigarette lighter adapter from the main unit to the monitor, so there is...

Owners Manual
Page 41
... the PORT on the additional monitor to DC adapter can drive up to 2 additional monitors (Please contact an Audiovox dealer for the additional monitors part # VBDV56) by using the cigarette lighter adapter in the vehicle. (NOTE:...left side of the monitor. Note: Using HEADPHONE 1 jack will all be supplied through DIN cable to Figure 18) Optional wired headphones may be used with the supplied DIN cable. L. Using MONITOR PORT (Refer to Figure 18 & 19) ... Figure 19 38 Simply plug in the main unit, DC 12V power, Audio/Video and IR signals will disconnect the internal speakers. K.
... the PORT on the additional monitor to DC adapter can drive up to 2 additional monitors (Please contact an Audiovox dealer for the additional monitors part # VBDV56) by using the cigarette lighter adapter in the vehicle. (NOTE:...left side of the monitor. Note: Using HEADPHONE 1 jack will all be supplied through DIN cable to Figure 18) Optional wired headphones may be used with the supplied DIN cable. L. Using MONITOR PORT (Refer to Figure 18 & 19) ... Figure 19 38 Simply plug in the main unit, DC 12V power, Audio/Video and IR signals will disconnect the internal speakers. K.


