
Owners Manual
Page 1
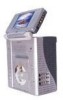
VBP5000 VIDEO IN A BAG SYSTEM WITH 5.6" LCD MONITOR VCP & DVD PLAYER
VBP5000 VIDEO IN A BAG SYSTEM WITH 5.6" LCD MONITOR VCP & DVD PLAYER
Owners Manual
Page 2
... (two external and one priority. The connection of the art electronics and is not in a Bag" System. Please read the entire instruction manual supplied with you to provide years of all passengers remains the number one attached). A. The system's main features include a 5.6" Liquid Crystal Display (LCD) Monitor Video Cassette Payer (VCP) and a DVD Player. The documentation will only support Two Monitors. The VBP5000 utilizes...
... (two external and one priority. The connection of the art electronics and is not in a Bag" System. Please read the entire instruction manual supplied with you to provide years of all passengers remains the number one attached). A. The system's main features include a 5.6" Liquid Crystal Display (LCD) Monitor Video Cassette Payer (VCP) and a DVD Player. The documentation will only support Two Monitors. The VBP5000 utilizes...
Owners Manual
Page 4
... hour before operating the unit, or remove the disc and leave the unit turned on headphones always adjust the volume setting to the VCP/DVD Player and not in use the system in the event of the VBP5000 system (Monitor/VCP/DVD Player). The system is in this appliance to the screen. Do not apply pressure to rain or moisture. Operate the "Video in a Bag" System with the instructions and...
... hour before operating the unit, or remove the disc and leave the unit turned on headphones always adjust the volume setting to the VCP/DVD Player and not in use the system in the event of the VBP5000 system (Monitor/VCP/DVD Player). The system is in this appliance to the screen. Do not apply pressure to rain or moisture. Operate the "Video in a Bag" System with the instructions and...
Owners Manual
Page 5
... the disc 2 not directly from the system. 4. There is a risk of switched (Accessory) power indicated on or in need of any kind into the system through openings; Use only a lightly dampened lint free cloth to Laser Radiation. CLEANING UNIT When cleaning, make sure the system is dirty. 7. Do not stick paper, tape or glue on the unit. Always disconnect the power source first...
... the disc 2 not directly from the system. 4. There is a risk of switched (Accessory) power indicated on or in need of any kind into the system through openings; Use only a lightly dampened lint free cloth to Laser Radiation. CLEANING UNIT When cleaning, make sure the system is dirty. 7. Do not stick paper, tape or glue on the unit. Always disconnect the power source first...

Owners Manual
Page 6
... playing a videocassette, remove it from the unit and store it in the sleeves or cases. 9. VIDEO CASSETTE Do not force a cassette into the compartment when the power cord is unplugged. Clean the disc by its case after playing. Some playback operations of discs may not be intentionally fixed by software producers. If the heads become dirty over a period of time during normal operation of disc...
... playing a videocassette, remove it from the unit and store it in the sleeves or cases. 9. VIDEO CASSETTE Do not force a cassette into the compartment when the power cord is unplugged. Clean the disc by its case after playing. Some playback operations of discs may not be intentionally fixed by software producers. If the heads become dirty over a period of time during normal operation of disc...
Owners Manual
Page 7
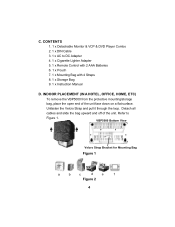
... PLACEMENT (IN A HOTEL, OFFICE, HOME, ETC) To remove the VBP5000 from the protective mounting/storage bag, place the open end of the unit. CONTENTS 1. 1 x Detachable Monitor & VCP & DVD Player Combo 2. 1 x DIN Cable 3. 1 x AC to Figure 1. Refer to DC Adapter 4. 1 x Cigarette Lighter Adapter 5. 1 x Remote Control with 2 AAA Batteries 6. 1 x Pouch 7. 1 x Mounting Bag with 4 Straps 8. 1 x Storage Bag 9. 1 x Instruction Manual D. VBP5000 Bottom View Velcro Strap Bracket for Mounting Bag Figure 1 a b c d e f Figure...
... PLACEMENT (IN A HOTEL, OFFICE, HOME, ETC) To remove the VBP5000 from the protective mounting/storage bag, place the open end of the unit. CONTENTS 1. 1 x Detachable Monitor & VCP & DVD Player Combo 2. 1 x DIN Cable 3. 1 x AC to Figure 1. Refer to DC Adapter 4. 1 x Cigarette Lighter Adapter 5. 1 x Remote Control with 2 AAA Batteries 6. 1 x Pouch 7. 1 x Mounting Bag with 4 Straps 8. 1 x Storage Bag 9. 1 x Instruction Manual D. VBP5000 Bottom View Velcro Strap Bracket for Mounting Bag Figure 1 a b c d e f Figure...

Owners Manual
Page 8
...detach* the monitor from the main unit by depressing the button below the screen with one hand and removing the monitor with or without the unit inside its mounting bag and pouch. *NOTE: During the Removal and Reinstallation of the Video Monitor, rotate the monitor and the monitor's hinged base... the monitor into the slot on a table or other hand. Adjust the screen for the desired viewing angle. The Video Monitor is inserted into the slot on the main unit with the screen facing either front or back. IN-CAR INSTALLATION NOTE: When used in a vehicle, always keep the VBP5000 fastened...
...detach* the monitor from the main unit by depressing the button below the screen with one hand and removing the monitor with or without the unit inside its mounting bag and pouch. *NOTE: During the Removal and Reinstallation of the Video Monitor, rotate the monitor and the monitor's hinged base... the monitor into the slot on a table or other hand. Adjust the screen for the desired viewing angle. The Video Monitor is inserted into the slot on the main unit with the screen facing either front or back. IN-CAR INSTALLATION NOTE: When used in a vehicle, always keep the VBP5000 fastened...

Owners Manual
Page 9
... driver's seat. Take one hand and removing the monitor with one of the monitor, and attach the Velcro 6 c. Swing the monitor upwards and adjust the screen for the right side. Slide the monitor into the monitor pouch, feed the bottom flap of the pouch into the long slot of the supplied straps from the sys- sired viewing angle. *Optional Second Video Monitor Part...
... driver's seat. Take one hand and removing the monitor with one of the monitor, and attach the Velcro 6 c. Swing the monitor upwards and adjust the screen for the right side. Slide the monitor into the monitor pouch, feed the bottom flap of the pouch into the long slot of the supplied straps from the sys- sired viewing angle. *Optional Second Video Monitor Part...

Owners Manual
Page 12
Care- Then secure and adjust the safety belt so that the unit is not free to Figure 8b). Finally uncover the attached monitor and adjust the screen for a de- On the Back Seat a b Figure 8 a. The Monitor can be inserted into the slot with the DVD facing up on the bottom of the mounting bag. sired viewing angle. *Optional Second Video Monitor Part #VBDV56 Figure 9 9 fully place the system with the screen facing either front (refer to Figure 8a) or rear (refer to move around. Guide the vehicles safety belt through the short strap sewn on the back seat. 3.
Care- Then secure and adjust the safety belt so that the unit is not free to Figure 8b). Finally uncover the attached monitor and adjust the screen for a de- On the Back Seat a b Figure 8 a. The Monitor can be inserted into the slot with the DVD facing up on the bottom of the mounting bag. sired viewing angle. *Optional Second Video Monitor Part #VBDV56 Figure 9 9 fully place the system with the screen facing either front (refer to Figure 8a) or rear (refer to move around. Guide the vehicles safety belt through the short strap sewn on the back seat. 3.

Owners Manual
Page 16
... the DIN cable, DC 12V power, Audio/Video and IR signals will be connected to the DC 12V jack on the side of the monitor, then plug the other end into the cigarette lighter socket. In this situation, the AC to DC adapter can connect the PORT on the side of the detached monitor. NOTE: When the monitor is no need for another power source to...
... the DIN cable, DC 12V power, Audio/Video and IR signals will be connected to the DC 12V jack on the side of the monitor, then plug the other end into the cigarette lighter socket. In this situation, the AC to DC adapter can connect the PORT on the side of the detached monitor. NOTE: When the monitor is no need for another power source to...
Owners Manual
Page 18
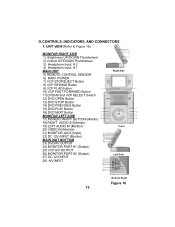
... UNIT 5) REMOTE CONTROL SENSOR 6) MAIN POWER 7) VCP STOP/EJECT Button 8) VCP REWIND Button 9) VCP PLAY Button 10) VCP FAST FORWARD Button 11) DVD/AV and VCP SELECT Switch 12) DVD OPEN Button 13) DVD STOP Button 14) DVD PREVIOUS Button 15) DVD PLAY Button 16) DVD NEXT Button MONITOR LEFT SIDE 17) POWER ON/OFF BUTTON (Monitor) 18) RIGHT AUDIO IN (Monitor) 19) LEFT AUDIO IN (Monitor) 20) VIDEO IN (Monitor) 21) MONITOR JACK (Input) 22) DC 12V INPUT (Monitor) MAIN UNIT BOTTOM 23) DVD/AV OUTPUT 24) MONITOR PORT #1 (Output) 25) VCP A/V OUTPUT 26) MONITOR PORT #2 (Output...
... UNIT 5) REMOTE CONTROL SENSOR 6) MAIN POWER 7) VCP STOP/EJECT Button 8) VCP REWIND Button 9) VCP PLAY Button 10) VCP FAST FORWARD Button 11) DVD/AV and VCP SELECT Switch 12) DVD OPEN Button 13) DVD STOP Button 14) DVD PREVIOUS Button 15) DVD PLAY Button 16) DVD NEXT Button MONITOR LEFT SIDE 17) POWER ON/OFF BUTTON (Monitor) 18) RIGHT AUDIO IN (Monitor) 19) LEFT AUDIO IN (Monitor) 20) VIDEO IN (Monitor) 21) MONITOR JACK (Input) 22) DC 12V INPUT (Monitor) MAIN UNIT BOTTOM 23) DVD/AV OUTPUT 24) MONITOR PORT #1 (Output) 25) VCP A/V OUTPUT 26) MONITOR PORT #2 (Output...
Owners Manual
Page 20
... and turns it ON/OFF AUDIO Select the Audio Language ZOOM Enlarge an Image to 1.5, 2, or 4 times the original SETUP Display the Setup Menu to open the DVD Player, insert a disc and close the DVD Player. Press the 'OPEN' button on the Main unit to select and set items and exit the setup menu 17 Scan Backward at 2, 4, 6, or 8 times Normal Speed REVERSE.......... Select an Item or Setting RETURN Return to the previous selection MENU Display...
... and turns it ON/OFF AUDIO Select the Audio Language ZOOM Enlarge an Image to 1.5, 2, or 4 times the original SETUP Display the Setup Menu to open the DVD Player, insert a disc and close the DVD Player. Press the 'OPEN' button on the Main unit to select and set items and exit the setup menu 17 Scan Backward at 2, 4, 6, or 8 times Normal Speed REVERSE.......... Select an Item or Setting RETURN Return to the previous selection MENU Display...

Owners Manual
Page 29
... are played in MP3 format can be played on the Remote Control to the next song. MP3 MP3 MP3 MP3 MP3 SMART NAV Screen Display 3. Press the UP or DOWN Arrow buttons on your DVD player. SKIPPING SONGS Use the Next ( uu ) button on the right). .. SELECTING FOLDERS AND SONGS When an MP3 disc is inserted in the folder appear on the remote control to move to navigate...
... are played in MP3 format can be played on the Remote Control to the next song. MP3 MP3 MP3 MP3 MP3 SMART NAV Screen Display 3. Press the UP or DOWN Arrow buttons on your DVD player. SKIPPING SONGS Use the Next ( uu ) button on the right). .. SELECTING FOLDERS AND SONGS When an MP3 disc is inserted in the folder appear on the remote control to move to navigate...

Owners Manual
Page 33
.... Select the TV display mode on the screen using UP/DOWN, and press ENTER to display the Main screen of the screen. 30 SETUP (The contents vary from disc to disc.) Press 'SETUP 'to confirm the setting. Press 'SETUP 'again to a normal TV, and a wide picture is shown on the full screen. * NORMAL/LB: When the player is shown on the screen, with black strip at both top...
.... Select the TV display mode on the screen using UP/DOWN, and press ENTER to display the Main screen of the screen. 30 SETUP (The contents vary from disc to disc.) Press 'SETUP 'to confirm the setting. Press 'SETUP 'again to a normal TV, and a wide picture is shown on the full screen. * NORMAL/LB: When the player is shown on the screen, with black strip at both top...
Owners Manual
Page 38
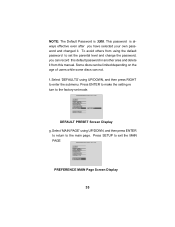
... to the factory-set the parental level and change the password, you have selected your own password and changed it from using UP/DOWN, and then press ENTER to return to exit the MAIN PAGE PREFERENCE MAIN Page Screen Display 35 Some discs can be limited depending on the age of users while some discs can record this manual. DEFAULT PRESET Screen Display g. This password is 3308...
... to the factory-set the parental level and change the password, you have selected your own password and changed it from using UP/DOWN, and then press ENTER to return to exit the MAIN PAGE PREFERENCE MAIN Page Screen Display 35 Some discs can be limited depending on the age of users while some discs can record this manual. DEFAULT PRESET Screen Display g. This password is 3308...

Owners Manual
Page 39
... blinking more , and the tape will blink. b. BASIC VIDEO CASSETTE OPERATION Power Turn the unit ON/OFF DVD/AUX/VCP Choose the VCP mode Play To playback tape Stop/Eject To stop mode, the tape will rewind at a high speed with Video, the rewind indicator lamp will rewind scan at a very high speed without picture or sound. 36 Forward (Fast) a. Press it once in...
... blinking more , and the tape will blink. b. BASIC VIDEO CASSETTE OPERATION Power Turn the unit ON/OFF DVD/AUX/VCP Choose the VCP mode Play To playback tape Stop/Eject To stop mode, the tape will rewind at a high speed with Video, the rewind indicator lamp will rewind scan at a very high speed without picture or sound. 36 Forward (Fast) a. Press it once in...

Owners Manual
Page 40
... AUDIO L and AUDIO R into the main unit and the built-in DVD player. PLAYING A VIDEO GAME (Refer to Figure 18) *** Optional Headphones **Games Not Included *Optional Video Monitors Figure 18 **Games Not Included 1. Adjust the volume control and the brightness control on the monitor for individual preference. 37 Adjust the volume control and the brightness control on the side of the main unit, which takes priority over the built-in DVD player. Plug the video output...
... AUDIO L and AUDIO R into the main unit and the built-in DVD player. PLAYING A VIDEO GAME (Refer to Figure 18) *** Optional Headphones **Games Not Included *Optional Video Monitors Figure 18 **Games Not Included 1. Adjust the volume control and the brightness control on the monitor for individual preference. 37 Adjust the volume control and the brightness control on the side of the main unit, which takes priority over the built-in DVD player. Plug the video output...

Owners Manual
Page 41
... an Audiovox dealer for the additional monitors part # VBDV56) by using the cigarette lighter adapter in the main unit, DC 12V power, Audio/Video and IR signals will disconnect the internal speakers. WIRED HEADPHONES (Refer to Figure 18) Optional wired headphones may be supplied through DIN cable to either combined or detached). SUPPORT EXTERNAL MONITORS 1. Note: Using HEADPHONE 1 jack will all be used with the supplied DIN cable. L. Connect the PORT on...
... an Audiovox dealer for the additional monitors part # VBDV56) by using the cigarette lighter adapter in the main unit, DC 12V power, Audio/Video and IR signals will disconnect the internal speakers. WIRED HEADPHONES (Refer to Figure 18) Optional wired headphones may be supplied through DIN cable to either combined or detached). SUPPORT EXTERNAL MONITORS 1. Note: Using HEADPHONE 1 jack will all be used with the supplied DIN cable. L. Connect the PORT on...

Owners Manual
Page 42
M. Using VIDEO, AUDIO L, AUDIO R outputs for connection to any monitor (Refer to Figure 18) Match the color-coded plugs to the appropriate DVD OUT jacks or VCP OUT jacks on the side of the main unit: Yellow (VIDEO) to Yellow, White (AUDIO L) to White, and Red (AUDIO R) to 16 V Power consumption: 35 W (Main With Monitor) Operating temperature: 5~40°C (41~104°F) Storage temperature: -20~60°C (4~140°F) Operating humidity: 10~75...
M. Using VIDEO, AUDIO L, AUDIO R outputs for connection to any monitor (Refer to Figure 18) Match the color-coded plugs to the appropriate DVD OUT jacks or VCP OUT jacks on the side of the main unit: Yellow (VIDEO) to Yellow, White (AUDIO L) to White, and Red (AUDIO R) to 16 V Power consumption: 35 W (Main With Monitor) Operating temperature: 5~40°C (41~104°F) Storage temperature: -20~60°C (4~140°F) Operating humidity: 10~75...

Owners Manual
Page 43
...THIS WRITTEN WARRANTY. This Warranty gives you specific legal rights and you may not apply to you. 90 DAY LIMITED WARRANTY Applies to Audiovox Video Products AUDIOVOX ELECTRONICS CORP. (the Company) warrants to...LOCATION OF WARRANTY STATION SERVING YOUR AREA 128-5556C To obtain repair or replacement within 90 days from state to the Company at the Company's option) without charge for installation, removal or reinstallation of warranty coverage (e.g. This Warranty does not extend to the elimination of externally generated static or noise, to correction of the factory serial number/bar code...
...THIS WRITTEN WARRANTY. This Warranty gives you specific legal rights and you may not apply to you. 90 DAY LIMITED WARRANTY Applies to Audiovox Video Products AUDIOVOX ELECTRONICS CORP. (the Company) warrants to...LOCATION OF WARRANTY STATION SERVING YOUR AREA 128-5556C To obtain repair or replacement within 90 days from state to the Company at the Company's option) without charge for installation, removal or reinstallation of warranty coverage (e.g. This Warranty does not extend to the elimination of externally generated static or noise, to correction of the factory serial number/bar code...


