Owners Manual
Page 1
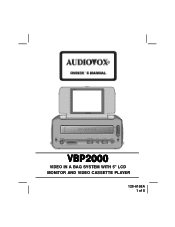
AUDIOVOX VBP2000 VIDEO IN A BAG SYSTEM WITH 5" LCD MONITOR AND VIDEO CASSETTE PLAYER 128-6168A 1 of 8
AUDIOVOX VBP2000 VIDEO IN A BAG SYSTEM WITH 5" LCD MONITOR AND VIDEO CASSETTE PLAYER 128-6168A 1 of 8
Owners Manual
Page 2
... Video Cassette Player and the Video Bag are not going to ensure proper ventilation of reliable, trouble-free service. The documentation will heat up or cool down dramatically, which could damage tapes if left in a hot or cold car for a period of time. 8. not directly from the Video Cassette Player. 7. The "S" hooks and all straps must be powered from the cigarette lighter socket when the unit...
... Video Cassette Player and the Video Bag are not going to ensure proper ventilation of reliable, trouble-free service. The documentation will heat up or cool down dramatically, which could damage tapes if left in a hot or cold car for a period of time. 8. not directly from the Video Cassette Player. 7. The "S" hooks and all straps must be powered from the cigarette lighter socket when the unit...
Owners Manual
Page 3
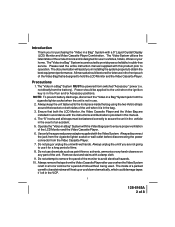
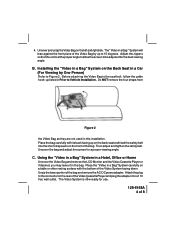
... "S" hook to the power plug on each side of the Video Cassette Player by sliding the strap through the slot in a Bag" System Between the Driver/Passenger Seats Figure 1 1. Adjust the straps so that the Video Bag is tightly secured. 2 2 128-6168A 3 of the Video Bag....headrest of the Video Cassette Player. 3. INSTALLATION INSTRUCTIONS Prior to the ring. Repeat this process for the right side (Passenger Seat). 2. Take another strap and connect the latch to each side of the Video Cassette Player. Slide the LCD Monitor and the Video Cassette Player into the Video Bag and attach...
... "S" hook to the power plug on each side of the Video Cassette Player by sliding the strap through the slot in a Bag" System Between the Driver/Passenger Seats Figure 1 1. Adjust the straps so that the Video Bag is tightly secured. 2 2 128-6168A 3 of the Video Bag....headrest of the Video Cassette Player. 3. INSTALLATION INSTRUCTIONS Prior to the ring. Repeat this process for the right side (Passenger Seat). 2. Take another strap and connect the latch to each side of the Video Cassette Player. Slide the LCD Monitor and the Video Cassette Player into the Video Bag and attach...
Owners Manual
Page 4
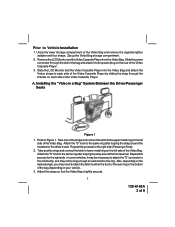
... the Video Cassette Player and plug the adapter into the short strap sewn on the front of the Video System facing down. Adjust the zippers so that the unit is n3ow ready for a proper viewing angle. Place the "Video in Prior to be adjusted for the best viewing angle. The Video System is at the proper angle to allow the screen to Vehicle Installation...
... the Video Cassette Player and plug the adapter into the short strap sewn on the front of the Video System facing down. Adjust the zippers so that the unit is n3ow ready for a proper viewing angle. Place the "Video in Prior to be adjusted for the best viewing angle. The Video System is at the proper angle to allow the screen to Vehicle Installation...
Owners Manual
Page 5
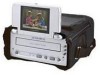
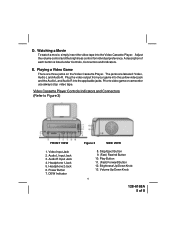
... and Indicators. Video Input Jack 2. Brightness Up/Down Knob 13. The jacks are three jacks on the Video Cassette Player. Adjust the volume control and the brightness control for individual preference. Playing a Video Game There are labeled: Video, Audio L and Audio R. Audio L Input Jack 3. Watching a Movie To watch a movie, simply insert the video tape into the applicable jacks. A description of 8 Video Cassette Player Controls Indicators and Connectors (Refer to video game or camcorder use always stop video tape. Audio R Input Jack 4. Power Button 7.
... and Indicators. Video Input Jack 2. Brightness Up/Down Knob 13. The jacks are three jacks on the Video Cassette Player. Adjust the volume control and the brightness control for individual preference. Playing a Video Game There are labeled: Video, Audio L and Audio R. Audio L Input Jack 3. Watching a Movie To watch a movie, simply insert the video tape into the applicable jacks. A description of 8 Video Cassette Player Controls Indicators and Connectors (Refer to video game or camcorder use always stop video tape. Audio R Input Jack 4. Power Button 7.
Owners Manual
Page 6
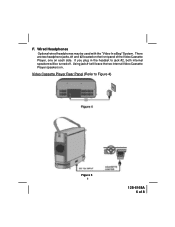
There are two headphone jacks, #1 and #2 located on the front panel of 8 F. Video Cassette Player Rear Panel (Refer to jack #2, both internal speakers will leave the two internal Video Cassette Player speakers on each side. If you plug in the headset to Figure 4) 3 3 Figure 5 5 128-6168A 6 of the Video Cassette Player, one on . Using jack #1 will be used with the "Video In a Bag" System. Wired Headphones Optional wired headphones may be turned off.
There are two headphone jacks, #1 and #2 located on the front panel of 8 F. Video Cassette Player Rear Panel (Refer to jack #2, both internal speakers will leave the two internal Video Cassette Player speakers on each side. If you plug in the headset to Figure 4) 3 3 Figure 5 5 128-6168A 6 of the Video Cassette Player, one on . Using jack #1 will be used with the "Video In a Bag" System. Wired Headphones Optional wired headphones may be turned off.

Owners Manual
Page 7
... Audio and Video Input Jacks for Games, Camcorder Input w Dual Speakers (One on each side of the unit) w Video Cassette Player (Mono) w Volume Up Down w Brightness Up Down w Play, Fast Forward, Rewind, and Stop Buttons w Heavy Duty Canvas Bag With Shoulder Strap w Includes all Mounting Straps, Power Adapter and Cable. 6 6 128-6168A 7 of 8 OPERATING INSTRUCTIONS G. Specification: Color System NTSC Screen Size 5 Inches Audio Track 1 track Tape Width 12.7 mm Tape Speed: SP 33.35 mm/s Playback Time 180 Minutes with T-1 20 Video Output...
... Audio and Video Input Jacks for Games, Camcorder Input w Dual Speakers (One on each side of the unit) w Video Cassette Player (Mono) w Volume Up Down w Brightness Up Down w Play, Fast Forward, Rewind, and Stop Buttons w Heavy Duty Canvas Bag With Shoulder Strap w Includes all Mounting Straps, Power Adapter and Cable. 6 6 128-6168A 7 of 8 OPERATING INSTRUCTIONS G. Specification: Color System NTSC Screen Size 5 Inches Audio Track 1 track Tape Width 12.7 mm Tape Speed: SP 33.35 mm/s Playback Time 180 Minutes with T-1 20 Video Output...
Owners Manual
Page 8
... WITHIN A PERIOD OF 30 MONTHS FROM DATE OF ORIGINAL PURCHASE. To obtain repair or replacement within 90 days from state to state. OPERATING INSTRUCTIONS 90 DAY LIMITED WARRANTY AUDIOVOX CORPORATION (the Company) warrants to the original retail purchaser of this product that should this product or any part thereof, under normal use and conditions, be proven defective in...
... WITHIN A PERIOD OF 30 MONTHS FROM DATE OF ORIGINAL PURCHASE. To obtain repair or replacement within 90 days from state to state. OPERATING INSTRUCTIONS 90 DAY LIMITED WARRANTY AUDIOVOX CORPORATION (the Company) warrants to the original retail purchaser of this product that should this product or any part thereof, under normal use and conditions, be proven defective in...

