

Instruction Manual
Page 5
... Tools to read all of the Phase Linear UV8 Mobile Multimedia Receiver. The monitor employs an automatic motorized mechanism. Disconnecting the Battery To prevent a short circuit, be installed in a fire. It's a good idea to remove existing radio (screwdriver, socket wrench set or other tools...Beep Tone Confirmation (On-OFF Option) • Heat Management System - Never use the video display function while driving the vehicle. UV8 PREPARATION Congratulations on -board drive or navigation computer, do not push, pull or swivel the monitor manually. We recommend having your ...
... Tools to read all of the Phase Linear UV8 Mobile Multimedia Receiver. The monitor employs an automatic motorized mechanism. Disconnecting the Battery To prevent a short circuit, be installed in a fire. It's a good idea to remove existing radio (screwdriver, socket wrench set or other tools...Beep Tone Confirmation (On-OFF Option) • Heat Management System - Never use the video display function while driving the vehicle. UV8 PREPARATION Congratulations on -board drive or navigation computer, do not push, pull or swivel the monitor manually. We recommend having your ...
Instruction Manual
Page 6
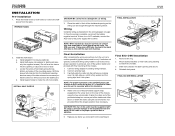
... operation (ignition switch must be mounted within this limitation. 4. Connect antenna lead. 3. Replace any items you removed from old radio. 3. PREPARE RADIO 2. Install half-sleeve into dash opening , bend as many of the tabs outward as illustrated in the wiring diagram on the... unit does not operate, recheck all wiring until it is firmly secured to the dashboard from the radio. Bend the strap to position it to avoid damaging the radio. FINAL INSTALLATION 5 1 UV8 4 2 3 Final ISO-DIN Installation 1. Connect wiring adapter to make the unit more stable. Mount...
... operation (ignition switch must be mounted within this limitation. 4. Connect antenna lead. 3. Replace any items you removed from old radio. 3. PREPARE RADIO 2. Install half-sleeve into dash opening , bend as many of the tabs outward as illustrated in the wiring diagram on the... unit does not operate, recheck all wiring until it is firmly secured to the dashboard from the radio. Bend the strap to position it to avoid damaging the radio. FINAL INSTALLATION 5 1 UV8 4 2 3 Final ISO-DIN Installation 1. Connect wiring adapter to make the unit more stable. Mount...

Instruction Manual
Page 8
... of two settings: Full or Normal. Turn the rotary encoder (5) to one step at a time or press and hold to automatically store strong radio stations in the six preset channels in a continuous motion. Use the joystick to select playing mode. 7. When on, press once to make adjustments... available on . VOL (LO/DX) Rotate to silence the receiver. Press again to resume previous volume level. 5 4 3 TILT PIC NOTE: The UV8 features Softmute, which will allow the volume to close the TFT. 2. Press again to increase or decrease gradually when the MUTE function is flashing. PIC...
... of two settings: Full or Normal. Turn the rotary encoder (5) to one step at a time or press and hold to automatically store strong radio stations in the six preset channels in a continuous motion. Use the joystick to select playing mode. 7. When on, press once to make adjustments... available on . VOL (LO/DX) Rotate to silence the receiver. Press again to resume previous volume level. 5 4 3 TILT PIC NOTE: The UV8 features Softmute, which will allow the volume to close the TFT. 2. Press again to increase or decrease gradually when the MUTE function is flashing. PIC...
Instruction Manual
Page 9
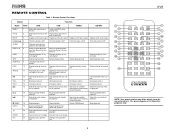
... auto-search for slow forward/slow reverse. MENU Mode: Press once to go down . 12. TUNER Mode: Press once to auto-search the next available radio station. MENU Mode: Press once to move the cursor to move the cursor up one frequency step. MENU Mode: Press once to the left. 11...
... auto-search for slow forward/slow reverse. MENU Mode: Press once to go down . 12. TUNER Mode: Press once to auto-search the next available radio station. MENU Mode: Press once to move the cursor to move the cursor up one frequency step. MENU Mode: Press once to the left. 11...
Instruction Manual
Page 10
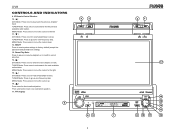
Displays playing informa- Plays back Picture CD with ent angle for a scene different angle of cur- ters ters UV8 8 23 1 2 10 11 30 31 12 18 16 15 20 19 27 DISP TILT SCAN REPT A-B REPT WIDE SLOW SETUP CLEAR 3 4 5 9 24 25... Language selection for illustrative purposes only. 6 Displays playing informa- Searches an available Selects the previous track ter for playback ter for playback radio station by decreasing for playback tuning frequency 16 Pauses playback/starts Pauses playback/starts playback playback Pauses playback/starts playback 17 Selects the next ...
Displays playing informa- Plays back Picture CD with ent angle for a scene different angle of cur- ters ters UV8 8 23 1 2 10 11 30 31 12 18 16 15 20 19 27 DISP TILT SCAN REPT A-B REPT WIDE SLOW SETUP CLEAR 3 4 5 9 24 25... Language selection for illustrative purposes only. 6 Displays playing informa- Searches an available Selects the previous track ter for playback ter for playback radio station by decreasing for playback tuning frequency 16 Pauses playback/starts Pauses playback/starts playback playback Pauses playback/starts playback 17 Selects the next ...

Instruction Manual
Page 12
... Exit Picture Quality Setting Mode: Press the PIC button (22) on the remote control or the PIC/AS/PS button (3) on the monitor UV8 Parking Brake Parking Brake Inhibit When the pink "Parking" wire is connected to the viewing position. Release parking brake for each playing source. ...brake for 3 ~ 5 seconds. While the yellow angle icon is automatically loaded into the viewing position. Before starting the parking brake sequence, the radio must be on the control panel. Parking Brake Sequence There are two situations that moves the display panel into unit 8 To activate video, the...
... Exit Picture Quality Setting Mode: Press the PIC button (22) on the remote control or the PIC/AS/PS button (3) on the monitor UV8 Parking Brake Parking Brake Inhibit When the pink "Parking" wire is connected to the viewing position. Release parking brake for each playing source. ...brake for 3 ~ 5 seconds. While the yellow angle icon is automatically loaded into the viewing position. Before starting the parking brake sequence, the radio must be on the control panel. Parking Brake Sequence There are two situations that moves the display panel into unit 8 To activate video, the...

Instruction Manual
Page 14
Press the MUTE button again to access auxiliary devices. The playing mode is displayed on the LCD. RADIO SOURCE MENU DISC RADIO CAMERA AUX 1 AUX 2 External Devices External peripheral devices, including a game console, camcorder, navigation unit, iPod, Zune, etc. The unit will beep to confirm your vehicle, ...
Press the MUTE button again to access auxiliary devices. The playing mode is displayed on the LCD. RADIO SOURCE MENU DISC RADIO CAMERA AUX 1 AUX 2 External Devices External peripheral devices, including a game console, camcorder, navigation unit, iPod, Zune, etc. The unit will beep to confirm your vehicle, ...

Instruction Manual
Page 16
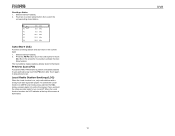
... resume normal playback, press the SETUP button (29) on the remote control or touch the BACK button on the screen. 12 UV8 P.VOL Sub-menu Features Setting Source Level Options Function Radio Disc AUX IN1 AUX IN2 0-6 Choose a source for setup. NTSC or PAL. Selecting a crossover frequency sets a cut-off frequency of...
... resume normal playback, press the SETUP button (29) on the remote control or touch the BACK button on the screen. 12 UV8 P.VOL Sub-menu Features Setting Source Level Options Function Radio Disc AUX IN1 AUX IN2 0-6 Choose a source for setup. NTSC or PAL. Selecting a crossover frequency sets a cut-off frequency of...

Instruction Manual
Page 17
... button on the unit only works when the TFT is selected Switching to Radio Tuner Source • Touch the top left corner of the screen (the RADIO circle) to change between the following bands: FM1, FM2, FM3, AM1, and AM2. UV8 TUNER OPERATION Tuner TFT Display 8 17 1 4 5 10 2 9 18 3 FM-1 P1 87.5... MHz RADIO ST LOC 01:02 PM P1 E Q P2 P3 P4 P5 P6 PS: 87...
... button on the unit only works when the TFT is selected Switching to Radio Tuner Source • Touch the top left corner of the screen (the RADIO circle) to change between the following bands: FM1, FM2, FM3, AM1, and AM2. UV8 TUNER OPERATION Tuner TFT Display 8 17 1 4 5 10 2 9 18 3 FM-1 P1 87.5... MHz RADIO ST LOC 01:02 PM P1 E Q P2 P3 P4 P5 P6 PS: 87...
Instruction Manual
Page 18
... VOL (rotary encoder) button (5) on the screen for a preview of the screen is illuminated. 14 UV8 Select a band (if needed ). 2. Recalling a Station 1. Select a band (if needed ). 2. Local Radio Station Seeking (LOC) When the Local function is active, the LOC indicator at the top of available ...strong stations and store them in that band. Touch again to select the corresponding stored station. Touch an on , only radio stations with a strong local radio signal are played. When the Local function is on -screen preset button (6) to stop preview scan. To activate the ...
... VOL (rotary encoder) button (5) on the screen for a preview of the screen is illuminated. 14 UV8 Select a band (if needed ). 2. Recalling a Station 1. Select a band (if needed ). 2. Local Radio Station Seeking (LOC) When the Local function is active, the LOC indicator at the top of available ...strong stations and store them in that band. Touch again to select the corresponding stored station. Touch an on , only radio stations with a strong local radio signal are played. When the Local function is on -screen preset button (6) to stop preview scan. To activate the ...

Instruction Manual
Page 25
UV8 TROUBLESHOOTING Table 7: Troubleshooting Problem GENERAL Unit will not power on Remote control does not function No/low audio output Poor sound quality or distortion Unit ... improper height/width ratio display Monitor stops at incorrect position TUNER Weak station searching Cannot insert disc Image blurred, distorted, or dark Cause Corrective Action Radio Fuse blown Install new fuse with correct rating Car battery fuse blown Install new fuse with correct rating Illegal operation Press the RESET button located...
UV8 TROUBLESHOOTING Table 7: Troubleshooting Problem GENERAL Unit will not power on Remote control does not function No/low audio output Poor sound quality or distortion Unit ... improper height/width ratio display Monitor stops at incorrect position TUNER Weak station searching Cannot insert disc Image blurred, distorted, or dark Cause Corrective Action Radio Fuse blown Install new fuse with correct rating Car battery fuse blown Install new fuse with correct rating Illegal operation Press the RESET button located...

Instruction Manual
Page 29
... and you may not apply to you. Proof of purchase is required in the form of products purchased through an authorized Audiovox retailer in material or workmanship within 12 months from the date of original purchase, such defect(s) will pay the return shipping...IMPLIED WARRANTY OF MERCHANTABILITY MUST BE BROUGHT WITHIN A PERIOD OF 24 MONTHS FROM DATE OF ORIGINAL PURCHASE. Limited Warranty CD or Multimedia Radios/Headunits Audiovox Electronics Corporation ("the Company") is committed to quality and customer service, and are not covered by improper installation, mishandling, misuse, ...
... and you may not apply to you. Proof of purchase is required in the form of products purchased through an authorized Audiovox retailer in material or workmanship within 12 months from the date of original purchase, such defect(s) will pay the return shipping...IMPLIED WARRANTY OF MERCHANTABILITY MUST BE BROUGHT WITHIN A PERIOD OF 24 MONTHS FROM DATE OF ORIGINAL PURCHASE. Limited Warranty CD or Multimedia Radios/Headunits Audiovox Electronics Corporation ("the Company") is committed to quality and customer service, and are not covered by improper installation, mishandling, misuse, ...

