
Owners Manual
Page 4
... Skip (Forward/Reverse 19 Zooming into an image 19 Angle selection 20 Audio selection 20 Subtitle selection 20 Special Functions 21-23 Display function (DVD 21 Locating a specific title 22 Locating a specific title/chapter/track 22 Locating a specific time 23 Angle setting 23 Audio setting 23 Subtitle ...setting 29 - 31 TV Shape 29 Video Output 30 Brightness 30 Edges 31 AUDIO setting 31 - 35 Digital Out 31 L/R speaker 32 Channels 32 Subwoofer 33 Surround Delay 33 Center Delay 34 Pink noise 34 RATING setting 35 Password/Parental Lock 36 Factory Set 36 Language Code List...
... Skip (Forward/Reverse 19 Zooming into an image 19 Angle selection 20 Audio selection 20 Subtitle selection 20 Special Functions 21-23 Display function (DVD 21 Locating a specific title 22 Locating a specific title/chapter/track 22 Locating a specific time 23 Angle setting 23 Audio setting 23 Subtitle ...setting 29 - 31 TV Shape 29 Video Output 30 Brightness 30 Edges 31 AUDIO setting 31 - 35 Digital Out 31 L/R speaker 32 Channels 32 Subwoofer 33 Surround Delay 33 Center Delay 34 Pink noise 34 RATING setting 35 Password/Parental Lock 36 Factory Set 36 Language Code List...

Owners Manual
Page 5
... have these numbers recorded on the DVD disc does not correspond to play that disc. The region number of this Unit, this Unit cannot play back some discs. Be sure to the Region Management Information that time. It does not support 7.1 channel MPEG Audio Version 2.0. • ...or Operation that is used for subtitles Screen aspect ratio 2 Multiple camera angles Region code indicator Notes: • This Unit supports 2-channel (L/R) audio and 5.1ch (Multi-channel) MPEG Audio 1/2 (only when the DIGITAL AUDIO OUT coaxial jack is Not Available When the symbol appears on the TV screen,...
... have these numbers recorded on the DVD disc does not correspond to play that disc. The region number of this Unit, this Unit cannot play back some discs. Be sure to the Region Management Information that time. It does not support 7.1 channel MPEG Audio Version 2.0. • ...or Operation that is used for subtitles Screen aspect ratio 2 Multiple camera angles Region code indicator Notes: • This Unit supports 2-channel (L/R) audio and 5.1ch (Multi-channel) MPEG Audio 1/2 (only when the DIGITAL AUDIO OUT coaxial jack is Not Available When the symbol appears on the TV screen,...
Owners Manual
Page 13
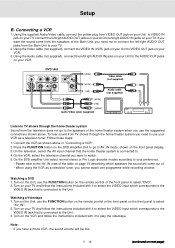
Follow these steps: 1. On the television, select the AV input channel that the home theater system is connected to play the videotape. Watching a DVD 1. Turn on the VCR and follow the instructions included with it to . 4. Connect the VCR as a television tuner, you ... Unit to select "AV_IN". 2. Setup B. Connecting a VCR 1. DVD Unit (yellow) (white) (red) Video cable (not supplied) Audio cable (not supplied) (white) (red) (yellow) Audio/Video cable (supplied) Listen to TV shows through the home theater system you need not to connect the left/right AUDIO OUT jacks from...
Follow these steps: 1. On the television, select the AV input channel that the home theater system is connected to play the videotape. Watching a DVD 1. Turn on the VCR and follow the instructions included with it to . 4. Connect the VCR as a television tuner, you ... Unit to select "AV_IN". 2. Setup B. Connecting a VCR 1. DVD Unit (yellow) (white) (red) Video cable (not supplied) Audio cable (not supplied) (white) (red) (yellow) Audio/Video cable (supplied) Listen to TV shows through the home theater system you need not to connect the left/right AUDIO OUT jacks from...

Owners Manual
Page 16
... that all functions are off before making connections. • When you have connected the Unit successfully, the DVD logo (start-up picture) will illuminate while the unit is firmly hooked. Note: • If no disc...PLAY button to turn on the Unit. 3)Turn on the TV by pressing its POWER button. 4)Select the channel on your TV screen. Please visit online help at standby mode. See TV User guide for more information. ...cord is connected to use the Unit for 30 minutes, the system will automatically enter standby mode. • The Standby LED will appear on next page) Need More Help?
... that all functions are off before making connections. • When you have connected the Unit successfully, the DVD logo (start-up picture) will illuminate while the unit is firmly hooked. Note: • If no disc...PLAY button to turn on the Unit. 3)Turn on the TV by pressing its POWER button. 4)Select the channel on your TV screen. Please visit online help at standby mode. See TV User guide for more information. ...cord is connected to use the Unit for 30 minutes, the system will automatically enter standby mode. • The Standby LED will appear on next page) Need More Help?

Owners Manual
Page 17
...Press the SOUND button repeatedly to display "CEN", then press the or CURSOR button to adjust the sound level. This Unit automatically recognizes DVDs that of Pro Logic II, to normal. It can be recorded in effect Use the remote control to make the following changes to ... CURSOR button to adjust the sound level. Dolby Digital Dolby Digital is that Music mode be used with 6 channels. Look for A/V systems. It is the standard required for autosound music systems (without adding any button within a few seconds, the display will show on the display of the Unit. ...
...Press the SOUND button repeatedly to display "CEN", then press the or CURSOR button to adjust the sound level. This Unit automatically recognizes DVDs that of Pro Logic II, to normal. It can be recorded in effect Use the remote control to make the following changes to ... CURSOR button to adjust the sound level. Dolby Digital Dolby Digital is that Music mode be used with 6 channels. Look for A/V systems. It is the standard required for autosound music systems (without adding any button within a few seconds, the display will show on the display of the Unit. ...
Owners Manual
Page 32
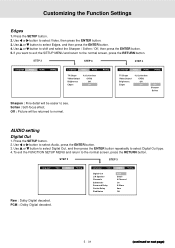
... Sharpen / Soften / Off, then press the ENTER button. 5. STEP 2 STEP 3 Language Video Audio Rating Language Video Digital Out L/R Speaker Channels Subwoofer Surround Delay Centre Delay Pink Noise Audio Rating Raw Small 6 Channel On 5/20ms 0ms Off Raw : Dolby Digital decoded. Customizing the Function Settings Edges 1. Use or button to select Digital Out...
... Sharpen / Soften / Off, then press the ENTER button. 5. STEP 2 STEP 3 Language Video Audio Rating Language Video Digital Out L/R Speaker Channels Subwoofer Surround Delay Centre Delay Pink Noise Audio Rating Raw Small 6 Channel On 5/20ms 0ms Off Raw : Dolby Digital decoded. Customizing the Function Settings Edges 1. Use or button to select Digital Out...
Owners Manual
Page 33
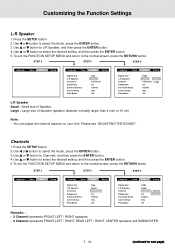
...1. Use or button to L/R Speaker, and then press the ENTER button. 4. To exit the FUNCTION SETUP MENU and return to Channels, and then press the ENTER button. 4. Channels 1. Use or button to the normal screen, press the RETURN button. Use or button to select the desired setting, and then ...0ms Off L/R Speaker Small : Small size of Speaker (speaker diameter normally larger than 4 inch or 10 cm) Note : • You can adjust the channel balance on next page) Large : Large size of Speaker. Press the SETUP button. 2. Please see "ADJUSTING THE SOUND". Use or button to select the ...
...1. Use or button to L/R Speaker, and then press the ENTER button. 4. To exit the FUNCTION SETUP MENU and return to Channels, and then press the ENTER button. 4. Channels 1. Use or button to the normal screen, press the RETURN button. Use or button to select the desired setting, and then ...0ms Off L/R Speaker Small : Small size of Speaker (speaker diameter normally larger than 4 inch or 10 cm) Note : • You can adjust the channel balance on next page) Large : Large size of Speaker. Press the SETUP button. 2. Please see "ADJUSTING THE SOUND". Use or button to select the ...
Owners Manual
Page 34
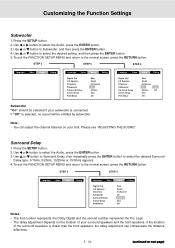
... "Off" is selected, no sound will be selected if your subwoofer is closer than the front speakers, the delay adjustment can adjust the channel balance on next page) E - 33 (continued on your surround speakers and the front speakers. Note : • You can compensate the... distance difference. STEP 2 STEP 3 Language Video Audio Rating Language Video Digital Out L/R Speaker Channels Subwoofer Surround Delay Centre Delay Pink Noise Audio Rating Raw Small 6 Channel On 5/20ms 0ms Off Notes: • The first number represents the Dolby Digital and the second ...
... "Off" is selected, no sound will be selected if your subwoofer is closer than the front speakers, the delay adjustment can adjust the channel balance on next page) E - 33 (continued on your surround speakers and the front speakers. Note : • You can compensate the... distance difference. STEP 2 STEP 3 Language Video Audio Rating Language Video Digital Out L/R Speaker Channels Subwoofer Surround Delay Centre Delay Pink Noise Audio Rating Raw Small 6 Channel On 5/20ms 0ms Off Notes: • The first number represents the Dolby Digital and the second ...

Owners Manual
Page 35
... for testing. STEP 2 STEP 3 Language Video Audio Rating Language Video Digital Out L/R Speaker Channels Subwoofer Surround Delay Centre Delay Pink Noise Audio Rating Raw Small 6 Channel On 5/20ms 0ms Off Note: • This delay adjustment depends on the location of your...STEP 4 Language Video Audio Rating Language Video Digital Out L/R Speaker Channels Subwoofer Surround Delay Centre Delay Pink Noise Audio Rating Raw Small 6 Channel On 5/20ms 0ms Off Language Video Digital Out L/R Speaker Channels Subwoofer Surround Delay Centre Delay Pink Noise Audio Rating Raw Off ...
... for testing. STEP 2 STEP 3 Language Video Audio Rating Language Video Digital Out L/R Speaker Channels Subwoofer Surround Delay Centre Delay Pink Noise Audio Rating Raw Small 6 Channel On 5/20ms 0ms Off Note: • This delay adjustment depends on the location of your...STEP 4 Language Video Audio Rating Language Video Digital Out L/R Speaker Channels Subwoofer Surround Delay Centre Delay Pink Noise Audio Rating Raw Small 6 Channel On 5/20ms 0ms Off Language Video Digital Out L/R Speaker Channels Subwoofer Surround Delay Centre Delay Pink Noise Audio Rating Raw Off ...