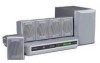
Owners Manual
Page 4
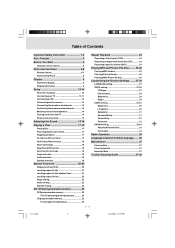
Table of Contents Important Safety Instruction 1-2 Disc Formats 4 Before You Start 5 Using the remote control 5 Parts and Functions 6-8 Remote Control 6-7 Front and Top Panel 8 Display 9 Front Panel Display 9 Display Information 9 Setup 10-14 For better reception 10 Connecting your TV 10-11 Connecting a VCR 12 ...
Table of Contents Important Safety Instruction 1-2 Disc Formats 4 Before You Start 5 Using the remote control 5 Parts and Functions 6-8 Remote Control 6-7 Front and Top Panel 8 Display 9 Front Panel Display 9 Display Information 9 Setup 10-14 For better reception 10 Connecting your TV 10-11 Connecting a VCR 12 ...
Owners Manual
Page 6
... When batteries become weak, the operating distance of the infrared REMOTE SENSOR may be used for remote operation is about 16 feet (5 meters). E-5-9.pmd E - 5 5 4/24/2004, 12:19 PM Notes: • If the Remote Control is greatly reduced and you will need to replace the batteries... or IECR03 [1.5V] size batteries. Before You Start Using the Remote Control • Point the Remote Control at the REMOTE SENSOR located on the Unit. • When there is a strong ambient light source, the performance of the Remote Control is not going to be degraded, causing unreliable operation. • ...
... When batteries become weak, the operating distance of the infrared REMOTE SENSOR may be used for remote operation is about 16 feet (5 meters). E-5-9.pmd E - 5 5 4/24/2004, 12:19 PM Notes: • If the Remote Control is greatly reduced and you will need to replace the batteries... or IECR03 [1.5V] size batteries. Before You Start Using the Remote Control • Point the Remote Control at the REMOTE SENSOR located on the Unit. • When there is a strong ambient light source, the performance of the Remote Control is not going to be degraded, causing unreliable operation. • ...
Owners Manual
Page 7
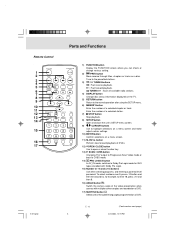
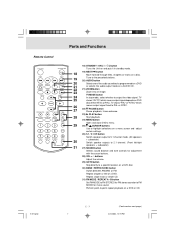
... button Return to the presetted stations. 3) / TUNING buttons : Fast reverse playback. : Fast forward playback. Enter the number of a selected chapter or track. Parts and Functions Remote Control 1 2 3 4 5 6 7 8 9 10 11 12 13 14 15 FUNCTION STANDBY/ON PREV TUNING NEXT RETURN DISPLAY AUDIO ZOOM/TV MODE MEMORY STOP PAUSE PLAY SETUP MENU ENTER...
... button Return to the presetted stations. 3) / TUNING buttons : Fast reverse playback. : Fast forward playback. Enter the number of a selected chapter or track. Parts and Functions Remote Control 1 2 3 4 5 6 7 8 9 10 11 12 13 14 15 FUNCTION STANDBY/ON PREV TUNING NEXT RETURN DISPLAY AUDIO ZOOM/TV MODE MEMORY STOP PAUSE PLAY SETUP MENU ENTER...
Owners Manual
Page 8
... point-to a specific location on a DVD disc. 30) BAND / REPEAT-DISC button Switch between AM(MW) or FM. Parts and Functions Remote Control FUNCTION STANDBY/ON PREV TUNING NEXT RETURN DISPLAY AUDIO ZOOM/TV MODE MEMORY STOP PAUSE PLAY SETUP MENU ENTER OPEN/CLOSE SLOW 5.1/2.1CH VOL P.SCAN...All speakers + subwoofer) 30 Switch speaker outputs to 2.1 channel. (Front left/right speakers + subwoofer) 31 27) SOUND button Selects sound balance and tone controls for FM stereo sound or to output the video signal. E-5-9.pmd E - 7 7 (Continued on DVD disc (either NTSC or PAL).
... point-to a specific location on a DVD disc. 30) BAND / REPEAT-DISC button Switch between AM(MW) or FM. Parts and Functions Remote Control FUNCTION STANDBY/ON PREV TUNING NEXT RETURN DISPLAY AUDIO ZOOM/TV MODE MEMORY STOP PAUSE PLAY SETUP MENU ENTER OPEN/CLOSE SLOW 5.1/2.1CH VOL P.SCAN...All speakers + subwoofer) 30 Switch speaker outputs to 2.1 channel. (Front left/right speakers + subwoofer) 31 27) SOUND button Selects sound balance and tone controls for FM stereo sound or to output the video signal. E-5-9.pmd E - 7 7 (Continued on DVD disc (either NTSC or PAL).

Owners Manual
Page 9
.... 5) PLAY button Press to start or resume playback 6) STOP button Stop playing a disc. 7) FUNCTION button Select the source. 8) VOLUME controls Change the loudness of the sound from the speakers connected to the Unit. 9) STANDBY/ON button Turn the power on or off and go...8 4/24/2004, 12:19 PM The light will turn off . 10) Remote sensor Receive the remote control unit signals. If you press theI / STANDBY/ ON button on the remote control, the Unit will continue to illuminate. 3) Display window Display system information. 4) OPEN/CLOSE button Use to open and close tray by pressing the ...
.... 5) PLAY button Press to start or resume playback 6) STOP button Stop playing a disc. 7) FUNCTION button Select the source. 8) VOLUME controls Change the loudness of the sound from the speakers connected to the Unit. 9) STANDBY/ON button Turn the power on or off and go...8 4/24/2004, 12:19 PM The light will turn off . 10) Remote sensor Receive the remote control unit signals. If you press theI / STANDBY/ ON button on the remote control, the Unit will continue to illuminate. 3) Display window Display system information. 4) OPEN/CLOSE button Use to open and close tray by pressing the ...

Owners Manual
Page 12
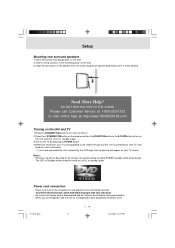
... IN jack on your TV and the Red plug PR/CR VIDEO OUT jack on your Unit to PR/CR VIDEO IN jack on the remote control when DVD is no video signal output from the wall outlet before making any connection. • Refer to these TVs, you must purchase an RF...
... IN jack on your TV and the Red plug PR/CR VIDEO OUT jack on your Unit to PR/CR VIDEO IN jack on the remote control when DVD is no video signal output from the wall outlet before making any connection. • Refer to these TVs, you must purchase an RF...

Owners Manual
Page 13
Turn on the Unit, use the FM ANT. 300Ω FUNCTION button on the remote control or the front panel to the DIGITAL AUDIO IN jack on your another equipment. Digital connection Using the Coaxial Digital Audio cable (not supplied), connect ... instructions included with digital audio input jack DIGITAL CONNECTION Notes: • When you connect the Unit to other equipment, be copied. To avoid this audio system is working. • If you have a mono VCR, the volume level from the Main Unit to VIDEO OUT jack on your TV using the supplied...
Turn on the Unit, use the FM ANT. 300Ω FUNCTION button on the remote control or the front panel to the DIGITAL AUDIO IN jack on your another equipment. Digital connection Using the Coaxial Digital Audio cable (not supplied), connect ... instructions included with digital audio input jack DIGITAL CONNECTION Notes: • When you connect the Unit to other equipment, be copied. To avoid this audio system is working. • If you have a mono VCR, the volume level from the Main Unit to VIDEO OUT jack on your TV using the supplied...
Owners Manual
Page 15
.../2004, 12:24 PM See TV User guide for more information. • If you are not going to use the Unit for 60 minutes, the system will be turned to POWER standby mode automatically. • The LED of Standby will be turned on while the unit is connected to the VIDEO....com Turning on the Unit and TV 1)Press the STANDBY/ON button to turn the Unit ON, or 2)Press theI / STANDBY/ON button on the remote control or the FUNCTION button or the PLAY button to turn on the Unit while the Unit is in standby mode. 3)Turn on the TV by...
.../2004, 12:24 PM See TV User guide for more information. • If you are not going to use the Unit for 60 minutes, the system will be turned to POWER standby mode automatically. • The LED of Standby will be turned on while the unit is connected to the VIDEO....com Turning on the Unit and TV 1)Press the STANDBY/ON button to turn the Unit ON, or 2)Press theI / STANDBY/ON button on the remote control or the FUNCTION button or the PLAY button to turn on the Unit while the Unit is in standby mode. 3)Turn on the TV by...
Owners Manual
Page 16
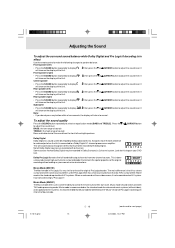
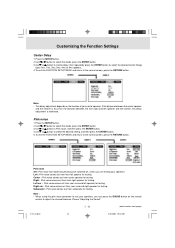
...to display , then press the or CURSOR button to adjust the sound level. Dolby Digital Dolby Digital is in Dolby Surround, a 2 channel system. Not all A/V systems. When an autosound unit has a video screen, it from the Movie mode. Subwoofer , then press the or CURSOR button to select an ...been recorded with 6 channels. This is done using an advanced, high-purity matrix surround decoder that Music mode be recorded in effect Use the remote control to make the following changes to next page) 4/24/2004, 12:27 PM Front speaker (right) , then press the or CURSOR button to...
...to display , then press the or CURSOR button to adjust the sound level. Dolby Digital Dolby Digital is in Dolby Surround, a 2 channel system. Not all A/V systems. When an autosound unit has a video screen, it from the Movie mode. Subwoofer , then press the or CURSOR button to select an ...been recorded with 6 channels. This is done using an advanced, high-purity matrix surround decoder that Music mode be recorded in effect Use the remote control to make the following changes to next page) 4/24/2004, 12:27 PM Front speaker (right) , then press the or CURSOR button to...

Owners Manual
Page 17
...status shown on below table. 2.At AV IN function mode, you also can press the PRO LOGIC II button repeatedly on the remote control to select PRO LOGIC II (indicator on Pro Logic II. Please select 5.1/2.1 CH output before . FUNCTION DISCS 5.1 / 2.1 ...reception may be simply to force the audio to mono. The following table shows which speakers are working in auto systems, where the fluctuations from Front Left and Front Right speakers plus the Subwoofer. • 5.1/2.1 CH button is ...Laboratories. 'Dolby' , 'Pro Logic' and the double-D symbol are trademarks of Digital Theater Systems, Inc.
...status shown on below table. 2.At AV IN function mode, you also can press the PRO LOGIC II button repeatedly on the remote control to select PRO LOGIC II (indicator on Pro Logic II. Please select 5.1/2.1 CH output before . FUNCTION DISCS 5.1 / 2.1 ...reception may be simply to force the audio to mono. The following table shows which speakers are working in auto systems, where the fluctuations from Front Left and Front Right speakers plus the Subwoofer. • 5.1/2.1 CH button is ...Laboratories. 'Dolby' , 'Pro Logic' and the double-D symbol are trademarks of Digital Theater Systems, Inc.
Owners Manual
Page 18
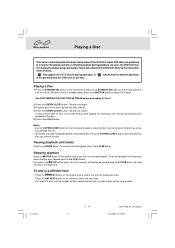
... PM Playing a Disc 1.Press the STANDBY/ON button on the front panel or press the STANDBY/ON button on the remote control to the beginning. To skip to a different track • Press the PREV button on the remote to skip to the next track. • For audio CD disc, use the number buttons... (remote control only) to jump straight to step 2. 2.Press the OPEN/CLOSE button. The disc tray opens. 3.Place the disc on the ...
... PM Playing a Disc 1.Press the STANDBY/ON button on the front panel or press the STANDBY/ON button on the remote control to the beginning. To skip to a different track • Press the PREV button on the remote to skip to the next track. • For audio CD disc, use the number buttons... (remote control only) to jump straight to step 2. 2.Press the OPEN/CLOSE button. The disc tray opens. 3.Place the disc on the ...
Owners Manual
Page 26
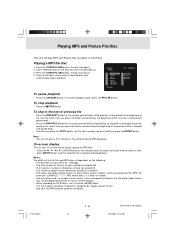
...ability of this Unit to , then press ENTER button and this selected file is located and played back. • Press the PREV button on the remote control briefly while playing, to skip back to load the disc and automatically begin playback. EXAMPLE: ********.MP3 where each * is located and played back. •...using 12 or fewer letters and/or numbers, and must be within 64 - 256 kbps. • The total number of files on the remote control to select the file you press the button consecutively, the beginning of the next file is located and played back. Playing MP3 and Picture File...
...ability of this Unit to , then press ENTER button and this selected file is located and played back. • Press the PREV button on the remote control briefly while playing, to skip back to load the disc and automatically begin playback. EXAMPLE: ********.MP3 where each * is located and played back. •...using 12 or fewer letters and/or numbers, and must be within 64 - 256 kbps. • The total number of files on the remote control to select the file you press the button consecutively, the beginning of the next file is located and played back. Playing MP3 and Picture File...
Owners Manual
Page 27
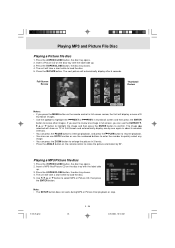
...The next picture will take a short while to confirm. If you want to review one again in 3 levels. • Press the ANGLE button on the remote control to review other images. Use , , or button to load the disc. 5. Note: • The SETUP button does not work during MP3 or Picture Disc... the disc. 5. Playing a MP3/Picture file disc 1. Press the OPEN/CLOSE button, the disc tray closes. 4. Insert a MP3 files/Picture CD on the remote control in full-screen review, the Unit will display a menu of 9 thumbnail images. • Use the cursor to highlight the NEXT or PREV in thumbnail screen...
...The next picture will take a short while to confirm. If you want to review one again in 3 levels. • Press the ANGLE button on the remote control to review other images. Use , , or button to load the disc. 5. Note: • The SETUP button does not work during MP3 or Picture Disc... the disc. 5. Playing a MP3/Picture file disc 1. Press the OPEN/CLOSE button, the disc tray closes. 4. Insert a MP3 files/Picture CD on the remote control in full-screen review, the Unit will display a menu of 9 thumbnail images. • Use the cursor to highlight the NEXT or PREV in thumbnail screen...
Owners Manual
Page 33
Pink noise Off : Pink noise test mode should always be switched off, unless you can press the SOUND button on the remote control to test your speakers, you are testing your center speaker. Right : Pink noise comes out from rear surround left speaker for testing. Left sur : Pink ...
Pink noise Off : Pink noise test mode should always be switched off, unless you can press the SOUND button on the remote control to test your speakers, you are testing your center speaker. Right : Pink noise comes out from rear surround left speaker for testing. Left sur : Pink ...
Owners Manual
Page 34
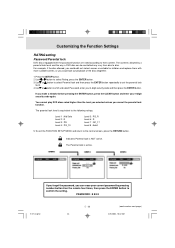
If you forget the password, you can be controlled may vary from disc to the normal screen, press the RETURN button. For example, if the disc allowed, you could lock out playback of the ... DVD discs rated higher than the level you selected unless you cancel the parental lock function. PASSWORD : 8 8 8 8 E-27-34.pmd E - 33 33 (continued on the remote four times, then press the ENTER button to shift and select Password, enter your 4-digit security code again. The Parental lock is NOT active. Customizing...
If you forget the password, you can be controlled may vary from disc to the normal screen, press the RETURN button. For example, if the disc allowed, you could lock out playback of the ... DVD discs rated higher than the level you selected unless you cancel the parental lock function. PASSWORD : 8 8 8 8 E-27-34.pmd E - 33 33 (continued on the remote four times, then press the ENTER button to shift and select Password, enter your 4-digit security code again. The Parental lock is NOT active. Customizing...
